2021 TOYOTA PROACE CITY VERSO lock
[x] Cancel search: lockPage 168 of 272
168
NOTIC E
When washing the vehicle at an automatic roller-brush car wash, be sure to lock the doors and, depending on version, remove the electronic key.When using a pressure washer, hold the lance at least 30 cm (0 ft 11") from the vehicle (particularly when cleaning areas containing chipped paint, sensors or seals).Promptly clean up any stains containing chemicals liable to damage the vehicle's paint (including tree resin, bird droppings, insect secretions, pollen and tar).If justified by the environment, clean the vehicle more frequently to remove salty deposits (in coastal areas), soot (in industrial estates) and mud (in wet or cold areas). These substances can be highly corrosive.Contact a TOYOTA dealer or a qualified workshop if you require advice on removing stubborn stains requiring special products (such as tar or insect removers).
Preferably, have paint touch-ups performed by a TOYOTA dealer or a qualified workshop.
Interior
WARNI NG
When washing the vehicle, never use a water hose or high-pressure washer to clean the interior.Liquids carried in cups or other open containers can spill, presenting a risk of damage if they come into contact with the
controls in the dashboard and centre console. Take care!
Bodywork
High-gloss paint
WARNI NG
Do not use abrasive products or solvents, petrol or oil to clean the bodywork.Never use an abrasive sponge to clean stubborn stains. Risk of scratching the paintwork!Do not apply polish in strong sunshine, or to plastic or rubber parts.
NOTIC E
Use a soft sponge and soapy water or a pH neutral product.Gently wipe the bodywork with a clean microfibre cloth.Apply polish with the vehicle clean and dry.Comply with the instructions for use stated on the product.
Decals
(Depending on version)
WARNI NG
Do not use a high pressure washer to clean the vehicle. Risk of damaging or detaching the decals!
NOTIC E
Use a high-flow hose at a temperature between 25°C and 40°C.Sweep the jet of water across the surface to be cleaned, perpendicular to it.Rinse the vehicle with demineralised water.
Page 174 of 272
174
Removing a wheel
WARNI NG
Parking the vehicleImmobilise the vehicle where it does not obstruct traffic: the ground must be level, stable and non-slippery.With a manual gearbox, engage first gear to lock the wheels, apply the parking brake, unless it is programmed to be in automatic mode, and switch off the ignition.With an automatic gearbox, select mode P to lock the wheels, apply the parking brake, unless it is programmed to be in automatic mode, and switch off the ignition.Check for the fixed illumination of the parking brake warning lamps in the instrument panel.The occupants must get out of the vehicle and wait where they are safe.If necessary, place a chock under the wheel diagonally opposite the wheel to be changed.Never go underneath a vehicle raised using a
jack; use an axle stand.
NOTIC E
Wheel with wheel trimWhen removing the wheel, first remove the wheel trim by pulling at the valve aperture using the wheelbrace.When refitting the wheel, refit the wheel trim, starting by placing its aperture in line with the valve and then pushing it into place all round its edge with the palm of your hand.
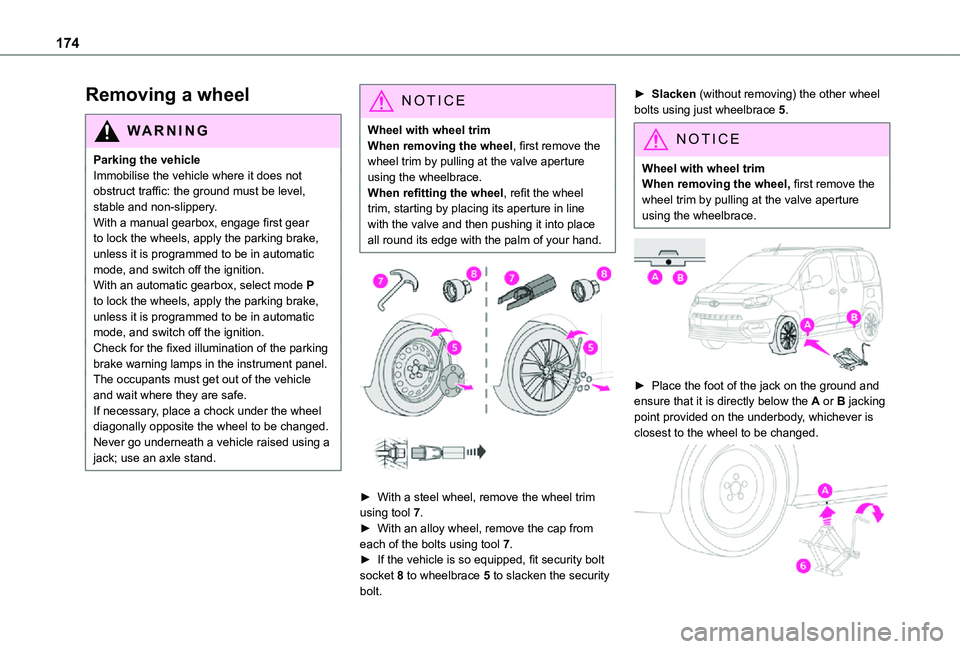
► With a steel wheel, remove the wheel trim using tool 7.► With an alloy wheel, remove the cap from each of the bolts using tool 7.
► If the vehicle is so equipped, fit security bolt socket 8 to wheelbrace 5 to slacken the security bolt.
► Slacken (without removing) the other wheel bolts using just wheelbrace 5.
NOTIC E
Wheel with wheel trimWhen removing the wheel, first remove the wheel trim by pulling at the valve aperture using the wheelbrace.
► Place the foot of the jack on the ground and ensure that it is directly below the A or B jacking point provided on the underbody, whichever is closest to the wheel to be changed.
Page 177 of 272
177
In the event of a breakdown
8
WARNI NG
Changing a bulb must only be done with the ignition off and after the lamp has been switched off for several minutes - risk of serious burns!Do not touch the bulb directly with your fingers, use a lint-free cloth.It is essential only to use anti-ultraviolet (UV) type bulbs, so as not to damage the headlamp.Always replace a failed bulb with a new bulb of the same type and specification.
WARNI NG
Opening the bonnet / Accessing the bulbsWith the engine warm, proceed with caution - risk of burns!Take care with objects or clothing that could be caught in the blades of the cooling fan - risk of strangulation!
NOTIC E
Halogen bulbs (Hx)To ensure good quality lighting, check that the bulb is correctly positioned in its housing.
WARNI NG
After changing a bulbTo refit, carry out the fitting operations in reverse order.Close the protective cover very carefully to guarantee the sealing of the lamps.
Light-emitting diode (LED)
headlamps and lamps
Depending on version, the affected types of headlamps / lamps are:– Daytime running lamps / sidelamps.
WARNI NG
For the replacement of this type of bulb, you must contact a TOYOTA dealer or a qualified workshop.
Types of bulb
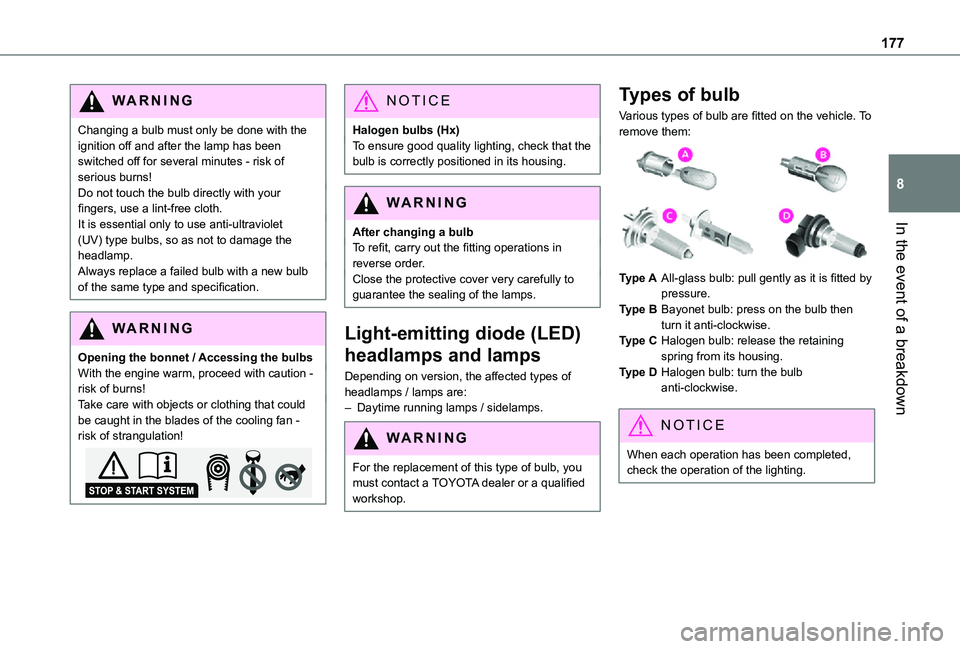
Various types of bulb are fitted on the vehicle. To remove them:
Type AAll-glass bulb: pull gently as it is fitted by pressure.
Type BBayonet bulb: press on the bulb then turn it anti-clockwise.
Type CHalogen bulb: release the retaining spring from its housing.
Type DHalogen bulb: turn the bulb anti-clockwise.
NOTIC E
When each operation has been completed, check the operation of the lighting.
Page 179 of 272
179
In the event of a breakdown
8
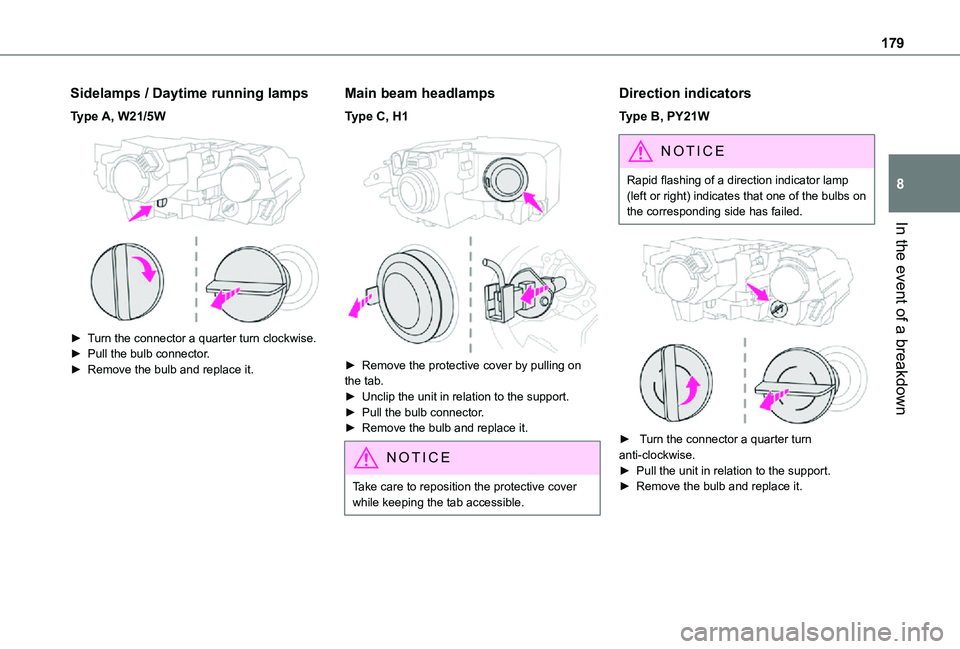
Sidelamps / Daytime running lamps
Type A, W21/5W
► Turn the connector a quarter turn clockwise.► Pull the bulb connector.► Remove the bulb and replace it.
Main beam headlamps
Type C, H1
► Remove the protective cover by pulling on the tab.► Unclip the unit in relation to the support.► Pull the bulb connector.► Remove the bulb and replace it.
NOTIC E
Take care to reposition the protective cover while keeping the tab accessible.
Direction indicators
Type B, PY21W
NOTIC E
Rapid flashing of a direction indicator lamp (left or right) indicates that one of the bulbs on the corresponding side has failed.
► Turn the connector a quarter turn anti-clockwise.► Pull the unit in relation to the support.
► Remove the bulb and replace it.
Page 180 of 272
180
Front foglamps
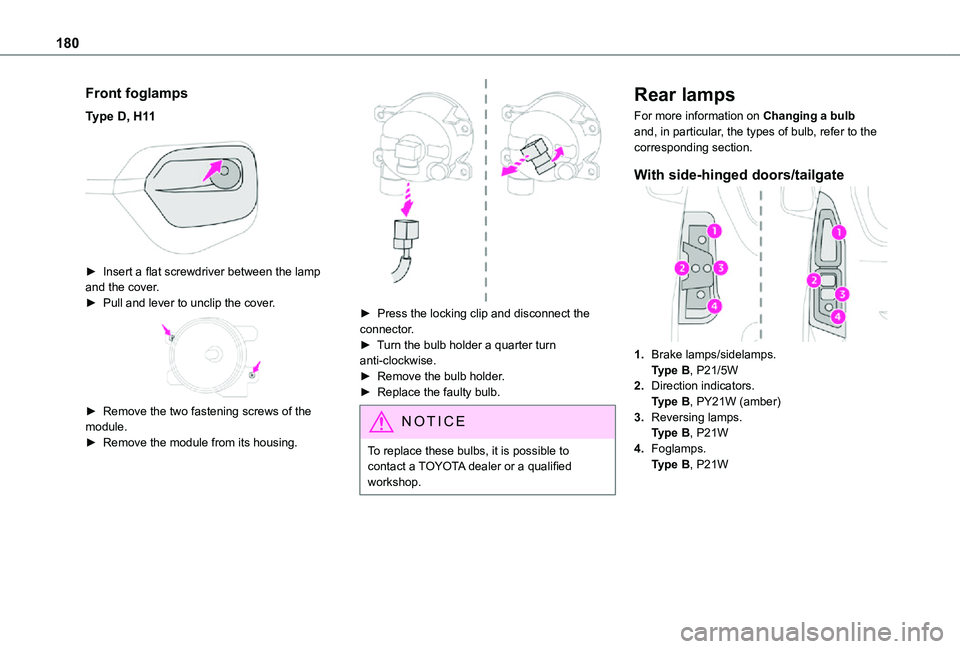
Type D, H11
► Insert a flat screwdriver between the lamp and the cover.► Pull and lever to unclip the cover.
► Remove the two fastening screws of the module.► Remove the module from its housing.
► Press the locking clip and disconnect the connector.► Turn the bulb holder a quarter turn anti-clockwise.► Remove the bulb holder.► Replace the faulty bulb.
NOTIC E
To replace these bulbs, it is possible to contact a TOYOTA dealer or a qualified workshop.
Rear lamps
For more information on Changing a bulb and, in particular, the types of bulb, refer to the corresponding section.
With side-hinged doors/tailgate
1.Brake lamps/sidelamps.Type B, P21/5W
2.Direction indicators.Type B, PY21W (amber)
3.Reversing lamps.Type B, P21W
4.Foglamps.Type B, P21W
Page 181 of 272
181
In the event of a breakdown
8
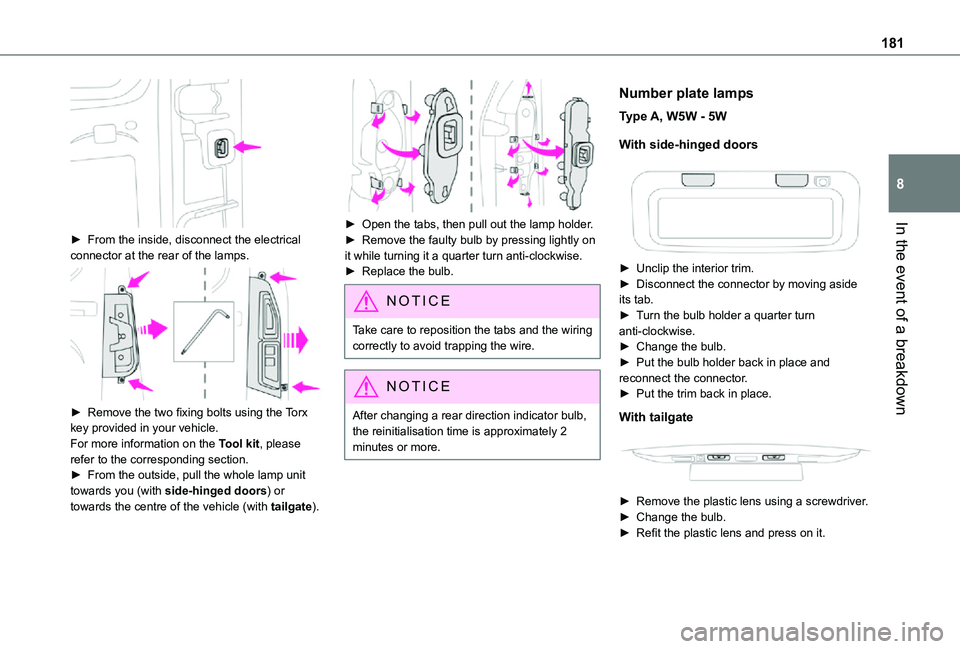
► From the inside, disconnect the electrical connector at the rear of the lamps.
► Remove the two fixing bolts using the Torx key provided in your vehicle.For more information on the Tool kit, please refer to the corresponding section.► From the outside, pull the whole lamp unit towards you (with side-hinged doors) or towards the centre of the vehicle (with tailgate).
► Open the tabs, then pull out the lamp holder.► Remove the faulty bulb by pressing lightly on it while turning it a quarter turn anti-clockwise.► Replace the bulb.
NOTIC E
Take care to reposition the tabs and the wiring correctly to avoid trapping the wire.
NOTIC E
After changing a rear direction indicator bulb, the reinitialisation time is approximately 2
minutes or more.
Number plate lamps
Type A, W5W - 5W
With side-hinged doors
► Unclip the interior trim.► Disconnect the connector by moving aside its tab.► Turn the bulb holder a quarter turn anti-clockwise.► Change the bulb.► Put the bulb holder back in place and reconnect the connector.► Put the trim back in place.
With tailgate
► Remove the plastic lens using a screwdriver.► Change the bulb.► Refit the plastic lens and press on it.
Page 183 of 272

183
In the event of a breakdown
8
GoodFailed
Tweezers
NOTIC E
Installing electrical accessoriesYour vehicle's electrical system is designed to operate with standard or optional equipment.Before installing other electrical equipment or accessories on your vehicle, contact a TOYOTA dealer or a qualified workshop.
WARNI NG
TOYOTA will not accept responsibility for the cost incurred in repairing your vehicle or for rectifying malfunctions resulting from the installation of accessories not supplied and not recommended by TOYOTA and not installed in accordance with its instructions, in
particular when the combined consumption of all of the additional equipment connected exceeds 10 milliamperes.
NOTIC E
For more information on installing a towbar or TAXI type equipment, contact a TOYOTA dealer.
Dashboard fuses
The fusebox is placed in the lower dashboard (left-hand side).
Access to the fuses
► Unclip the cover by pulling at the top left, then right.The fuses described below vary according to the equipment in your vehicle.
Fuse No.Rating (A)Functions
F110Wireless smartphone charger, interior electrochrome rear view mirror.
F415Horn.
F620Screenwash pump.
F71012 V socket (rear).
F1030Electric locks module.
F1310Telematics and radio controls.
F145Alarm, advanced telematic unit.
F193Trailer interface unit.
F235Generic trailer interface unit.
F275Additional heating.
F2920Audio system, touch screen.
Page 187 of 272
187
In the event of a breakdown
8
Disconnecting the battery
In order to maintain an adequate state of charge for starting the engine, we recommend disconnecting the battery if the vehicle is to be unused for an extended period.Before disconnecting the battery:► close all doors, windows and the tailgate and sunroof,► switch off all electricity consuming devices (audio system, wipers, headlamps, etc.),► switch off the ignition and wait for four minutes.At the battery, it is only necessary to disconnect the (+) terminal.
Quick-release terminal clamp
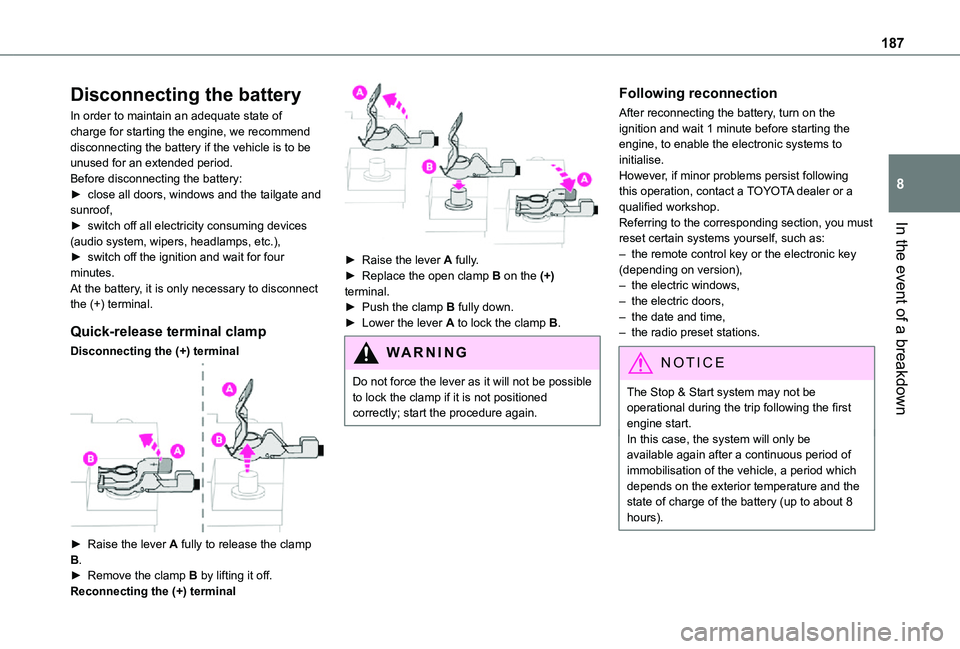
Disconnecting the (+) terminal
► Raise the lever A fully to release the clamp B.► Remove the clamp B by lifting it off.Reconnecting the (+) terminal
► Raise the lever A fully.► Replace the open clamp B on the (+) terminal.► Push the clamp B fully down.► Lower the lever A to lock the clamp B.
WARNI NG
Do not force the lever as it will not be possible to lock the clamp if it is not positioned correctly; start the procedure again.
Following reconnection
After reconnecting the battery, turn on the ignition and wait 1 minute before starting the engine, to enable the electronic systems to initialise.However, if minor problems persist following this operation, contact a TOYOTA dealer or a qualified workshop.Referring to the corresponding section, you must reset certain systems yourself, such as:– the remote control key or the electronic key (depending on version),– the electric windows,– the electric doors,– the date and time,– the radio preset stations.
NOTIC E
The Stop & Start system may not be operational during the trip following the first engine start.In this case, the system will only be
available again after a continuous period of immobilisation of the vehicle, a period which depends on the exterior temperature and the state of charge of the battery (up to about 8 hours).