2021 TOYOTA PROACE CITY VERSO lock
[x] Cancel search: lockPage 121 of 272
121
Driving
6
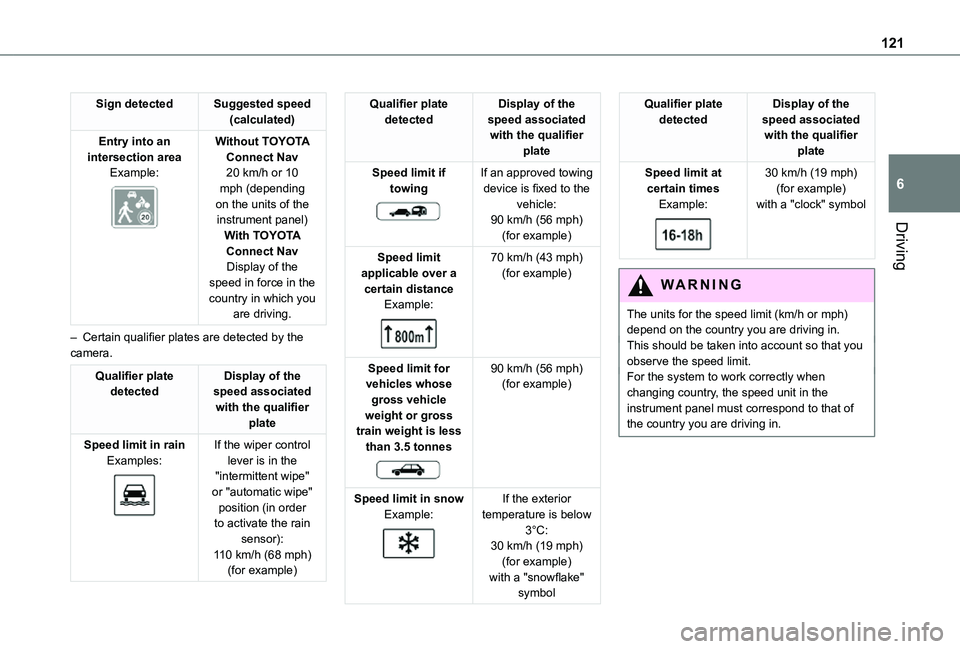
Sign detectedSuggested speed (calculated)
Entry into an intersection areaExample:
Without TOYOTA Connect Nav20 km/h or 10 mph (depending on the units of the instrument panel)With TOYOTA
Connect NavDisplay of the speed in force in the country in which you are driving.
– Certain qualifier plates are detected by the camera.
Qualifier plate detectedDisplay of the speed associated with the qualifier plate
Speed limit in rainExamples:
If the wiper control lever is in the "intermittent wipe" or "automatic wipe" position (in order to activate the rain sensor):
110 km/h (68 mph) (for example)
Qualifier plate detectedDisplay of the speed associated with the qualifier plate
Speed limit if towing
If an approved towing device is fixed to the vehicle:90 km/h (56 mph) (for example)
Speed limit applicable over a certain distanceExample:
70 km/h (43 mph) (for example)
Speed limit for vehicles whose gross vehicle weight or gross train weight is less than 3.5 tonnes
90 km/h (56 mph) (for example)
Speed limit in snowExample:
If the exterior temperature is below 3°C:
30 km/h (19 mph) (for example)with a "snowflake" symbol
Qualifier plate detectedDisplay of the speed associated with the qualifier plate
Speed limit at certain timesExample:
30 km/h (19 mph) (for example)with a "clock" symbol
WARNI NG
The units for the speed limit (km/h or mph) depend on the country you are driving in.This should be taken into account so that you observe the speed limit.For the system to work correctly when changing country, the speed unit in the instrument panel must correspond to that of the country you are driving in.
Page 152 of 272
152
Refuelling
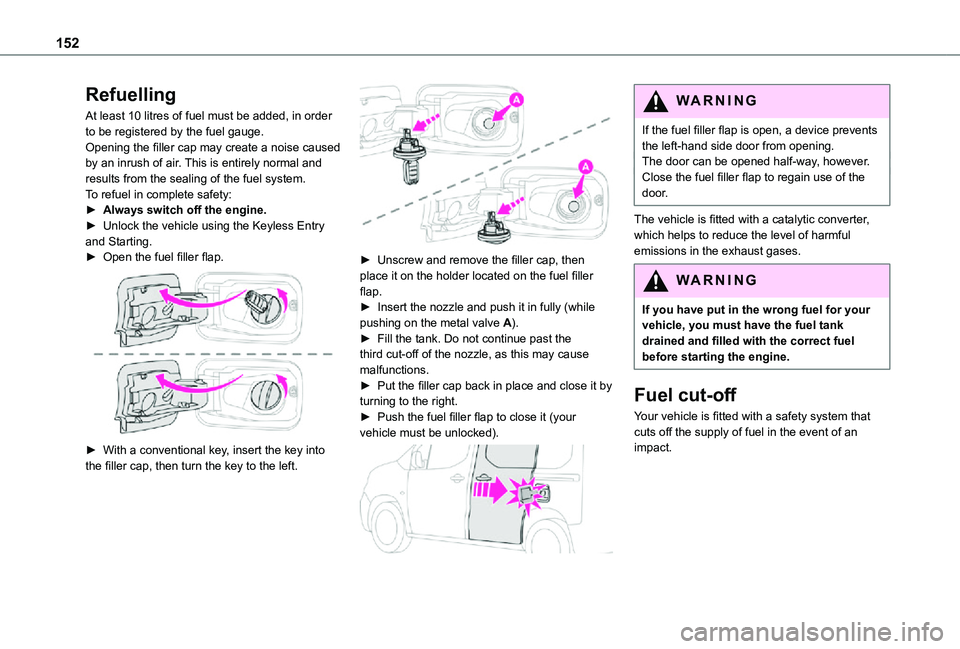
At least 10 litres of fuel must be added, in order to be registered by the fuel gauge.Opening the filler cap may create a noise caused by an inrush of air. This is entirely normal and results from the sealing of the fuel system.To refuel in complete safety:► Always switch off the engine.► Unlock the vehicle using the Keyless Entry and Starting.► Open the fuel filler flap.
► With a conventional key, insert the key into the filler cap, then turn the key to the left.
► Unscrew and remove the filler cap, then place it on the holder located on the fuel filler flap.► Insert the nozzle and push it in fully (while pushing on the metal valve A).► Fill the tank. Do not continue past the third cut-off of the nozzle, as this may cause malfunctions.► Put the filler cap back in place and close it by turning to the right.► Push the fuel filler flap to close it (your vehicle must be unlocked).
WARNI NG
If the fuel filler flap is open, a device prevents the left-hand side door from opening.The door can be opened half-way, however.Close the fuel filler flap to regain use of the door.
The vehicle is fitted with a catalytic converter, which helps to reduce the level of harmful emissions in the exhaust gases.
WARNI NG
If you have put in the wrong fuel for your vehicle, you must have the fuel tank drained and filled with the correct fuel before starting the engine.
Fuel cut-off
Your vehicle is fitted with a safety system that cuts off the supply of fuel in the event of an impact.
Page 156 of 272
156
Towing device with quickly
detachable towball
No tools are required to install or remove this genuine towing device.
NOTIC E
Trailers with LED lamps are not compatible with the wiring harness of this device.
Fitting
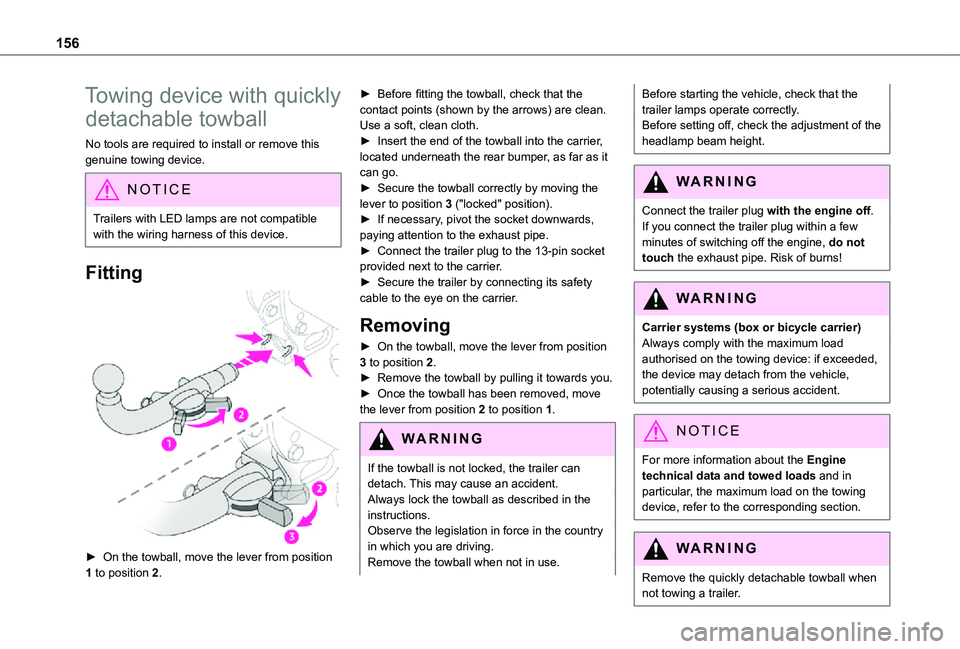
► On the towball, move the lever from position 1 to position 2.
► Before fitting the towball, check that the contact points (shown by the arrows) are clean. Use a soft, clean cloth.► Insert the end of the towball into the carrier, located underneath the rear bumper, as far as it can go.► Secure the towball correctly by moving the lever to position 3 ("locked" position).► If necessary, pivot the socket downwards, paying attention to the exhaust pipe.► Connect the trailer plug to the 13-pin socket provided next to the carrier.► Secure the trailer by connecting its safety cable to the eye on the carrier.
Removing
► On the towball, move the lever from position 3 to position 2.► Remove the towball by pulling it towards you.► Once the towball has been removed, move the lever from position 2 to position 1.
WARNI NG
If the towball is not locked, the trailer can detach. This may cause an accident.Always lock the towball as described in the instructions.Observe the legislation in force in the country in which you are driving.Remove the towball when not in use.
Before starting the vehicle, check that the trailer lamps operate correctly.Before setting off, check the adjustment of the headlamp beam height.
WARNI NG
Connect the trailer plug with the engine off.If you connect the trailer plug within a few minutes of switching off the engine, do not
touch the exhaust pipe. Risk of burns!
WARNI NG
Carrier systems (box or bicycle carrier)Always comply with the maximum load authorised on the towing device: if exceeded, the device may detach from the vehicle, potentially causing a serious accident.
NOTIC E
For more information about the Engine technical data and towed loads and in particular, the maximum load on the towing device, refer to the corresponding section.
WARNI NG
Remove the quickly detachable towball when not towing a trailer.
Page 158 of 272

158
If the height exceeds 40 cm (1 ft 3"), adapt the speed of the vehicle to the profile of the road to avoid damaging the roof bars or the roof rack and the fixings on the vehicle.Refer to national legislation in order to comply with the regulations for transporting objects that are longer than the vehicle.
WARNI NG
In the event of loading a 7-seat model (not exceeding 40 cm (1 ft 3") in height) on the roof, do not exceed the following loads:– Three transverse bars bolted to the roof: 100 kg (220 lb).– An aluminium rack: 70 kg (154 lb).– A steel rack: 65 kg (143 lb).
W ARNI NG
As a safety measure and to avoid damaging the roof, it is essential to use the roof bars and racks approved for your vehicle.Observe the instructions on fitting and use contained in the guide supplied with the roof bars and racks.
To fit the transverse roof bars or a roof rack, use the fixing points provided for this purpose:► Remove the fixing covers installed on the vehicle.► Put each fixing in place and lock them on the roof one by one.► Ensure that the roof bars or the roof rack are correctly fitted (by shaking them).The bars are adaptable for each fixing point.
Bonnet
WARNI NG
Stop & StartBefore doing anything under the bonnet, you must switch off the ignition to avoid any risk of injury resulting from an automatic change to START mode.
NOTIC E
The location of the interior bonnet release lever prevents opening the bonnet when the left-hand front door is closed.
WARNI NG
When the engine is hot, handle the exterior safety catch and the bonnet stay with care (risk of burns), using the protected area.When the bonnet is open, take care not to damage the safety catch.Do not open the bonnet under very windy conditions.
Page 159 of 272
159
Practical information
7
WARNI NG
Cooling of the engine when stoppedThe engine cooling fan may start after the engine has been switched off.Take care with objects or clothing that could be caught in the blades of the fan!
Opening
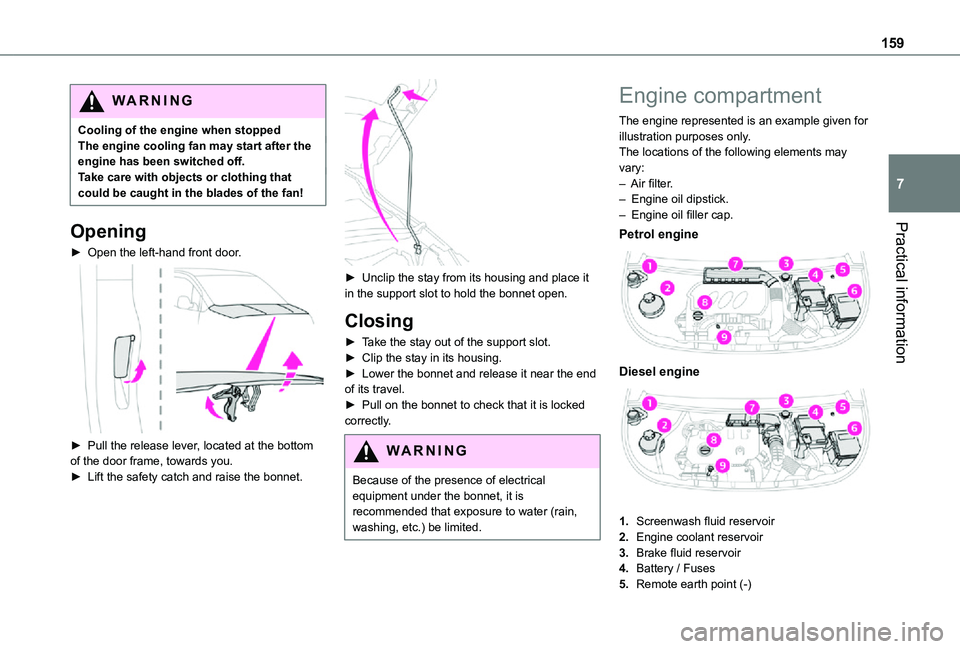
► Open the left-hand front door.
► Pull the release lever, located at the bottom of the door frame, towards you.► Lift the safety catch and raise the bonnet.
► Unclip the stay from its housing and place it in the support slot to hold the bonnet open.
Closing
► Take the stay out of the support slot.► Clip the stay in its housing.► Lower the bonnet and release it near the end of its travel.► Pull on the bonnet to check that it is locked correctly.
WARNI NG
Because of the presence of electrical equipment under the bonnet, it is recommended that exposure to water (rain, washing, etc.) be limited.
Engine compartment
The engine represented is an example given for illustration purposes only.The locations of the following elements may vary:– Air filter.– Engine oil dipstick.– Engine oil filler cap.
Petrol engine
Diesel engine
1.Screenwash fluid reservoir
2.Engine coolant reservoir
3.Brake fluid reservoir
4.Battery / Fuses
5.Remote earth point (-)
Page 164 of 272
164
Manual parking brake
If you notice excessive brake lever travel or decreased effectiveness, the parking brake must be adjusted, even between two services.This system must be checked by a TOYOTA dealer or a qualified workshop.
Electric parking brake
This system does not require any routine servicing. However, in the event of a problem, do not hesitate to have the system checked by a TOYOTA dealer or a qualified workshop.
NOTIC E
For more information on the Electric parking brake, refer to the corresponding section.
Wheels and tyres
The inflation pressure of all tyres, including the spare wheel, must be checked on "cold” tyres.The pressures indicated on the tyre pressure label are valid for "cold" tyres. If you have driven for more than 10 minutes or more than 10 km (6 miles) at over 50 km/h (31 mph), add 0.3 bar (30 kPa) to the values indicated on the label.
WARNI NG
Under-inflation increases fuel consumption. Non-compliant tyre pressure causes premature wear on tyres and has an adverse effect on the vehicle's road holding - risk of an accident!
Driving with worn or damaged tyres reduces the braking and road holding performance of the vehicle. It is recommended to regularly check the condition of the tyres (tread and sidewalls) and wheel rims as well as the presence of the valves.When the wear indicators no longer appear set back from the tread, the depth of the grooves is less than 1.6 mm; it is imperative to replace the tyres.Using different size wheels and tyres from those specified can affect the lifetime of tyres, wheel rotation, ground clearance, the speedometer reading and have an adverse effect on road holding.Fitting different tyres on the front and rear axles
can cause the ESC to mistime.
AdBlue® (Diesel engines)
To respect the environment and ensure compliance with the Euro 6 standard, without adversely affecting the performance or fuel consumption of its Diesel engines, TOYOTA has taken the decision to equip its vehicles with a system that associates SCR (Selective Catalytic Reduction) with a Diesel particle filter (DPF) for the treatment of exhaust gases.
SCR System SCR
Using a liquid called AdBlue® that contains urea, a catalytic converter turns up to 85% of the nitrogen oxides (NOx) into nitrogen and water, which are harmless to health and the environment.The AdBlue® is contained in a special tank holding about 17 litres. Its capacity allows a driving range of approximately 6,000 km (3,700 miles), (which may vary considerably depending on your driving style and the vehicle). An alert system
is automatically triggered when the remaining range reaches 2,400 km (1,500 miles), i.e. once the reserve level has been reached.Several alerts are triggered successively during the remaining 2,400 km (1,500 miles) before the tank is empty and the vehicle blocked.
Page 166 of 272
166
If swallowed, immediately wash out the mouth with clean water and then drink plenty of water.In certain conditions (high temperature, for example), the risk of release of ammonia cannot be excluded: do not inhale the fluid. Ammonia vapours have an irritant effect on mucous membranes (eyes, nose and throat).
WARNI NG
Store AdBlue® out of the reach of children, in
its original container.
Procedure
Before starting the top-up procedure, ensure that the vehicle is parked on a flat and level surface.In wintry conditions, ensure that the temperature of the vehicle is above -11 °C. Otherwise the AdBlue® may be frozen and so cannot be poured into its tank. Park the vehicle in a warmer area for a few hours to allow the top-up to be carried out.
WARNI NG
Never put the AdBlue® into the Diesel fuel tank.
WARNI NG
If any AdBlue® is splashed, or if there are any spillages on the bodywork, rinse immediately with cold water or wipe with a damp cloth.If the fluid has crystallised, clean it off using a sponge and hot water.
WARNI NG
Important: in the event of a top-up after a breakdown because of a lack of AdBlue, it is essential to wait around 5 minutes before switching on the ignition, without opening the driver’s door, unlocking the vehicle, introducing the key into the ignition switch, or introducing the key of the “Keyless Entry and Starting ” system into the passenger compartment.Switch on the ignition, then wait for 10 seconds before starting the engine.
► Switch off the ignition and remove the key from the switch to switch off the engine.or► With Keyless Entry and Starting, press the "START/STOP" button to switch off the engine.
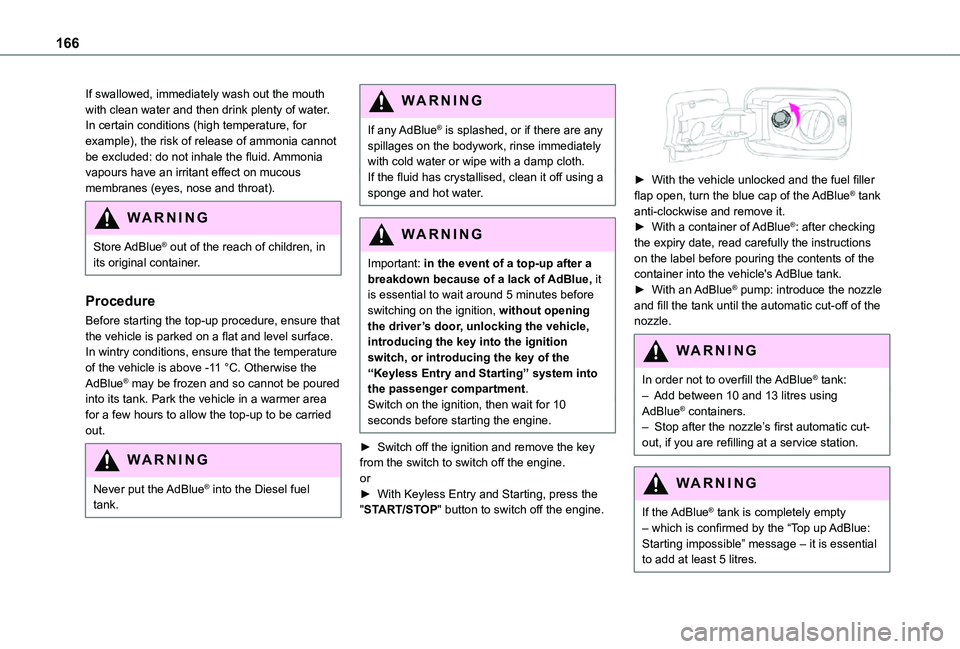
► With the vehicle unlocked and the fuel filler flap open, turn the blue cap of the AdBlue® tank anti-clockwise and remove it.► With a container of AdBlue®: after checking the expiry date, read carefully the instructions on the label before pouring the contents of the container into the vehicle's AdBlue tank.► With an AdBlue® pump: introduce the nozzle and fill the tank until the automatic cut-off of the nozzle.
WARNI NG
In order not to overfill the AdBlue® tank:– Add between 10 and 13 litres using AdBlue® containers.– Stop after the nozzle’s first automatic cut-out, if you are refilling at a service station.
WARNI NG
If the AdBlue® tank is completely empty – which is confirmed by the “Top up AdBlue: Starting impossible” message – it is essential to add at least 5 litres.
Page 167 of 272
167
Practical information
7
After refilling
► Refit the blue cap to the tank filler and turn it clockwise, as far as it will go.► Close the fuel filler flap.
Do not dispose of AdBlue® bottles or containers in the household waste.Place them in a container reserved for this purpose or take them back to where you purchased them.
Free-wheeling
In certain situations, you must allow the vehicle to free-wheel (while being towed, on a rolling road, in an automatic car wash, or being transported by rail or sea freight, etc.).The procedure varies according to the type of gearbox and parking brake.
With a manual gearbox and
electric parking brake /
Release procedure
► With the engine running and while depressing the brake pedal, move the gear selector to the neutral position.
► While depressing the brake pedal, switch off the ignition.► Release the brake pedal, then switch on the ignition again.► While depressing the brake pedal, press the control lever to release the parking brake.► Release the brake pedal, then switch off the ignition.
Reverting to normal operation
► While depressing the brake pedal, start the engine.
With an automatic gearbox
and electric parking brake /
Release procedure
► With the engine running and while depressing the brake pedal, set the gear selector to N.► While depressing the brake pedal, switch off the ignition.
► Release the brake pedal, then switch on the ignition again.► While depressing the brake pedal, press the control lever to release the parking brake.► Release the brake pedal, then switch off the ignition.
Reverting to normal operation
► While depressing the brake pedal, start the engine.
NOTIC E
Keyless Entry and StartingYou must not depress the brake pedal while switching the ignition on or off. If you do, the engine will start, requiring you to restart the procedure.
Advice on care and
maintenance
General recommendations
Observe the following recommendations to avoid damaging your vehicle.
Exterior
WARNI NG
Never use a high-pressure jet wash in the engine compartment, due to the risk of damaging electrical components.Do not wash the vehicle in strong sunshine or extremely cold conditions.