2021 TOYOTA PROACE CITY VERSO EV screen
[x] Cancel search: screenPage 30 of 320
30
SettingsMain system settings.
NOTIC E
For more information about the menus, refer to the sections describing the audio and telematics systems.
Touch screen
This system gives access to the following elements:– Permanent display of the time and outside temperature (a blue warning lamp appears if there is a risk of ice).– Vehicle functions and equipment setting menus.– Audio system and telephone controls and display of related information.– Display of visual manoeuvring aid functions– Internet services and display of related information.– Navigation system controls and display of related information (depending on version).
WARNI NG
For safety reasons, always stop the vehicle before performing operations that require sustained attention.Some functions are not accessible while driving.
Recommendations
This screen is of the capacitive type.– Do not use pointed objects on the touch screen.– Do not touch the touch screen with wet hands.– Use a soft, clean cloth to clean the touch screen.
Principles
► Use the buttons on each side of the touch screen to access the menus, then press the buttons that appear on the touch screen.Some menus may display across two pages: press the "OPTIONS" button to access the
second page.
NOTIC E
After a few moments with no action on the second page, the first page is displayed automatically.
To deactivate/activate a function, select "OFF" or "ON".
Configuring a function
Access to additional information on the functionConfirm
Return to the previous page or confirm
Menus
NOTIC E
Press the touch screen with three fingers to show all of the menu buttons.
NOTIC E
For more information about the menus, refer to the sections describing the audio and telematics systems.
Radio/Media
Navigation (Depending on equipment)
Driving or Vehicle (Depending on equipment)Activation, deactivation and settings for certain
functions.The functions are organised in 2 tabs: "Driving functions" and "Vehicle settings".
Page 31 of 320
31
Instruments
1
Telephone
ApplicationsDisplay of available connected services.Energy (with TOYOTA Connect Nav)Access the specific Electric functions (energy flow, consumption statistics, deferred charge) organised in the corresponding 3 tabs.orSettingsMain settings for the audio system and touch screen.Audio system on/off.Volume adjustment/mute.
Upper bar
Certain information is displayed permanently in the upper bar of the touch screen:– Time and outside temperature (a blue warning lamp appears if there is a risk of ice).– Reminder of information from the Radio Media and Telephone menus and navigation instructions (depending on
equipment).– Notifications.– Access to the Settings.
Energy menu
This menu is only accessible with a TOYOTA Connect Nav:Depending on version, this is accessible either:– directly, by pressing the button near the touch screen.– via the Applications menu.
Flow
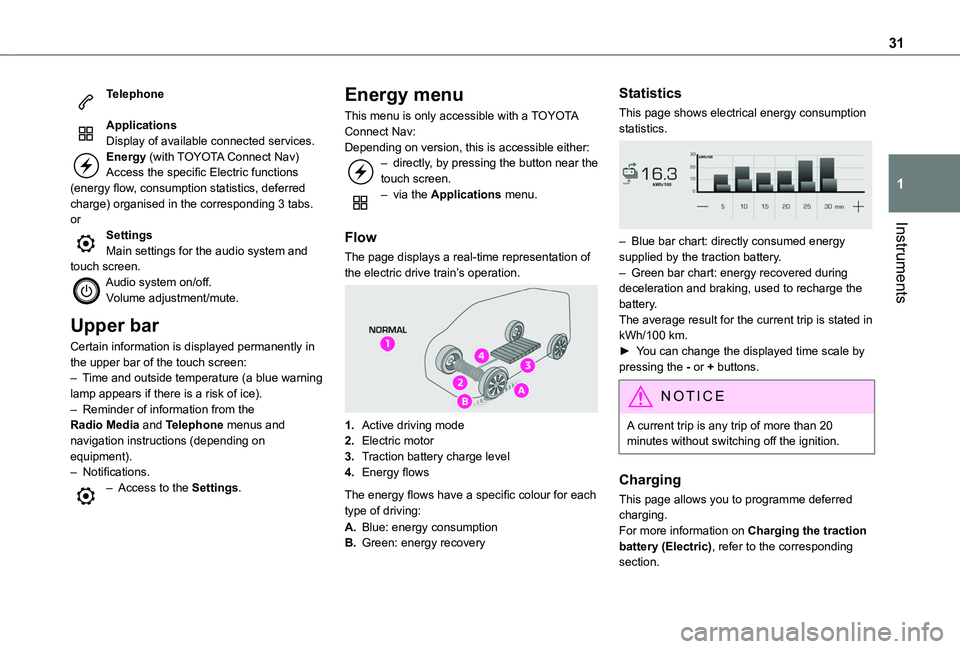
The page displays a real-time representation of the electric drive train’s operation.
1.Active driving mode
2.Electric motor
3.Traction battery charge level
4.Energy flows
The energy flows have a specific colour for each type of driving:
A.Blue: energy consumption
B.Green: energy recovery
Statistics
This page shows electrical energy consumption statistics.
– Blue bar chart: directly consumed energy supplied by the traction battery.– Green bar chart: energy recovered during deceleration and braking, used to recharge the battery.The average result for the current trip is stated in kWh/100 km.► You can change the displayed time scale by pressing the - or + buttons.
NOTIC E
A current trip is any trip of more than 20 minutes without switching off the ignition.
Charging
This page allows you to programme deferred charging.For more information on Charging the traction battery (Electric), refer to the corresponding section.
Page 39 of 320
39
Access
2
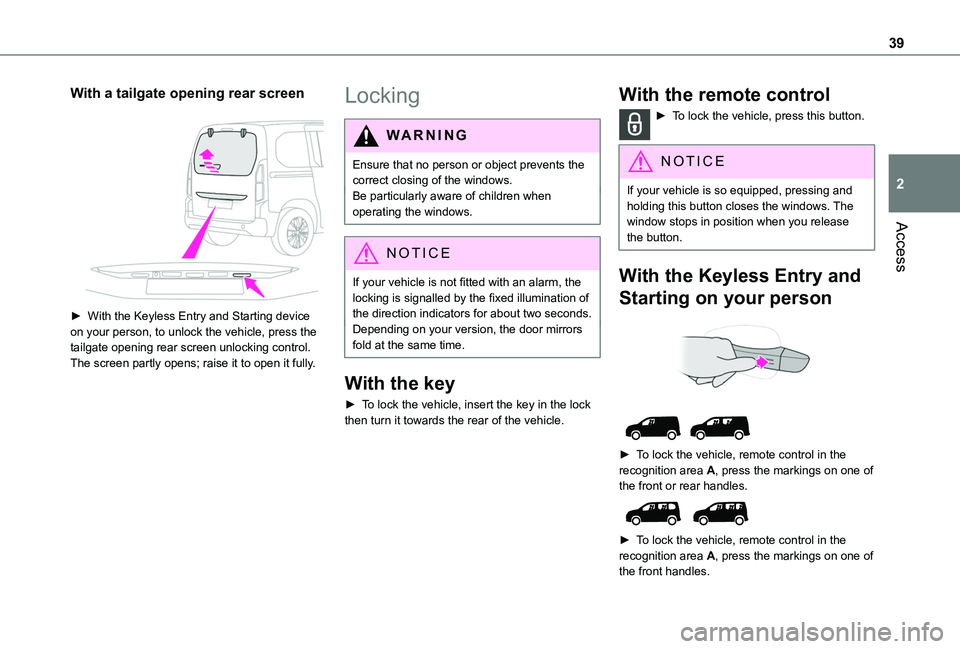
With a tailgate opening rear screen
► With the Keyless Entry and Starting device on your person, to unlock the vehicle, press the tailgate opening rear screen unlocking control. The screen partly opens; raise it to open it fully.
Locking
WARNI NG
Ensure that no person or object prevents the correct closing of the windows.Be particularly aware of children when operating the windows.
NOTIC E
If your vehicle is not fitted with an alarm, the locking is signalled by the fixed illumination of the direction indicators for about two seconds.Depending on your version, the door mirrors fold at the same time.
With the key
► To lock the vehicle, insert the key in the lock then turn it towards the rear of the vehicle.
With the remote control
► To lock the vehicle, press this button.
NOTIC E
If your vehicle is so equipped, pressing and holding this button closes the windows. The window stops in position when you release the button.
With the Keyless Entry and
Starting on your person
► To lock the vehicle, remote control in the recognition area A, press the markings on one of the front or rear handles.
► To lock the vehicle, remote control in the recognition area A, press the markings on one of the front handles.
Page 47 of 320
47
Access
2
General
recommendations for the
sliding side doors
WARNI NG
Doors must only be operated when the vehicle is stationary.For your safety and that of your passengers, as well as for correct operation of the doors, you are strongly advised not to drive with a door open.Always check that it is safe to operate the door and in particular, be sure not to leave children or animals near the door controls without supervision.An audible warning, "door open” warning lamp and onscreen message are there to remind you. Contact a TOYOTA dealer or a qualified workshop if you want to deactivate this warning.
Lock the vehicle when you use an automatic car wash.
WARNI NG
Before opening or closing and while moving doors, ensure that no person, animal or object is in the door frame or any other position that
would block the desired movement, inside or outside the vehicle.If this advice is not followed, injuries or damage may occur if a person or an object is trapped or caught.
WARNI NG
Take care not to block the guide space on the floor, to allow the door to slide correctly.
For safety and functional reasons, do not drive with the sliding side door open.
NOTIC E
To hold the sliding side door in the open position, open the door fully to engage the
latch (located at the bottom of the door).
NOTIC E
To hold the sliding side door in the open position, open the door fully to engage the latch (located at the bottom of the door).
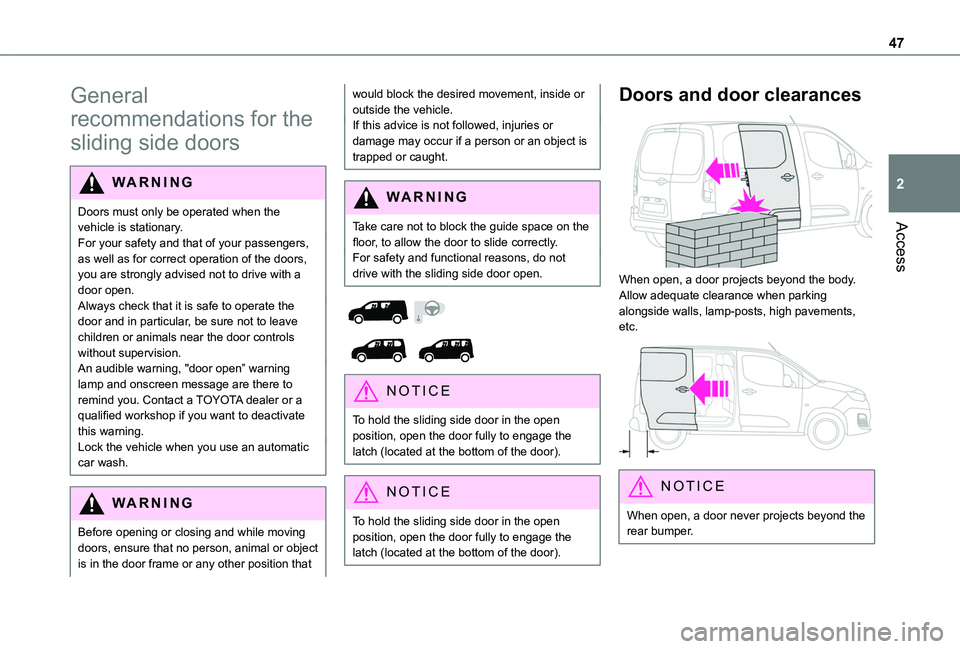
Doors and door clearances
When open, a door projects beyond the body. Allow adequate clearance when parking alongside walls, lamp-posts, high pavements, etc.
NOTIC E
When open, a door never projects beyond the rear bumper.
Page 58 of 320
58
Mirrors
Door mirrors
Adjustment
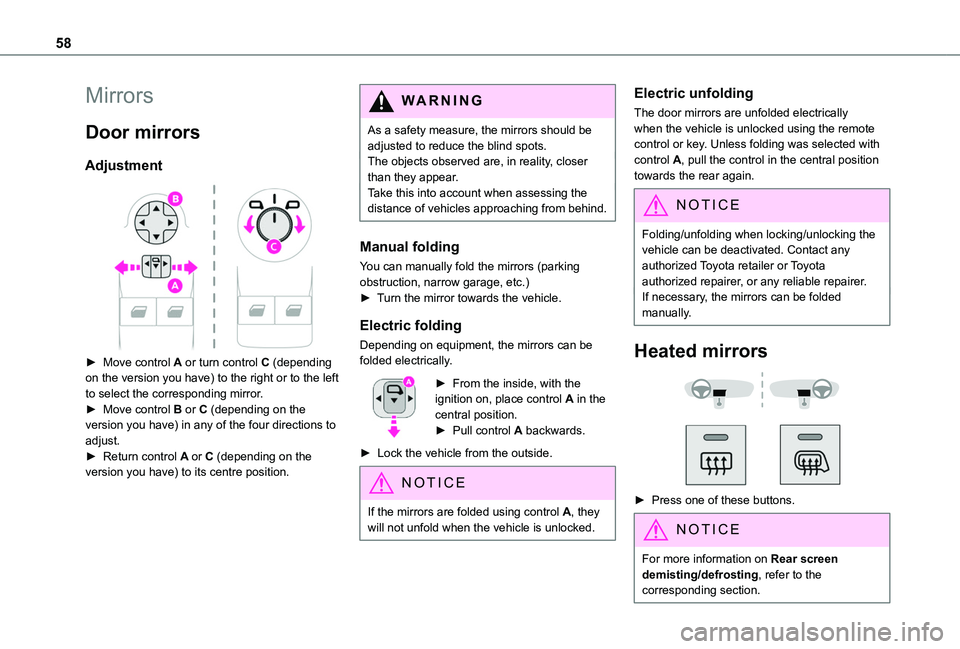
► Move control A or turn control C (depending on the version you have) to the right or to the left to select the corresponding mirror.► Move control B or C (depending on the version you have) in any of the four directions to adjust.
► Return control A or C (depending on the version you have) to its centre position.
WARNI NG
As a safety measure, the mirrors should be adjusted to reduce the blind spots.The objects observed are, in reality, closer than they appear.Take this into account when assessing the distance of vehicles approaching from behind.
Manual folding
You can manually fold the mirrors (parking obstruction, narrow garage, etc.)► Turn the mirror towards the vehicle.
Electric folding
Depending on equipment, the mirrors can be folded electrically.
► From the inside, with the ignition on, place control A in the central position.► Pull control A backwards.
► Lock the vehicle from the outside.
NOTIC E
If the mirrors are folded using control A, they will not unfold when the vehicle is unlocked.
Electric unfolding
The door mirrors are unfolded electrically when the vehicle is unlocked using the remote control or key. Unless folding was selected with control A, pull the control in the central position towards the rear again.
NOTIC E
Folding/unfolding when locking/unlocking the
vehicle can be deactivated. Contact any authorized Toyota retailer or Toyota authorized repairer, or any reliable repairer.If necessary, the mirrors can be folded manually.
Heated mirrors
► Press one of these buttons.
NOTIC E
For more information on Rear screen demisting/defrosting, refer to the corresponding section.
Page 66 of 320
66
Roof and roof storage
Overhead storage compartment and central storage compartment
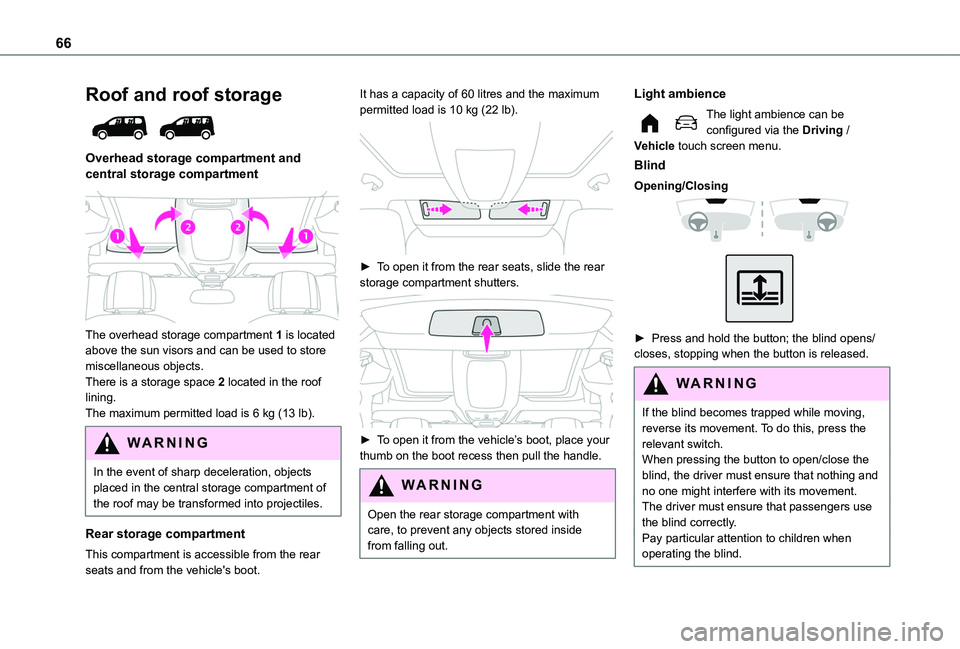
The overhead storage compartment 1 is located above the sun visors and can be used to store miscellaneous objects.There is a storage space 2 located in the roof lining.The maximum permitted load is 6 kg (13 lb).
WARNI NG
In the event of sharp deceleration, objects placed in the central storage compartment of the roof may be transformed into projectiles.
Rear storage compartment
This compartment is accessible from the rear seats and from the vehicle's boot.
It has a capacity of 60 litres and the maximum permitted load is 10 kg (22 lb).
► To open it from the rear seats, slide the rear storage compartment shutters.
► To open it from the vehicle’s boot, place your thumb on the boot recess then pull the handle.
WARNI NG
Open the rear storage compartment with care, to prevent any objects stored inside from falling out.
Light ambience
The light ambience can be configured via the Driving / Vehicle touch screen menu.
Blind
Opening/Closing
► Press and hold the button; the blind opens/closes, stopping when the button is released.
WARNI NG
If the blind becomes trapped while moving, reverse its movement. To do this, press the relevant switch.When pressing the button to open/close the blind, the driver must ensure that nothing and no one might interfere with its movement.The driver must ensure that passengers use the blind correctly.Pay particular attention to children when
operating the blind.
Page 67 of 320
67
Ease of use and comfort
3
12 V accessory socket(s)
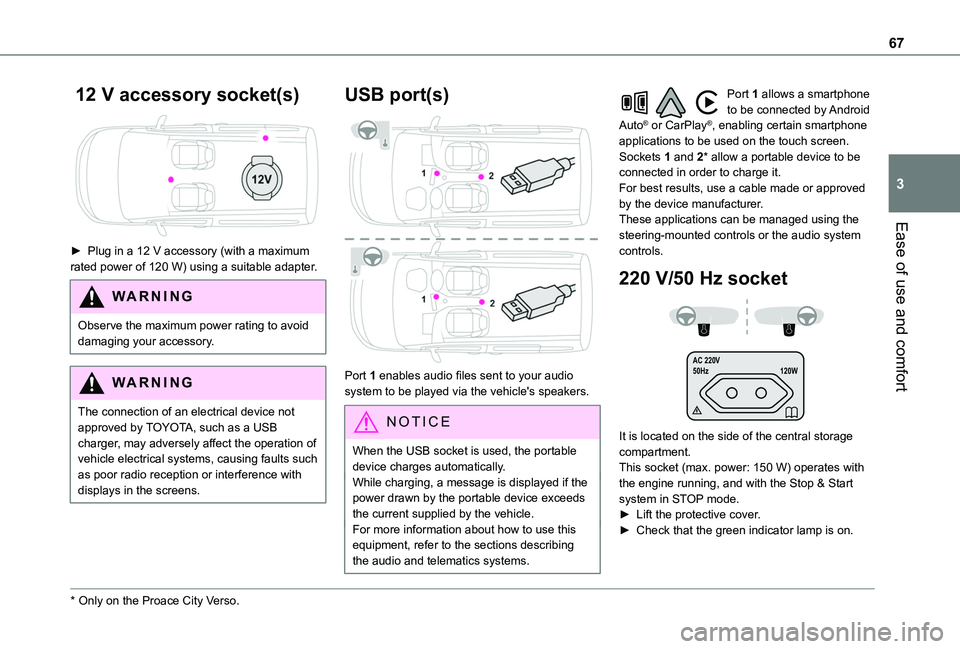
► Plug in a 12 V accessory (with a maximum rated power of 120 W) using a suitable adapter.
WARNI NG
Observe the maximum power rating to avoid damaging your accessory.
WARNI NG
The connection of an electrical device not approved by TOYOTA, such as a USB charger, may adversely affect the operation of vehicle electrical systems, causing faults such as poor radio reception or interference with
displays in the screens.
* Only on the Proace City Verso.
USB port(s)
Port 1 enables audio files sent to your audio system to be played via the vehicle's speakers.
N OTIC E
When the USB socket is used, the portable device charges automatically.While charging, a message is displayed if the power drawn by the portable device exceeds the current supplied by the vehicle.For more information about how to use this
equipment, refer to the sections describing the audio and telematics systems.
Port 1 allows a smartphone to be connected by Android Auto® or CarPlay®, enabling certain smartphone applications to be used on the touch screen.Sockets 1 and 2* allow a portable device to be connected in order to charge it.For best results, use a cable made or approved by the device manufacturer.These applications can be managed using the steering-mounted controls or the audio system controls.
220 V/50 Hz socket
AC 220 V
50Hz 120W
It is located on the side of the central storage compartment.This socket (max. power: 150 W) operates with the engine running, and with the Stop & Start system in STOP mode.► Lift the protective cover.► Check that the green indicator lamp is on.
Page 72 of 320
72
Installation
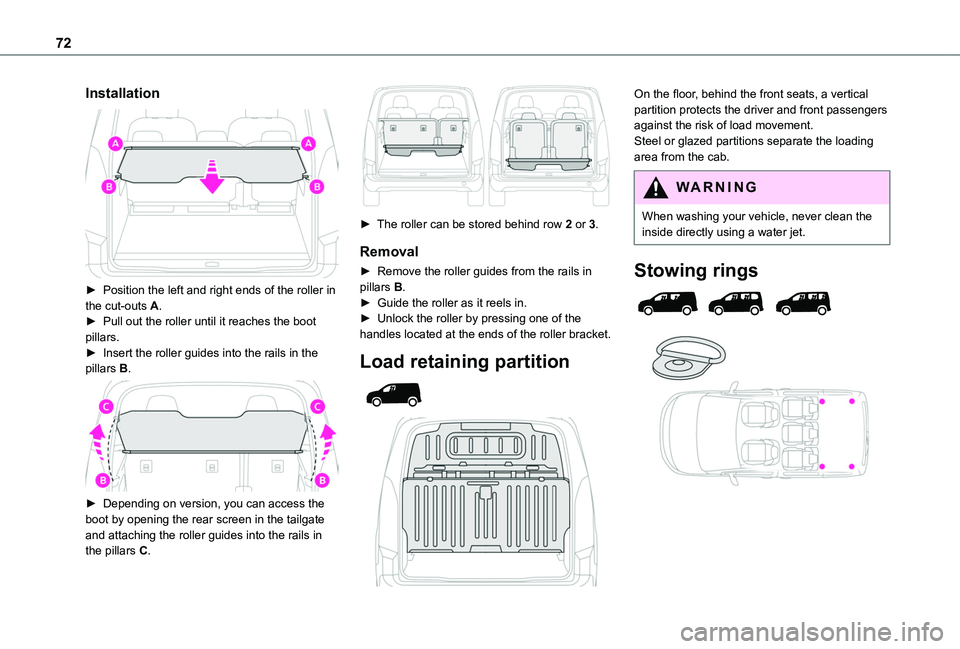
► Position the left and right ends of the roller in the cut-outs A.► Pull out the roller until it reaches the boot pillars.► Insert the roller guides into the rails in the pillars B.
► Depending on version, you can access the boot by opening the rear screen in the tailgate and attaching the roller guides into the rails in the pillars C.
► The roller can be stored behind row 2 or 3.
Removal
► Remove the roller guides from the rails in pillars B.► Guide the roller as it reels in.► Unlock the roller by pressing one of the handles located at the ends of the roller bracket.
Load retaining partition
On the floor, behind the front seats, a vertical partition protects the driver and front passengers against the risk of load movement.Steel or glazed partitions separate the loading area from the cab.
WARNI NG
When washing your vehicle, never clean the inside directly using a water jet.
Stowing rings