2021 TOYOTA PROACE CITY VERSO EV screen
[x] Cancel search: screenPage 207 of 320
207
Practical information
7
For more information, contact a TOYOTA dealer or a qualified workshop.
Installation tips
► If you have to fit the chains during a journey, stop the vehicle on a flat surface on the side of the road.► Apply the parking brake and position any wheel chocks under the wheels to prevent movement of your vehicle.► Fit the chains following the instructions provided by the manufacturer.► Move off gently and drive for a few moments, without exceeding 50 km/h (31 mph).► Stop your vehicle and check that the snow chains are correctly tightened.
NOTIC E
It is strongly recommended that before you leave, you practise fitting the snow chains on a level and dry surface.
WARNI NG
Avoid driving with snow chains on roads that have been cleared of snow to avoid damaging your vehicle's tyres and the road surface. If your vehicle is fitted with alloy wheels, check
that no part of the chain or its fixings is in contact with the wheel rim.
Very cold climate screen
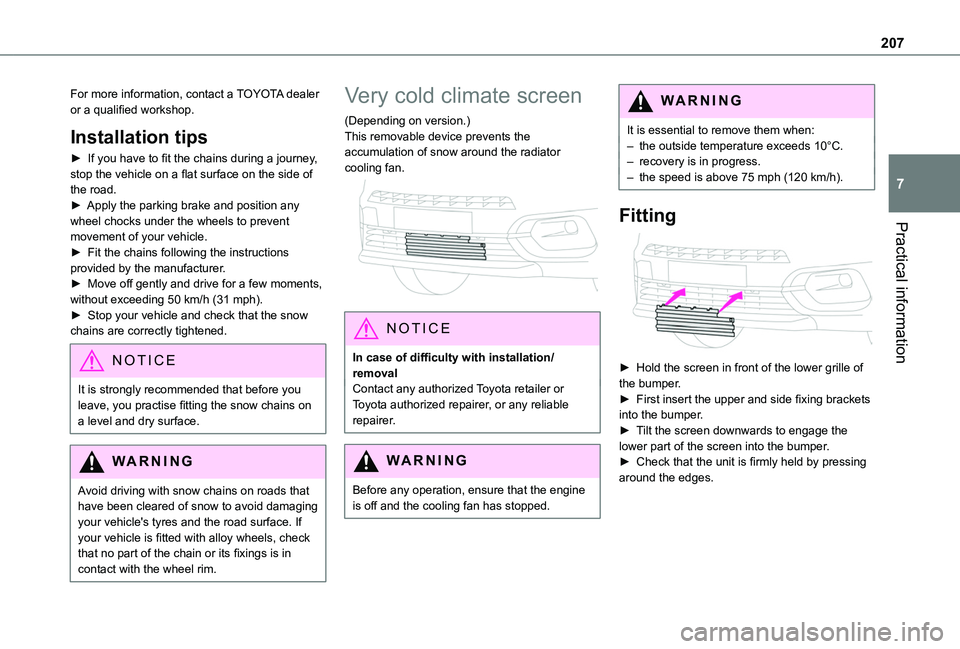
(Depending on version.)This removable device prevents the accumulation of snow around the radiator cooling fan.
NOTIC E
In case of difficulty with installation/removalContact any authorized Toyota retailer or Toyota authorized repairer, or any reliable repairer.
WARNI NG
Before any operation, ensure that the engine is off and the cooling fan has stopped.
WARNI NG
It is essential to remove them when:– the outside temperature exceeds 10°C.– recovery is in progress.– the speed is above 75 mph (120 km/h).
Fitting
► Hold the screen in front of the lower grille of the bumper.► First insert the upper and side fixing brackets into the bumper.► Tilt the screen downwards to engage the lower part of the screen into the bumper.► Check that the unit is firmly held by pressing around the edges.
Page 208 of 320
208
Removing
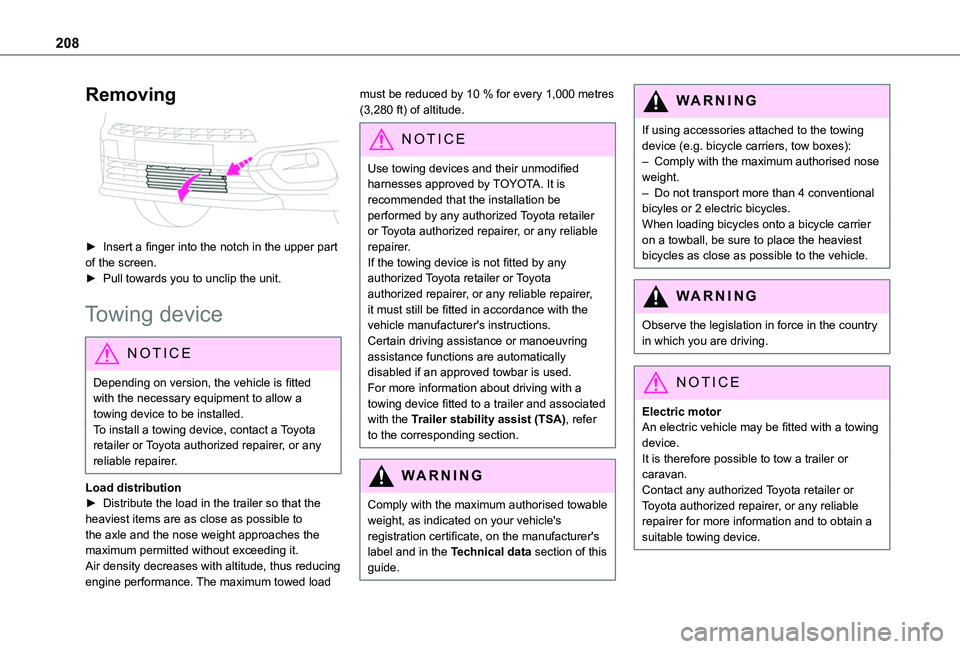
► Insert a finger into the notch in the upper part of the screen.► Pull towards you to unclip the unit.
Towing device
NOTIC E
Depending on version, the vehicle is fitted with the necessary equipment to allow a towing device to be installed.To install a towing device, contact a Toyota retailer or Toyota authorized repairer, or any reliable repairer.
Load distribution► Distribute the load in the trailer so that the heaviest items are as close as possible to the axle and the nose weight approaches the
maximum permitted without exceeding it.Air density decreases with altitude, thus reducing engine performance. The maximum towed load
must be reduced by 10 % for every 1,000 metres (3,280 ft) of altitude.
NOTIC E
Use towing devices and their unmodified harnesses approved by TOYOTA. It is recommended that the installation be performed by any authorized Toyota retailer or Toyota authorized repairer, or any reliable
repairer.If the towing device is not fitted by any authorized Toyota retailer or Toyota authorized repairer, or any reliable repairer, it must still be fitted in accordance with the vehicle manufacturer's instructions.Certain driving assistance or manoeuvring assistance functions are automatically disabled if an approved towbar is used.For more information about driving with a towing device fitted to a trailer and associated with the Trailer stability assist (TSA), refer to the corresponding section.
WARNI NG
Comply with the maximum authorised towable weight, as indicated on your vehicle's registration certificate, on the manufacturer's
label and in the Technical data section of this guide.
WARNI NG
If using accessories attached to the towing device (e.g. bicycle carriers, tow boxes):– Comply with the maximum authorised nose weight.– Do not transport more than 4 conventional bicyles or 2 electric bicycles.When loading bicycles onto a bicycle carrier on a towball, be sure to place the heaviest bicycles as close as possible to the vehicle.
WARNI NG
Observe the legislation in force in the country in which you are driving.
NOTIC E
Electric motorAn electric vehicle may be fitted with a towing device.It is therefore possible to tow a trailer or caravan.Contact any authorized Toyota retailer or Toyota authorized repairer, or any reliable repairer for more information and to obtain a suitable towing device.
Page 212 of 320
212
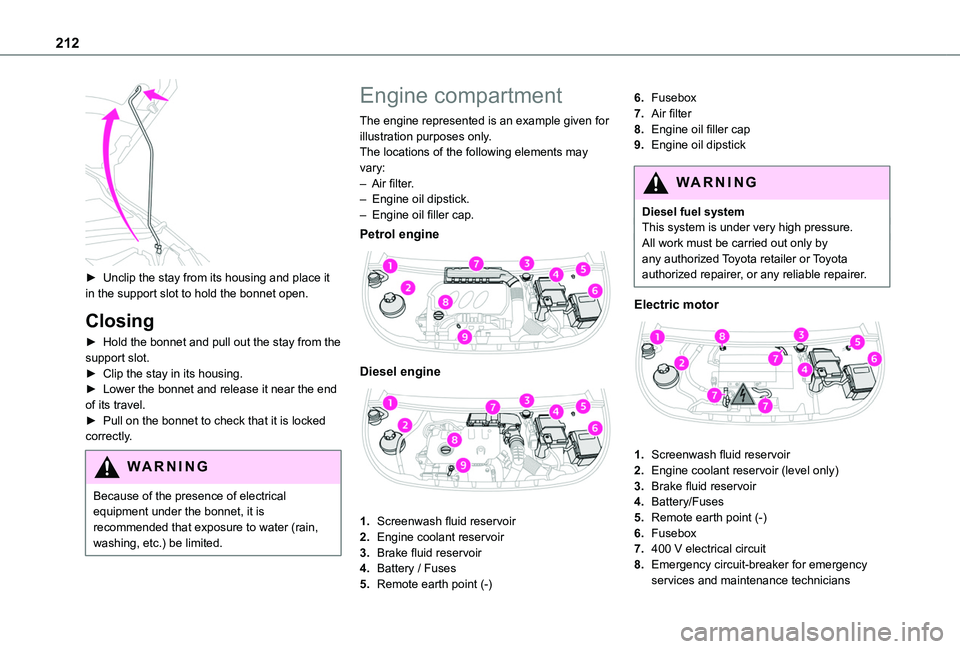
► Unclip the stay from its housing and place it in the support slot to hold the bonnet open.
Closing
► Hold the bonnet and pull out the stay from the support slot.► Clip the stay in its housing.► Lower the bonnet and release it near the end of its travel.► Pull on the bonnet to check that it is locked correctly.
WARNI NG
Because of the presence of electrical equipment under the bonnet, it is recommended that exposure to water (rain, washing, etc.) be limited.
Engine compartment
The engine represented is an example given for illustration purposes only.The locations of the following elements may vary:– Air filter.– Engine oil dipstick.– Engine oil filler cap.
Petrol engine
Diesel engine
1.Screenwash fluid reservoir
2.Engine coolant reservoir
3.Brake fluid reservoir
4.Battery / Fuses
5.Remote earth point (-)
6.Fusebox
7.Air filter
8.Engine oil filler cap
9.Engine oil dipstick
WARNI NG
Diesel fuel systemThis system is under very high pressure.All work must be carried out only by any authorized Toyota retailer or Toyota authorized repairer, or any reliable repairer.
Electric motor
1.Screenwash fluid reservoir
2.Engine coolant reservoir (level only)
3.Brake fluid reservoir
4.Battery/Fuses
5.Remote earth point (-)
6.Fusebox
7.400 V electrical circuit
8.Emergency circuit-breaker for emergency services and maintenance technicians
Page 214 of 320
214
WARNI NG
Oil gradeBefore topping up or changing the engine oil, check that the oil is suitable for the engine and complies with the recommendations in the service schedule supplied with the vehicle (or available from your TOYOTA dealer and qualified workshops).Use of non-recommended oil may invalidate the contractual warranty in the event of engine failure.
Topping up the engine oil level
The location of the oil filler cap is shown in the corresponding underbonnet layout view.► Add oil in small quantities, avoiding any spills on engine components (risk of fire).► Wait a few minutes before checking the level again using the dipstick.► Add more oil if necessary.► After checking the level, carefully refit the oil
filler cap and the dipstick in its tube.
NOTIC E
During the 30 minutes after topping up the oil, the check performed with the oil level indicator in the instrument panel when the ignition is switched on is not valid.
Brake fluid
The level of this fluid should be close to the "MAX" mark. If not, check the brake pad wear.To know how often the brake fluid should be replaced, refer to the manufacturer's servicing schedule.
WARNI NG
If topping up, clean the cap before replacing it. Use only DOT4 brake fluid from a sealed canister.
Engine coolant
It is normal to top up this fluid between two services.The check and top-up must only be done with the engine cold.A level of coolant that is too low risks causing major damage to the engine; the coolant level must be close to the "MAX" mark without ever going above it.If the level is close to or below the "MIN" mark, it is essential to top it up.When the engine is hot, the temperature of the coolant is regulated by the fan.As the cooling system is pressurised, wait at least one hour after switching off the engine before carrying out any work.In order to avoid the risk of scalding if you need to top up in an emergency, wrap a cloth around
the cap and unscrew the cap by two turns to allow the pressure to drop.Once the pressure has dropped, remove the cap and top up to the required level.
WARNI NG
Vehicle with electric motorDo not top up the coolant.
If the level is close to or below the "MIN" mark, it is essential to contact any authorized Toyota retailer or Toyota authorized repairer, or any reliable repairer.
Screenwash fluid
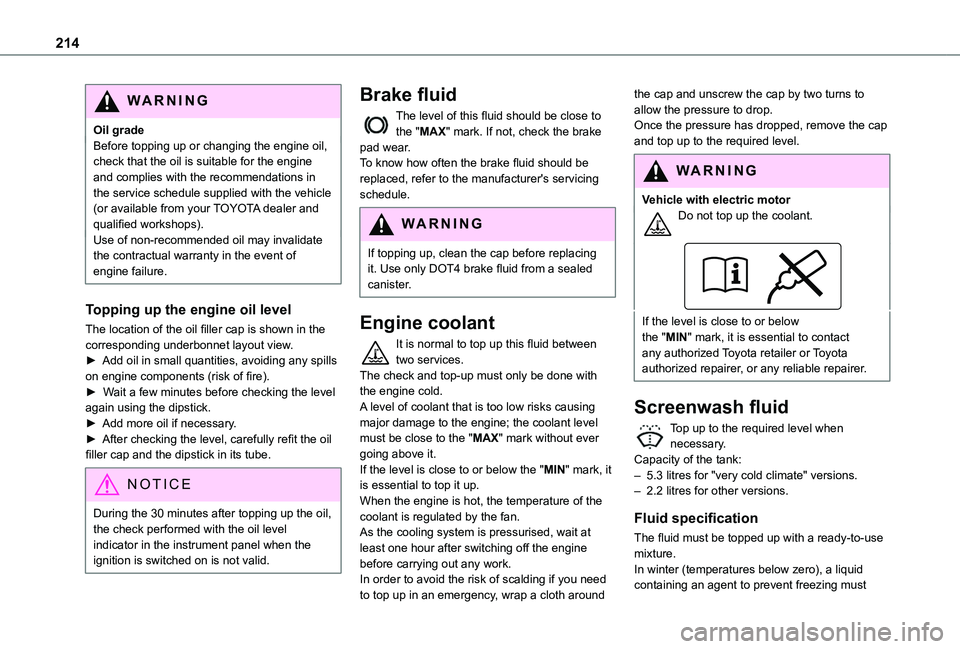
Top up to the required level when necessary.Capacity of the tank:– 5.3 litres for "very cold climate" versions.– 2.2 litres for other versions.
Fluid specification
The fluid must be topped up with a ready-to-use
mixture.In winter (temperatures below zero), a liquid containing an agent to prevent freezing must
Page 222 of 320
222
Interior
WARNI NG
When washing the vehicle, never use a water hose or high-pressure jet to clean the interior.Liquids carried in cups or other open containers can spill, presenting a risk of damage to the instruments and controls and the controls located on the centre console. Be
vigilant!To clean instrument panels, touch screens or other displays, wipe gently with a soft, dry cloth. Do not use products (e.g. alcohol, disinfectant) or soapy water directly on these surfaces - risk of damage!
Bodywork
High-gloss paint
WARNI NG
Do not use abrasive products or solvents, petrol or oil to clean the bodywork.Never use an abrasive sponge to clean stubborn stains. Risk of scratching the paintwork!Do not apply polish in strong sunshine, or to
plastic or rubber parts.
NOTIC E
Use a soft sponge and soapy water or a pH neutral product.Gently wipe the bodywork with a clean microfibre cloth.Apply polish with the vehicle clean and dry.Comply with the instructions for use stated on the product.
Decals
(Depending on version)
WARNI NG
Do not use a high pressure washer to clean the vehicle. Risk of damaging or detaching the decals!
NOTIC E
Use a high-flow hose at a temperature between 25°C and 40°C.Sweep the jet of water across the surface to be cleaned, perpendicular to it.Rinse the vehicle with demineralised water.
Page 254 of 320
254
Identification markings
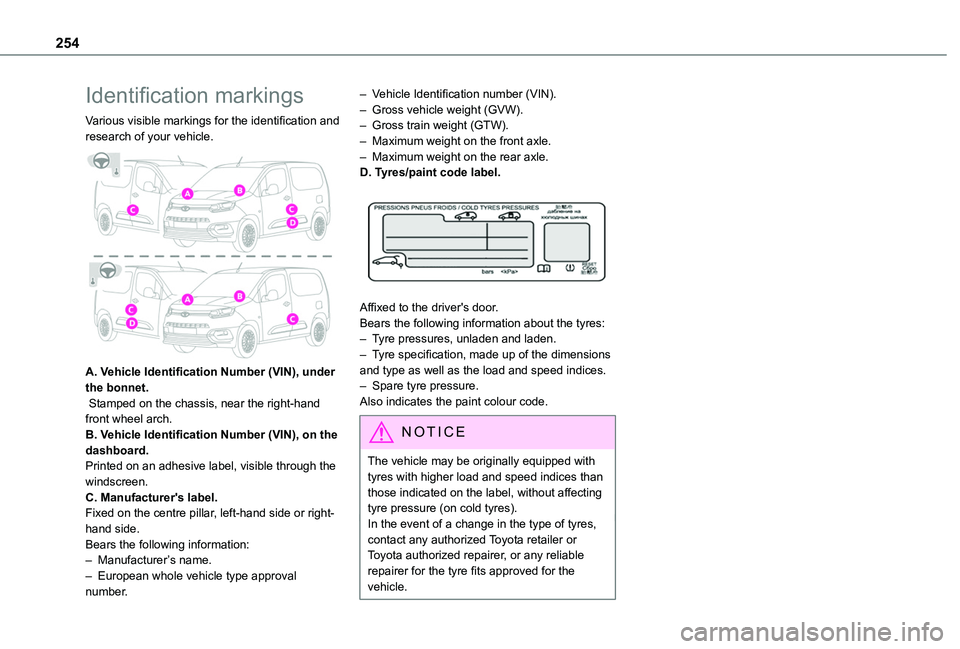
Various visible markings for the identification and research of your vehicle.
A. Vehicle Identification Number (VIN), under the bonnet. Stamped on the chassis, near the right-hand front wheel arch.B. Vehicle Identification Number (VIN), on the dashboard.Printed on an adhesive label, visible through the windscreen.C. Manufacturer's label.Fixed on the centre pillar, left-hand side or right-hand side.Bears the following information:
– Manufacturer’s name.– European whole vehicle type approval number.
– Vehicle Identification number (VIN).– Gross vehicle weight (GVW).– Gross train weight (GTW).– Maximum weight on the front axle.– Maximum weight on the rear axle.D. Tyres/paint code label.
Affixed to the driver's door.Bears the following information about the tyres:– Tyre pressures, unladen and laden.– Tyre specification, made up of the dimensions and type as well as the load and speed indices.– Spare tyre pressure.Also indicates the paint colour code.
NOTIC E
The vehicle may be originally equipped with tyres with higher load and speed indices than those indicated on the label, without affecting tyre pressure (on cold tyres).In the event of a change in the type of tyres, contact any authorized Toyota retailer or Toyota authorized repairer, or any reliable repairer for the tyre fits approved for the vehicle.
Page 255 of 320
255
Touch screen BLUETOOTH audio system
10
Touch screen
BLUETOOTH audio
system
Multimedia audio system -
Bluetooth® telephone
NOTIC E
The functions and settings described vary according to the vehicle version and configuration.
WARNI NG
For safety reasons and because they require sustained attention by the driver, the following operations must be carried out with the vehicle stationary and the ignition on:– Pairing the smartphone with the system in Bluetooth mode.– Using the smartphone.– Changing the system settings and configuration.
NOTIC E
The system is protected in such a way that it will only operate in the vehicle.The Energy Economy Mode message is displayed when the system is about to enter the corresponding mode.
First steps
With the engine running, a press mutes the sound.With the ignition off, a press turns the system on.Increase or decrease the volume using the thumbwheel on the left-hand side.To access the menus, press this button on the touch screen.Press the back arrow to go back a level.
WARNI NG
To clean the screen, use a soft, non-abrasive cloth (e.g. spectacles cloth) with no additional product.Do not use sharp objects on the screen.Do not touch the screen with wet hands.
Certain information is displayed permanently in the upper bar of the touch screen:– Air conditioning information (depending on version).– Bluetooth connection.
– Indication of location data sharing.Selection of the audio source:– FM/AM/DAB radio stations (depending on equipment).– Telephone connected via Bluetooth and Bluetooth multimedia broadcast (streaming).– USB memory stick.– Media player connected via the auxiliary socket (depending on equipment).
NOTIC E
In very hot conditions, the volume may be limited to protect the system. It may go into standby (screen and sound off) for at least 5 minutes.The return to normal takes place when the temperature in the passenger compartment has dropped.
Page 257 of 320
257
Touch screen BLUETOOTH audio system
10
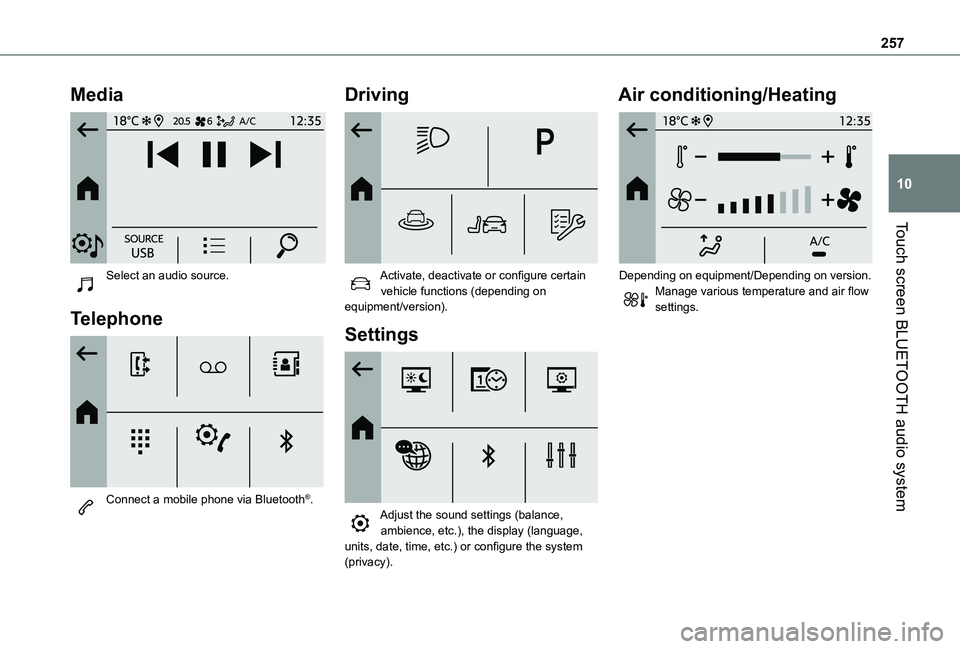
Media
Select an audio source.
Telephone
Connect a mobile phone via Bluetooth®.
Driving
Activate, deactivate or configure certain vehicle functions (depending on equipment/version).
Settings
Adjust the sound settings (balance, ambience, etc.), the display (language,
units, date, time, etc.) or configure the system (privacy).
Air conditioning/Heating
Depending on equipment/Depending on version.Manage various temperature and air flow settings.