2021 TOYOTA PROACE CITY bulb
[x] Cancel search: bulbPage 3 of 272
3
Contents
Memorising speeds 133Active Safety Brake with Collision Risk Alert and Intelligent emergency braking assistance 133Active Lane Departure Warning System 136Blind Spot Monitoring System 139Active Blind Spot Monitoring System 141Distraction detection 141Parking sensors 143Reversing Camera 145Surround Rear Vision 146
7Practical information
Compatibility of fuels 150Refuelling 150Misfuel prevention (Diesel) 152Snow chains 152Towing device 153Overload indicator 155Energy economy mode 156Roof bars / Roof rack 157Bonnet 158
Engine compartment 159Checking levels 159Speed checks 161AdBlue® (Diesel engines) 163Free-wheeling 166Advice on care and maintenance 166
8In the event of a breakdown
Running out of fuel (Diesel) 168
Tool kit 168Temporary puncture repair kit 169Spare wheel 172Changing a bulb 175Changing a fuse 18112 V battery 183Towing 186
9Technical data
Dimensions 189Engine technical data and towed loads 193Identification markings 196
10Bluetooth® audio system
First steps 197Steering mounted controls 198Menus 199Radio 199DAB (Digital Audio Broadcasting) radio 200Media 202Telephone 204
Frequently asked questions 207
11TOYOTA Connect Radio
First steps 210Steering mounted controls 2 11Menus 212Applications 213Radio 214DAB (Digital Audio Broadcasting) radio 215
Media 216
Telephone 217Settings 221Frequently asked questions 223
12TOYOTA Connect Nav
First steps 225Steering mounted controls 226Menus 226Voice commands 228Navigation 232Connected navigation 234Applications 237Radio 240DAB (Digital Audio Broadcasting) radio 241Media 242Telephone 243Settings 246Frequently asked questions 249
■Alphabetical index
Page 4 of 272
4
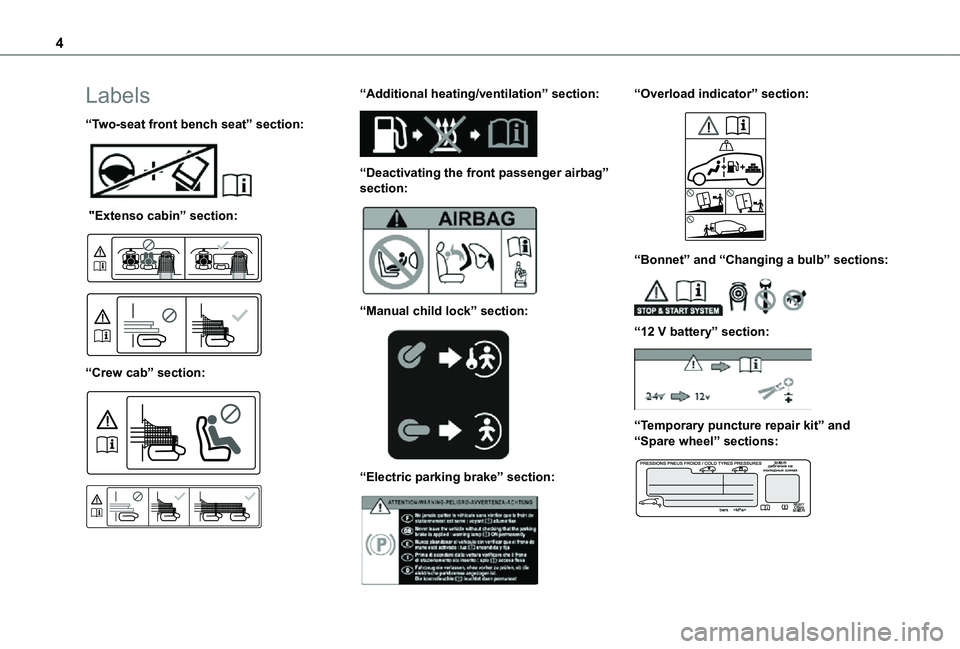
Labels
“Two-seat front bench seat” section:
"Extenso cabin” section:
“Crew cab” section:
“Additional heating/ventilation” section:
“Deactivating the front passenger airbag” section:
“Manual child lock” section:
“Electric parking brake” section:
“Overload indicator” section:
“Bonnet” and “Changing a bulb” sections:
“12 V battery” section:
“Temporary puncture repair kit” and “Spare wheel” sections:
Page 79 of 272
79
Safety
5
General safety
recommendations
WARNI NG
Do not remove the labels attached in different places on your vehicle. They include safety warnings as well as identification information for the vehicle.
WARNI NG
For all work on your vehicle, use a qualified workshop that has the technical information, skills and equipment required, all of which a TOYOTA dealer is able to provide.
WARNI NG
Depending on country regulations, certain safety equipment may be mandatory: high
visibility safety vests, warning triangles, breathalysers, spare bulbs, spare fuses, fire extinguisher, first aid kit, mud flaps at the rear of the vehicle, etc.
WARNI NG
Installing electrical accessories:– The fitting of electrical equipment or accessories not approved by TOYOTA may cause excessive current consumption and faults and failures with the electrical system of your vehicle. Contact a TOYOTA dealer for information on the range of approved accessories.– As a safety measure, access to the diagnostic socket, used for the vehicle's electronic systems, is reserved strictly for TOYOTA dealers or qualified workshops, equipped with the special tools required (risk of malfunctions of the vehicle's electronic systems that could cause breakdowns or serious accidents). The Manufacturer cannot be held responsible if this advice is not followed.– Any modification or adaptation not intended or authorised by TOYOTA or carried out without meeting the technical requirements
defined by the Manufacturer will result in the suspension of the commercial warranty.
W ARNI NG
Installation of accessory radio communication transmittersBefore installing a radio communication transmitter with an external aerial, you must without fail contact a TOYOTA dealer for the specification of transmitters which can be fitted (frequency, maximum power, aerial position, specific installation requirements), in line with the Vehicle Electromagnetic Compatibility Directive (2004/104/EC).
Page 168 of 272
168
Running out of fuel
(Diesel)
On vehicles fitted with Diesel engines, the fuel system must be primed if you run out of fuel.If the engine does not start first time, do not keep trying, but start the procedure again from the beginning.
NOTIC E
For more information on Misfuel prevention (Diesel), refer to the corresponding section.
With Euro 6.2/6.3 engines
► Switch on the ignition (without starting the engine).► Wait around 1 minute and switch off the ignition.► Operate the starter motor to start the engine.If the engine does not start at the first attempt, do not keep trying, but restart the procedure.
Tool kit
► For easier access, move the seat(s) forward.
Accessing the tools
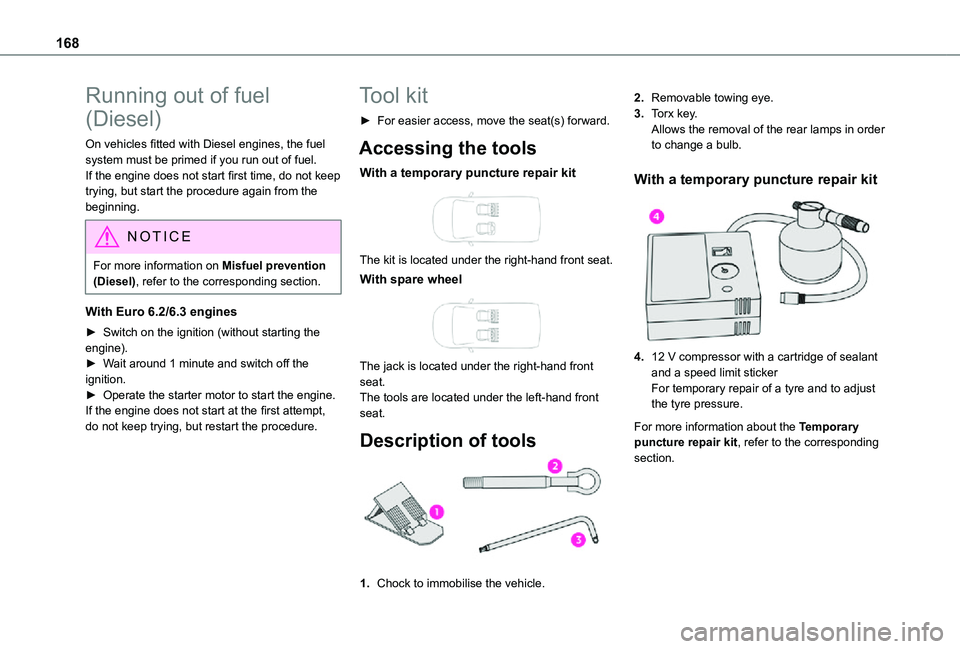
With a temporary puncture repair kit
The kit is located under the right-hand front seat.
With spare wheel
The jack is located under the right-hand front seat.The tools are located under the left-hand front seat.
Description of tools
1.Chock to immobilise the vehicle.
2.Removable towing eye.
3.Torx key.Allows the removal of the rear lamps in order to change a bulb.
With a temporary puncture repair kit
4.12 V compressor with a cartridge of sealant and a speed limit stickerFor temporary repair of a tyre and to adjust the tyre pressure.
For more information about the Temporary puncture repair kit, refer to the corresponding section.
Page 175 of 272
175
In the event of a breakdown
8
wheel is secured by the conical contact of each bolt.
WARNI NG
After changing a wheelStow the punctured wheel in the carrier.Go to a TOYOTA dealer or a qualified workshop as soon as possible.Have the punctured tyre examined. After inspection, the technician will advise you on whether the tyre can be repaired or if it must be replaced.
NOTIC E
Some driving aid functions should be disabled, e.g. the Active Safety Brake.
NOTIC E
If your vehicle has tyre under-inflation detection, check the tyre pressures and reinitialise the system.For more information on Under-inflation detection, refer to the corresponding section.
NOTIC E
Wheel with wheel trimWhen refitting the wheel, refit the wheel trim, starting by aligning the cutout with the valve and then pushing the trim into place all round its edge with the palm of your hand.
NOTIC E
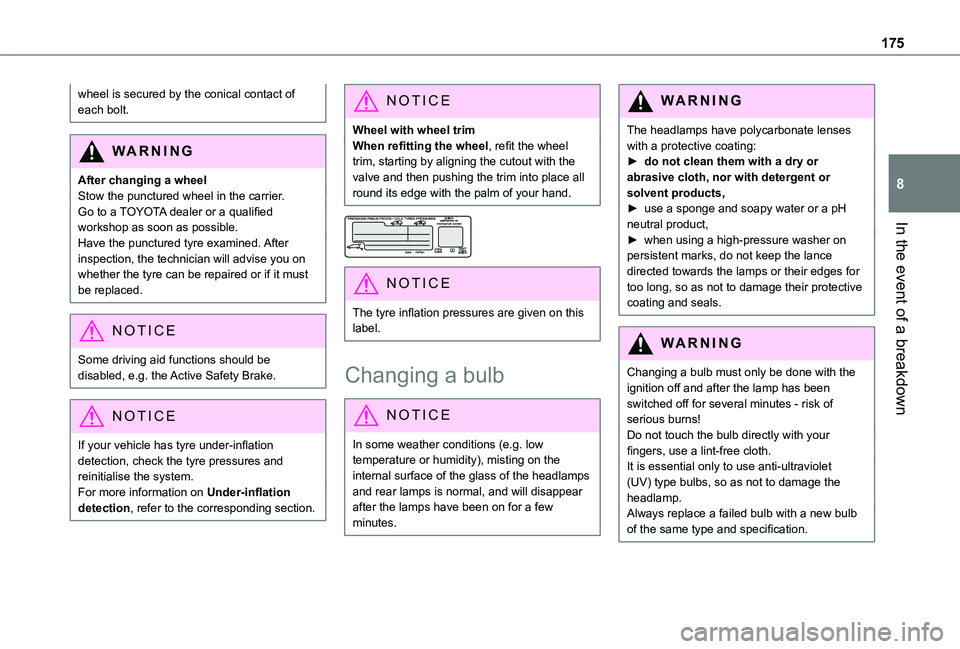
The tyre inflation pressures are given on this label.
Changing a bulb
NOTIC E
In some weather conditions (e.g. low temperature or humidity), misting on the internal surface of the glass of the headlamps and rear lamps is normal, and will disappear after the lamps have been on for a few minutes.
WARNI NG
The headlamps have polycarbonate lenses with a protective coating:► do not clean them with a dry or abrasive cloth, nor with detergent or solvent products,► use a sponge and soapy water or a pH neutral product,► when using a high-pressure washer on persistent marks, do not keep the lance directed towards the lamps or their edges for too long, so as not to damage their protective coating and seals.
WARNI NG
Changing a bulb must only be done with the ignition off and after the lamp has been switched off for several minutes - risk of serious burns!Do not touch the bulb directly with your fingers, use a lint-free cloth.It is essential only to use anti-ultraviolet (UV) type bulbs, so as not to damage the headlamp.Always replace a failed bulb with a new bulb of the same type and specification.
Page 176 of 272
176
WARNI NG
Opening the bonnet / Accessing the bulbsWith the engine warm, proceed with caution - risk of burns!Take care with objects or clothing that could be caught in the blades of the cooling fan - risk of strangulation!
NOTIC E
Halogen bulbs (Hx)To ensure good quality lighting, check that the bulb is correctly positioned in its housing.
WARNI NG
After changing a bulb
To refit, carry out the fitting operations in reverse order.Close the protective cover very carefully to guarantee the sealing of the lamps.
Types of bulb
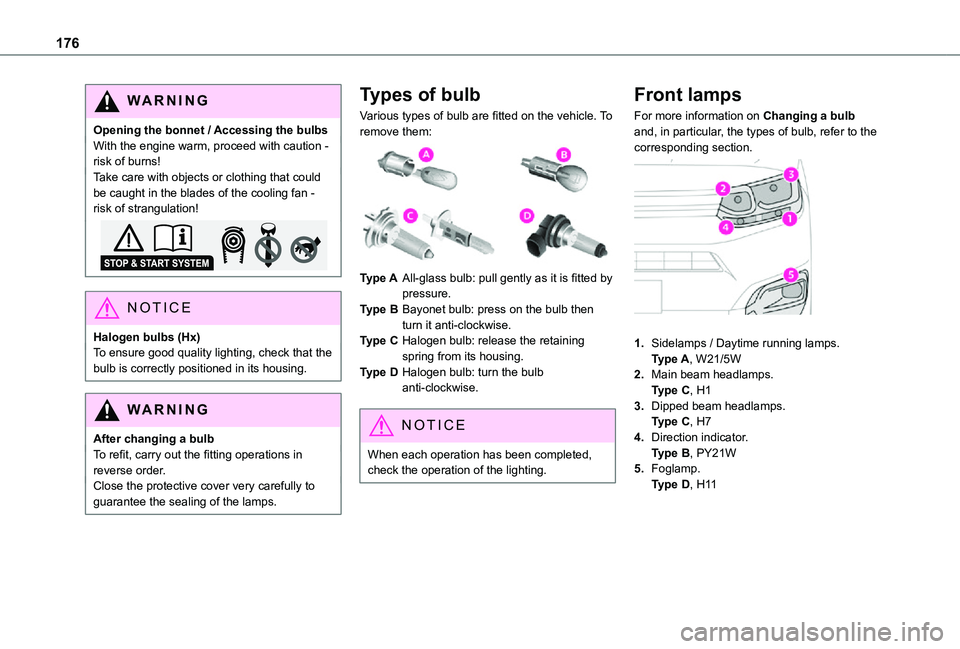
Various types of bulb are fitted on the vehicle. To remove them:
Type AAll-glass bulb: pull gently as it is fitted by pressure.
Type BBayonet bulb: press on the bulb then turn it anti-clockwise.
Type CHalogen bulb: release the retaining spring from its housing.
Type DHalogen bulb: turn the bulb anti-clockwise.
NOTIC E
When each operation has been completed, check the operation of the lighting.
Front lamps
For more information on Changing a bulb and, in particular, the types of bulb, refer to the corresponding section.
1.Sidelamps / Daytime running lamps.Type A, W21/5W
2.Main beam headlamps.Type C, H1
3.Dipped beam headlamps.Type C, H7
4.Direction indicator.Type B, PY21W
5.Foglamp.Type D, H11
Page 177 of 272
177
In the event of a breakdown
8
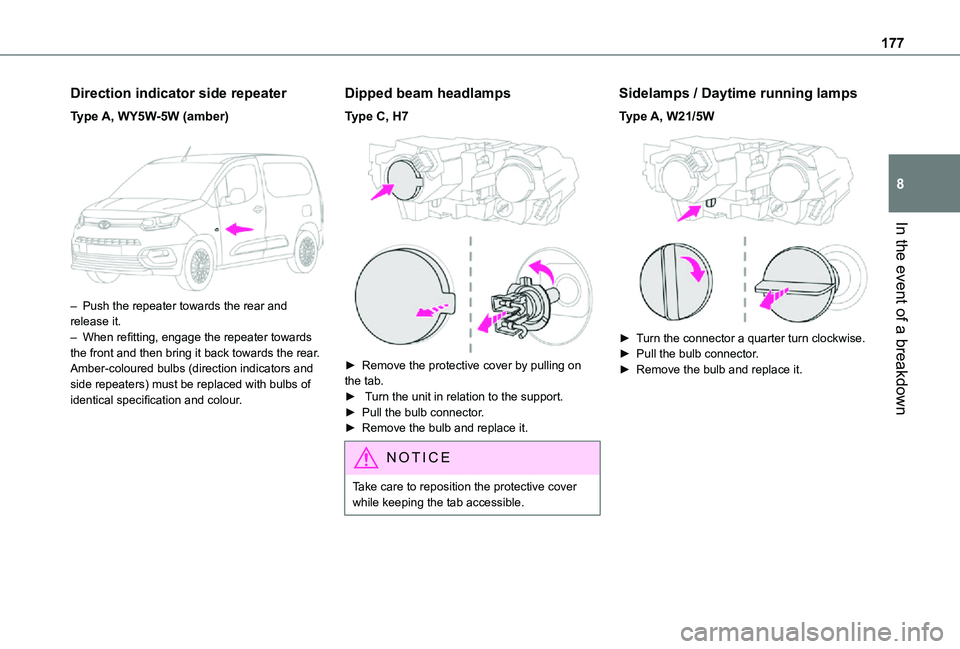
Direction indicator side repeater
Type A, WY5W-5W (amber)
– Push the repeater towards the rear and release it.– When refitting, engage the repeater towards the front and then bring it back towards the rear.Amber-coloured bulbs (direction indicators and side repeaters) must be replaced with bulbs of identical specification and colour.
Dipped beam headlamps
Type C, H7
► Remove the protective cover by pulling on the tab. ► Turn the unit in relation to the support.► Pull the bulb connector.► Remove the bulb and replace it.
NOTIC E
Take care to reposition the protective cover while keeping the tab accessible.
Sidelamps / Daytime running lamps
Type A, W21/5W
► Turn the connector a quarter turn clockwise.► Pull the bulb connector.► Remove the bulb and replace it.
Page 178 of 272
178
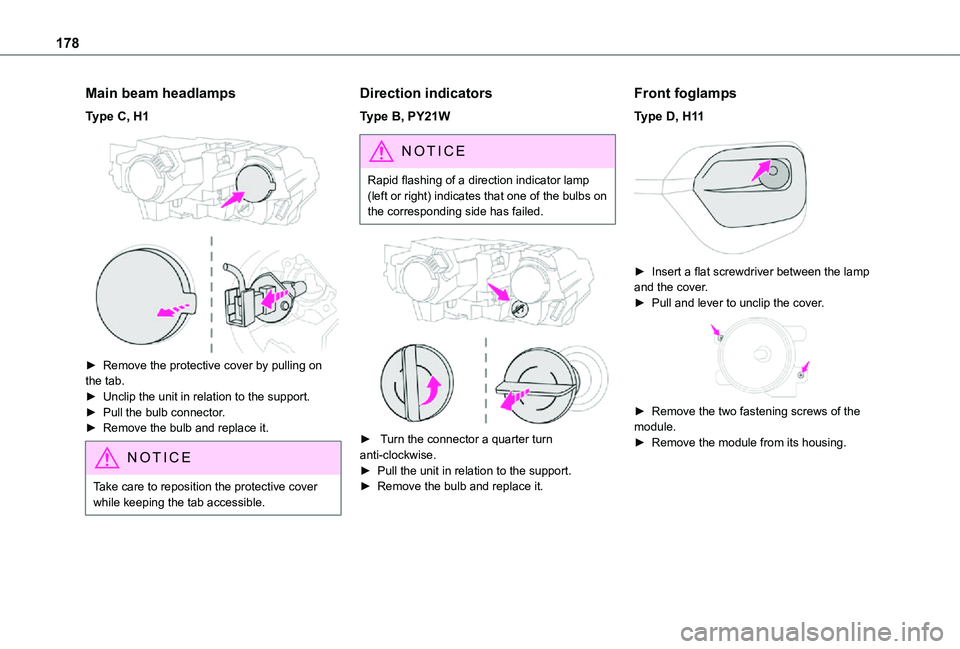
Main beam headlamps
Type C, H1
► Remove the protective cover by pulling on the tab.► Unclip the unit in relation to the support.► Pull the bulb connector.► Remove the bulb and replace it.
NOTIC E
Take care to reposition the protective cover while keeping the tab accessible.
Direction indicators
Type B, PY21W
NOTIC E
Rapid flashing of a direction indicator lamp (left or right) indicates that one of the bulbs on the corresponding side has failed.
► Turn the connector a quarter turn anti-clockwise.► Pull the unit in relation to the support.
► Remove the bulb and replace it.
Front foglamps
Type D, H11
► Insert a flat screwdriver between the lamp and the cover.► Pull and lever to unclip the cover.
► Remove the two fastening screws of the module.► Remove the module from its housing.