Page 147 of 272
147
Driving
6
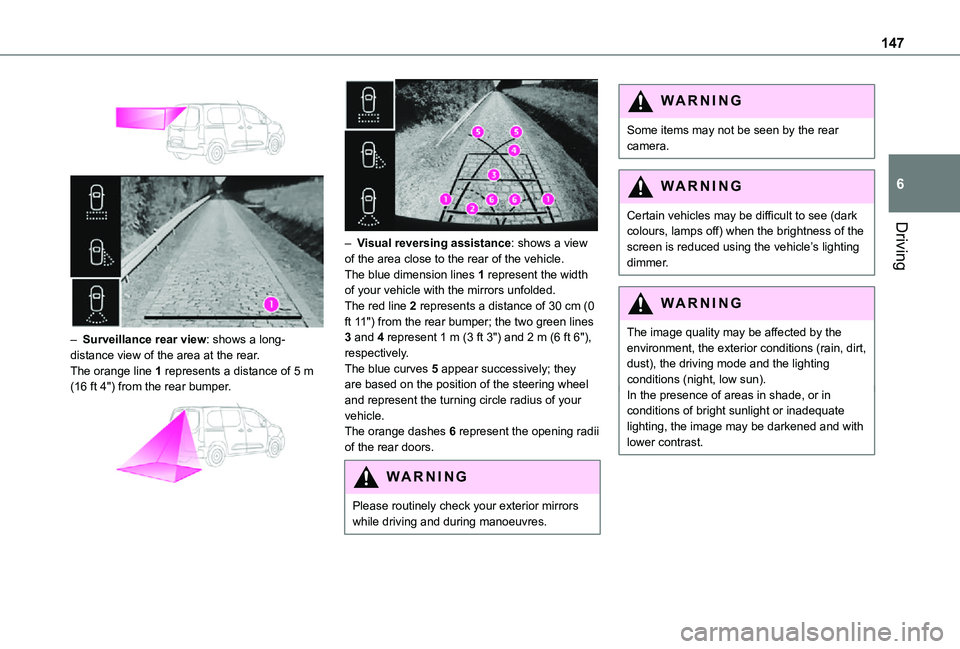
– Surveillance rear view: shows a long-distance view of the area at the rear.The orange line 1 represents a distance of 5 m (16 ft 4") from the rear bumper.
– Visual reversing assistance: shows a view of the area close to the rear of the vehicle.The blue dimension lines 1 represent the width of your vehicle with the mirrors unfolded.The red line 2 represents a distance of 30 cm (0 ft 11") from the rear bumper; the two green lines 3 and 4 represent 1 m (3 ft 3") and 2 m (6 ft 6"), respectively.The blue curves 5 appear successively; they are based on the position of the steering wheel and represent the turning circle radius of your vehicle.The orange dashes 6 represent the opening radii
of the rear doors.
WARNI NG
Please routinely check your exterior mirrors while driving and during manoeuvres.
WARNI NG
Some items may not be seen by the rear camera.
WARNI NG
Certain vehicles may be difficult to see (dark colours, lamps off) when the brightness of the
screen is reduced using the vehicle’s lighting dimmer.
WARNI NG
The image quality may be affected by the environment, the exterior conditions (rain, dirt, dust), the driving mode and the lighting conditions (night, low sun).In the presence of areas in shade, or in conditions of bright sunlight or inadequate lighting, the image may be darkened and with lower contrast.
Page 148 of 272
148
WARNI NG
Obstacles may appear further away than they actually are.During parking manoeuvres and lane changes, it is important to check the sides of the vehicle using the mirrors.The rear parking sensors also supplement the information on the vehicle's surroundings.
Activation / Deactivation
The system starts when the ignition is switched on.
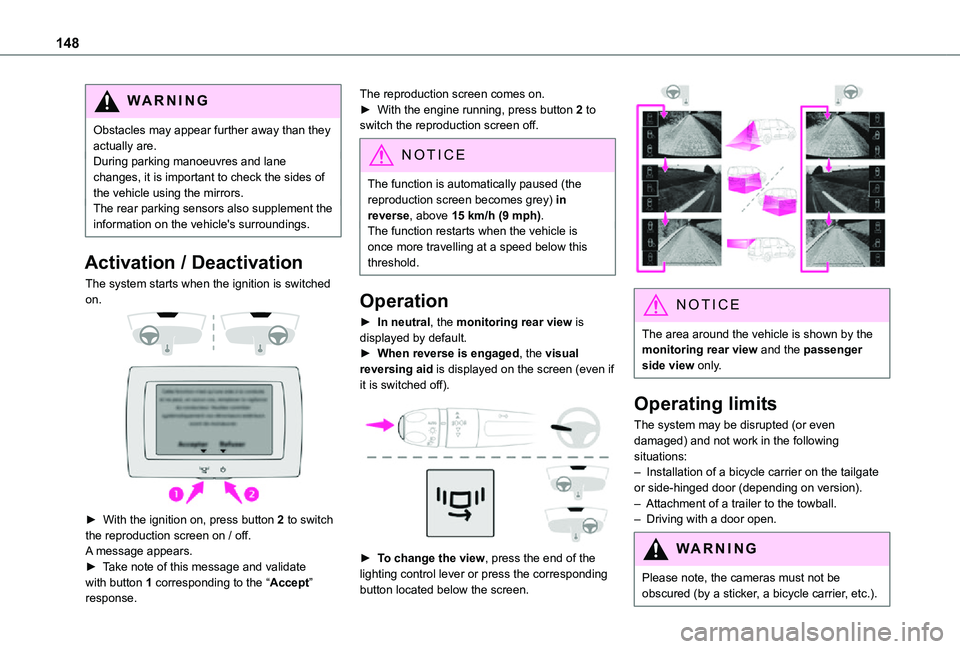
► With the ignition on, press button 2 to switch the reproduction screen on / off.
A message appears.► Take note of this message and validate with button 1 corresponding to the “Accept” response.
The reproduction screen comes on.► With the engine running, press button 2 to switch the reproduction screen off.
NOTIC E
The function is automatically paused (the reproduction screen becomes grey) in reverse, above 15 km/h (9 mph).The function restarts when the vehicle is
once more travelling at a speed below this threshold.
Operation
► In neutral, the monitoring rear view is displayed by default.► When reverse is engaged, the visual reversing aid is displayed on the screen (even if it is switched off).
► To change the view, press the end of the lighting control lever or press the corresponding button located below the screen.
NOTIC E
The area around the vehicle is shown by the monitoring rear view and the passenger side view only.
Operating limits
The system may be disrupted (or even damaged) and not work in the following situations:– Installation of a bicycle carrier on the tailgate or side-hinged door (depending on version).– Attachment of a trailer to the towball.– Driving with a door open.
WARNI NG
Please note, the cameras must not be obscured (by a sticker, a bicycle carrier, etc.).
Page 149 of 272
149
Driving
6
NOTIC E
The field of vision of the rear camera (surveillance rear view and visual reversing aid) may vary depending on the load in the vehicle.
NOTIC E
If the side-hinged door is opened during use of the surveillance rear view or the visual aid for reversing, in forward gear or reverse gear, the output screen becomes grey.If the front passenger door is opened during use of the passenger side view, in forward gear or reverse gear, the output screen becomes grey.
NOTIC E
If a trailer is attached to the towball, when reverse gear is engaged the visual reversing aid will no longer work until the trailer is disconnected. The surveillance rear view becomes the default view.
NOTIC E
If the system develops a malfunction, go to a TOYOTA dealer to avoid any safety problems.
Maintenance
recommendations
In bad or wintry weather, ensure that the sensors and cameras are not covered with mud, ice or snow.Regularly inspect the camera lenses to check that they are clean.If necessary, clean the cameras with a soft, dry cloth.
Page 172 of 272
172
Spare wheel
Procedure for changing a damaged wheel with the spare wheel using the tools provided with the vehicle.
NOTIC E
For more information on the Tool kit, refer to the corresponding section.
► Park the vehicle, taking care to avoid obstructing traffic, and apply the parking brake.► Follow the safety instructions (hazard warning lamps, warning triangle, wearing high visibility vest, etc.) according to the legislation in force in the country where you are driving.► Switch off the ignition.
Access to the spare wheel
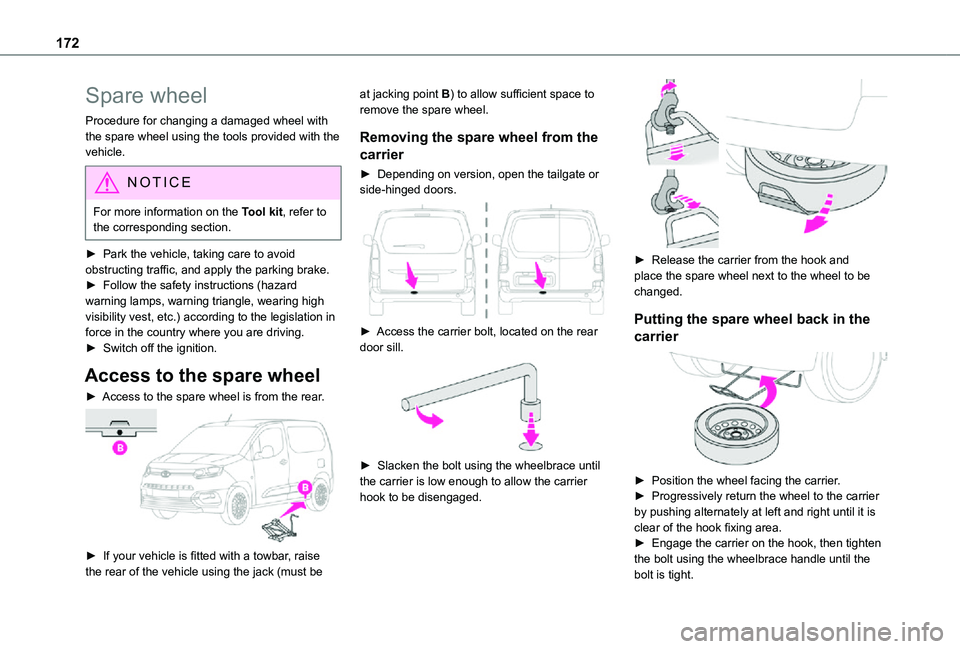
► Access to the spare wheel is from the rear.
► If your vehicle is fitted with a towbar, raise the rear of the vehicle using the jack (must be
at jacking point B) to allow sufficient space to remove the spare wheel.
Removing the spare wheel from the
carrier
► Depending on version, open the tailgate or side-hinged doors.
► Access the carrier bolt, located on the rear door sill.
► Slacken the bolt using the wheelbrace until the carrier is low enough to allow the carrier hook to be disengaged.
► Release the carrier from the hook and place the spare wheel next to the wheel to be changed.
Putting the spare wheel back in the
carrier
► Position the wheel facing the carrier.► Progressively return the wheel to the carrier by pushing alternately at left and right until it is clear of the hook fixing area.► Engage the carrier on the hook, then tighten the bolt using the wheelbrace handle until the bolt is tight.
Page 179 of 272
179
In the event of a breakdown
8
► Press the locking clip and disconnect the connector.► Turn the bulb holder a quarter turn anti-clockwise.► Remove the bulb holder.► Replace the faulty bulb.
NOTIC E
To replace these bulbs, it is possible to contact a TOYOTA dealer or a qualified workshop.
Rear lamps
For more information on Changing a bulb and, in particular, the types of bulb, refer to the corresponding section.
With side-hinged doors/tailgate
1.Brake lamps/sidelamps.Type B, P21/5W
2.Direction indicators.Type B, PY21W (amber)
3.Reversing lamps.Type B, P21W
4.Foglamps.Type B, P21W
► From the inside, disconnect the electrical connector at the rear of the lamps.
► Remove the two fixing bolts using the Torx key provided in your vehicle.For more information on the Tool kit, please refer to the corresponding section.► From the outside, pull the whole lamp unit towards you (with side-hinged doors) or towards the centre of the vehicle (with tailgate).
Page 180 of 272
180
► Open the tabs, then pull out the lamp holder.► Remove the faulty bulb by pressing lightly on it while turning it a quarter turn anti-clockwise.► Replace the bulb.
NOTIC E
Take care to reposition the tabs and the wiring correctly to avoid trapping the wire.
NOTIC E
After changing a rear direction indicator bulb, the reinitialisation time is approximately 2
minutes or more.
Number plate lamps
Type A, W5W - 5W
With side-hinged doors
► Unclip the interior trim.► Disconnect the connector by moving aside its tab.► Turn the bulb holder a quarter turn anti-clockwise.► Change the bulb.► Put the bulb holder back in place and reconnect the connector.► Put the trim back in place.
With tailgate
► Remove the plastic lens using a screwdriver.► Change the bulb.► Refit the plastic lens and press on it.
Third brake lamp
Type A, W16W - 16W
– Unscrew the two nuts.– Push the rods.– If necessary, disconnect the connector to remove the lamp.– Replace the bulb.
Page 196 of 272
196
Identification markings
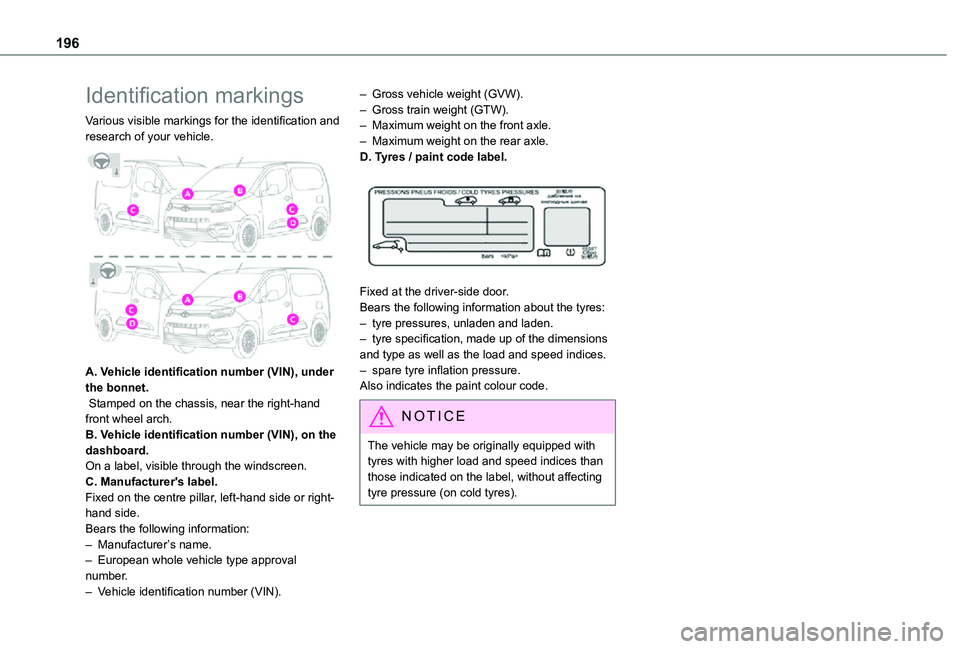
Various visible markings for the identification and research of your vehicle.
A. Vehicle identification number (VIN), under the bonnet. Stamped on the chassis, near the right-hand front wheel arch.B. Vehicle identification number (VIN), on the dashboard.On a label, visible through the windscreen.C. Manufacturer's label.Fixed on the centre pillar, left-hand side or right-hand side.Bears the following information:– Manufacturer’s name.
– European whole vehicle type approval number.– Vehicle identification number (VIN).
– Gross vehicle weight (GVW).– Gross train weight (GTW).– Maximum weight on the front axle.– Maximum weight on the rear axle.D. Tyres / paint code label.
Fixed at the driver-side door.Bears the following information about the tyres:– tyre pressures, unladen and laden.– tyre specification, made up of the dimensions and type as well as the load and speed indices.– spare tyre inflation pressure.Also indicates the paint colour code.
NOTIC E
The vehicle may be originally equipped with tyres with higher load and speed indices than those indicated on the label, without affecting tyre pressure (on cold tyres).
Page 253 of 272
253
Alphabetical index
Checks, routine 161–162Child lock 98Children 89, 97Children (safety) 98Child seats 89, 93–94, 96–97Child seats, conventional 96Cleaning (advice) 166–167Closing the doors 24, 29Collision Risk Alert 133–134Connected applications 238Connection, Bluetooth 205, 219–220, 239, 243–244Connection, MirrorLink 217–218, 237Connection, Wi-Fi network 239–240Connectivity 237Container, AdBlue® 164Control, emergency boot release 31Control, emergency door 23, 30–31Control, heated seats 44Control stalk, lighting 70, 72Control stalk, wipers 75–78Courtesy lamp 69
Courtesy lamp, front 69Courtesy lamp, rear 69Courtesy lamps 69Cruise control 123, 126, 128–129, 133Cruise control, adaptive 129Cruise control by speed limit recognition 123Cruise control, dynamic with Stop function 123Cup holder 49
D
DAB (Digital Audio Broadcasting) - Digital radio 200–201, 215, 241Date (setting) 222, 248Daytime running lamps 72, 176–177Deactivating the passenger airbag 90, 95–96Deactivation of DSC (ESC) 83Deadlocking 30Defrosting 46, 64–65Demisting 64–65Demisting, rear 45, 66Demisting, rear screen 45, 66Dimensions 189Dipstick 159Direction indicators 71–72, 176, 178–179Display, head-up 11 8Doors, side 36Doors, side-hinged 29–30Driver’s attention warning 141–142Driving 99–100Driving abroad 71
Driving aids camera (warnings) 120Driving aids (recommendations) 11 9Driving economically 7Dynamic stability control (DSC) 83, 85–86
E
EBFD 82Eco-driving (advice) 7
Economy mode 156Electric windows 40–41Electronic brake force distribution (EBFD) 82–83Emergency braking assistance (EBA) 83Emergency call 80–81Emergency warning lamps 82Emissions control system, SCR 163Energy economy mode 156Engine compartment 159Engine, Diesel 150, 159, 168, 195Engine, petrol 159, 194Engines 193–195Environment 7, 32, 68ESC (electronic stability control) 82Expanded traffic sign recognition 124
F
Fatigue detection 141–142Filling the AdBlue® tank 161, 165
Filling the fuel tank 151–152Filter, air 162Filter, oil 162Filter, particle 161–162Filter, passenger compartment 60, 162Finisher 175Fitting a wheel 173–175Fitting roof bars 157Fittings, interior 49Flap, fuel filler 151–152