2021 TOYOTA PROACE CITY check engine light
[x] Cancel search: check engine lightPage 148 of 272
148
WARNI NG
Obstacles may appear further away than they actually are.During parking manoeuvres and lane changes, it is important to check the sides of the vehicle using the mirrors.The rear parking sensors also supplement the information on the vehicle's surroundings.
Activation / Deactivation
The system starts when the ignition is switched on.
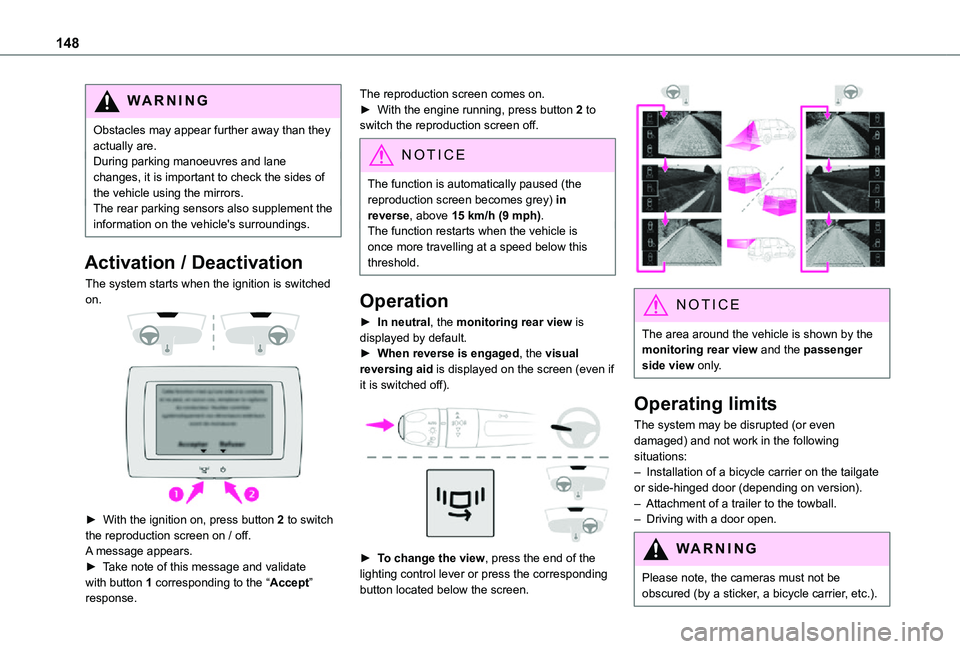
► With the ignition on, press button 2 to switch the reproduction screen on / off.
A message appears.► Take note of this message and validate with button 1 corresponding to the “Accept” response.
The reproduction screen comes on.► With the engine running, press button 2 to switch the reproduction screen off.
NOTIC E
The function is automatically paused (the reproduction screen becomes grey) in reverse, above 15 km/h (9 mph).The function restarts when the vehicle is
once more travelling at a speed below this threshold.
Operation
► In neutral, the monitoring rear view is displayed by default.► When reverse is engaged, the visual reversing aid is displayed on the screen (even if it is switched off).
► To change the view, press the end of the lighting control lever or press the corresponding button located below the screen.
NOTIC E
The area around the vehicle is shown by the monitoring rear view and the passenger side view only.
Operating limits
The system may be disrupted (or even damaged) and not work in the following situations:– Installation of a bicycle carrier on the tailgate or side-hinged door (depending on version).– Attachment of a trailer to the towball.– Driving with a door open.
WARNI NG
Please note, the cameras must not be obscured (by a sticker, a bicycle carrier, etc.).
Page 176 of 272
176
WARNI NG
Opening the bonnet / Accessing the bulbsWith the engine warm, proceed with caution - risk of burns!Take care with objects or clothing that could be caught in the blades of the cooling fan - risk of strangulation!
NOTIC E
Halogen bulbs (Hx)To ensure good quality lighting, check that the bulb is correctly positioned in its housing.
WARNI NG
After changing a bulb
To refit, carry out the fitting operations in reverse order.Close the protective cover very carefully to guarantee the sealing of the lamps.
Types of bulb
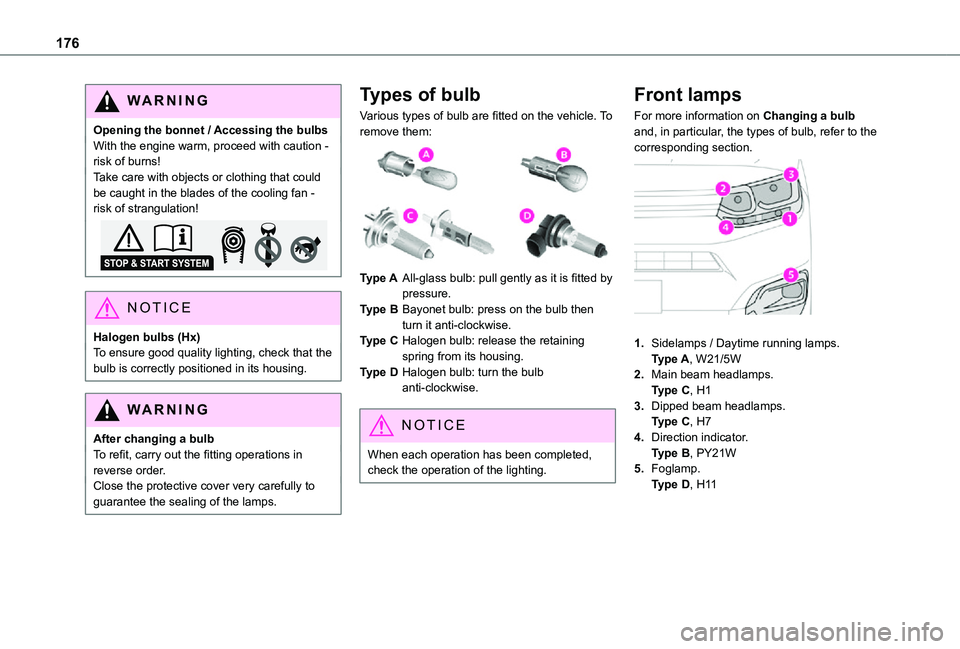
Various types of bulb are fitted on the vehicle. To remove them:
Type AAll-glass bulb: pull gently as it is fitted by pressure.
Type BBayonet bulb: press on the bulb then turn it anti-clockwise.
Type CHalogen bulb: release the retaining spring from its housing.
Type DHalogen bulb: turn the bulb anti-clockwise.
NOTIC E
When each operation has been completed, check the operation of the lighting.
Front lamps
For more information on Changing a bulb and, in particular, the types of bulb, refer to the corresponding section.
1.Sidelamps / Daytime running lamps.Type A, W21/5W
2.Main beam headlamps.Type C, H1
3.Dipped beam headlamps.Type C, H7
4.Direction indicator.Type B, PY21W
5.Foglamp.Type D, H11
Page 184 of 272
184
Starting using another
battery
When your vehicle's battery is discharged, the engine can be started using a backup battery (external or from another vehicle) and jump leads or using a battery booster.
WARNI NG
Never start the engine by connecting a battery charger.Never use a 24 V or higher battery booster.Check beforehand that the backup battery has a nominal voltage of 12 V and a capacity at least equal to that of the discharged battery.The two vehicles must not be in contact with each other.Switch off all the electrical consumers on both vehicles (audio system, wipers, lighting, etc.).Make sure that the jump leads are not close to the moving parts of the engine (fan, belt, etc.).Do not disconnect the (+) terminal while the engine is running.
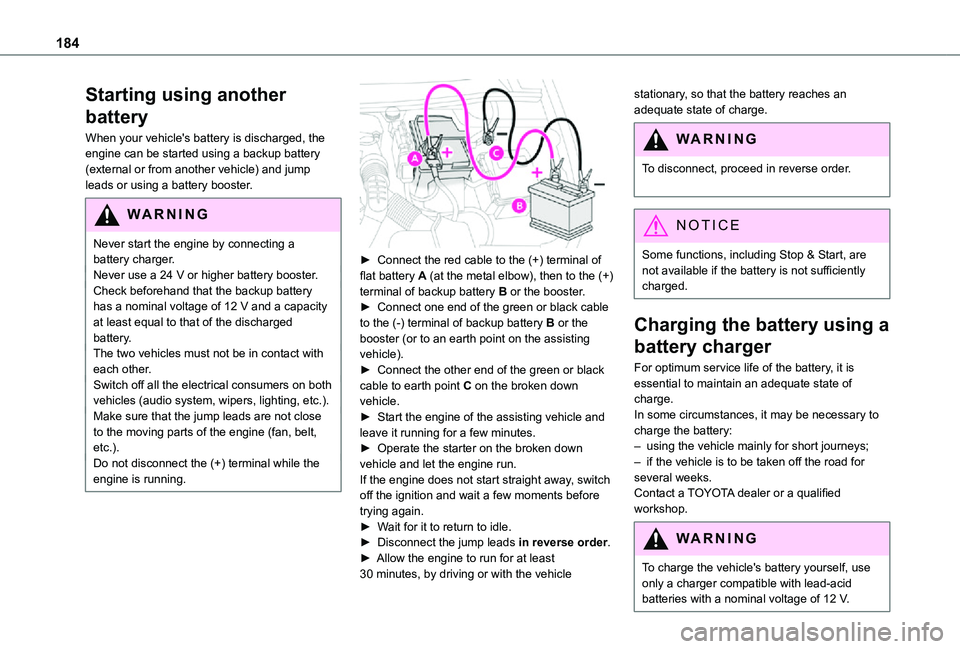
► Connect the red cable to the (+) terminal of flat battery A (at the metal elbow), then to the (+) terminal of backup battery B or the booster.► Connect one end of the green or black cable to the (-) terminal of backup battery B or the booster (or to an earth point on the assisting vehicle).► Connect the other end of the green or black cable to earth point C on the broken down vehicle.► Start the engine of the assisting vehicle and leave it running for a few minutes.► Operate the starter on the broken down vehicle and let the engine run.If the engine does not start straight away, switch off the ignition and wait a few moments before trying again.► Wait for it to return to idle.► Disconnect the jump leads in reverse order.► Allow the engine to run for at least 30 minutes, by driving or with the vehicle
stationary, so that the battery reaches an adequate state of charge.
WARNI NG
To disconnect, proceed in reverse order.
NOTIC E
Some functions, including Stop & Start, are not available if the battery is not sufficiently charged.
Charging the battery using a
battery charger
For optimum service life of the battery, it is essential to maintain an adequate state of charge.In some circumstances, it may be necessary to charge the battery:– using the vehicle mainly for short journeys;– if the vehicle is to be taken off the road for several weeks.Contact a TOYOTA dealer or a qualified workshop.
WARNI NG
To charge the vehicle's battery yourself, use only a charger compatible with lead-acid batteries with a nominal voltage of 12 V.
Page 185 of 272
185
In the event of a breakdown
8
WARNI NG
Follow the instructions provided by the manufacturer of the charger.Never reverse polarities.
NOTIC E
It is not necessary to disconnect the battery.
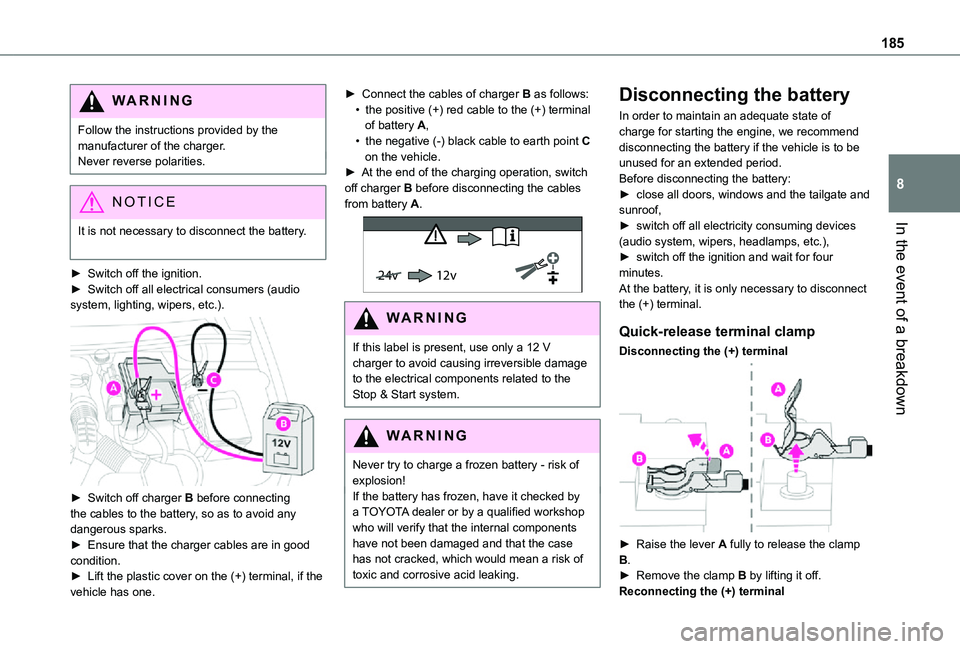
► Switch off the ignition.► Switch off all electrical consumers (audio system, lighting, wipers, etc.).
► Switch off charger B before connecting the cables to the battery, so as to avoid any dangerous sparks.
► Ensure that the charger cables are in good condition.► Lift the plastic cover on the (+) terminal, if the vehicle has one.
► Connect the cables of charger B as follows:• the positive (+) red cable to the (+) terminal of battery A,• the negative (-) black cable to earth point C on the vehicle.► At the end of the charging operation, switch off charger B before disconnecting the cables from battery A.
24v 12v
WARNI NG
If this label is present, use only a 12 V charger to avoid causing irreversible damage to the electrical components related to the Stop & Start system.
WARNI NG
Never try to charge a frozen battery - risk of explosion!If the battery has frozen, have it checked by a TOYOTA dealer or by a qualified workshop who will verify that the internal components have not been damaged and that the case has not cracked, which would mean a risk of toxic and corrosive acid leaking.
Disconnecting the battery
In order to maintain an adequate state of charge for starting the engine, we recommend disconnecting the battery if the vehicle is to be unused for an extended period.Before disconnecting the battery:► close all doors, windows and the tailgate and sunroof,► switch off all electricity consuming devices (audio system, wipers, headlamps, etc.),► switch off the ignition and wait for four minutes.At the battery, it is only necessary to disconnect the (+) terminal.
Quick-release terminal clamp
Disconnecting the (+) terminal
► Raise the lever A fully to release the clamp B.► Remove the clamp B by lifting it off.Reconnecting the (+) terminal
Page 253 of 272
253
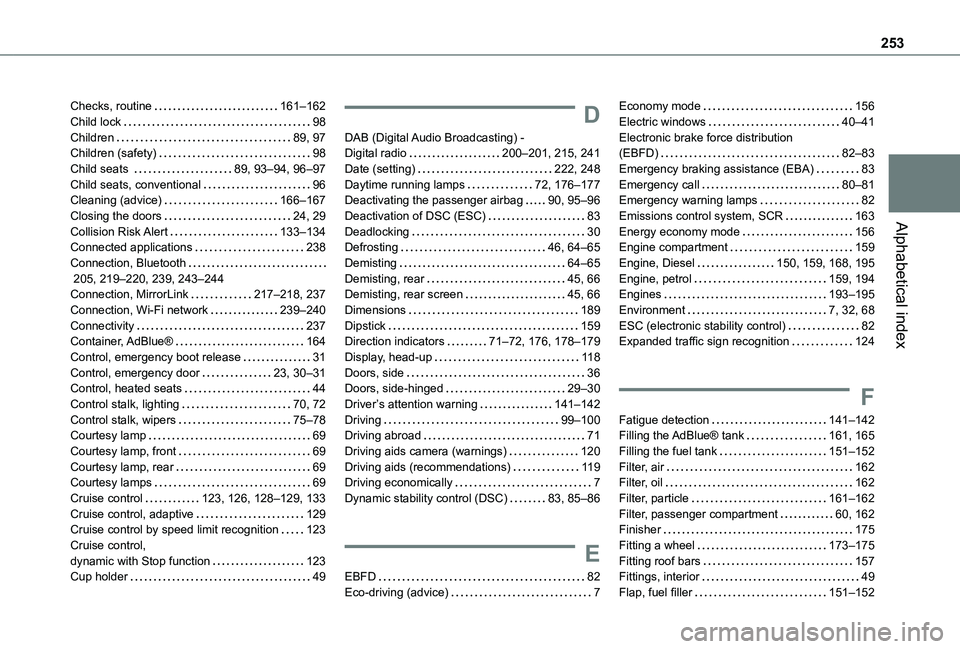
Alphabetical index
Checks, routine 161–162Child lock 98Children 89, 97Children (safety) 98Child seats 89, 93–94, 96–97Child seats, conventional 96Cleaning (advice) 166–167Closing the doors 24, 29Collision Risk Alert 133–134Connected applications 238Connection, Bluetooth 205, 219–220, 239, 243–244Connection, MirrorLink 217–218, 237Connection, Wi-Fi network 239–240Connectivity 237Container, AdBlue® 164Control, emergency boot release 31Control, emergency door 23, 30–31Control, heated seats 44Control stalk, lighting 70, 72Control stalk, wipers 75–78Courtesy lamp 69
Courtesy lamp, front 69Courtesy lamp, rear 69Courtesy lamps 69Cruise control 123, 126, 128–129, 133Cruise control, adaptive 129Cruise control by speed limit recognition 123Cruise control, dynamic with Stop function 123Cup holder 49
D
DAB (Digital Audio Broadcasting) - Digital radio 200–201, 215, 241Date (setting) 222, 248Daytime running lamps 72, 176–177Deactivating the passenger airbag 90, 95–96Deactivation of DSC (ESC) 83Deadlocking 30Defrosting 46, 64–65Demisting 64–65Demisting, rear 45, 66Demisting, rear screen 45, 66Dimensions 189Dipstick 159Direction indicators 71–72, 176, 178–179Display, head-up 11 8Doors, side 36Doors, side-hinged 29–30Driver’s attention warning 141–142Driving 99–100Driving abroad 71
Driving aids camera (warnings) 120Driving aids (recommendations) 11 9Driving economically 7Dynamic stability control (DSC) 83, 85–86
E
EBFD 82Eco-driving (advice) 7
Economy mode 156Electric windows 40–41Electronic brake force distribution (EBFD) 82–83Emergency braking assistance (EBA) 83Emergency call 80–81Emergency warning lamps 82Emissions control system, SCR 163Energy economy mode 156Engine compartment 159Engine, Diesel 150, 159, 168, 195Engine, petrol 159, 194Engines 193–195Environment 7, 32, 68ESC (electronic stability control) 82Expanded traffic sign recognition 124
F
Fatigue detection 141–142Filling the AdBlue® tank 161, 165
Filling the fuel tank 151–152Filter, air 162Filter, oil 162Filter, particle 161–162Filter, passenger compartment 60, 162Finisher 175Fitting a wheel 173–175Fitting roof bars 157Fittings, interior 49Flap, fuel filler 151–152
Page 255 of 272
255
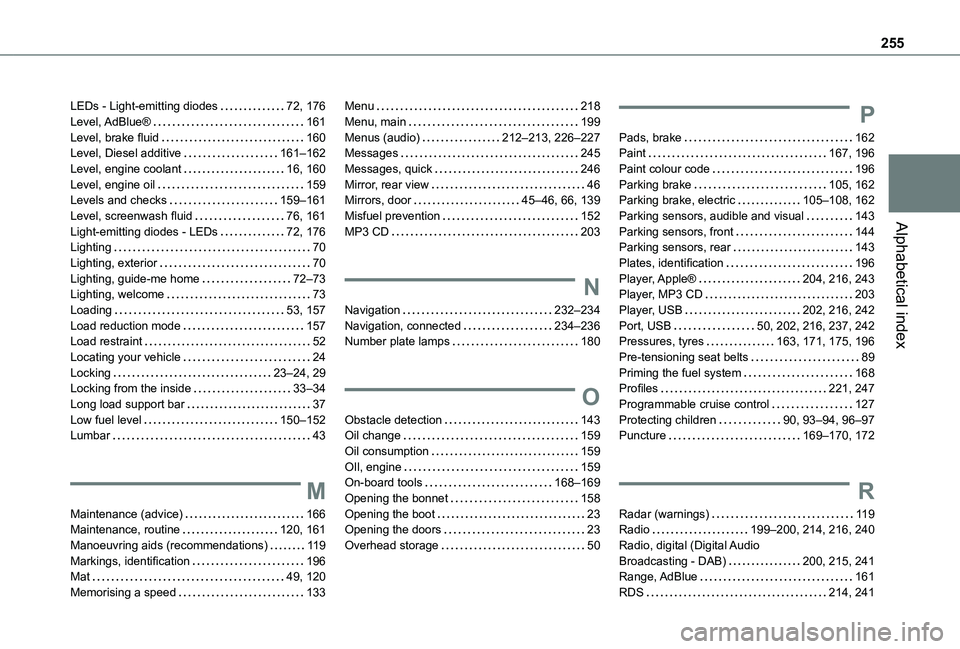
Alphabetical index
LEDs - Light-emitting diodes 72, 176Level, AdBlue® 161Level, brake fluid 160Level, Diesel additive 161–162Level, engine coolant 16, 160Level, engine oil 159Levels and checks 159–161Level, screenwash fluid 76, 161Light-emitting diodes - LEDs 72, 176Lighting 70Lighting, exterior 70Lighting, guide-me home 72–73Lighting, welcome 73Loading 53, 157Load reduction mode 157Load restraint 52Locating your vehicle 24Locking 23–24, 29Locking from the inside 33–34Long load support bar 37Low fuel level 150–152Lumbar 43
M
Maintenance (advice) 166Maintenance, routine 120, 161Manoeuvring aids (recommendations) 11 9Markings, identification 196Mat 49, 120Memorising a speed 133
Menu 218Menu, main 199Menus (audio) 212–213, 226–227Messages 245Messages, quick 246Mirror, rear view 46Mirrors, door 45–46, 66, 139Misfuel prevention 152MP3 CD 203
N
Navigation 232–234Navigation, connected 234–236Number plate lamps 180
O
Obstacle detection 143Oil change 159
Oil consumption 159OIl, engine 159On-board tools 168–169Opening the bonnet 158Opening the boot 23Opening the doors 23Overhead storage 50
P
Pads, brake 162Paint 167, 196Paint colour code 196Parking brake 105, 162Parking brake, electric 105–108, 162Parking sensors, audible and visual 143Parking sensors, front 144Parking sensors, rear 143Plates, identification 196Player, Apple® 204, 216, 243Player, MP3 CD 203Player, USB 202, 216, 242Port, USB 50, 202, 216, 237, 242Pressures, tyres 163, 171, 175, 196Pre-tensioning seat belts 89Priming the fuel system 168Profiles 221, 247Programmable cruise control 127Protecting children 90, 93–94, 96–97Puncture 169–170, 172
R
Radar (warnings) 11 9Radio 199–200, 214, 216, 240Radio, digital (Digital Audio Broadcasting - DAB) 200, 215, 241Range, AdBlue 161RDS 214, 241