Page 343 of 548

3436-1. Maintenance and care
6
Maintenance and care
C-HR_OM_USA_OM10684U
NOTICE
■Cleaning the exterior lights
● Wash carefully. Do not use organic substances or scrub with a h ard brush.
This may damage the surfaces of the lights.
● Do not apply wax to the surfaces of the lights.
Wax may cause damage to the lenses.
■ To prevent damage to th e windshield wiper arms
When lifting the wiper arms away from the windshield, pull the driver side
wiper arm upward first, and then the passenger side. When returning the
wipers to their original position, do so from the passenger sid e first.
■ When using a high pressure car wash
● When washing the vehicle, do not let water of the high pressure washer hit
directly or the vicinity of the camera. Due to the shock from t he high pres-
sure water, it is possible the device may not operate as normal .
● Do not spray water directly on the radar which is equipped behind the
emblem. Otherwise it may cause the device to be damaged.
● Do not bring the nozzle tip close to boots (rubber or resin man ufactured
cover), connectors or the following parts. The parts may be dam aged if
they come into contact with high-pressure water.
• Traction related parts
• Steering parts
• Suspension parts
• Brake parts
● Keep the cleaning nozzle at least 11.9 in. (30 cm) away from th e vehicle
body. Otherwise resin section, such as moldings and bumpers, ma y be
deformed and damaged.
Also, do not continuously hold the nozzle in the same place.
● Do not spray the lower part of the windshield continuously.
If water enters the air conditioning system intake located near the lower
part of the windshield, the air conditioning system may not ope rate cor-
rectly.
● Do not wash the underside of the vehicle using a high pressure car
washer.
■ When raising the windshield wiper arms
Make sure to hold the hook parts of the
wiper arms to raise them.
Do not hold only the wiper blades when
raising them, or it may cause deformation
of the wiper blades.
Hook parts
Page 357 of 548
3576-3. Do-it-yourself maintenance
6
Maintenance and care
C-HR_OM_USA_OM10684U
WARNING
■When working near the electric cooling fan or radiator grille
Vehicles without a smart key system: Be sure the engine switch is off. With
the engine switch in the “ON” position, the electric cooling fan may automat-
ically start to run if the air conditioning is on and/or the co olant temperature
is high. ( P. 366)
Vehicles with a smart key system: Be sure the engine switch is off. With the
engine switch in IGNITION ON mode, the electric cooling fan may automat-
ically start to run if the air conditioning is on and/or the co olant temperature
is high. ( P. 366)
■ Safety glasses
Wear safety glasses to prevent flying or falling material, fluid spray, etc.,
from getting in your eyes.
NOTICE
■If you remove the air cleaner filter
Driving with the air cleaner filter removed may cause excessive engine wear
due to dirt in the air.
Page 385 of 548

3856-3. Do-it-yourself maintenance
6
Maintenance and care
C-HR_OM_USA_OM10684U
NOTICE
■Repairing or replacing tires, wheels, tire pressure warning valves,
transmitters and tire valve caps
●When removing or fitting the wheels, tires or the tire pressure warning
valves and transmitters, contact your Toyota dealer as the tire pres-
sure warning valves and transmitters may be damaged if not hand led
correctly.
●Make sure to install the tire val ve caps. If the tire valve caps are not
installed, water could enter the tire pressure warning valves a nd the
tire pressure warning valves could be bound.
●When replacing tire valve caps, do not use tire valve caps othe r than
those specified. The cap may become stuck.
■To avoid damage to the tire pressure warning valves and transmi t-
ters
When a tire is repaired with liqui d sealants, the tire pressure warning
valve and transmitter may not operate properly. If a liquid sea lant is
used, contact your Toyota dealer or other qualified service shop as soon
as possible. Make sure to replac e the tire pressure warning valve and
transmitter when replacing the tire. ( P. 3 7 7 )
■Driving on rough roads
Take particular care when drivi ng on roads with loose surfaces or pot-
holes.
These conditions may cause losses in tire inflation pressure, reducing
the cushioning ability of the t ires. In addition, driving on ro ugh roads
may cause damage to the tires themselves, as well as the vehicl e’s
wheels and body.
■If tire inflation pressure of e ach tire becomes low while drivi ng
Do not continue driving, or your t ires and/or wheels may be ruined.
Page 389 of 548
3896-3. Do-it-yourself maintenance
6
Maintenance and care
C-HR_OM_USA_OM10684U
WARNING
■Proper inflation is critical to save tire performance
Keep your tires properly inflated.
If the tires are not properly in flated, the following conditions may occur
which could lead to an accident r esulting in death or serious injury:
●Excessive wear
●Uneven wear
●Poor handling
●Possibility of blowouts resulting from overh eated tires
●Air leaking from between tire and wheel
●Wheel deformation and/or tire damage
●Greater possibility of tire damage while driving (due to road hazards,
expansion joints, sharp ed ges in the road, etc.)
NOTICE
■When inspecting and adjusti ng tire inflation pressure
Be sure to put the tire valve caps back on.
If a valve cap is not installed , dirt or moisture may get into the valve and
cause an air leak, resulting in decreased tire inflation pressu re.
Page 393 of 548
3936-3. Do-it-yourself maintenance
6
Maintenance and care
C-HR_OM_USA_OM10684U
Air conditioning filter
Turn the engine switch off.
Open the glove box. Slide off
the damper.
Push in each side of the glove
box to disconnect the claws,
and then slowly and fully open
the glove box while supporting
it.
The air conditioning filter must be changed regularly to maintain
air conditioning efficiency.
Removal method
1
2
3
Page 394 of 548
3946-3. Do-it-yourself maintenance
C-HR_OM_USA_OM10684U
With the glove box fully open,
slightly lift up the glove box and
pull toward the seat to detach
the bottom of the glove box.
Do not use excessive force if the
glove box does not detach when
lightly pulled. Instead, pull toward
the seat while slightly adjusting the
height of the glove box.
Ty p e A
Remove the filter cover.
Remove the air conditioning fil-
ter and replace it with a new
one.
The “UP” marks shown on the fil-
ter should be pointing up.
When installing, rever se the steps listed.
4
5
6
7
Page 395 of 548
3956-3. Do-it-yourself maintenance
6
Maintenance and care
C-HR_OM_USA_OM10684U
Ty p e B
Remove the filter cover.Unlock the filter cover.
Move the filter cover in the
direction of the arrow, and
then pull it out of the claws.
Remove the filter case.
Remove the air conditioning fil-
ter from the filter case and
replace it with a new one.
The “ UP” marks shown on the fil-
ter should be pointing up.
When installing, rever se the steps listed.
5
6
7
8
Page 396 of 548

3966-3. Do-it-yourself maintenance
C-HR_OM_USA_OM10684U
■Checking interval
Inspect and replace the air conditioning filter according to th e maintenance
schedule. In dusty areas or areas with heavy traffic flow, earl y replacement
may be required. (For scheduled maintenance information, please refer to the
“Schedule maintenance guide” or “Owner’s Manual Supplement”.)
■ If air flow from the ven ts decreases dramatically
The filter may be clogged. Check the filter and replace if nece ssary.
NOTICE
■When using the air conditioning system
Make sure that a filter is always installed.
Using the air conditioning system without a filter may cause da mage to the
system.
■ When removing the glove box
Always follow the specified procedure to remove the glove box ( P. 393). If
the glove box is removed without following the specified proced ure, the
hinge of the glove box may become damaged.
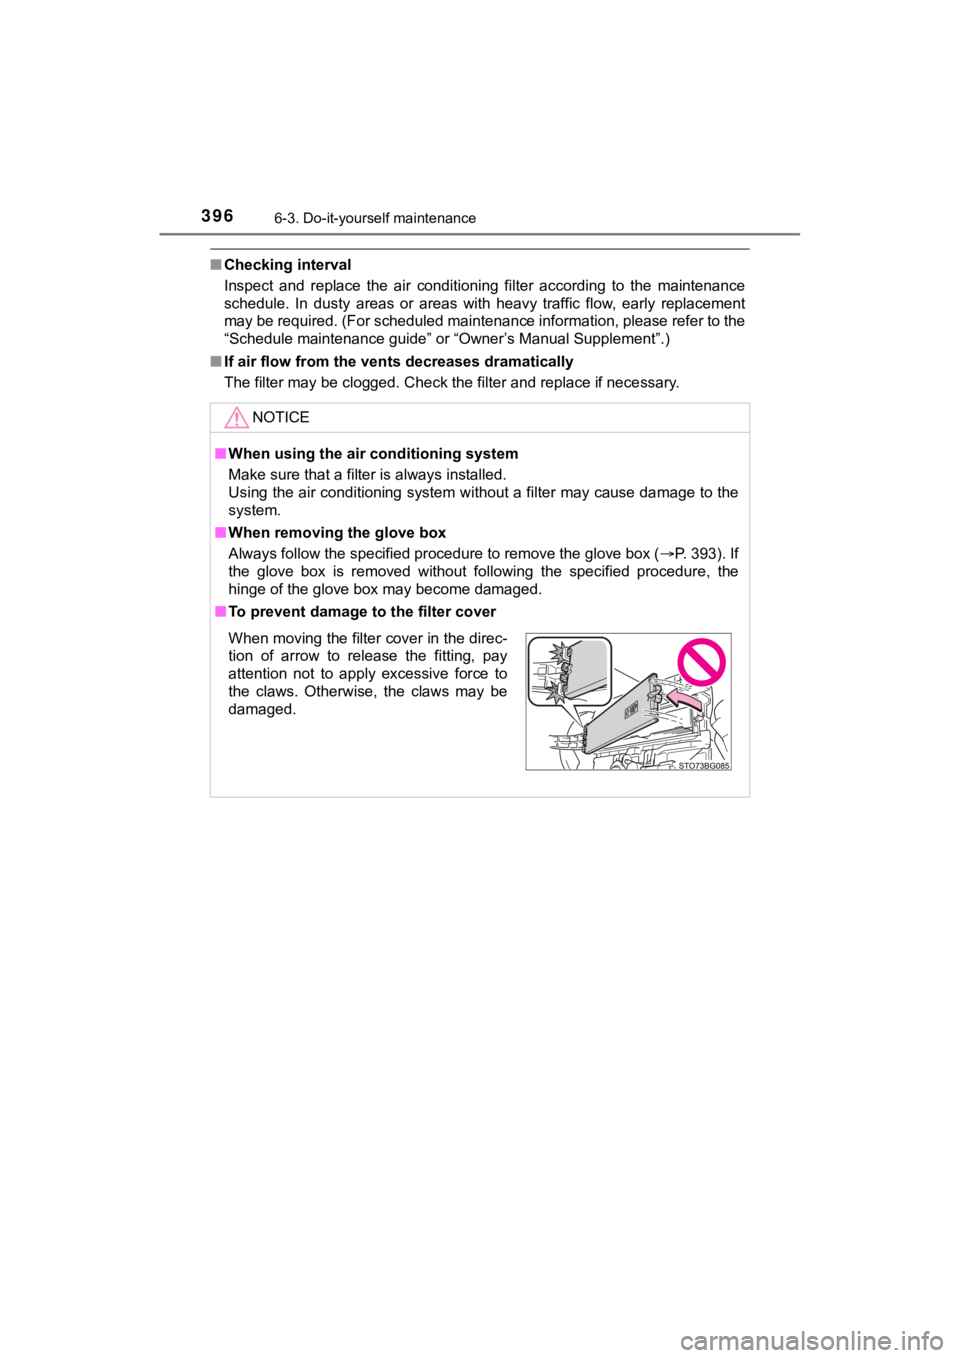
■ To prevent damage to the filter cover
When moving the filter cover in the direc-
tion of arrow to release the fitting, pay
attention not to apply excessive force to
the claws. Otherwise, the claws may be
damaged.