2021 TOYOTA 4RUNNER height
[x] Cancel search: heightPage 30 of 592
301-1. For safe use
4RUNNER (U)
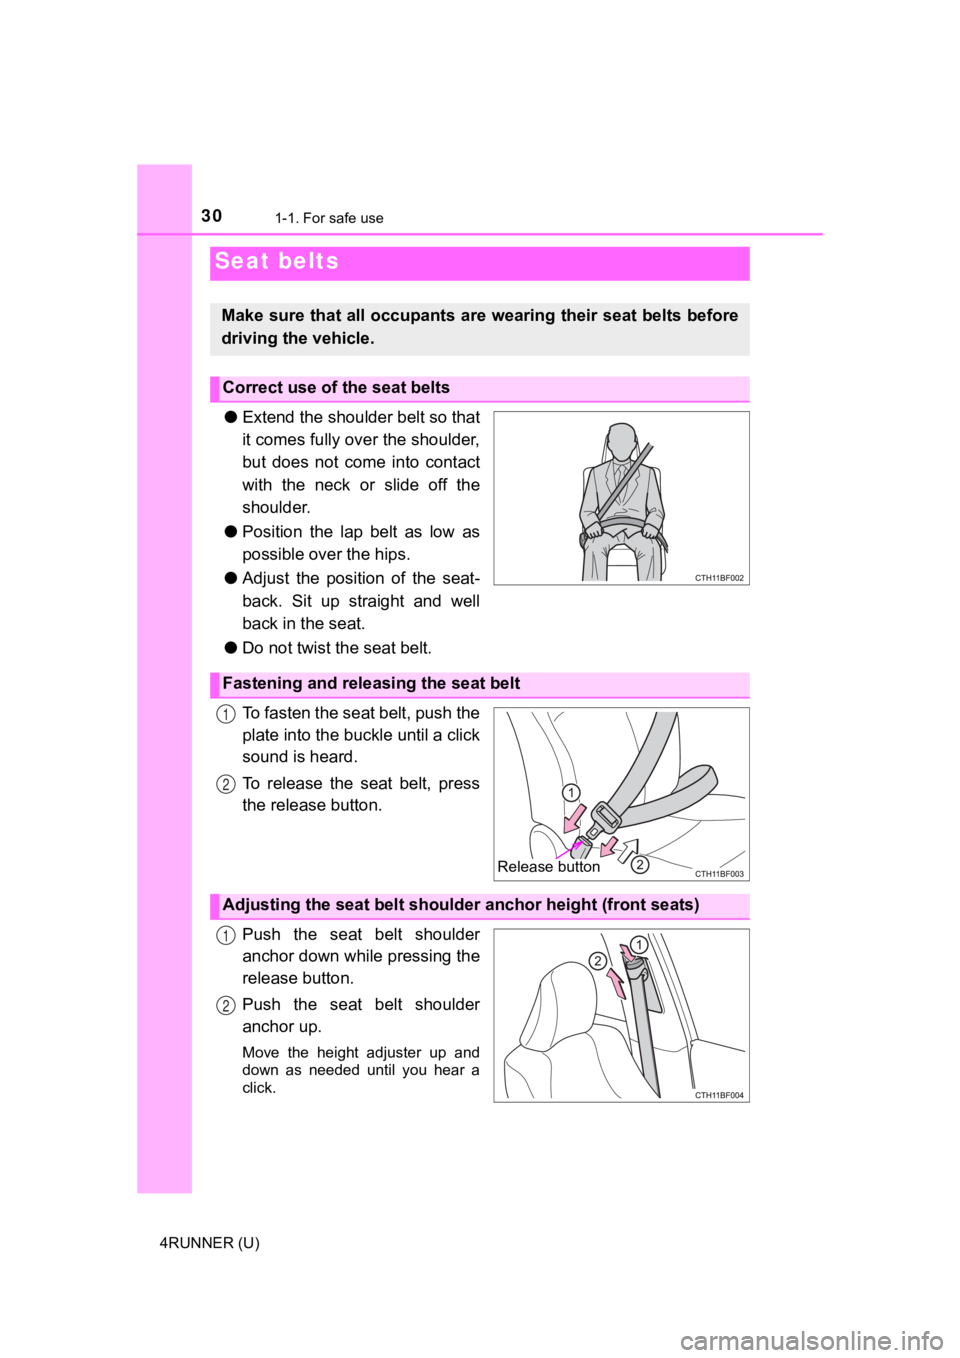
●Extend the shoulder belt so that
it comes fully over the shoulder,
but does not come into contact
with the neck or slide off the
shoulder.
● Position the lap belt as low as
possible over the hips.
● Adjust the position of the seat-
back. Sit up straight and well
back in the seat.
● Do not twist the seat belt.
To fasten the seat belt, push the
plate into the buckle until a click
sound is heard.
To release the seat belt, press
the release button.
Push the seat belt shoulder
anchor down while pressing the
release button.
Push the seat belt shoulder
anchor up.
Move the height adjuster up and
down as needed until you hear a
click.
Seat belts
Make sure that all occupants are wearing their seat belts before
driving the vehicle.
Correct use of the seat belts
Fastening and releasing the seat belt
Release button
1
2
Adjusting the seat be lt shoulder anchor height (front seats)
1
2
Page 136 of 592
136
4RUNNER (U)
3-3. Adjusting the seats
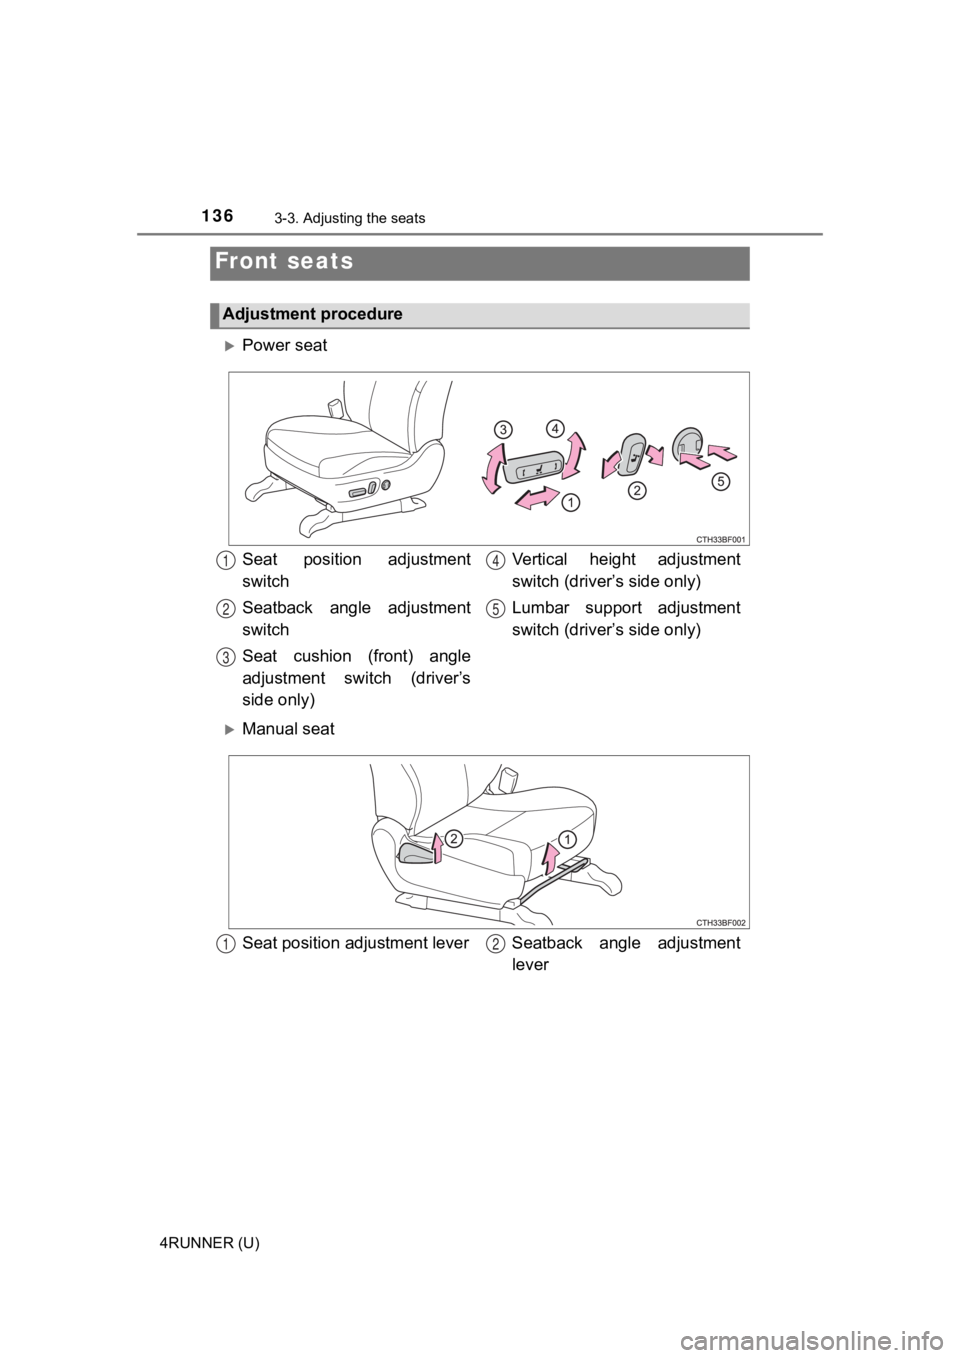
Power seat
Manual seat
Front seats
Adjustment procedure
Seat position adjustment
switch
Seatback angle adjustment
switch
Seat cushion (front) angle
adjustment switch (driver’s
side only)Vertical height adjustment
switch (driver’s side only)
Lumbar support adjustment
switch (driver’s side only)1
2
3
4
5
Seat position adju
stment lever Seatback angle adjustment
lever12
Page 154 of 592
1543-3. Adjusting the seats
4RUNNER (U)
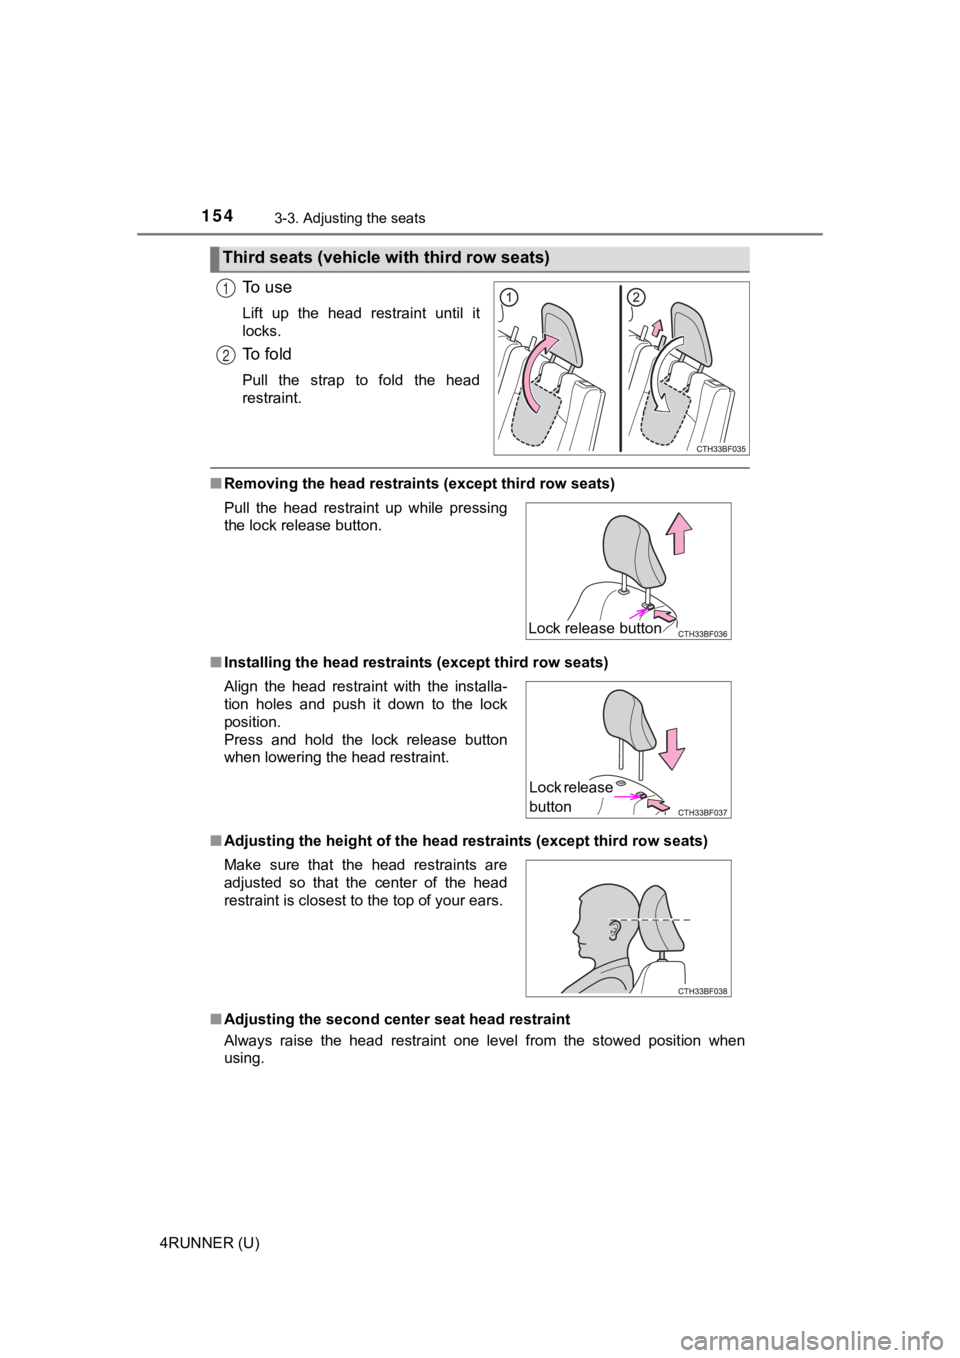
To u s e
Lift up the head restraint until it
locks.
To f o l d
Pull the strap to fold the head
restraint.
■Removing the head restrain ts (except third row seats)
■ Installing the head restraints (except third row seats)
■ Adjusting the height of the h ead restraints (except third row s eats)
■ Adjusting the second center seat head restraint
Always raise the head restraint one level from the stowed posit ion when
using.
Third seats (vehicle with third row seats)
1
2
Pull the head restraint up while pressing
the lock release button.
Align the head restraint with the installa-
tion holes and push it down to the lock
position.
Press and hold the lock release button
when lowering the head restraint.
Make sure that the head restraints are
adjusted so that the center of the head
restraint is closest to the top of your ears.
Lock release button
Lock release
button
Page 158 of 592

1583-4. Adjusting the steering wheel and mirrors
4RUNNER (U)
The height of the rear view mirror can be adjusted to suit your driving
posture.
Adjust the height of the rear view
mirror by moving it up and down.
Responding to the level of brightness of the headlights of vehi cles
behind, the reflected light is automatically reduced.
Changing automatic anti-glare
function mode
ON/OFF
When the automatic anti-glare
function is in on mode, the indica-
tor illuminates.
Vehicles without a smart key sys-
tem:
The function will set to on mode
each time the engine switch is
turned to the “ON” position.
Pressing the button turns the func-
tion to off mode. (The indicator also
turns off.)
Vehicles with a smart key system:
The function will set to on mode
each time the engine switch is
turned to IGNITION ON mode.
Pressing the button turns the func-
tion to off mode. (The indicator also
turns off.)
Inside rear view mirror
The rear view mirror’s position ca n be adjusted to enable suffi-
cient confirmation of the rear view.
Adjusting the height of rear view mirror
Anti-glare function
Indicator
Page 203 of 592
2034-1. Before driving
4
Driving
4RUNNER (U)
●Always place wheel blocks under both the vehicle’s and the trai ler’s
wheels when parking. Apply the parking brake firmly, and put th e
transmission in P. Avoid parking on a slope, but if unavoidable , do
so only after perform ing the following:
Apply the brakes and keep them applied.
Have someone place wheel blocks under both the vehicle’s and
trailer’s wheels.
When the wheel blocks are in pl ace, release the brakes slowly
until the blocks absorb the load.
Apply the parking brake firmly.
Shift into P and turn off the engine.
● When restarting afte r parking on a slope:
With the transmission in P, start the engine. Be sure to keep t he
brake pedal pressed.
Shift into a forward gear. If reversing, shift into R.
Release the parking brake and brake pedal, and slowly pull or
back away from the wheel bloc ks. Stop and apply the brakes.
Have someone retrieve the blocks.
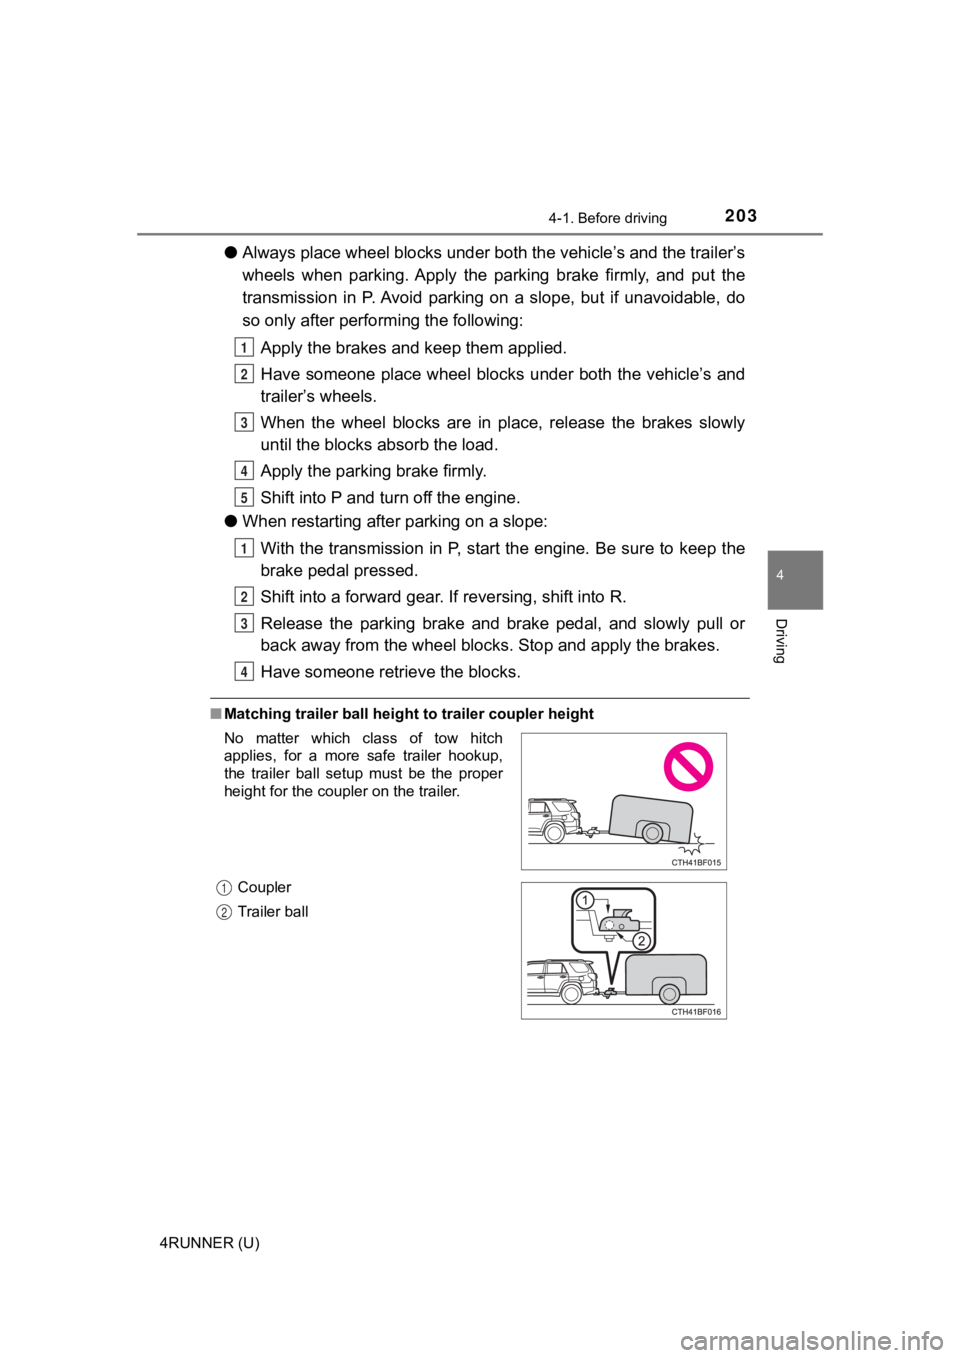
■ Matching trailer ball height to trailer coupler height
1
2
3
4
5
1
2
3
4
No matter which class of tow hitch
applies, for a more safe trailer hookup,
the trailer ball setup must be the proper
height for the coupler on the trailer.
Coupler
Trailer ball
1
2
Page 204 of 592

2044-1. Before driving
4RUNNER (U)■
Before towing
Check that the following conditions are met:
●Ensure that your vehicle’s tires are properly inflated. ( P. 528)
● Trailer tires are inflated according to the trailer manufacture r’s recommen-
dation.
● All trailer lights work as required by law.
● All lights work each time you connect them.
● The trailer ball is set at the proper height for the coupler on the trailer.
● The trailer is level when it is hitched.
Do not drive if the trailer is not level, and check for imprope r tongue weight,
overloading, worn suspension, or other possible causes.
● The trailer cargo is securely loaded.
● The rear view mirrors conform to all applicable federal, state/provincial or
local regulations. If they do not, install rear view mirrors ap propriate for tow-
ing purposes.
■ Break-in schedule
If your vehicle is new or equipped with any new power train com ponents
(such as an engine, transmission, differential or wheel bearing ), Toyota rec-
ommends that you do not tow a trailer until the vehicle has bee n driven for
over 500 miles (800 km).
After the vehicle has been driven for over 500 miles (800 km), you can start
towing. However, for the next 500 miles (800 km), drive the veh icle at a speed
of less than 45 mph (72 km/h) when towing a trailer, and avoid full throttle
acceleration.
■ Maintenance
●If you tow a trailer, your vehicle will require more frequent m aintenance due
to the additional load. (See “Scheduled Maintenance Guide” or “ Owner’s
Manual Supplement”.)
● Retighten the fixing bolts of the towing ball and bracket after approximately
600 miles (1000 km) of trailer towing.
■ If trailer sway occurs
One or more factors (crosswinds, passing vehicles, rough roads, etc.) can
adversely affect handling of your vehicle and trailer, causing instability.
● If trailer swaying occurs:
• Firmly grip the steering wheel. Steer straight ahead.
Do not try to control trailer swaying by turning the steering w heel.
• Begin releasing the accelerator pedal immediately but very gra dually to
reduce speed.
Do not increase speed. Do not apply vehicle brakes.
If you make no extreme correction with the steering or brakes, your vehicle
and trailer should stabilize. (if enabled, Trailer Sway Control can also help to
stabilize the vehicle and trailer.)
Page 333 of 592
3334-6. Driving tips
4
Driving
4RUNNER (U)
●Specific design charac teristics give it a higher center of grav ity than
ordinary passenger cars. This vehi cle design feature causes this
type of vehicle to be more likel y to rollover. And, utility vehicles
have a significantly higher rollover rate than other types of v ehicles.
● An advantage of the higher ground clearance is a better view of the
road allowing you to anticipate problems.
● It is not designed for cornering at the same speeds as ordinary pas-
senger cars any more than low-s lung sports cars designed to per-
form satisfactorily under off-road conditions. Therefore, sharp turns
at excessive speeds may cause rollover.
Off-road precautions
This vehicle belongs to the utility vehicle class, which has
higher ground clearance and narrower tread in relation to the
height of its center of gravity t o make it capable of performin g in
a wide variety of of f-road applications.
Off-road vehicle feature
Page 491 of 592

4917-2. Steps to take in an emergency
7
When trouble arises
4RUNNER (U)
WARNING
■Using the tire jack
Improper use of the tire jack may cause the vehicle to suddenly fall off
the jack, leading to death or serious injury.
●Do not use the tire jack for any purpose other than replacing t ires or
installing and removing tire chains.
●Only use the tire jack that comes with this vehicle for replacing a flat
tire.
Do not use it on other vehicles, and do not use other tire jack s for
replacing tires on this vehicle.
●Always check that the tire jack is securely set to the jack poi nt.
●Do not put any part of your body under the vehicle while it is supported
by the jack.
●Do not start or run the engine while your vehicle is supported by the
jack.
●Do not raise the vehicle w hile someone is inside.
●When raising the vehicle, do not put an object on or under the jack.
●Do not raise the vehicle to a height greater than that required to
replace the tire.
●Use a jack stand if it is nece ssary to get under the vehicle.
Vehicles with Automatic running boards
●Observe the following precautions. Failure to do so may result in seri-
ous injury:
• When jacking up the vehicle, always turn the Automatic running boards switch off.
• When jacking up the vehicle, do not use an Automatic running b oard
as a jack point. The Automatic running board may break, causing
injuries.
Take particular care when lowering the vehicle to ensure that n o one
working on or near the vehicle may be injured.
■Using the jack handle
Tighten all the jack handle bol ts securely using a Phillips-hea d screw-
driver, to prevent the extension parts from coming apart unexpe ctedly.