2021 TOYOTA 4RUNNER ignition
[x] Cancel search: ignitionPage 357 of 592
357
5
Interior features
4RUNNER (U)
5-2. Using the interior lights
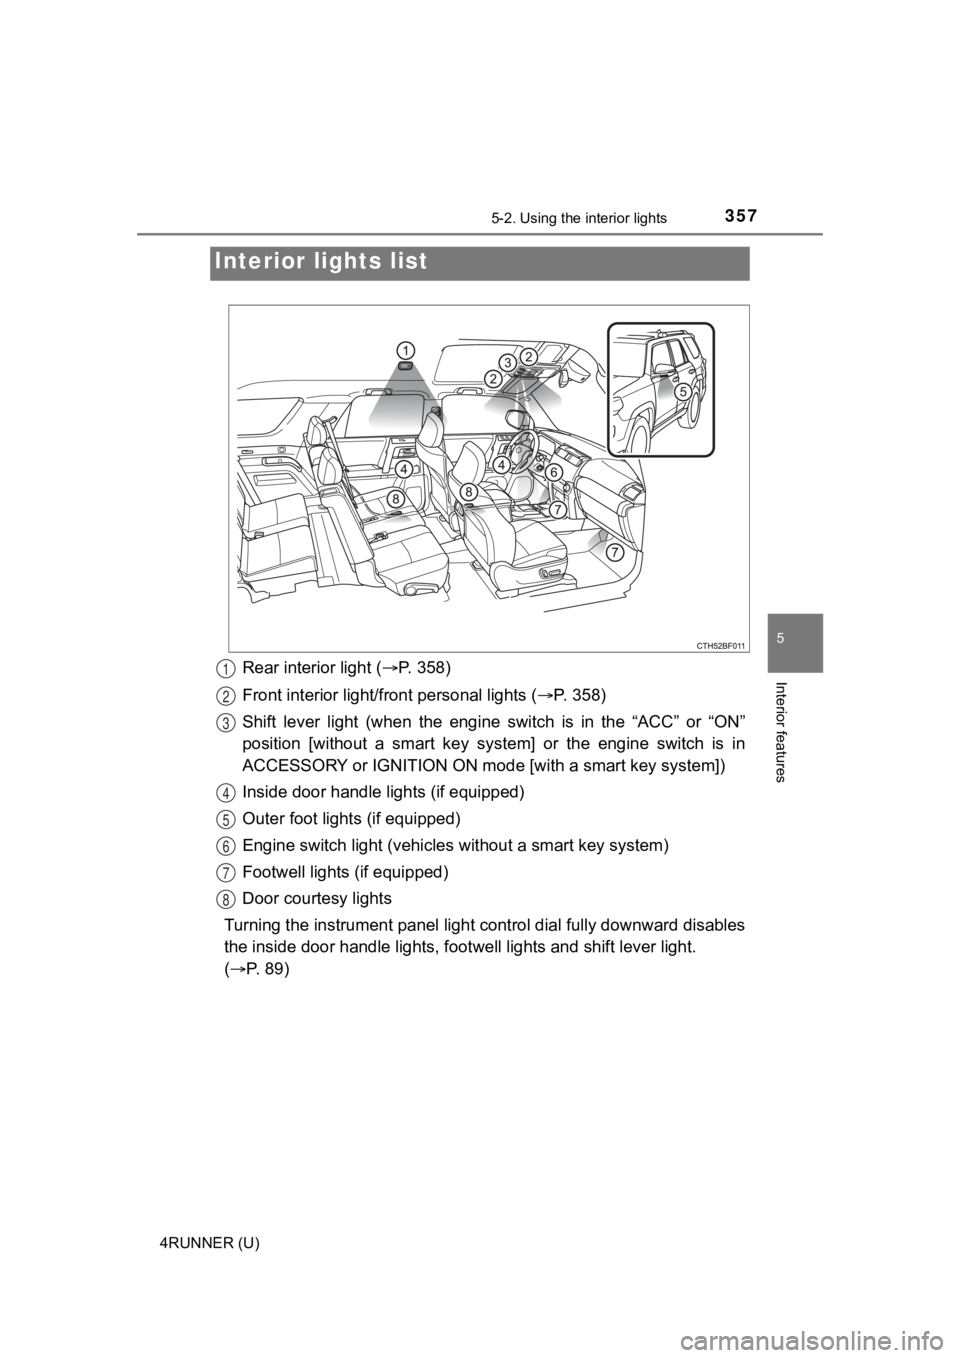
Rear interior light (P. 358)
Front interior light/fr ont personal lights ( P. 3 5 8 )
Shift lever light (when the engine switch is in the “ACC” or “O N”
position [without a smart key s ystem] or the engine switch is i n
ACCESSORY or IGNITION ON mode [with a smart key system])
Inside door handle lights (if equipped)
Outer foot lights (if equipped)
Engine switch light (vehicles without a smart key system)
Footwell lights (if equipped)
Door courtesy lights
Turning the instrument panel light control dial fully downward disables
the inside door handle lights, f ootwell lights and shift lever light.
( P. 89)
Interior li ghts list
1
2
3
4
5
6
7
8
Page 373 of 592
3735-4. Other interior features
5
Interior features
4RUNNER (U)
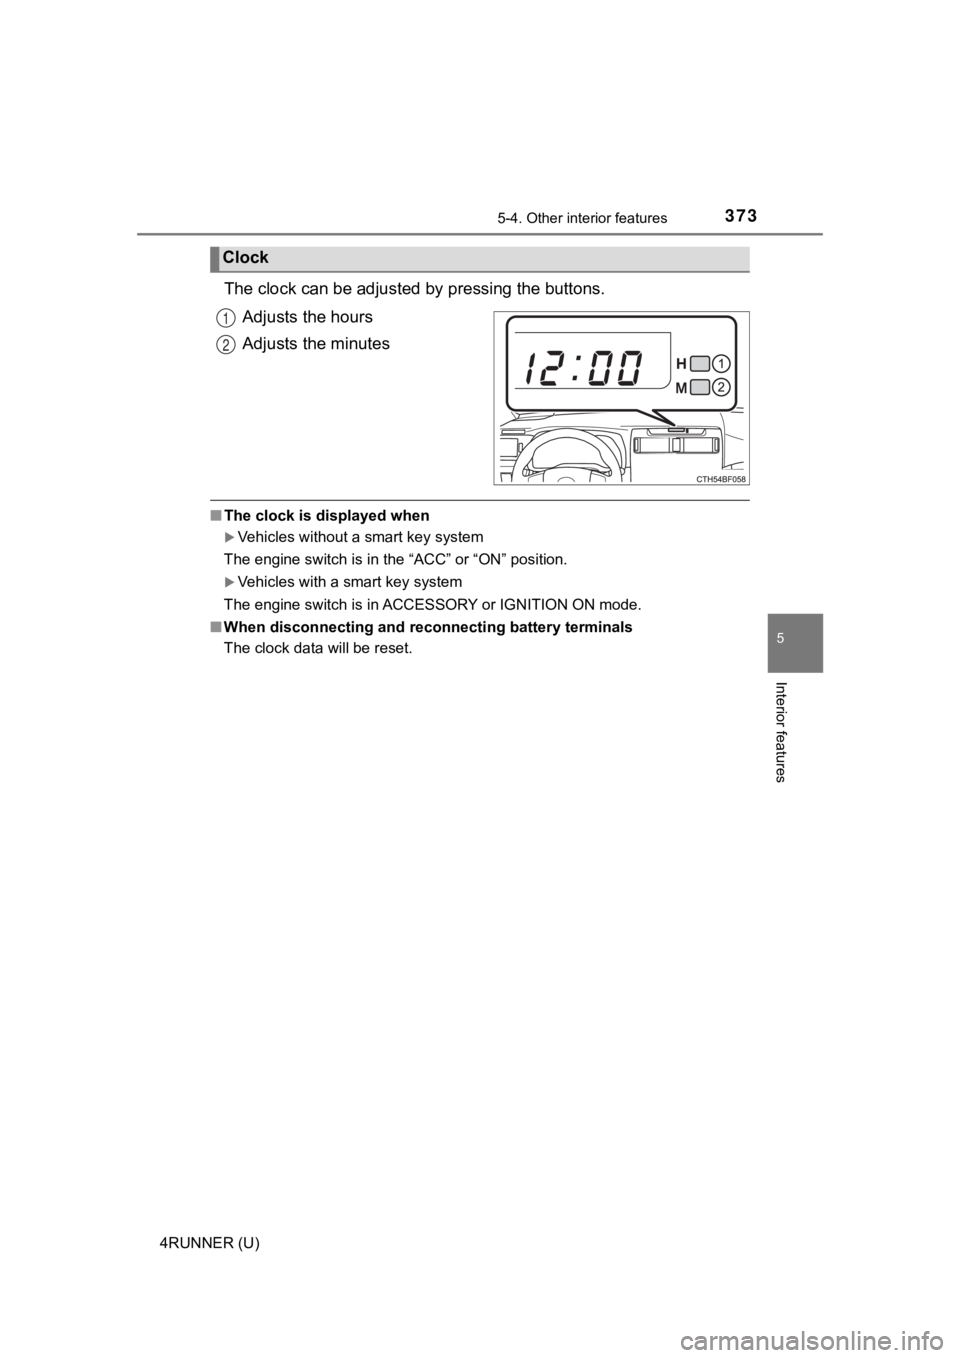
The clock can be adjusted by pressing the buttons.
Adjusts the hours
Adjusts the minutes
■ The clock is displayed when
Vehicles without a smart key system
The engine switch is in the “ACC” or “ON” position.
Vehicles with a smart key system
The engine switch is in ACCESSORY or IGNITION ON mode.
■ When disconnecting and reco nnecting battery terminals
The clock data will be reset.
Clock
1
2
Page 380 of 592
3805-4. Other interior features
4RUNNER (U)
■The power outlets can be used when
Vehicles without a smart key system
The engine switch is in the “ACC” or “ON” position.
Vehicles with a smart key system
The engine switch is in ACCESSORY or IGNITION ON mode.
■ When turning the engine switch off
Disconnect electrical devices with charging functions, such as mobile battery
packs.
If such devices are left connected, the engine switch may not b e turned off
normally.
NOTICE
■ To avoid damaging the power outlets
Close the power outlet lids when the power outlets are not in u se.
Foreign objects or liquids that enter the power outlets may cau se a short cir-
cuit.
■ To prevent battery discharge
Do not use the power outlets longer than necessary when the eng ine is off.
Page 381 of 592
3815-4. Other interior features
5
Interior features
4RUNNER (U)
The USB charging ports are used to supply 2.1 A of electricity at 5 V
to external devices (power consumption of 10.5 W).
The USB charging ports are for charging only. They are not desi gned
for data transfer or other purposes.
Depending on the external device, it may not charge properly. R efer to
the manual included with the dev ice before using a USB charging
port.
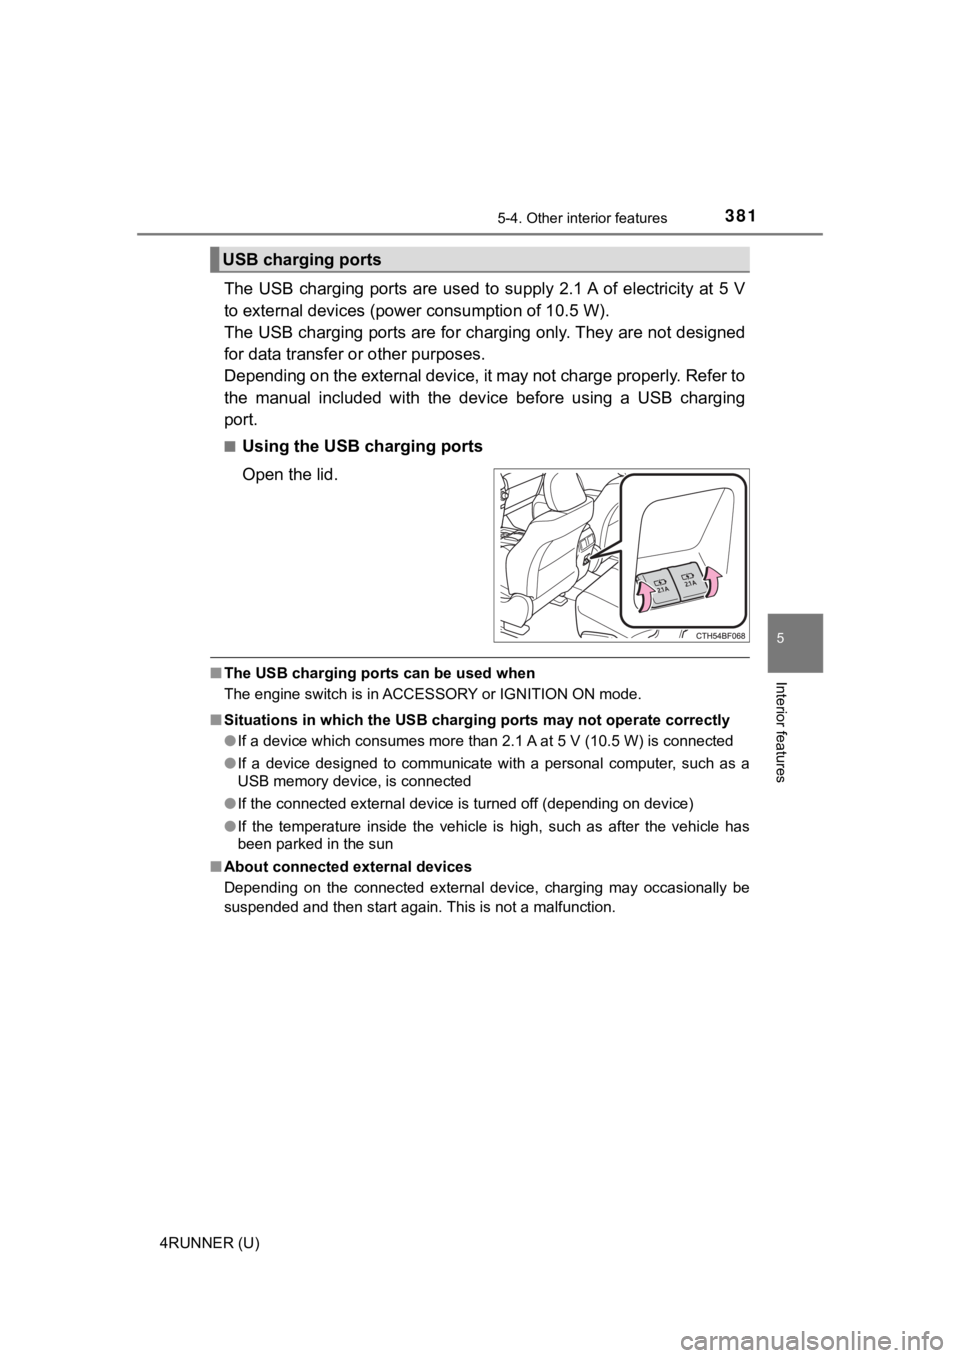
■Using the USB charging ports
Open the lid.
■ The USB charging ports can be used when
The engine switch is in ACCESSORY or IGNITION ON mode.
■ Situations in which the USB charg ing ports may not operate correctly
● If a device which consumes more than 2.1 A at 5 V (10.5 W) is connected
● If a device designed to communicate with a personal computer, s uch as a
USB memory device, is connected
● If the connected external device is turned off (depending on de vice)
● If the temperature inside the vehicle is high, such as after the vehicle has
been parked in the sun
■ About connected external devices
Depending on the connected external device, charging may occasi onally be
suspended and then start again. This is not a malfunction.
USB charging ports
Page 399 of 592

3996-2. Maintenance
6
Maintenance and care
4RUNNER (U)■
Resetting the message indicating ma intenance is required (U.S.A. only)
After the required maintenance is performed according to the ma intenance
schedule, please reset the message.
To reset the message, follow the procedures described below:
Turn the engine switch off with the trip meter A reading shown. (P. 89)
Vehicles without a smart key system:
While pressing the display change button ( P. 89), turn the engine switch
to the “ON” position (do not start the engine because reset mod e will be
canceled).
Vehicles with a smart key system:
While pressing the display change button ( P. 89), turn the engine switch
to the IGNITION ON mode (do not start the engine because otherw ise the
reset mode will be canceled).
Continue to press and hold the button until the trip meter disp lays “000000”.
■ Allow inspection and repairs to be performed by a Toyota dealer
●Toyota technicians are well-trained specialists and are kept up to date with
the latest service information. They are well informed about th e operations
of all systems on your vehicle.
● Keep a copy of the repair order. It proves that the maintenance that has
been performed is under warranty coverage. If any problem should arise
while your vehicle is under warranty, your Toyota dealer will p romptly take
care of it.
WARNING
■ If your vehicle is no t properly maintained
Improper maintenance could result in serious damage to the vehi cle and
possible death or serious injury.
■ Handling of the battery
● Engine exhaust, some of its constituents, and a wide variety of automobile
components contain or emit chemicals known to the State of California to
cause cancer and birth defects and other reproductive harm. Wor k in a
well ventilated area.
● Oils, fuels and fluids contained in vehicles as well as waste produced by
component wear contain or emit chemicals known to the State of Califor-
nia to cause cancer and birth defects or other reproductive har m. Avoid
exposure and wash any affected area immediately.
● Battery posts, terminals and related accessories contain lead a nd lead
compounds which are known to cause brain damage. Wash your hand s
after handling. ( P. 417)
1
2
3
Page 431 of 592

4316-3. Do-it-yourself maintenance
6
Maintenance and care
4RUNNER (U)■
The initialization operation
●Make sure to carry out initializ
ation after adjusting the tire inflation pres-
sure.
Also, make sure the tires are co ld before carrying out initialization or tire
inflation pressure adjustment.
●If you have accidentally turned the engine switch to the “LOCK” position
(vehicles without a smart key system) or off (vehicles with a s mart key
system) during initialization, it is not necessary to press the reset switch
again as initialization will rest art automatically when the engine switch
has been turned to the “ON” posi tion (vehicles without a smart key sys-
tem) or IGNITION ON mode (vehicl es with a smart key system) for the
next time.
●If you accidentally press the reset switch when initialization is not neces-
sary, adjust the tire inflation pressure to the specified level when the
tires are cold, and cond uct initialization again.
●While the position of each tire is being determined and the inf lation pres-
sures are not being displayed on the multi-information display, if the
inflation pressure of a tire drops, the tire pressure warning l ight will come
on.
■When initialization of the tire pressure warning system has fai led
●Do not move the vehicle backward during initialization. Initialization is
started again from the beginning and it may take longer than usual.
●Initialization may take longer to complete if the vehicle is driven on an
unpaved road.
When performing initialization, drive on a paved road if possib le.
Depending on the driving environment and condition of the tires , initial-
ization will be complet ed in approximately 10 to 30 minutes.
• If initialization is not complet e after driving approximately 30 minutes,
continue driving for a while.
• If initialization is not complet e after driving approximately 1 hour, park
the vehicle in a safe place for approximately 20 minutes. Then drive
straight (with occasional left a nd right turns) at approximatel y 25 mph
(40 km/h) or more
* for approximately 10 to 30 minutes.
• If initialization is still not co mplete, have the vehicle inspected by your
Toyota dealer.
*: Except when making a left/right turn
●In the following situations, the tire inflation pressure will n ot be recorded
and the system will not operate p roperly. Perform initialization again.
• When operating the tire pressure warning reset switch, the tir e pres-
sure warning light does not blink 3 times.
• After performing initialization, the tire pressure warning light blinks for
1 minute then stays on after driving for about 20 minutes.
Page 508 of 592
5087-2. Steps to take in an emergency
4RUNNER (U)
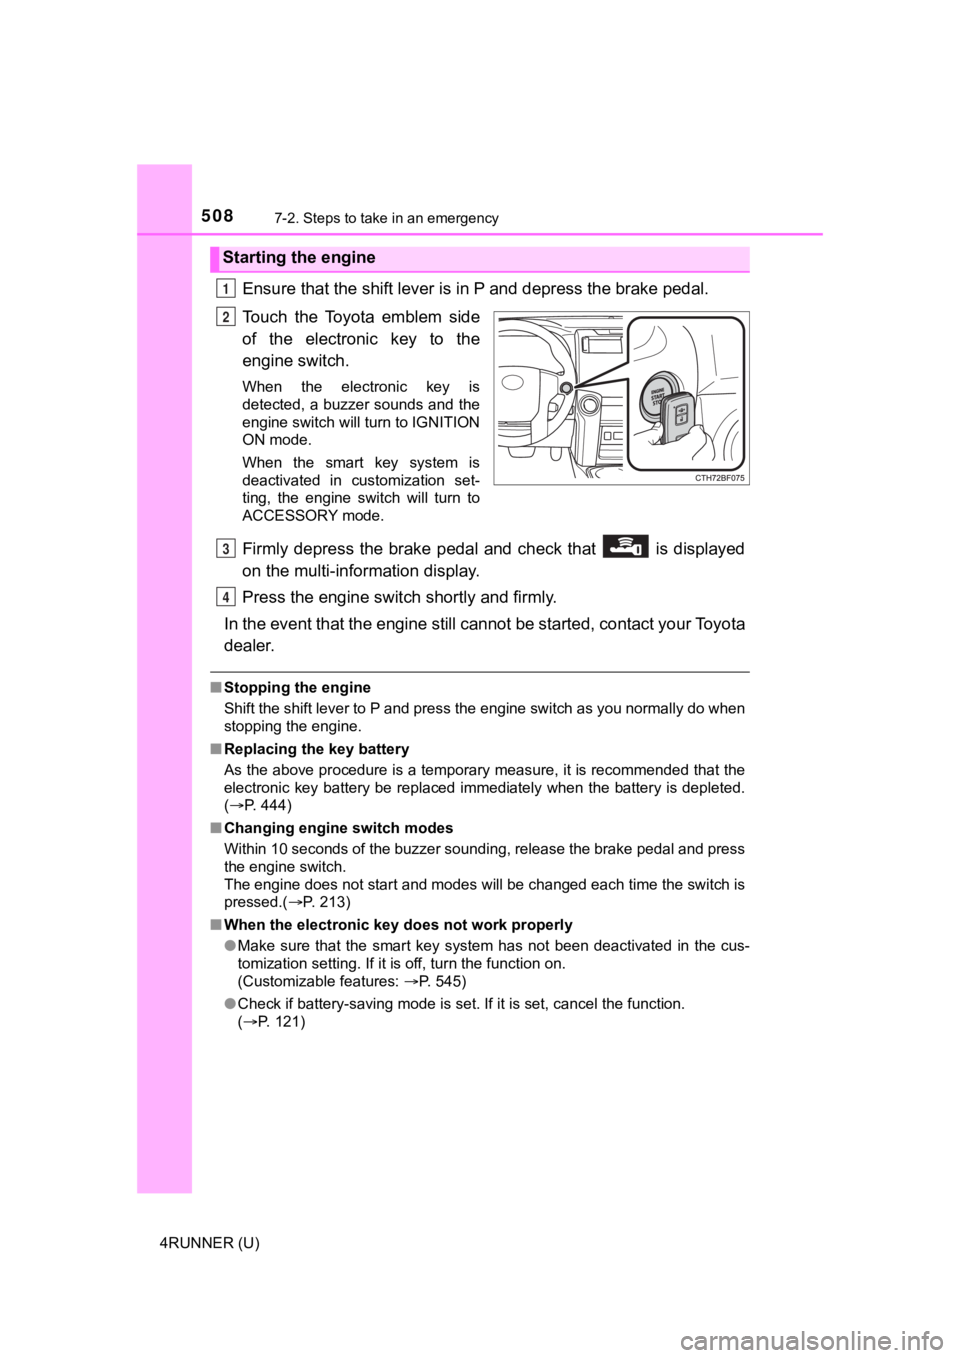
Ensure that the shift lever is in P and depress the brake pedal.
Touch the Toyota emblem side
of the electronic key to the
engine switch.
When the electronic key is
detected, a buzzer sounds and the
engine switch will turn to IGNITION
ON mode.
When the smart key system is
deactivated in customization set-
ting, the engine switch will turn to
ACCESSORY mode.
Firmly depress the brake pedal and check that is displayed
on the multi-information display.
Press the engine switch shortly and firmly.
In the event that the engine still cannot be started, contact your Toyota
dealer.
■ Stopping the engine
Shift the shift lever to P and press the engine switch as you normally do when
stopping the engine.
■ Replacing the key battery
As the above procedure is a temporary measure, it is recommende d that the
electronic key battery be replaced immediately when the battery is depleted.
( P. 444)
■ Changing engine switch modes
Within 10 seconds of the buzzer sounding, release the brake ped al and press
the engine switch.
The engine does not start and modes will be changed each time t he switch is
pressed.( P. 213)
■ When the electronic key does not work properly
●Make sure that the smart key system has not been deactivated in the cus-
tomization setting. If it is off, turn the function on.
(Customizable features: P. 545)
● Check if battery-saving mode is set. If it is set, cancel the f unction.
( P. 121)
Starting the engine
1
2
3
4
Page 511 of 592

5117-2. Steps to take in an emergency
7
When trouble arises
4RUNNER (U)
Connect the jumper cables according to the following procedure:Connect a positive jumper cable clamp to the positive (+) batte ry
terminal on your vehicle.
Connect the clamp on the other end of the positive cable to the
positive (+) battery termi nal on the second vehicle.
Connect a negative cable clamp to the negative (-) battery term i-
nal on the s econd vehicle.
Connect the clamp at the other e nd of the negative cable to a
solid, stationary, unpainted meta llic point away from the battery
and any moving parts, as shown in the illustration.
Start the engine of the second v ehicle. Increase the engine speed
slightly and maintain at that lev el for approximately 5 minutes to
recharge the batter y of your vehicle.
Vehicles with a smart key system only: Open and close any of th e
doors of your vehicle wi th the engine switch off.
Maintain the engine speed of the second vehicle and start the
engine of your vehicle by turning the engine switch to the “ON”
position (vehicles without a smart key system) or turning the e ngine
switch to IGNITION ON mode (vehi cles with a smart key system).
Once the vehicle’s engine has st arted, remove the jumper cables in
the exact reverse order from which they were connected.
Once the engine starts, have the vehicle inspected at your Toyota
dealer as soon as possible.3
1
2
3
4
4
5
6
7