Page 79 of 212
Towing Capacity
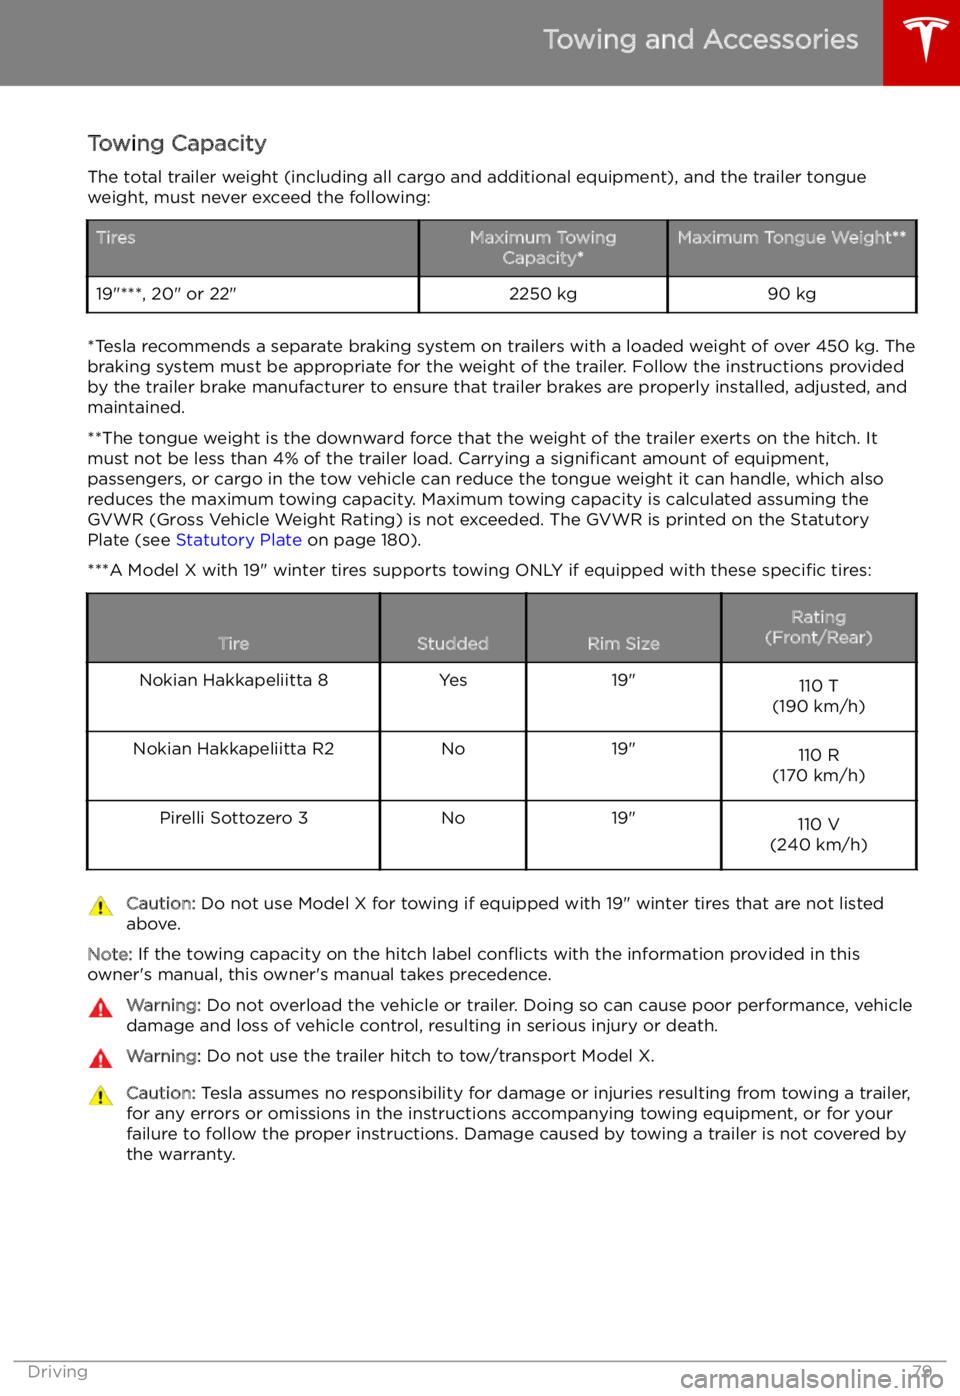
The total trailer weight (including all cargo and additional equipment), and the trailer tongue
weight, must never exceed the following:TiresMaximum Towing Capacity*Maximum Tongue Weight**19"***, 20" or 22"2250 kg90 kg
*Tesla recommends a separate braking system on trailers with a loaded weight of over 450 kg. Thebraking system must be appropriate for the weight of the trailer. Follow the instructions providedby the trailer brake manufacturer to ensure that trailer brakes are properly installed, adjusted, and
maintained.
**The tongue weight is the downward force that the weight of the trailer exerts on the hitch. It must not be less than 4% of the trailer load. Carrying a significant amount of equipment,
passengers, or cargo in the tow vehicle can reduce the tongue weight it can handle, which also
reduces the maximum towing capacity. Maximum towing capacity is calculated assuming the
GVWR (Gross Vehicle Weight Rating) is not exceeded. The GVWR is printed on the Statutory
Plate (see Statutory Plate on page 180).
***A Model X with 19" winter tires supports towing ONLY if equipped with these specific tires:
TireStuddedRim Size
Rating
(Front/Rear)Nokian Hakkapeliitta 8Yes19"110 T
(190 km/h)Nokian Hakkapeliitta R2No19"110 R
(170 km/h)Pirelli Sottozero 3No19"110 V
(240 km/h)Caution: Do not use Model X for towing if equipped with 19" winter tires that are not listed
above.
Note: If the towing capacity on the hitch label con
Page 92 of 212
Note: Your set speed will use your current
driving speed if you move the cruise control lever up or down.
Note: If Speed Assist is unable to determine a
speed limit, your set speed does not change
when you pull the cruise control lever toward
you.Warning: Do not rely on Speed Assist or
Traffic-Aware Cruise Control to determine
an accurate or appropriate cruising
speed. Always cruise at a safe speed
based on road conditions and applicable
speed limits.
Changing the Set Speed
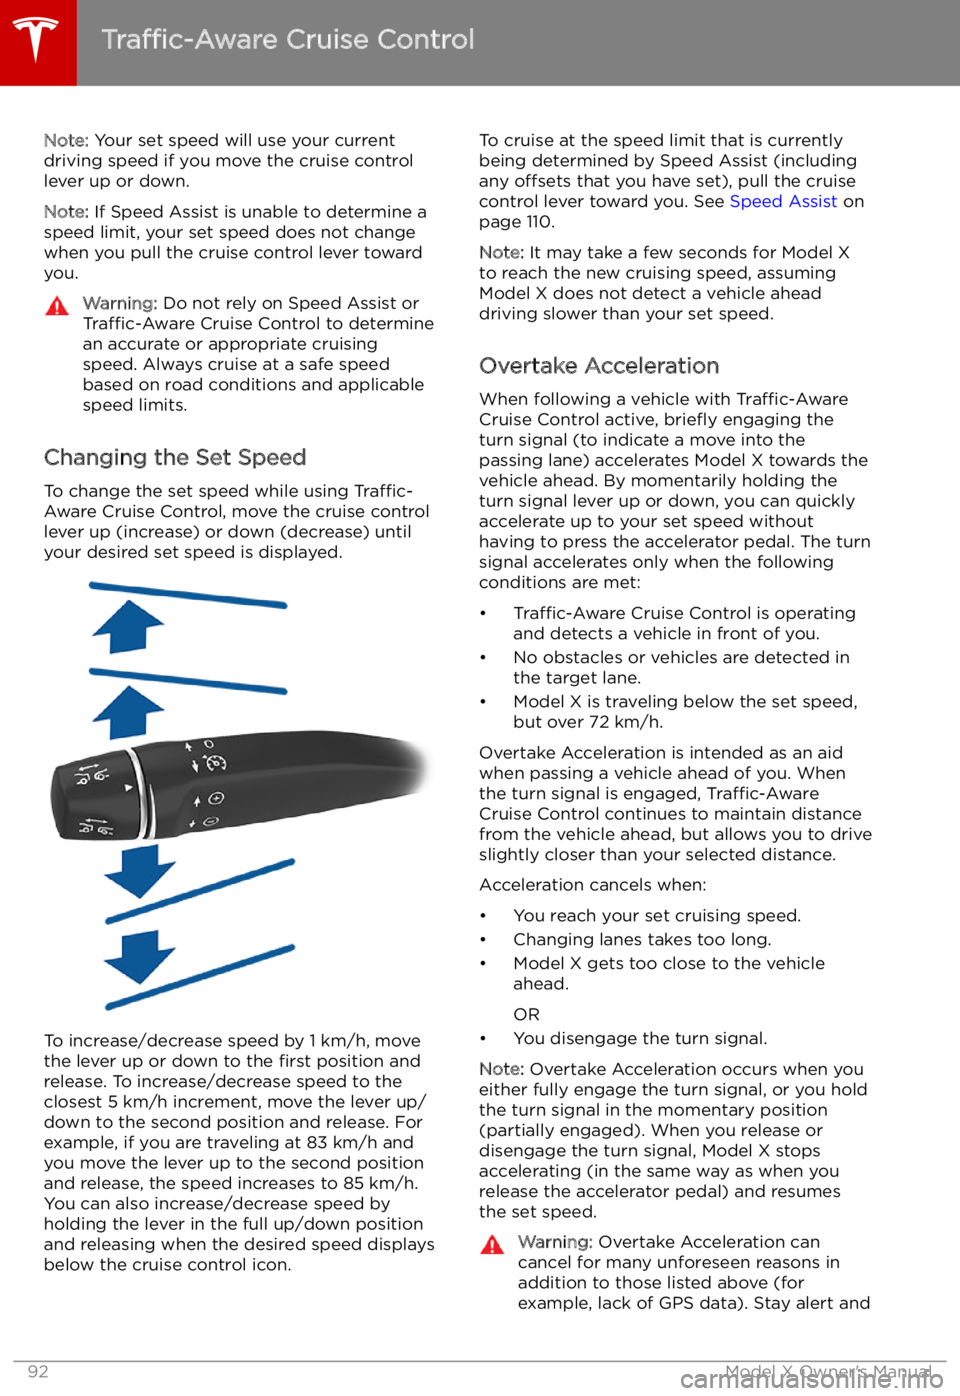
To change the set speed while using Traffic-
Aware Cruise Control, move the cruise control
lever up (increase) or down (decrease) until
your desired set speed is displayed.
To increase/decrease speed by 1 km/h, move
the lever up or down to the first position and
release. To increase/decrease speed to the closest 5 km/h increment, move the lever up/
down to the second position and release. For
example, if you are traveling at 83 km/h and you move the lever up to the second positionand release, the speed increases to 85 km/h.
You can also increase/decrease speed by
holding the lever in the full up/down position
and releasing when the desired speed displays
below the cruise control icon.
To cruise at the speed limit that is currently
being determined by Speed Assist (including any offsets that you have set), pull the cruise
control lever toward you. See Speed Assist on
page 110.
Note: It may take a few seconds for Model X
to reach the new cruising speed, assuming
Model X does not detect a vehicle ahead
driving slower than your set speed.
Overtake Acceleration
When following a vehicle with Traffic-Aware
Cruise Control active, brie
Page 99 of 212
Note: Auto Lane Change assists in moving
Model X one lane at a time. Moving into an
additional lane requires you to engage the
turn signal a second time after the first lane
change is complete.Warning: If Auto Lane Change aborts
during a lane change (for example, Auto
Lane Change cannot detect the outside
of the target lane midway through the
lane change), Model X returns to its
original driving lane.
When Auto Lane Change is active, it is
important to monitor its performance by
watching the driving path in front of you and
the surrounding area. Stay prepared to take
over steering at any time. As you are crossing
over into the adjacent lane, the instrument
panel displays the lane marking as a dashed
blue line. Once in your new lane, lane markings
are displayed as solid blue lines again.
In situations where Auto Lane Change is
unable to operate at optimal performance, or
cannot operate due to inadequate data, the
instrument panel displays a series of warnings.
Therefore, when using Auto Lane Change,
always pay attention to the instrument panel
and be prepared to manually steer Model X.
Warning: When Auto Lane Change is
actively assisting in steering Model X, the steering wheel moves accordingly.
Although you must have your hands on
the steering wheel, any significant
restriction of or force on the steering wheel
Page 110 of 212
Speed Assist
How Speed Assist Works
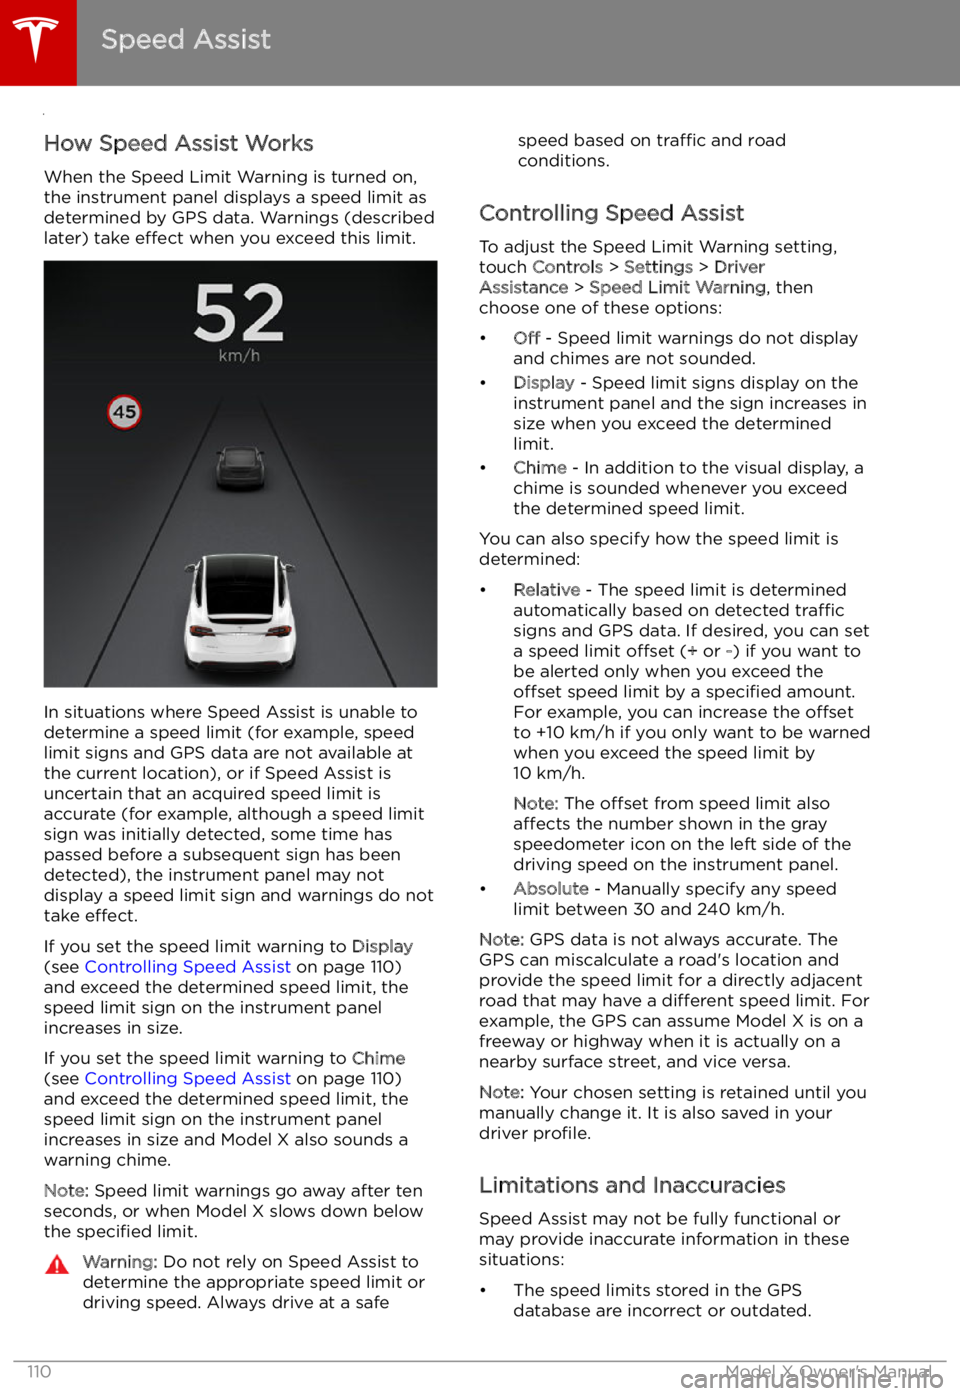
When the Speed Limit Warning is turned on,
the instrument panel displays a speed limit as
determined by GPS data. Warnings (described
later) take effect when you exceed this limit.
In situations where Speed Assist is unable to
determine a speed limit (for example, speed
limit signs and GPS data are not available at
the current location), or if Speed Assist is
uncertain that an acquired speed limit is
accurate (for example, although a speed limit sign was initially detected, some time has
passed before a subsequent sign has been
detected), the instrument panel may not
display a speed limit sign and warnings do not take effect.
If you set the speed limit warning to Display
(see Controlling Speed Assist on page 110)
and exceed the determined speed limit, the
speed limit sign on the instrument panel
increases in size.
If you set the speed limit warning to Chime
(see Controlling Speed Assist on page 110)
and exceed the determined speed limit, the speed limit sign on the instrument panelincreases in size and Model X also sounds a
warning chime.
Note: Speed limit warnings go away after ten
seconds, or when Model X slows down below
the specified limit.
Warning:
Do not rely on Speed Assist to
determine the appropriate speed limit or driving speed. Always drive at a safespeed based on traffic and road
conditions.
Controlling Speed Assist
To adjust the Speed Limit Warning setting,
touch Controls > Settings > Driver
Assistance > Speed Limit Warning , then
choose one of these options:
Page 118 of 212
1.Close
Touch the circled X in the top left corner of a window to close it (or you can touch anywhere
outside the window).
2. Doors
Touch to open or close doors.
3. Seats
If Model X is equipped with monopost second row seats, touch to move the second row seats
forward or backward (see Adjusting Second Row Monopost Seats on page 21).
4. Suspension
If Model X is equipped with Smart Air Suspension, touch to manually raise or lower Model X, or to remove a previously saved auto-raising location (see Smart Air Suspension on page 133).
Model X must be powered on and you must press the brake pedal before you can change
suspension settings. Smart Air Suspension causes Model X to self-level, even when powered off. Therefore, when towing or lifting, you must disable self-leveling (see Instructions for
Transporters on page 195 and Jacking and Lifting on page 176).
5. Driving
Page 130 of 212
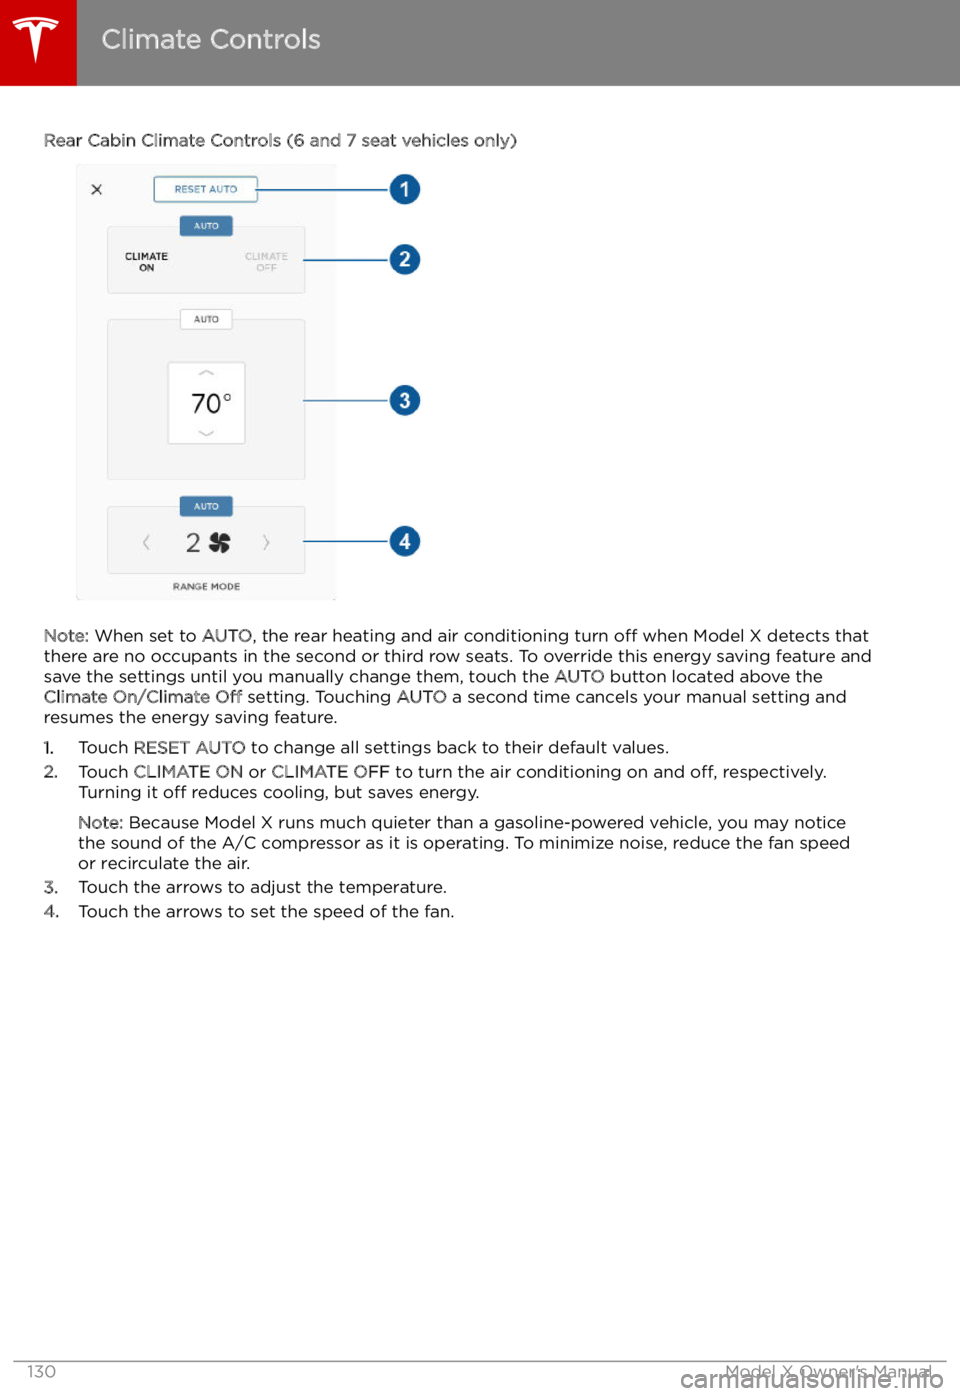
Rear Cabin Climate Controls (6 and 7 seat vehicles only)
Note: When set to AUTO, the rear heating and air conditioning turn off when Model X detects that
there are no occupants in the second or third row seats. To override this energy saving feature and
save the settings until you manually change them, touch the AUTO button located above the
Climate On/Climate Off setting. Touching AUTO a second time cancels your manual setting and
resumes the energy saving feature.
1. Touch RESET AUTO to change all settings back to their default values.
2. Touch CLIMATE ON or CLIMATE OFF to turn the air conditioning on and off, respectively.
Turning it off reduces cooling, but saves energy.
Note: Because Model X runs much quieter than a gasoline-powered vehicle, you may notice
the sound of the A/C compressor as it is operating. To minimize noise, reduce the fan speed
or recirculate the air.
3. Touch the arrows to adjust the temperature.
4. Touch the arrows to set the speed of the fan.
Climate Controls
130Model X Owner
Page 150 of 212
Troubleshooting HomeLinkWhen programming a HomeLink device, the
touchscreen walks you through a two-part programming process:
1. Model X records the signal from the
remote. The touchscreen instructs you to
stand in front of the vehicle, point the
remote at the front bumper and press and
hold the button until the headlights
Page 151 of 212
Connecting to Wi-Fi
Wi-Fi is available as a data connection method and is often faster than cellular data networks.
Connecting to Wi-Fi is especially useful in areas with limited or no cellular connectivity.
To ensure fast, reliable delivery of Model X
updates (see Software Updates on page 152),
Tesla recommends leaving Wi-Fi turned on and connected to a Wi-Fi network. To connectto a Wi-Fi network:
1. Touch the LTE (or 3G) icon in the
touchscreen status bar. Model X will start
scanning and display the Wi-Fi networks
that are within range.
2. Select the Wi-Fi network you want to use,
enter the password (if necessary), then
touch Connect .
You can also connect to a hidden network that
isn