Page 98 of 172

SOUND
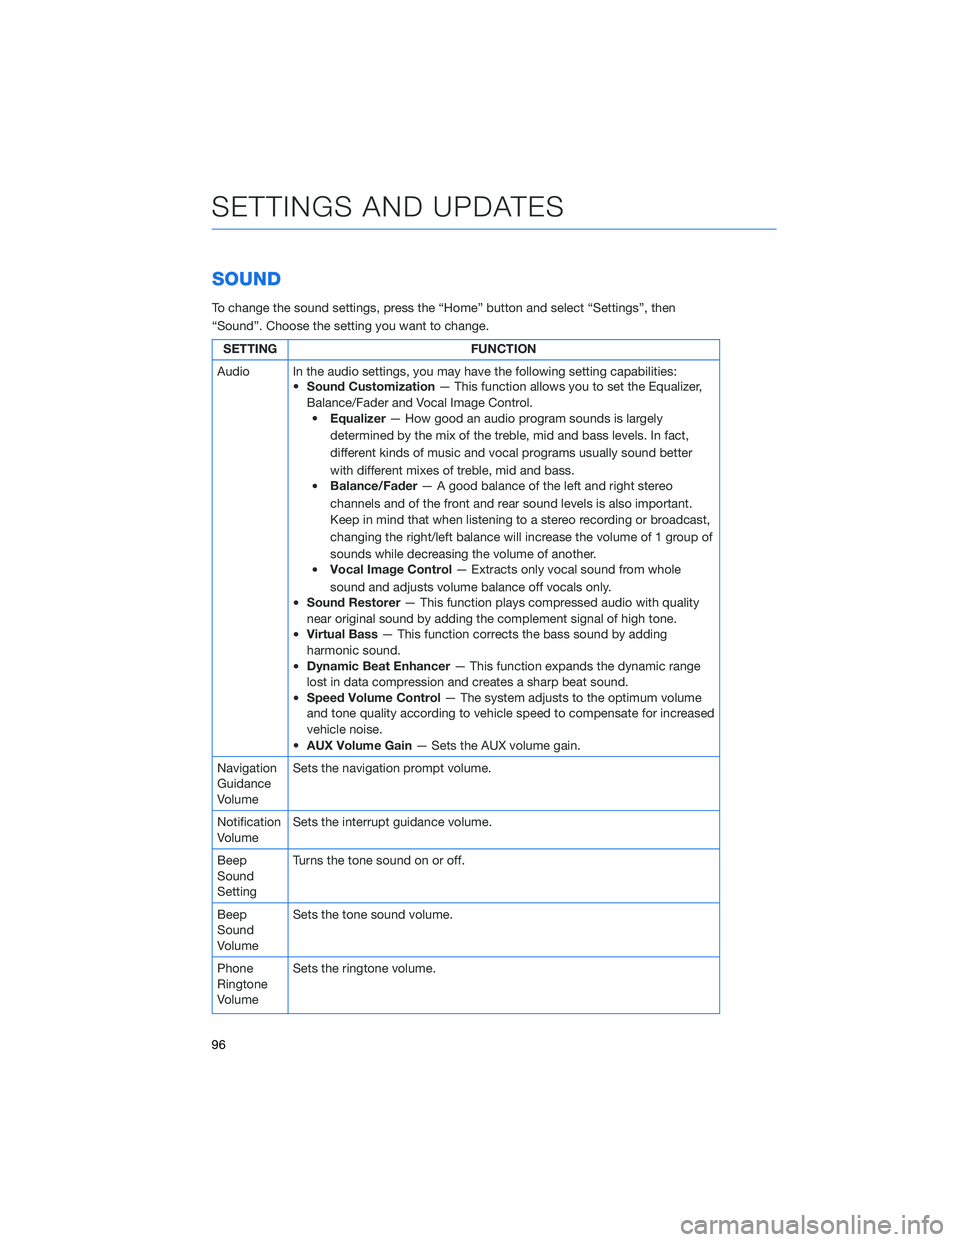
To change the sound settings, press the “Home” button and select “Settings”, then
“Sound”. Choose the setting you want to change.
SETTING FUNCTION
Audio In the audio settings, you may have the following setting capabilities:
•Sound Customization— This function allows you to set the Equalizer,
Balance/Fader and Vocal Image Control.
•Equalizer— How good an audio program sounds is largely
determined by the mix of the treble, mid and bass levels. In fact,
different kinds of music and vocal programs usually sound better
with different mixes of treble, mid and bass.
•Balance/Fader— A good balance of the left and right stereo
channels and of the front and rear sound levels is also important.
Keep in mind that when listening to a stereo recording or broadcast,
changing the right/left balance will increase the volume of 1 group of
sounds while decreasing the volume of another.
•Vocal Image Control— Extracts only vocal sound from whole
sound and adjusts volume balance off vocals only.
•Sound Restorer— This function plays compressed audio with quality
near original sound by adding the complement signal of high tone.
•Virtual Bass— This function corrects the bass sound by adding
harmonic sound.
•Dynamic Beat Enhancer— This function expands the dynamic range
lost in data compression and creates a sharp beat sound.
•Speed Volume Control— The system adjusts to the optimum volume
and tone quality according to vehicle speed to compensate for increased
vehicle noise.
•AUX Volume Gain— Sets the AUX volume gain.
Navigation
Guidance
VolumeSets the navigation prompt volume.
Notification
VolumeSets the interrupt guidance volume.
Beep
Sound
SettingTurns the tone sound on or off.
Beep
Sound
VolumeSets the tone sound volume.
Phone
Ringtone
VolumeSets the ringtone volume.
SETTINGS AND UPDATES
96
Page 129 of 172
3For 11.6-inch display models, select
“Auto”. For Dual 7.0-inch display models,
select “Sync With Phone”.
4Select “Back”.
The clock automatically adjusts as follows:
• 11.6-inch display with navigation system: Automatically adjusts the clock when a GPS
signal is available.
• 11.6-inch display without navigation system: Automatically adjusts the clock when a
STARLINK
®Safety and Security signal is available.
• Dual 7.0-inch display: Automatically adjusts the clock when a phone is paired and
connected via Bluetooth
®. “Phonebook Download” must be enabled in the Phone
Settings.
For step-by-step procedure to pair a phone to the SUBARU STARLINK
®Touchscreen, see
page 130 for Android devices or page 133 for Apple devices.
3
4
HOW TO APPENDIX
127
Page 154 of 172
Route Options
You can set the navigation system to avoid certain types of routes:
1From the “Home” screen select “Settings”, then “Navigation”.
2Select “Avoid”.
3Select the desired item to avoid.
HOW TO APPENDIX
152
Page 162 of 172
Map Updates
For vehicles with 11.6 Multimedia Plus and 11.6 Multimedia Navigation systems, the maps
can be updated over a Wi-Fi network, either manually or automatically.
For more information, please refer to “Subaru Map Update” in the STARLINK®
Owner’s Manual.
To update your maps automatically over Wi-Fi, follow this process:
1First, make sure you are connected to a Wi-Fi Network (see page 139), return to
“Settings”, and then select the “Navigation” menu.
2Select “Map Update”, select “Wi-Fi” and
then select “Automatic Update”.
3Select “Update maps automatically (at
most 8 can be selected)” and then select
the regions you would like to update.
HOW TO APPENDIX
160
Page 163 of 172

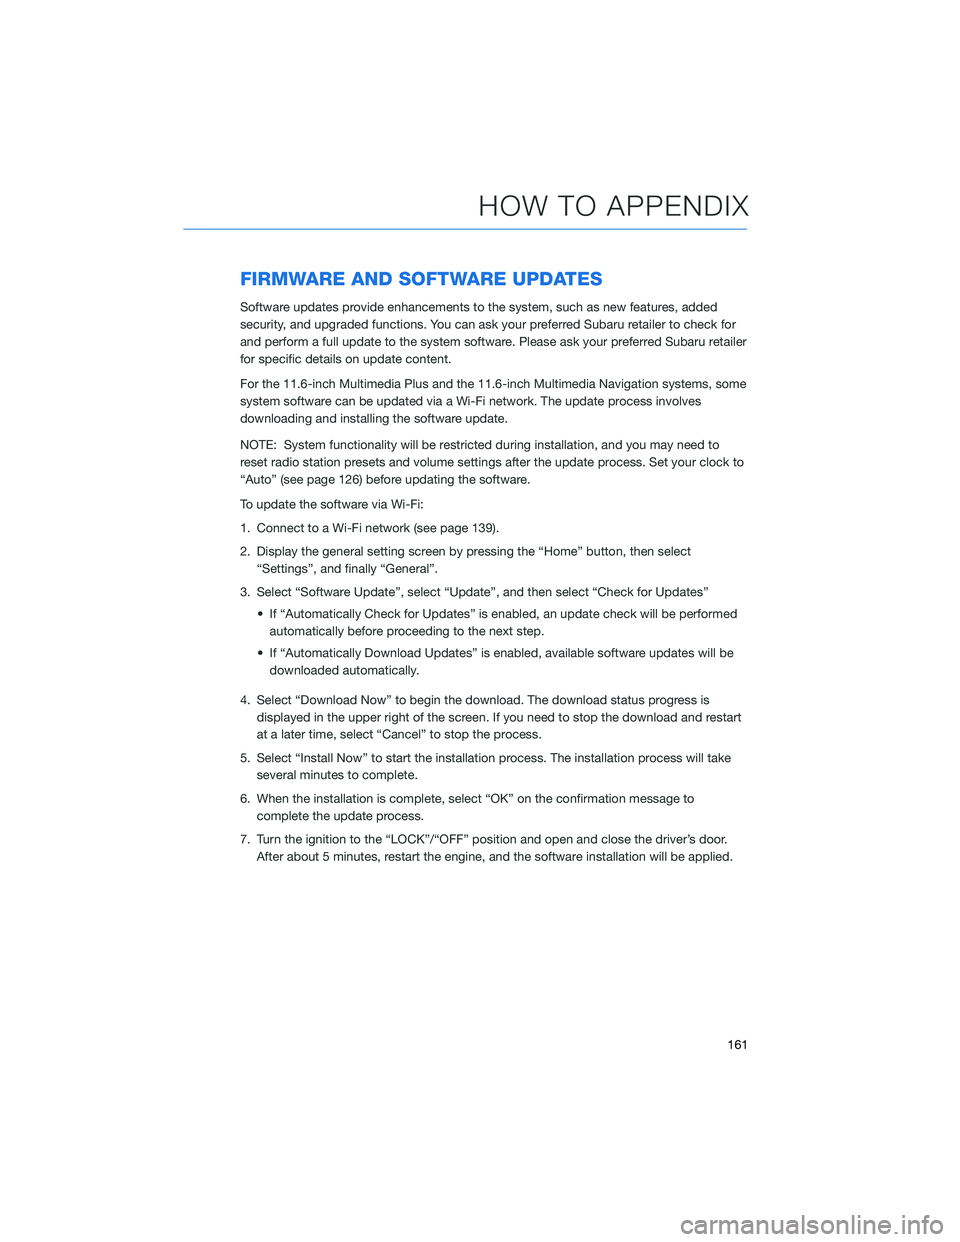
FIRMWARE AND SOFTWARE UPDATES
Software updates provide enhancements to the system, such as new features, added
security, and upgraded functions. You can ask your preferred Subaru retailer to check for
and perform a full update to the system software. Please ask your preferred Subaru retailer
for specific details on update content.
For the 11.6-inch Multimedia Plus and the 11.6-inch Multimedia Navigation systems, some
system software can be updated via a Wi-Fi network. The update process involves
downloading and installing the software update.
NOTE: System functionality will be restricted during installation, and you may need to
reset radio station presets and volume settings after the update process. Set your clock to
“Auto” (see page 126) before updating the software.
To update the software via Wi-Fi:
1. Connect to a Wi-Fi network (see page 139).
2. Display the general setting screen by pressing the “Home” button, then select
“Settings”, and finally “General”.
3. Select “Software Update”, select “Update”, and then select “Check for Updates”
• If “Automatically Check for Updates” is enabled, an update check will be performed
automatically before proceeding to the next step.
• If “Automatically Download Updates” is enabled, available software updates will be
downloaded automatically.
4. Select “Download Now” to begin the download. The download status progress is
displayed in the upper right of the screen. If you need to stop the download and restart
at a later time, select “Cancel” to stop the process.
5. Select “Install Now” to start the installation process. The installation process will take
several minutes to complete.
6. When the installation is complete, select “OK” on the confirmation message to
complete the update process.
7. Turn the ignition to the “LOCK”/“OFF” position and open and close the driver’s door.
After about 5 minutes, restart the engine, and the software installation will be applied.
HOW TO APPENDIX
161
Page 165 of 172

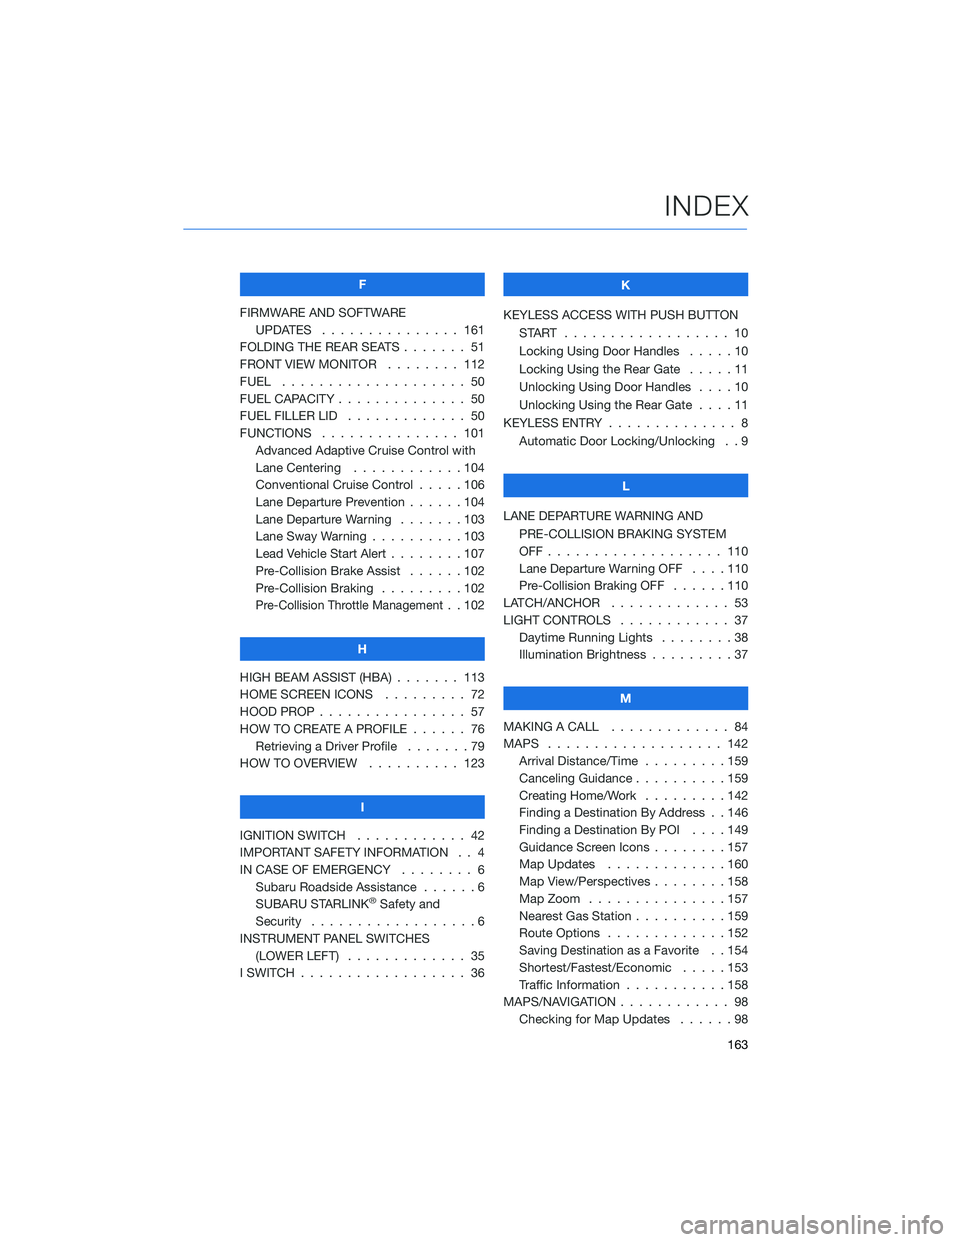
F
FIRMWARE AND SOFTWARE
UPDATES . . . ............ 161
FOLDING THE REAR SEATS....... 51
FRONT VIEW MONITOR . . . . . . . . 112
FUEL . . . . . . . . . ........... 50
FUEL CAPACITY . . ............ 50
FUEL FILLER LID . . . .......... 50
FUNCTIONS . . . . . .......... 101
Advanced Adaptive Cruise Control with
Lane Centering . . ..........104
Conventional Cruise Control . . . . . 106
Lane Departure Prevention . . . . . . 104
Lane Departure Warning.......103
Lane Sway Warning . .........103
Lead Vehicle Start Alert . . . . . . . . 107
Pre-Collision Brake Assist . . . . . . 102
Pre-Collision Braking . ........102
Pre-Collision Throttle Management. . 102
H
HIGH BEAM ASSIST (HBA) . . . . . . . 113
HOME SCREEN ICONS . . . . . . . . . 72
HOOD PROP . . . . ............ 57
HOW TO CREATE A PROFILE . . . . . . 76
Retrieving a Driver Profile.......79
HOW TO OVERVIEW .......... 123
I
IGNITION SWITCH . ........... 42
IMPORTANT SAFETY INFORMATION . . 4
IN CASE OF EMERGENCY . . . . . . . . 6
Subaru Roadside Assistance . . . . . . 6
SUBARU STARLINK
®Safety and
Security . . . . . . . . . .........6
INSTRUMENT PANEL SWITCHES
(LOWER LEFT) . . . . . . . . . . . . . 35
I SWITCH . . . . . . . ........... 36K
KEYLESS ACCESS WITH PUSH BUTTON
START .................. 10
Locking Using Door Handles . . . . . 10
Locking Using the Rear Gate . . . . . 11
Unlocking Using Door Handles . . . . 10
Unlocking Using the Rear Gate....11
KEYLESS ENTRY . ............. 8
Automatic Door Locking/Unlocking . . 9
L
LANE DEPARTURE WARNING AND
PRE-COLLISION BRAKING SYSTEM
OFF................... 110
Lane Departure Warning OFF....110
Pre-Collision Braking OFF ......110
LATCH/ANCHOR . . ........... 53
LIGHT CONTROLS . ........... 37
Daytime Running Lights . .......38
Illumination Brightness . ........37
M
MAKING A CALL . . . .......... 84
MAPS . . . ................ 142
Arrival Distance/Time.........159
Canceling Guidance . . ........159
Creating Home/Work.........142
Finding a Destination By Address . . 146
Finding a Destination By POI . . . . 149
Guidance Screen Icons . .......157
Map Updates .............160
Map View/Perspectives . . . .....158
Map Zoom . . . . . . . . . ......157
Nearest Gas Station ..........159
Route Options . . . . . . . ......152
Saving Destination as a Favorite . . 154
Shortest/Fastest/Economic .....153
Traffic Information . ..........158
MAPS/NAVIGATION . . . ......... 98
Checking for Map Updates......98
INDEX
163