Page 41 of 140

DRIVING THE VEHICLE
Automatic Transmission Shift Mode
The Continuously Variable
Transmission (CVT) is
electronically controlled and
provides two different driving
modes: normal and manual.
Normal Mode
When the select lever is in the “D”
(Drive) position, the transmission
is in normal shift mode. The
select lever position indicator in
the Combination Meter Display
(CMD) shows “D” and the
transmission automatically shifts
into a suitable forward gear.
Manual Mode
In manual mode, you select the desired gear position to obtain necessary acceleration and
engine braking. Move the select lever left from the “D” position into the “M” position to
select manual mode. The gear position indicator in the Combination Meter Display (CMD)
shows the currently selected gear. Arrow-shaped indicators show when upshifting or
downshifting is available. To shift, use the paddle shift control switches behind the steering
wheel.
Paddle Shift Control Switches
You can shift gears using the
paddle shift control switches. To
upshift to the next higher gear,
pull the “+” paddle on the right
toward you. To downshift to the
next lower gear, pull the “–”
paddle on the left toward you.
You can temporarily shift gears
even when the select lever is in
the “D” position by pulling either
the “+” or “–” paddle toward you.
Once vehicle speed stabilizes, the
transmission will switch back to
normal mode.
OPERATING THE VEHICLE
39
Page 42 of 140
ELECTRONIC PARKING BRAKE (EPB)
To apply the parking brake,
depress the brake pedal and pull
up the parking brake switch. The
indicator light on the parking
brake switch will illuminate and
“PARK” will appear in the
Combination Meter.
To release the parking brake
manually, depress the brake pedal
and push the parking brake
switch down. To automatically
release the parking brake, gently
press the accelerator pedal with
the select lever in the “D” or “R” position.
NOTE: Automatic parking brake release will not work unless all the doors are closed and
your seatbelt is fastened.
OPERATING THE VEHICLE
40
Page 43 of 140
Auto Vehicle Hold (AVH)
Auto Vehicle Hold gives your feet
a break by automatically holding
your Subaru in place when at a
complete stop, such as a traffic
signal, even after you release the
brake pedal. Press the Auto
Vehicle Hold switch on the center
console to turn on the function.
The AVH indicator in the
combination meter will illuminate.
While your Subaru is being held
by this function, the operation
indicator in the combination meter
will illuminate. The function is
canceled when you depress the
accelerator pedal or the brake
pedal.
Press the switch again to turn it
off. The function works with the
select lever in either the “D” or
“R” position.
NOTE:
• For this system to work your
seatbelt must be fastened.
• Make sure to turn off this
function before entering an
automatic car wash.
ICON MODE
Auto Vehicle Hold ON
Auto Vehicle Hold IN
OPERATION
OPERATING THE VEHICLE
41
Page 44 of 140

X-MODE®
X-MODE®is the integrated control system of the
engine, All Wheel Drive, and Vehicle Dynamics Control
(VDC) 
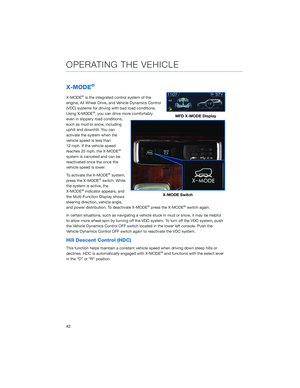
systems for driving with bad road conditions.
Using X-MODE
®, you can drive more comfortably
even in slippery road conditions,
such as mud or snow, including
uphill and downhill. You can
activate the system when the
vehicle speed is less than
12 mph. If the vehicle speed
reaches 25 mph, the X-MODE
®
system is canceled and can be
reactivated once the once the
vehicle speed is lower.
To activate the X-MODE
®system,
press the X-MODE®switch. While
the system is active, the
X-MODE
®indicator appears, and
the Multi-Function Display shows
steering direction, vehicle angle,
and power distribution. To deactivate X-MODE
®press the X-MODE®switch again.
In certain situations, such as navigating a vehicle stuck in mud or snow, it may be helpful
to allow more wheel spin by turning off the VDC system. To turn off the VDC system, push
the Vehicle Dynamics Control OFF switch located in the lower left console. Push the
Vehicle Dynamics Control OFF switch again to reactivate the VDC system.
Hill Descent Control (HDC)
This function helps maintain a constant vehicle speed when driving down steep hills or
declines. HDC is automatically engaged with X-MODE®and functions with the select lever
in the “D” or “R” position.
MFD X-MODE Display
X-MODE Switch
OPERATING THE VEHICLE
42
Page 45 of 140
TURNING OFF THE VEHICLE
Without Push-button Ignition
To stop the engine:
1. Stop your Subaru completely.
2. Move the select lever to the “P” position.
3. Turn the ignition switch to “OFF”.
NOTE: The front windows will remain active for about 40 seconds and the SUBARU
STARLINK
®Multimedia System will remain on for about three minutes or until a door is
opened, whichever occurs first.
With Push-button Ignition
To stop the engine:
1. Stop your Subaru completely.
2. Move the select lever to the “P” position.
3. Press the ignition switch.
NOTE: The front windows will remain active for about 40 seconds and the SUBARU
STARLINK
®Multimedia System will remain on for about three minutes or until a door is
opened, whichever occurs first.
OPERATING THE VEHICLE
43
Page 46 of 140

FUEL FILLER LID
The fuel filler lid is located toward the rear of the
passenger side. To open the lid:
1. Make sure your Subaru is stopped and the select
lever is placed in PARK. Then turn the ignition to
the "LOCK"/ "OFF" position.
2. The fuel filler lid is automatically unlocked when the
ignition is moved to the ”LOCK”/OFF” position, or
by unlocking using the access key fob/transmitter
or door handles.
3. Push the rear side of the lid.
4. When the lid opens slightly, open it further by hand.
While refueling, place the fuel filler cap on the cap
holder inside the lid.
After refueling, put the cap back on and turn it
clockwise until you hear a clicking noise. Be certain
not to catch the tether under the cap while tightening.
To close the lid, press it until you hear it latch.
NOTE: If the fuel filler cap is not tightened until it clicks or if the tether is caught under the
cap, the Check Engine warning light may illuminate.
FUEL
Use regular unleaded gasoline with an octane rating of 87 AKI or higher. Do not use fuels
with more than 15% ethanol.
For more information, please refer to the Owner’s Manual.
FUEL CAPACITY
Capacity
Full Fuel Tank
19.3 US gallons
Low Fuel Warning Light
2.6 US gallons
Fuel Filler Lid and Cap
REFUELING
44
Page 47 of 140
ACCESSING THE THIRD-ROW
While pulling up the lever on the
second-row seat, fold the
seatback forward and slide the
seat toward the front.
EXITING THE THIRD-ROW
From the third-row seat, raise the
lever on the second-row
seatback. The seatback of the
second-row seat tips forward and
the seat can slide forward.
PASSENGER/CARGO AREAS
45
Page 48 of 140
FOLDING THE REAR SEATS
Second-Row Seat
1Tilt:Pull the lever and tilt the
seatback forward.
2Fold:After tilting the
seatback, pull the lever to
unlock the seatback and fold
it down. To return the
seatback to its original
position, raise the seatback
until it locks into place,
making sure that it is
securely locked.
PASSENGER/CARGO AREAS
46