2021 SUBARU ASCENT door lock
[x] Cancel search: door lockPage 27 of 140

7Fan Speed Control Dial:Turn the fan speed control dial to increase or decrease fan
speed.
8Recirculated/Outside Air Button:Press this button to prevent outside air from
entering your Subaru. Press the button again to allow outside air into your Subaru.
NOTE: To prevent windshield fogging, do not remain in the recirculated mode for an
extended period of time.
9Defroster Button:Press this button to defrost or dehumidify the windshield and front
door windows.
NOTE: The air conditioning may turn on to defrost the windshield more quickly.
However, the indicator on the air conditioner button will not illuminate.
10Rear Window Defogger Button:Press this button to turn on the defogger. It will
automatically turn off after about 15 minutes. If the window clears before then, press
the button again to turn it off. If equipped, the outside mirror defogger and windshield
wiper de-icer will also activate. You can customize this function for continuous
operation through the Combination Meter Display (CMD) or the SUBARU STARLINK
®
touch screen.
11Rear Climate Control Button:Press this button to operate the rear climate control
with the front climate control panel. Press the button while the rear climate control is
on. Press and hold to lock the rear climate control. The lock indicator will illuminate
on the front and rear climate control panels.
12Rear Climate On and Off Button:Press this button to turn the rear climate control
system on or off.
GETTING COMFORTABLE
25
Page 37 of 140

REAR WINDOW WIPER
Rotate the end of the lever up one position for
intermittent, or two positions for continuous
operation.
When the lever in is the intermittent position,
the wiper operates at intervals corresponding
with vehicle speed. When you move the select
lever to the “R” position, the wiper will switch
to continuous operation. It will return to
intermittent when you move the select lever
out of “R”.
Rotate the dial up from the continuous operation position or down from the “OFF” position
to spray washer fluid. The washer will spray until you release the dial, then return to the
previous position and resume operation.
ONE-TOUCH INTERIOR LIGHTING(if equipped)
When your interior lights are set to
the “DOOR” position in the
overhead console, pressing the
One-Touch Interior Lighting
Switch conveniently turns on the
all the map lights and reading
lights at once. Pressing the switch
again turns all the map and
reading lights off. Once the lights
are turned on using the switch,
you can also turn them off by
locking the doors using the key
fob/transmitter, door handle, or
Power Rear Gate Lock Switch.
CONTROLS
35
Page 38 of 140

OVERHEAD CONSOLE
1SOS Emergency
Assistance:Press the
“SOS” button to connect
with a SUBARU STARLINK
®
Customer Care Advisor.
(Subscription required.)
Press and hold the button for
about two seconds to cancel
the call.
For more information,
please refer to page 77 or
the SUBARU STARLINK
®
Safety and Security Owner’s
Manual.
2Enhanced Roadside Assistance:Press the “i” button to connect with a SUBARU
STARLINK
®Roadside Assistance Provider. (Subscription required.) Press and hold
the button for about two seconds to cancel the call.
For more information, please refer to page 77 or the SUBARU STARLINK®Safety
and Security Owner’s Manual.
3Lane Departure Warning OFF switch:Press and hold this switch for two seconds to
turn off the Lane Departure Warning and the Lane Sway Warning function. Press and
hold the switch again for two seconds to turn the systems back on.
For more information, please refer to page 96 or the EyeSight®Owner’s Manual.
4Power Sunshade/Moonroof Switches:Operate these switches to open and close
the sunshade or tilt and slide the moonroof.
For more information, please refer to page 22 or your Owner’s Manual.
5Pre-Collision Braking System OFF switch:Press and hold this switch for two
seconds to turn off the Pre-Collision Braking System and Pre-Collision Throttle
Management. Press and hold the switch again for two seconds to turn the systems
back on.
For more information, please refer to page 96 or the EyeSight®Owner’s Manual.
6Automatic Illumination:When the switch is in the “DOOR” position, the map lights
illuminate when any door is opened, the doors are unlocked using the remote keyless
entry system or keyless access function, or the ignition is turned from “ON” or “ACC”
to “LOCK”/“OFF”.
7Map Lights:Press a map light to turn it on or off.
CONTROLS
36
Page 46 of 140

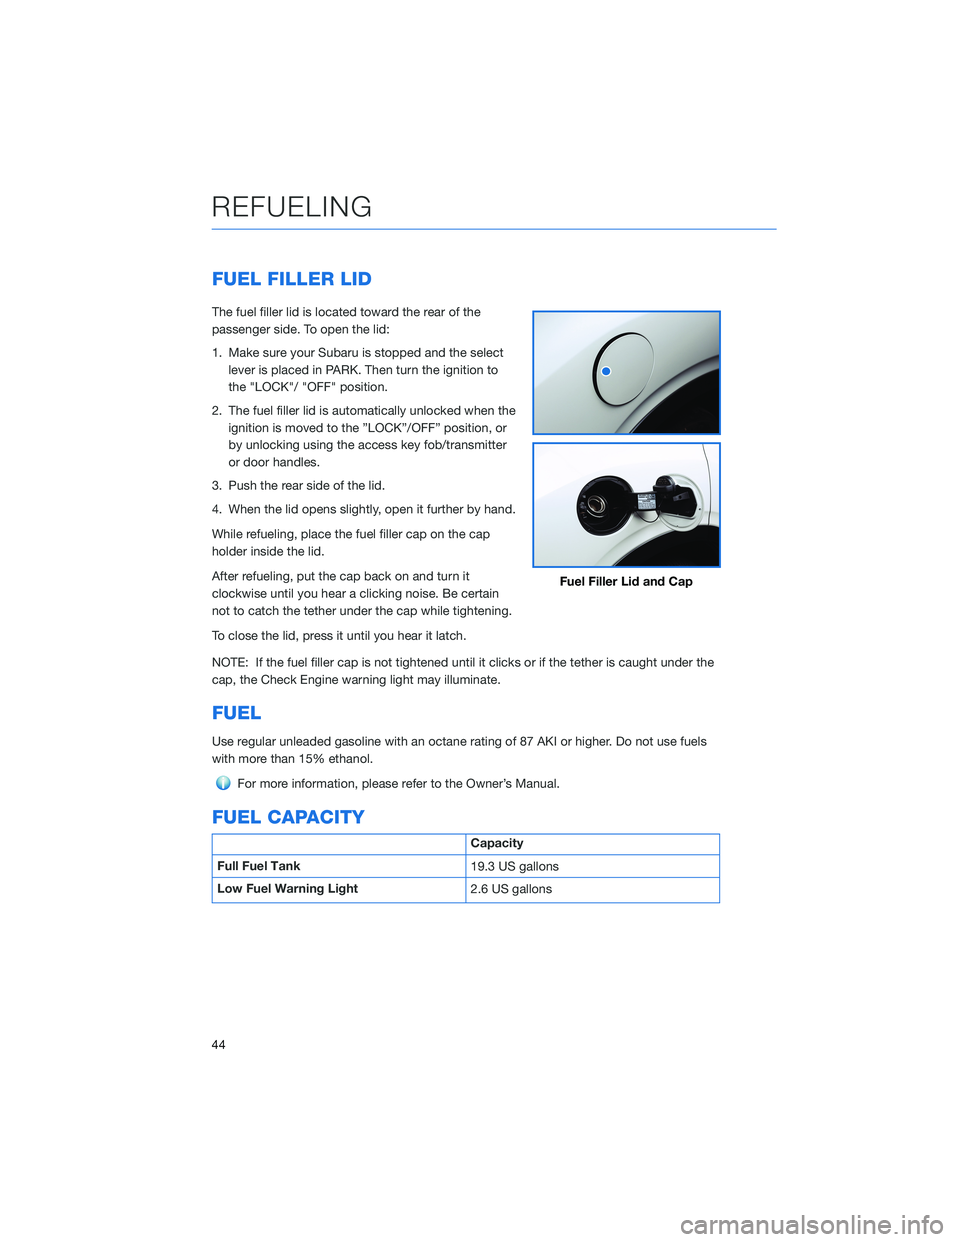
FUEL FILLER LID
The fuel filler lid is located toward the rear of the
passenger side. To open the lid:
1. Make sure your Subaru is stopped and the select
lever is placed in PARK. Then turn the ignition to
the "LOCK"/ "OFF" position.
2. The fuel filler lid is automatically unlocked when the
ignition is moved to the ”LOCK”/OFF” position, or
by unlocking using the access key fob/transmitter
or door handles.
3. Push the rear side of the lid.
4. When the lid opens slightly, open it further by hand.
While refueling, place the fuel filler cap on the cap
holder inside the lid.
After refueling, put the cap back on and turn it
clockwise until you hear a clicking noise. Be certain
not to catch the tether under the cap while tightening.
To close the lid, press it until you hear it latch.
NOTE: If the fuel filler cap is not tightened until it clicks or if the tether is caught under the
cap, the Check Engine warning light may illuminate.
FUEL
Use regular unleaded gasoline with an octane rating of 87 AKI or higher. Do not use fuels
with more than 15% ethanol.
For more information, please refer to the Owner’s Manual.
FUEL CAPACITY
Capacity
Full Fuel Tank
19.3 US gallons
Low Fuel Warning Light
2.6 US gallons
Fuel Filler Lid and Cap
REFUELING
44
Page 49 of 140

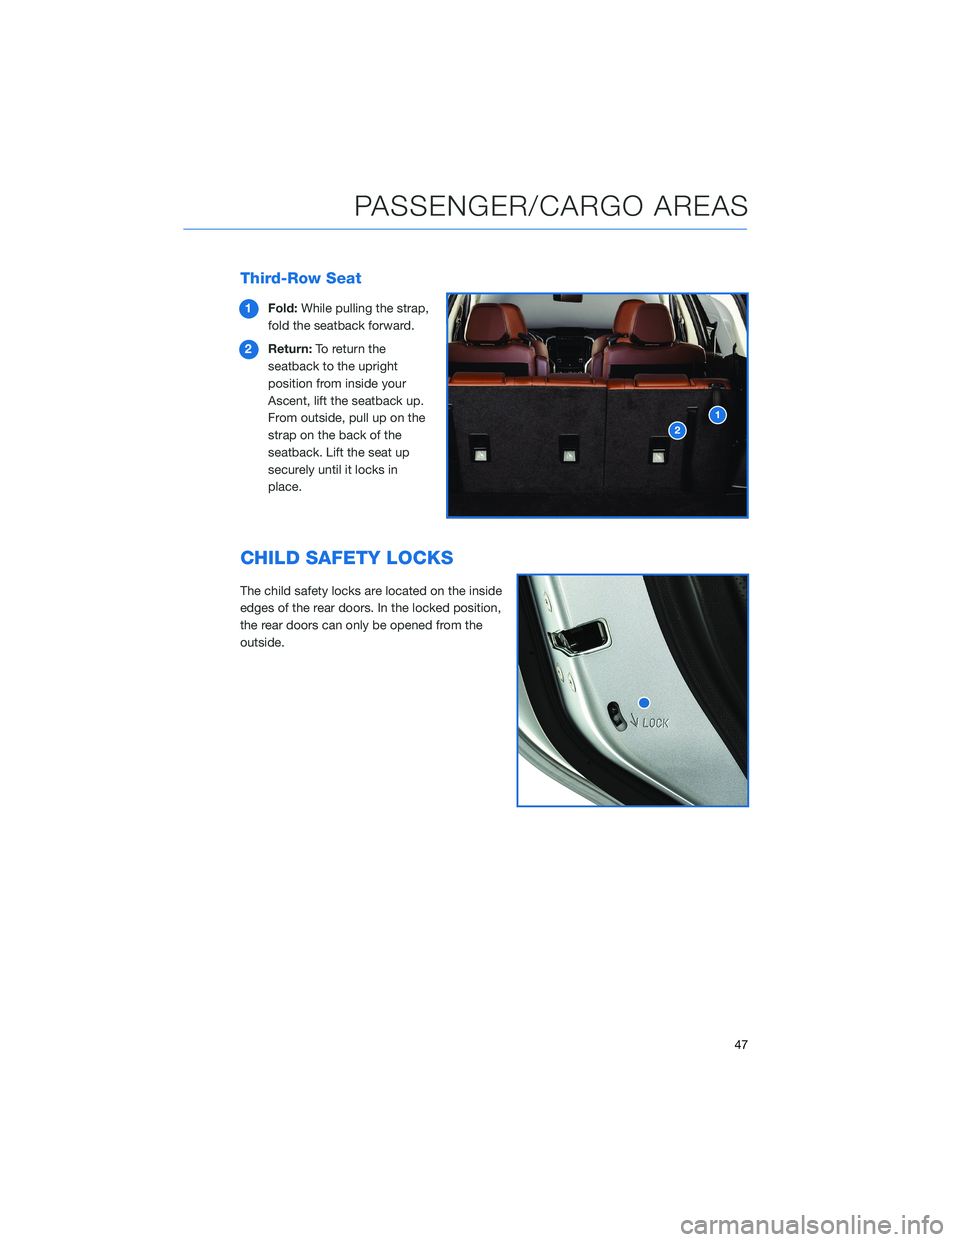
Third-Row Seat
1Fold:While pulling the strap,
fold the seatback forward.
2Return:To return the
seatback to the upright
position from inside your
Ascent, lift the seatback up.
From outside, pull up on the
strap on the back of the
seatback. Lift the seat up
securely until it locks in
place.
CHILD SAFETY LOCKS
The child safety locks are located on the inside
edges of the rear doors. In the locked position,
the rear doors can only be opened from the
outside.
PASSENGER/CARGO AREAS
47
Page 108 of 140

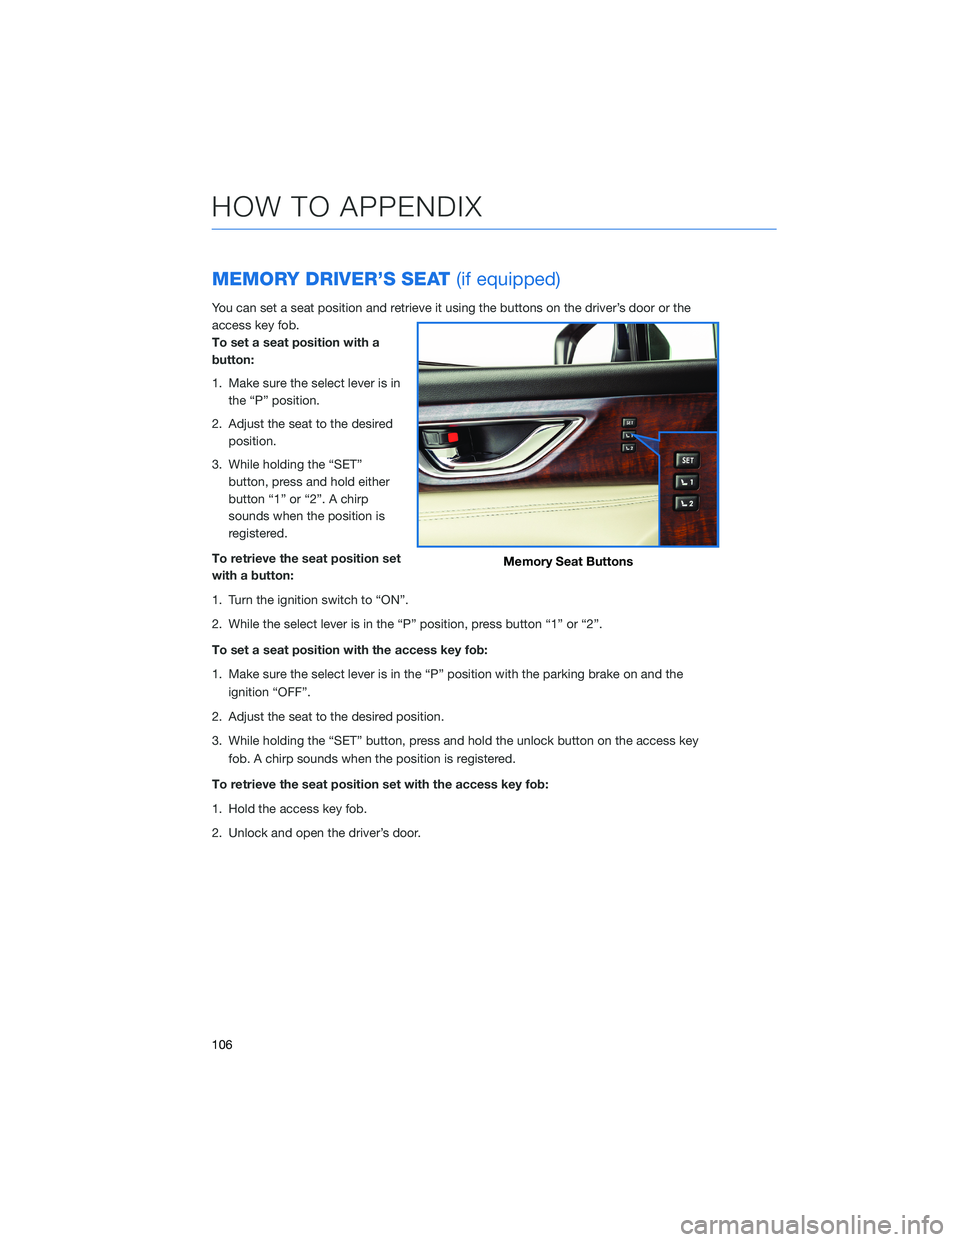
MEMORY DRIVER’S SEAT(if equipped)
You can set a seat position and retrieve it using the buttons on the driver’s door or the
access key fob.
To set a seat position with a
button:
1. Make sure the select lever is in
the “P” position.
2. Adjust the seat to the desired
position.
3. While holding the “SET”
button, press and hold either
button “1” or “2”. A chirp
sounds when the position is
registered.
To retrieve the seat position set
with a button:
1. Turn the ignition switch to “ON”.
2. While the select lever is in the “P” position, press button “1” or “2”.
To set a seat position with the access key fob:
1. Make sure the select lever is in the “P” position with the parking brake on and the
ignition “OFF”.
2. Adjust the seat to the desired position.
3. While holding the “SET” button, press and hold the unlock button on the access key
fob. A chirp sounds when the position is registered.
To retrieve the seat position set with the access key fob:
1. Hold the access key fob.
2. Unlock and open the driver’s door.
Memory Seat Buttons
HOW TO APPENDIX
106
Page 133 of 140

FOLDING THE REAR SEATS....... 46
Second-Row Seat . . . . .......46
Third-Row Seat . . . . .........47
FRONT VIEW MONITOR......... 97
FUEL . . . . . . . . . ........... 44
FUEL CAPACITY . . ............ 44
FUEL FILLER LID . . . .......... 44
FUNCTIONS . . . . ............ 87
Advanced Adaptive Cruise Control with
Lane Centering . . . . . ........90
Conventional Cruise Control......92
Lane Departure Prevention . . . . . . 90
Lane Departure Warning . . . . . . . . 89
Lane Sway Warning..........89
Lead Vehicle Start Alert . . . . . . . . 92
Pre-Collision Brake Assist.......88
Pre-Collision Braking..........88
Pre-Collision Throttle Management . . 88
H
HIGH BEAM ASSIST (HBA)....... 99
HOME SCREEN ICONS . . . . . . . . . 62
HOOD PROP . . . . ............ 51
HOW TO OVERVIEW .......... 103
I
IGNITION SWITCH . ........... 38
IMPORTANT SAFETY INFORMATION . . 4
IN CASE OF EMERGENCY . . . . . . . . 5
Subaru Roadside Assistance . . . . . . 5
SUBARU STARLINK
®Safety and
Security . . . . . . . . . .........5
INSTRUMENT PANEL SWITCHES (LOWER
LEFT) . . . . . . . ........... 30
I/SET SWITCH . . . . ........... 31
J
JACK AND TOOLS . ........... 50K
KEYLESS ACCESS WITH PUSH BUTTON
START .................. 9
Locking Using Door Handles ......9
Locking Using the Rear Gate . . . . . 10
Unlocking Using Door Handles .....9
Unlocking Using the Rear Gate....10
KEYLESS ENTRY . ............. 7
Automatic Door Locking/Unlocking . . 8
L
LANE DEPARTURE WARNING AND
PRE-COLLISION BRAKING SYSTEM
OFF ................... 96
Lane Departure Warning OFF
Switch . . . . ..............96
Pre-Collision Braking OFF Switch . . 96
LATCH/ANCHOR . . ........... 48
LIGHT CONTROLS . ........... 32
Daytime Running Lights . .......33
Illumination Brightness . ........33
M
MAKING A CALL . . . .......... 68
MAPS . . . ................ 121
Arrival Time/Distance.........126
Canceling Guidance . . ........126
Finding a Destination by Address . . 121
Finding a Destination by POI.....122
Guidance Screen Icons . .......124
Map Updates .............127
Map View/Perspective . . . .....125
Map Zoom . . . . . . . . . ......124
Nearest Gas Station ..........126
Route Options . . . . . . . ......123
Saving Destination as a Favorite . . 123
Shortest/Fastest/Economic .....123
Traffic Information . ..........125
MAPS/NAVIGATION . . . ......... 82
Checking for Map Updates......82
INDEX
131