2021 PEUGEOT PARTNER change wheel
[x] Cancel search: change wheelPage 120 of 260

11 8
Driving
save speed settings that will subsequently be
proposed for the purpose of configuring these
two systems.
You can memorise multiple speed settings for
each of the two systems.
By default, some speed settings are already
memorised.
As a safety measure, the driver must only change speed settings when stationary.
Changing a speed setting
In the Driving / Vehicle touch screen
menu, select "Driving functions " then
"Memorised speed settings".
"MEM" button
With this button, you can select a memorised
speed setting to use with the speed limiter or the
programmable cruise control.
For more information on the Speed limiter or
Programmable cruise control, refer to the
corresponding section.
Active Safety Brake with Distance Alert and
Intelligent emergency
braking assistance
Refer to the General recommendations on the
use of driving and manoeuvring aids .
This system allows:
–
the driver to be warned that their vehicle is at
risk of collision with the vehicle in front,
–
a collision to be prevented, or its severity to be
limited, by reducing the vehicle’
s speed.
This system is comprised of three functions:
–
Distance Alert,
–
Intelligent emergency braking assistance,
–
Active Safety Brake (automatic emergency
braking).
The vehicle has a camera located at the top of
the windscreen.
This system does not avoid the need for vigilance on the part of the driver.
This system is designed to assist the driver
and improve road safety.
It is the driver's responsibility to continuously
monitor the state of the traffic, observing the
driving regulations.
As soon as the system detects a potential obstacle, it prepares the braking
circuit in case automatic braking is needed.
This may cause a slight noise and a slight
sensation of deceleration.
Operating conditions and
limits
The ESC system must not be faulty.
The DSC/ASR systems must not be deactivated.
All passenger seat belts must be fastened.
Driving at a steady speed on roads with few
bends is required.
In the following cases, deactivating the system
via the vehicle's configuration menu is advised:
–
towing a trailer
,
–
carrying long objects on roof bars or roof rack,
–
with snow chains fitted,
–
before using an automatic car wash, with the
engine running,
–
before placing the vehicle on a rolling road in
a workshop,
–
towed vehicle, engine running,
– Following an impact to the windscreen close to
the detection camera.
The system is automatically deactivated after the use of certain "space-saver"
type spare wheels is detected (smaller
diameter).
The system is automatically deactivated
after detection of a fault with the brake pedal
switch or with at least two brake lamps.
It is possible that warnings are not given,
are given too late or seem unjustified.
Consequently, always stay in control of your
vehicle and be prepared to react at any time
to avoid an accident.
After an impact, the function automatically stops operating. Contact a
PEUGEOT dealer or a qualified workshop to
have the system checked.
Distance Alert
It warns the driver that their vehicle is at risk of
collision with the vehicle in front or a pedestrian
present in their traffic lane.
Operation
Depending on the degree of risk of collision
detected by the system and the alert threshold
chosen by the driver, several different levels
Page 122 of 260
120
Driving
Active Safety Brake
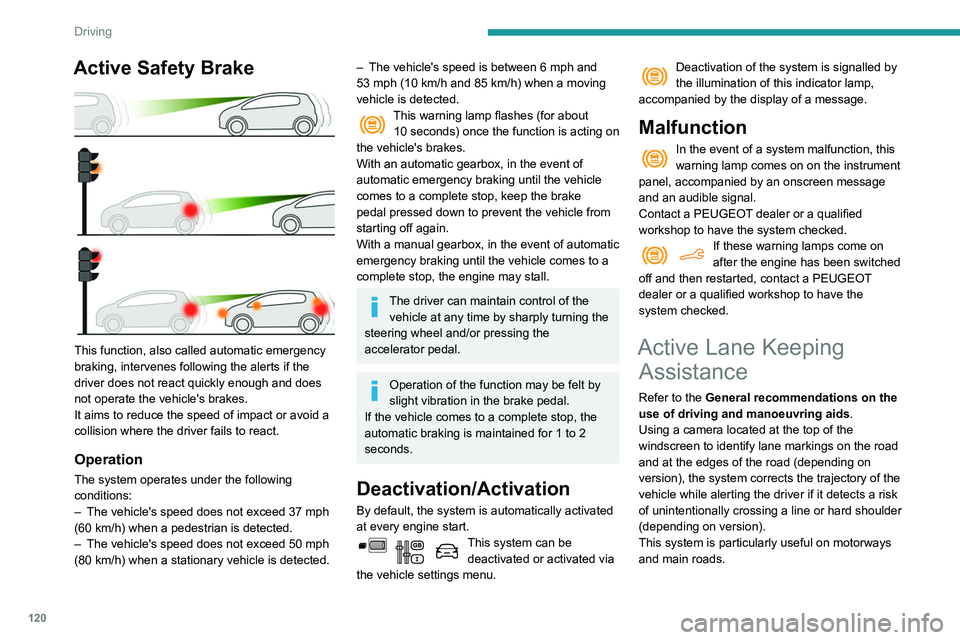
This function, also called automatic emergency
braking, intervenes following the alerts if the
driver does not react quickly enough and does
not operate the vehicle's brakes.
It aims to reduce the speed of impact or avoid a
collision where the driver fails to react.
Operation
The system operates under the following
conditions:
–
The vehicle's speed does not exceed 37 mph
(60 km/h) when a pedestrian is detected.
–
The vehicle's speed does not exceed 50 mph
(80 km/h) when a stationary vehicle is detected.
– The vehicle's speed is between 6 mph and
53 mph (10 km/h and 85 km/h) when a moving
vehicle is detected.
This warning lamp flashes (for about 10 seconds) once the function is acting on
the vehicle's brakes.
With an automatic gearbox, in the event of
automatic emergency braking until the vehicle
comes to a complete stop, keep the brake
pedal pressed down to prevent the vehicle from
starting off again.
With a manual gearbox, in the event of automatic
emergency braking until the vehicle comes to a
complete stop, the engine may stall.
The driver can maintain control of the vehicle at any time by sharply turning the
steering wheel and/or pressing the
accelerator pedal.
Operation of the function may be felt by
slight vibration in the brake pedal.
If the vehicle comes to a complete stop, the
automatic braking is maintained for 1 to 2
seconds.
Deactivation/Activation
By default, the system is automatically activated
at every engine start.
This system can be deactivated or activated via
the vehicle settings menu.
Deactivation of the system is signalled by
the illumination of this indicator lamp,
accompanied by the display of a message.
Malfunction
In the event of a system malfunction, this
warning lamp comes on on the instrument
panel, accompanied by an onscreen message
and an audible signal.
Contact a PEUGEOT dealer or a qualified
workshop to have the system checked.
If these warning lamps come on
after the engine has been switched
off and then restarted, contact a PEUGEOT
dealer or a qualified workshop to have the
system checked.
Active Lane Keeping Assistance
Refer to the General recommendations on the
use of driving and manoeuvring aids .
Using a camera located at the top of the
windscreen to identify lane markings on the road
and at the edges of the road (depending on
version), the system corrects the trajectory of the
vehicle while alerting the driver if it detects a risk
of unintentionally crossing a line or hard shoulder
(depending on version).
This system is particularly useful on motorways
and main roads.
Conditions for operation
– The speed of the vehicle must be between 40
and 112 mph (65 and 180 km/h).
– The traffic lane must be delimited by a dividing
line.
– The driver must hold the wheel with both
hands.
– The change of trajectory must not be
accompanied by operation of the direction
indicators.
– The ESC system must be activated and not
faulty.
The system helps the driver only when there is a risk of the vehicle involuntarily
wandering from the lane it is being driven in. It
Driving situations and related alerts
The table below describes the alerts and messages displayed in different driving situations.
These alerts are not displayed sequentially.
Page 123 of 260
121
Driving
6
Conditions for operation
– The speed of the vehicle must be between 40
and 1 12 mph (65 and 180 km/h).
–
The traffic lane must be delimited by a dividing
line.
–
The driver must hold the wheel with both
hands.
–
The change of trajectory must not be
accompanied by operation of the direction
indicators.
–
The ESC system must be activated and not
faulty
.
The system helps the driver only when there is a risk of the vehicle involuntarily
wandering from the lane it is being driven in. It
does not manage the safe driving distance,
the speed of the vehicle or the brakes.
The driver must hold the steering wheel with
both hands in a way that allows control to
be maintained in circumstances where the
system is not able to intervene (for example, if
the dividing line marking disappears).
Operation
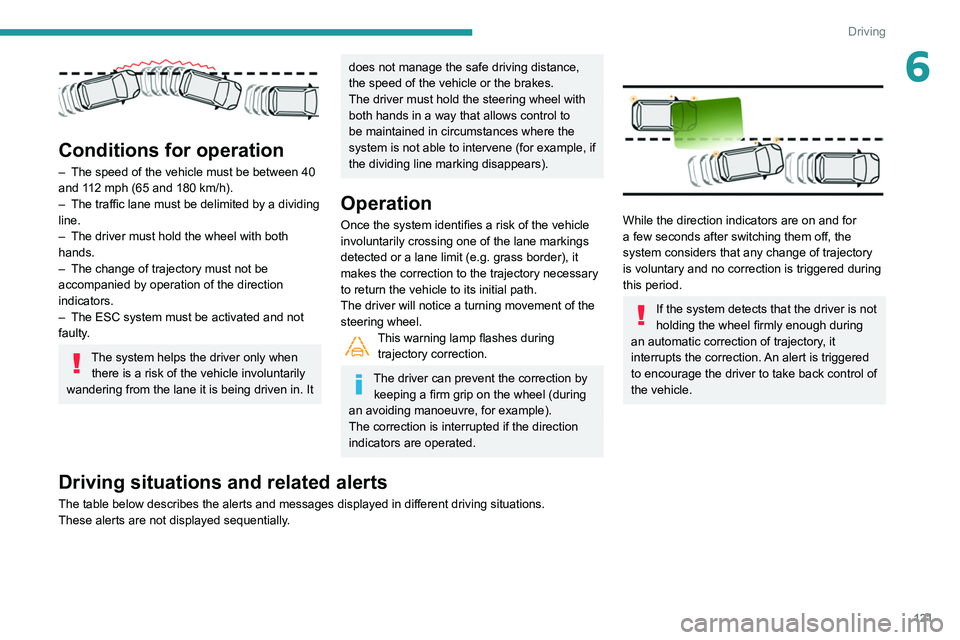
Once the system identifies a risk of the vehicle
involuntarily crossing one of the lane markings
detected or a lane limit (e.g. grass border), it
makes the correction to the trajectory necessary
to return the vehicle to its initial path.
The driver will notice a turning movement of the
steering wheel.
This warning lamp flashes during trajectory correction.
The driver can prevent the correction by keeping a firm grip on the wheel (during
an avoiding manoeuvre, for example).
The correction is interrupted if the direction
indicators are operated.
While the direction indicators are on and for
a few seconds after switching them off, the
system considers that any change of trajectory
is voluntary and no correction is triggered during
this period.
If the system detects that the driver is not
holding the wheel firmly enough during
an automatic correction of trajectory, it
interrupts the correction. An alert is triggered
to encourage the driver to take back control of
the vehicle.
Driving situations and related alerts
The table below describes the alerts and messages displayed in different driving situations.
These alerts are not displayed sequentially.
Page 133 of 260

131
Driving
6The blue dimension lines 1 represent the width
of your vehicle with the mirrors unfolded.
The red line 2 represents a distance of 30
cm
from the rear bumper; the two green lines 3 and
4 represent 1
m and 2 m, respectively.
The blue curves 5 appear successively; they
are based on the position of the steering wheel
and represent the turning circle radius of your
vehicle.
The orange dashes 6 represent the opening radii
of the rear doors.
Please routinely check your exterior
mirrors while driving and during
manoeuvres.
Some items may not be seen by the rear
camera.
Certain vehicles may be difficult to see
(dark colours, lamps off) when the
brightness of the screen is reduced using the
vehicle’s lighting dimmer.
The image quality may be affected by the environment, the exterior conditions
(rain, dirt, dust), the driving mode and the
lighting conditions (night, low sun).
In the presence of areas in shade, or in
conditions of bright sunlight or inadequate
lighting, the image may be darkened and with
lower contrast.
Obstacles may appear further away than
they actually are.
During parking manoeuvres and lane
changes, it is important to check the sides of
the vehicle using the mirrors.
The rear parking sensors also supplement the
information on the vehicle's surroundings.
Activation / Deactivation
The system starts when the ignition is switched
on.
► With the ignition on, press button 2 to switch
the reproduction screen on / off.
A message appears.
►
T
ake note of this message and validate
with button 1 corresponding to the “ Accept”
response.
The reproduction screen comes on.
► With the engine running, press button 2 to
switch the reproduction screen off.
The function is automatically paused (the reproduction screen becomes grey) in
reverse , above 9 mph (15
km/h).
The function restarts when the vehicle is
once more travelling at a speed below this
threshold.
Operation
► In neutral , the monitoring rear view is
displayed by default.
►
When reverse is engaged
, the visual
reversing aid is displayed on the screen (even if
it is switched off).
► To change the view , press the end of the
lighting control stalk or press the corresponding
button located below the screen.
Page 147 of 260

145
Practical information
7If the warning lamp stays on, this
indicates a low Diesel additive level.
For more information on Checking levels,
refer to the corresponding section.
Following prolonged operation of the
vehicle at very low speed or at idle, you
may, in exceptional circumstances, notice the
emission of water vapour at the exhaust while
accelerating. This has no impact on the
vehicle’s behaviour or the environment.
New vehicle
During the first few particle filter
regeneration operations, you may notice a
"burning" smell. This is perfectly normal.
Manual gearbox
The gearbox does not require any maintenance (no oil change).
Automatic gearbox
The gearbox does not require any maintenance (no oil change).
Brake pads
Brake wear depends on the style of
driving, particularly in the case of vehicles
used in town, over short distances. It may be
necessary to have the condition of the brakes
checked, even between vehicle services.
Unless there is a leak in the circuit, a drop in the
brake fluid level indicates that the brake pads
are worn.
After washing the vehicle, moisture, or in wintry conditions, ice can form on the
brake discs and pads: braking efficiency may
be reduced. Gently dab the brakes to dry and
defrost them.
Brake disc wear
For information on checking brake disc
wear, contact a PEUGEOT dealer or a
qualified workshop.
Manual parking brake
If you notice excessive brake lever travel
or decreased effectiveness, the parking
brake must be adjusted, even between two
services.
This system must be checked by a PEUGEOT
dealer or a qualified workshop.
Electric parking brake
This system does not require any routine servicing. However, in the event of a
problem, do not hesitate to have the system
checked by a PEUGEOT dealer or a qualified
workshop.
For more information on the Electric
parking brake, refer to the
corresponding section.
Wheels and tyres
The inflation pressure of all tyres, including the spare wheel, must be
checked on "cold” tyres.
The pressures indicated on the tyre pressure
label are valid for "cold" tyres. If you have driven
for more than 10 minutes or more than 6 miles
(10 kilometres) at over 31 mph (50
km/h), add
0.3 bar (30 kPa) to the values indicated on the
label.
Under-inflation increases fuel
consumption. Non-compliant tyre
pressure causes premature wear on tyres and
has an adverse effect on the vehicle's road
holding - risk of an accident!
Driving with worn or damaged tyres reduces the
braking and road holding performance of the
vehicle. It is recommended to regularly check the
condition of the tyres (tread and sidewalls) and
wheel rims as well as the presence of the valves.
When the wear indicators no longer appear set
back from the tread, the depth of the grooves is
less than 1.6 mm; it is imperative to replace the
tyres.
Using different size wheels and tyres from those
specified can affect the lifetime of tyres, wheel
rotation, ground clearance, the speedometer
reading and have an adverse effect on road
holding.
Fitting different tyres on the front and rear axles
can cause the ESC to mistime.
Page 152 of 260
150
In the event of a breakdown
Running out of fuel
(Diesel)
On vehicles fitted with Diesel engines, the fuel
system must be primed if you run out of fuel.
If the engine does not start first time, do not keep
trying, but start the procedure again from the
beginning.
For more information on Misfuel
prevention (Diesel), refer to the
corresponding section.
With 1.6 BlueHDi (Euro 6.1)
► Switch on the ignition (without starting the
engine).
►
W
ait around 6 seconds and switch off the
ignition.
►
Repeat the operation 10
times.
►
Operate the starter motor to start the engine.
If the engine does not start at the first attempt,
do not keep trying, but restart the procedure.
With 1.5 BlueHDi (Euro 6.2/6.3)
► Switch on the ignition (without starting the
engine).
►
W
ait around 1 minute and switch off the
ignition.
►
Operate the starter motor to start the engine.
If the engine does not start at the first attempt,
do not keep trying, but restart the procedure.
Non-BlueHDi engines
► Open the bonnet and then, if necessary ,
unclip the cover to access the priming pump.
► Operate the priming pump repeatedly
until resistance is felt (resistance may be
felt at the first press).
►
Operate the starter motor to start the engine
(if the engine does not start at the first attempt,
wait around 15 seconds before trying again).
►
If the engine does not start after a few
attempts, operate the priming pump again, then
the starter motor
.
►
Put the cover back in place and clip it in, then
close the bonnet.
Tool kit
► For easier access, move the seat(s) forward.
Accessing the tools
With a temporary puncture repair kit
The kit is located under the right-hand front seat.
With spare wheel
The jack is located under the right-hand front
seat.
The tools are located under the left-hand front
seat.
Description of tools
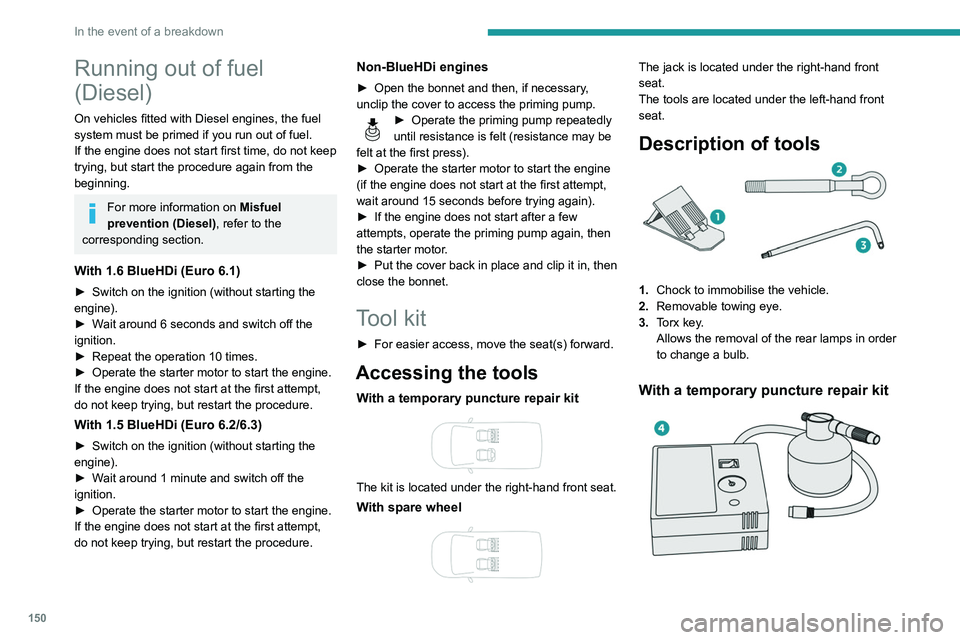
1. Chock to immobilise the vehicle.
2. Removable towing eye.
3. Torx key.
Allows the removal of the rear lamps in order
to change a bulb.
With a temporary puncture repair kit
4.12 V compressor with a cartridge of sealant
and a speed limit sticker
For temporary repair of a tyre and to adjust
the tyre pressure.
For more information about the Temporary
puncture repair kit, refer to the corresponding
section.
With spare wheel
5. Wheelbrace.
For removing the wheel bolts and raising/
lowering the jack.
6. Jack.
Used to raise the vehicle.
7. Wheel bolt cover/wheel trim removal tool
(depending on equipment).
If present on the vehicle, used to remove
the wheel bolt covers on alloy wheels or the
wheel trim on steel wheels.
Page 153 of 260
151
In the event of a breakdown
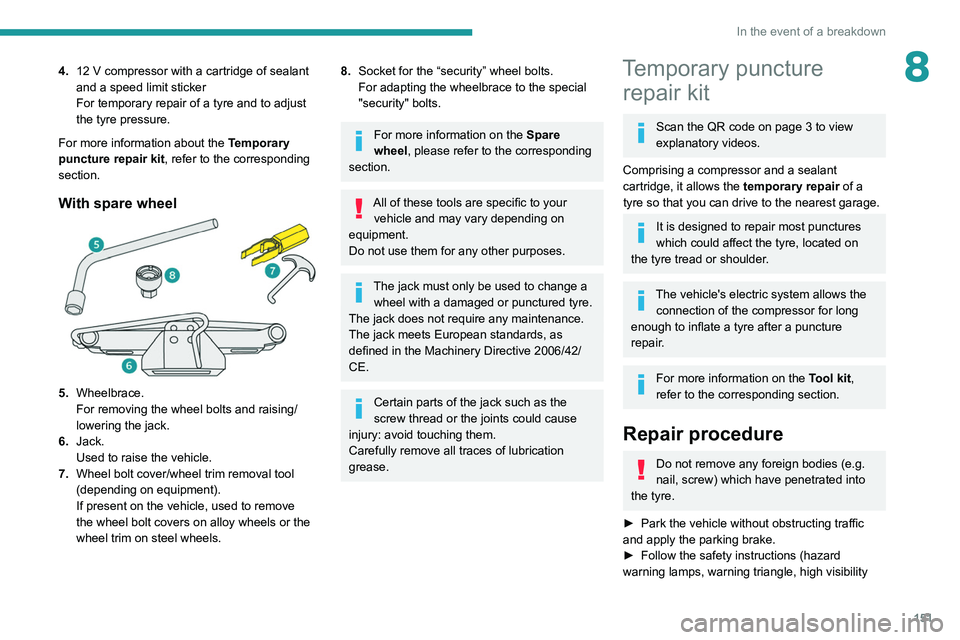
84.12 V compressor with a cartridge of sealant
and a speed limit sticker
For temporary repair of a tyre and to adjust
the tyre pressure.
For more information about the Temporary
puncture repair kit, refer to the corresponding
section.
With spare wheel
5. Wheelbrace.
For removing the wheel bolts and raising/
lowering the jack.
6. Jack.
Used to raise the vehicle.
7. Wheel bolt cover/wheel trim removal tool
(depending on equipment).
If present on the vehicle, used to remove
the wheel bolt covers on alloy wheels or the
wheel trim on steel wheels.
8.Socket for the “security” wheel bolts.
For adapting the wheelbrace to the special
"security" bolts.
For more information on the Spare
wheel, please refer to the corresponding
section.
All of these tools are specific to your vehicle and may vary depending on
equipment.
Do not use them for any other purposes.
The jack must only be used to change a wheel with a damaged or punctured tyre.
The jack does not require any maintenance.
The jack meets European standards, as
defined in the Machinery Directive 2006/42/
CE.
Certain parts of the jack such as the
screw thread or the joints could cause
injury: avoid touching them.
Carefully remove all traces of lubrication
grease.
Temporary puncture repair kit
Scan the QR code on page 3 to view
explanatory videos.
Comprising a compressor and a sealant
cartridge, it allows the temporary repair of a
tyre so that you can drive to the nearest garage.
It is designed to repair most punctures
which could affect the tyre, located on
the tyre tread or shoulder.
The vehicle's electric system allows the connection of the compressor for long
enough to inflate a tyre after a puncture
repair.
For more information on the Tool kit,
refer to the corresponding section.
Repair procedure
Do not remove any foreign bodies (e.g.
nail, screw) which have penetrated into
the tyre.
►
Park the vehicle without obstructing traffic
and apply the parking brake.
►
Follow the safety instructions (hazard
warning lamps, warning triangle, high visibility
Page 154 of 260
152
In the event of a breakdown
vest, etc.) according to the legislation in force in
the country of driving.
►
Switch off the ignition.
►
Remove the valve cap from the tyre to be
repaired, and place it in a clean area.
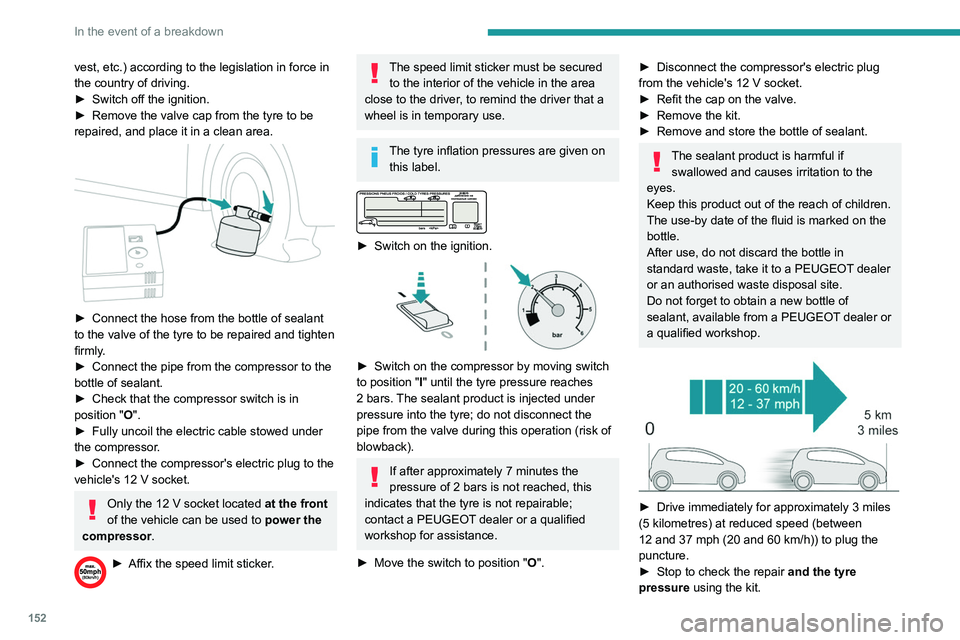
► Connect the hose from the bottle of sealant
to the valve of the tyre to be repaired and tighten
firmly
.
►
Connect the pipe from the compressor to the
bottle of sealant.
►
Check that the compressor switch is in
position
"O".
►
Fully uncoil the electric cable stowed under
the compressor
.
►
Connect the compressor's electric plug to the
vehicle's 12
V socket.
Only the 12 V socket located at the front
of the vehicle can be used to power the
compressor .
► Affix the speed limit sticker .
The speed limit sticker must be secured
to the interior of the vehicle in the area
close to the driver, to remind the driver that a
wheel is in temporary use.
The tyre inflation pressures are given on this label.
► Switch on the ignition.
► Switch on the compressor by moving switch
to position " I" until the tyre pressure reaches
2 bars. The sealant product is injected under
pressure into the tyre; do not disconnect the
pipe from the valve during this operation (risk of
blowback).
If after approximately 7 minutes the
pressure of 2 bars is not reached, this
indicates that the tyre is not repairable;
contact a PEUGEOT dealer or a qualified
workshop for assistance.
►
Move the switch to position " O
".
► Disconnect the compressor's electric plug
from the vehicle's 12 V socket.
►
Refit the cap on the valve.
►
Remove the kit.
►
Remove and store the bottle of sealant.
The sealant product is harmful if swallowed and causes irritation to the
eyes.
Keep this product out of the reach of children.
The use-by date of the fluid is marked on the
bottle.
After use, do not discard the bottle in
standard waste, take it to a PEUGEOT dealer
or an authorised waste disposal site.
Do not forget to obtain a new bottle of
sealant, available from a PEUGEOT dealer or
a qualified workshop.
► Drive immediately for approximately 3 miles
(5 kilometres) at reduced speed (between
12 and 37 mph (20 and 60
km/h)) to plug the
puncture.
►
Stop to check the repair
and the tyre
pressure using the kit.
With a tyre repaired using this type of kit,
do not exceed a speed of 50 mph
(80 km/h) and do not drive more than
125 miles (200 km).
Contact a PEUGEOT dealer or a qualified
workshop to have the tyre changed.
Checking / adjusting tyre
pressures
The compressor can be used, without injecting
sealant, to check and, if necessary, adjust the
tyre pressures.
► Remove the valve cap from the tyre and keep
it in a clean place.
► Uncoil the pipe stowed under the compressor.
► Screw the pipe onto the valve and tighten
firmly.
► Check that the compressor switch is in
position " O".
► Fully uncoil the electric cable stowed under
the compressor.
► Connect the compressor's electric plug to the
vehicle's 12 V socket.
► Switch on the ignition.
Only the 12 V socket located at the front
of the vehicle can be used to power the
compressor .
The tyre inflation pressures are given on
this label.