2021 Peugeot Landtrek bar
[x] Cancel search: barPage 5 of 176

3
Contents
7Practical information
Recommended fuel 88
Refuelling 88
Towing device 89
Snow chains 89
Roof bars 90
Bonnet 90
Engine compartment 91
Checking levels 92
Checks
94
Maintenance 96
Free-wheeling 102
Advice on care and maintenance 102
8In the event of a breakdown
Warning triangle 104
Fire extinguisher 104
Running out of fuel (Diesel) 105
Tool kit 105
Spare wheel 106
Changing a bulb 11 0
Changing a fuse 11 3
12
V battery 11 6
Towing the vehicle 11 9
9Technical data
Engine technical data and towed loads 122
Petrol engines 123
Diesel engines 124
Dimensions 125
Identification markings 125
10Bluetooth® radio
Menus 127
Steering mounted controls 128
Radio 128
Media 129
Telephone 129
11Peugeot Connect 10" Touchscreen
First steps 131
Steering mounted controls
131
Menus 132
Navigation 133
Radio 133
Music player 133
Telephone 134
Applications 135
Settings 136
■
Alphabetical index
Page 6 of 176

4
Overview
Instruments and controls
These illustrations and descriptions are intended
as a guide. The presence and location of some
elements vary depending on the version or trim
level.
1.Electric windows
Central locking/unlocking
2. Side switch panel
3. Horn
Driver front airbag
4. Instrument panel
5. Front courtesy/map reading lamps
6. Glasses holder
7. Interior rear view mirror
8. Monochrome screen or touch screen
9. Heating/air conditioning controls
10. Central switch panel (lower and upper)
11 . Audio USB socket/Charger USB socket
12. Key ignition switch or button START/STOP 13.
2H, 4H and 4L transmission mode selector
14. Gearbox
15. Sport/Eco button
16. Parking brake
Cigarette lighter/12 V (120 W) accessory
socket
17. Front passenger airbag
18. Glove box
19. Deactivate front passenger airbag (on the
side of the dashboard)
Steering-mounted controls
Depending on the vehicle’s equipment, the
function and location of the controls may vary.
1.External lighting/Direction indicator controls
2. Wiper/Screenwash controls
3.Audio system settings
4. Speed limiter/Cruise control A.
Speed limiter/Cruise control pause
B. Activate Cruise control
C. Decrease/Increase Speed limiter/Cruise
control speed setting
Memorising speeds function (SET) or
reactivation of the programmed speed
function (RES)
D. V
oice recognition/Media
E. Activate Speed limiter
F. Select menus on the instrument panel and
validate
G.
Decrease/Increase volume
H. Select the instrument panel display mode
and navigate in the menus
I. Access the
Telephone menu /Answer a call
Select next media
J. Access the Telephone menu / End a call
Select previous media
Side control bar
1. Door mirror controls
Page 7 of 176

5
Overview
2.Deactivate the Lane Departure Warning
System function
3. Headlamp beam height adjustment
4. Activate loading zone external lighting
(available only when stationary)
5. Deactivate parking sensors
Central control bar (lower and upper)
1.Rear differential locking
2. Hill Assist Descent Control
3. Deactivate the DSC/ASR system
4. Central locking
5. Central unlocking
6. Hazard warning lamps
7. Passenger airbag deactivation/activation
indication lamp
8. Activate camera functions (360° Camera or
Off Road Camera)
9. Audio system on/off (long press)
Volume adjustment/Mute (short press)
Page 8 of 176

6
Eco-driving
Eco-driving
Eco-driving refers to a range of everyday
practices that allow the motorist to optimise their
energy consumption (fuel and/or electricity) and
CO
2 emissions.
Optimise your use of the gearbox
With a manual gearbox, move off gently and
change up promptly. While accelerating, change
up early.
With an automatic gearbox, favour automatic
mode and avoid pressing the accelerator pedal
heavily or suddenly.
With a 4-wheel drive vehicle, favour 2H
transmission (standard) mode over 4H mode.
With a manual gearbox, the gear shift indicator
prompts you to engage the most suitable gear:
whenever this indication is displayed on the
instrument panel, follow it straight away.
Drive smoothly
Maintain a safe distance between vehicles, use
engine braking rather than the brake pedal and
press the accelerator gradually. These practices
help to save on energy consumption, reduce
CO
2 emissions and decrease general traffic
noise.
If the vehicle has the steering-mounted
"CRUISE" control, use cruise control at speeds
above 25
mph (40 km/h) when traffic is flowing
smoothly.
Control the use of electrical equipment
Before moving off, if the passenger compartment
is too warm, ventilate it by opening the windows
and air vents before using the air conditioning.
At speeds above 31
mph (50 km/h), close the
windows and leave the air vents open.
Consider using equipment that can help keep
the temperature in the passenger compartment
down.
Unless automatically regulated, switch off the air
conditioning as soon as the desired temperature
has been reached.
Switch off the demisting and defrosting functions,
if they are not managed automatically.
Switch off the heated seat as soon as possible.
Switch off the headlamps and foglamps when
the visibility conditions do not require their use.
Avoid running the engine before moving off,
particularly in winter (other than in severe wintry
conditions: temperature below -23°C); your
vehicle will warm up much faster while driving.
As a passenger, avoid connecting your
multimedia devices (film, music, video game,
etc.) to help reduce consumption of energy.
Disconnect all portable devices before leaving
the vehicle.
Limit the causes of excess consumption
Spread loads throughout the vehicle.
Limit the loads carried in the vehicle and
minimise wind resistance (roof bars, roof rack,
bicycle carrier, trailer, etc.). Preferably, use a
roof box. Remove roof bars and roof racks after use.
At the end of winter, remove snow tyres and refit
summer tyres.
Comply with the servicing instructions
Check tyre pressures regularly, with the tyres
cold, referring to the label in the door aperture on
the driver's side.
Carry out this check in particular:
–
before a long journey
.
–
at each change of season.
–
after a long period out of use.
Do not forget the spare wheel and, where
applicable, the tyres on your trailer or caravan.
Have your vehicle serviced regularly (engine oil,
oil filter
, air filter, passenger compartment filter,
etc.)and observe the schedule of operations in
the manufacturer's service schedule.
With an HDi Diesel engine, if the particle filter
is faulty, your vehicle will emit pollution. Visit
a PEUGEOT dealer or a qualified workshop
as soon as possible to restore your vehicle's
particulate emissions to legal levels.
When filling the fuel tank, do not continue after
the third cut-out of the nozzle, to avoid overflow.
You will only see the fuel consumption of your
new vehicle settle down to a consistent average
after the first 1,900 miles (3,000 kilometres).
Page 28 of 176

26
Ease of use and comfort
The backrest of the seat located next to the
driver, once in the table position, can also be
used as an armrest and has 2 cup/can holders
and a support strap.
For more information on the Seat belts,
refer to the corresponding section.
Folding the backrests
The backrests must only be operated with the vehicle stationary.
While driving, having a passenger in the rear,
behind the front benchseat is prohibited if the
benchseat backrests are tilted.
When sharp deceleration occurs, objects
placed on the folded backrest can turn into
projectiles.
Preliminary operations:
► Lower the head restraints.
► Check that no person or object will interfere
with folding down the backrests (clothing,
luggage, etc.).
► Check that the outer seat belt is properly
tensioned along the pillars, the central belt is
stowed and the tongues of the belts are correctly
in the stowed position.
Deactivation of the front passenger
airbag is recommended.
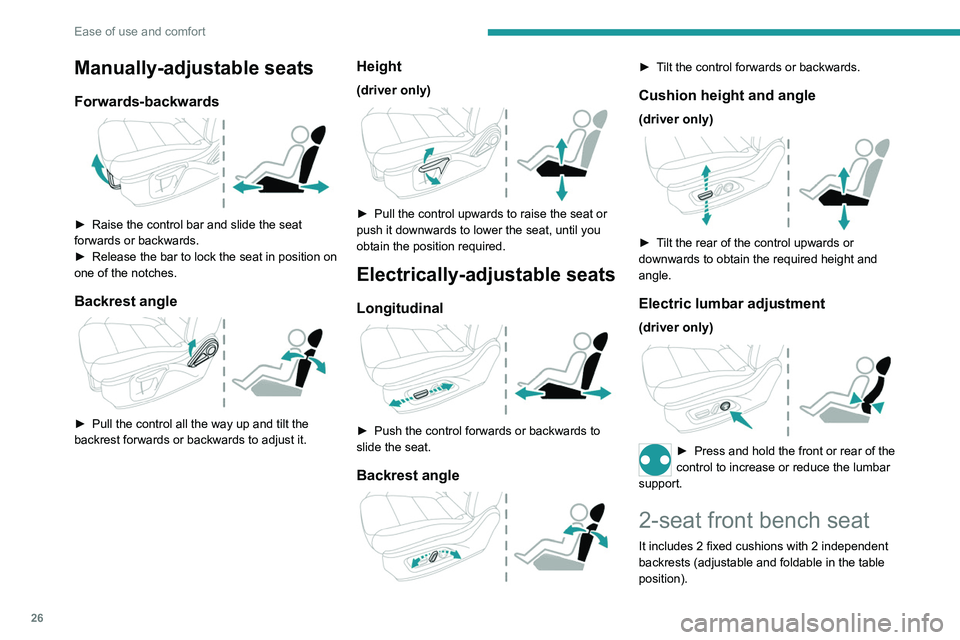
Manually-adjustable seats
Forwards-backwards
► Raise the control bar and slide the seat
forwards or backwards.
►
Release the bar to lock the seat in position on
one of the notches.
Backrest angle
► Pull the control all the way up and tilt the
backrest forwards or backwards to adjust it.
Height
(driver only)
► Pull the control upwards to raise the seat or
push it downwards to lower the seat, until you
obtain the position required.
Electrically-adjustable seats
Longitudinal
► Push the control forwards or backwards to
slide the seat.
Backrest angle
► Tilt the control forwards or backwards.
Cushion height and angle
(driver only)
► Tilt the rear of the control upwards or
downwards to obtain the required height and
angle.
Electric lumbar adjustment
(driver only)
► Press and hold the front or rear of the
control to increase or reduce the lumbar
support.
2-seat front bench seat
It includes 2 fixed cushions with 2 independent
backrests (adjustable and foldable in the table
position).
Page 41 of 176

39
Ease of use and comfort
3Storage boxes
Storage boxes are provided in the floor, under
the cushions of the rear bench seat.
They may contain the vehicle’s tools.
►
T
o open them, raise the corresponding
seat cushion and lift the carpet (depending on
version).
For more information on the Rear bench seat,
and especially on tilting the seat cushions, refer
to the corresponding section.
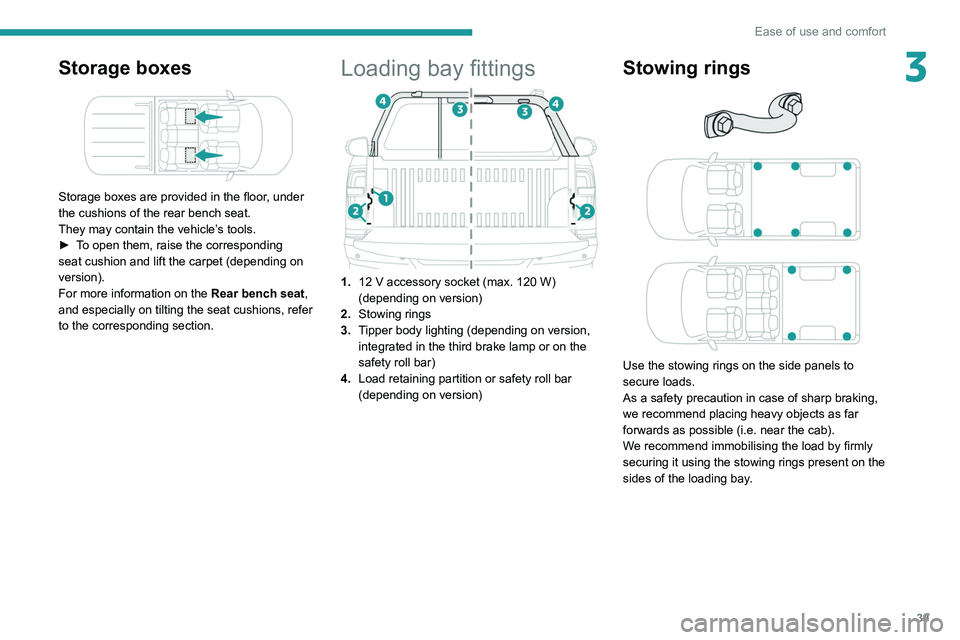
Loading bay fittings
1. 12 V accessory socket (max. 120 W)
(depending on version)
2. Stowing rings
3. Tipper body lighting (depending on version,
integrated in the third brake lamp or on the
safety roll bar)
4. Load retaining partition or safety roll bar
(depending on version)
Stowing rings
Use the stowing rings on the side panels to
secure loads.
As a safety precaution in case of sharp braking,
we recommend placing heavy objects as far
forwards as possible (i.e. near the cab).
We recommend immobilising the load by firmly
securing it using the stowing rings present on the
sides of the loading bay.
Page 42 of 176

40
Ease of use and comfort
Load retaining partition
On the structure of the loading bay, behind the
rear window, a vertical separation protects the
driver and passengers against the risk of load
movement.
Bars separate the loading area from the cab.
Retractable hooks, integrated into the upper bar,
are used to secure the loads in the loading bay.
Recommendations on
loading
The weight of the load must comply with the Gross Train Weight (GTW).
For more information on Engine technical
data and towed loads , refer to the
corresponding section.
Make sure that the size, shape and
volume of the loads carried are
compatible with the highway code and safety
regulations and do not impair the driver’s field
of vision.
The load must be evenly distributed in the loading area so as not to interfere
with driving the vehicle.
Place the load close to the side wall panels,
or push it against the side wall panels
between the wheel arches.
However, it is recommended that heavy
objects are placed as close to the cab as
possible as a precaution in case of sharp
braking.
Secure all loads firmly using the stowing
rings present on the side panels of the
loading bay.
For more information on the Loading bay
fittings, and in particular on the stowing
rings, refer to the corresponding section.
To avoid the risk of injury or accident, the load must be made stable so that it
cannot slide, tip over, fall or be projected. To
do this, use only retaining straps that conform
to current standards (DIN, for example).
For more information on putting straps in
place, refer to the manufacturer’s user guide.
To prevent the load from sliding, there must
not be any empty spaces between the load
items and the vehicle wall panels.
As well as the straps, optimise the stability
of the load with stable handling equipment
(wedges, rigid blocks of wood or padding).
When washing the vehicle, never clean
the interior directly with a water jet.
Loading bay lighting
Depending on version, the loading bay lighting is
integrated into the third brake lamp or positioned
at each end of the safety roll bar.
The tipper body
lighting only operates when the
vehicle is stationary.
Page 63 of 176

61
Driving
6Driving recommendations
► Observe the driving regulations and remain
vigilant whatever the traffic conditions.
►
Monitor your surroundings and keep your
hands on the wheel to be able to react to
anything that may happen any time.
►
Drive smoothly
, anticipate the need for
braking and maintain a longer safety distance,
especially in bad weather.
►
Stop the vehicle to carry out operations that
require close attention (such as adjustments).
►
During long trips, take a break every 2 hours.
T
o ensure the durability of the vehicle and
for safety reasons, remember that certain
precautionary measures must be taken when
driving the vehicle:
Manoeuvre cautiously, at low speed
Manoeuvre slowly.
Before turning, check that there are no obstacles
at mid-height along the sides.
Before reversing, check that there are no
obstacles, particularly at high level behind the
vehicle.
Load the vehicle correctly
Observe the Gross Train Weight.
To avoid unbalancing the vehicle, centre the
load, placing the heaviest part on the floor in
front of the rear wheels.
Observe the maximum weight for the roof
anchoring points, communicated by a PEUGEOT
dealer. Loads must be securely lashed down.
Loads that are not properly secured in the
loading bay can disturb the vehicle’s behaviour
and cause an accident.
The dimensions of the load in the loading
bay
must respect the (overall) dimensions of the
vehicle.
Drive the vehicle carefully
Take corners gently.
Anticipate the need to brake as the stopping
distance is increased, particularly on wet or icy
roads.
Be aware of the effect of side winds on the
vehicle.
Avoid rough manoeuvres; improper driving can
lead to loss of control of the vehicle.
Precautions for off-road driving
Before driving off-road:
– Check the engine oil level.
–
Check the condition of the wheels and tyres.
–
Make sure that you transport the tool kit as
well as specialised equipment adapted to the
terrain.
Driving on uneven terrain or roads increases the
risk of the vehicle being damaged and the driver
or passengers being injured. Drive carefully
according to the conditions of the conditions.
–
Fasten seat belts (even at low speed).
–
Do not hold the steering wheel on the inside
or by its spokes (risk of injury due to the wheel
spinning back).
– Do not accelerate suddenly and do not drive at
excessive speed.
–
Do not make sharp turns.
–
A
void dangerous areas and avoid hitting
obstacles.
–
Do not drive perpendicularly or turn around on
a steep slope (risk of tipping over). Go up/down
or reverse in a straight line (with reverse gear
engaged if reversing).
–
Never reverse on a steep slope in neutral or
with the clutch pedal depressed (with a manual
gearbox).
On a descent, the vehicle speed can increase
without any action on the accelerator pedal.
In this case, use the engine brake to slow the
vehicle down. If necessary
, depress the brake
pedal without using it for an extended period
(risk of overheating the braking system).
As a precautionary measure, anticipate the
arrival at the top of a slope (steep slope on the
other side or presence of obstacle).
It is recommended to clean the brakes
regularly after driving off-road. In the
event of noise or loss of braking efficiency, it
is essential to visit a PEUGEOT dealer or a
qualified workshop to have the braking
system checked.
Maintenance
Inflate to the minimum pressure indicated on the
label, or even over-inflate by 0.2 to 0.3 bar for
long journeys.