2021 Peugeot Landtrek display
[x] Cancel search: displayPage 86 of 176
84
Driving
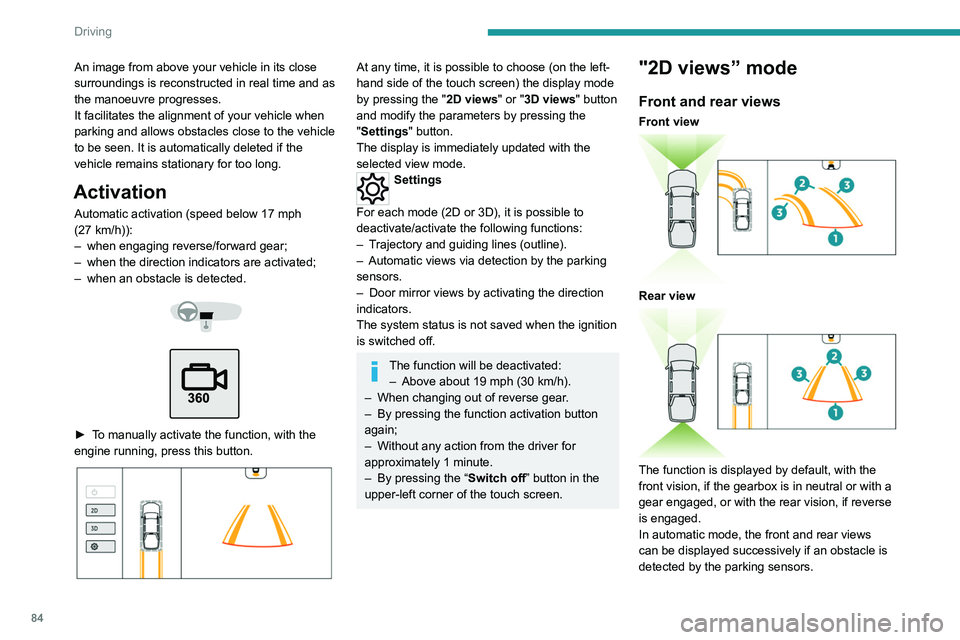
The guiding line 1 (in red) represents the end of
the bumper.
From the bumper, the thin orange guiding lines
2 represent the width of the vehicle, with
the mirrors unfolded and the wide orange
guiding lines 3 represent the trajectory of the
vehicle.
Lines 2 and 3 are oriented according to the
position of the steering wheel.
The system is deactivated:
– Automatically above about 19 mph (30 km/h)
(the image disappears temporarily from 12 mph
(20 km/h)).
– By pressing the function activation button
again.
Door mirror views
The door mirror views make it possible to
visualise the areas located under each mirror as
well as all of the front lateral sides of the vehicle
in order to manoeuvre the vehicle with the
surrounding obstacles.
An image from above your vehicle in its close
surroundings is reconstructed in real time and as
the manoeuvre progresses.
It facilitates the alignment of your vehicle when
parking and allows obstacles close to the vehicle
to be seen. It is automatically deleted if the
vehicle remains stationary for too long.
Activation
Automatic activation (speed below 17 mph
(27 km/h)):
–
when engaging reverse/forward gear;
–
when the direction indicators are activated;
–
when an obstacle is detected.
► To manually activate the function, with the
engine running, press this button.
At any time, it is possible to choose (on the left-
hand side of the touch screen) the display mode
by pressing the " 2D views" or "3D views" button
and modify the parameters by pressing the
"Settings" button.
The display is immediately updated with the
selected view mode.
Settings
For each mode (2D or 3D), it is possible to
deactivate/activate the following functions:
–
T
rajectory and guiding lines (outline).
–
Automatic views via detection by the parking
sensors.
–
Door mirror views by activating the direction
indicators.
The system status is not saved when the ignition
is switched off.
The function will be deactivated: – Above about 19 mph (30 km/h).
–
When changing out of reverse gear
.
–
By pressing the function activation button
again;
–
Without any action from the driver for
approximately 1 minute.
–
By pressing the “
Switch off” button in the
upper-left corner of the touch screen.
"2D views” mode
Front and rear views
Front view
Rear view
The function is displayed by default, with the
front vision, if the gearbox is in neutral or with a
gear engaged, or with the rear vision, if reverse
is engaged.
In automatic mode, the front and rear views
can be displayed successively if an obstacle is
detected by the parking sensors.
Page 87 of 176
85
Driving
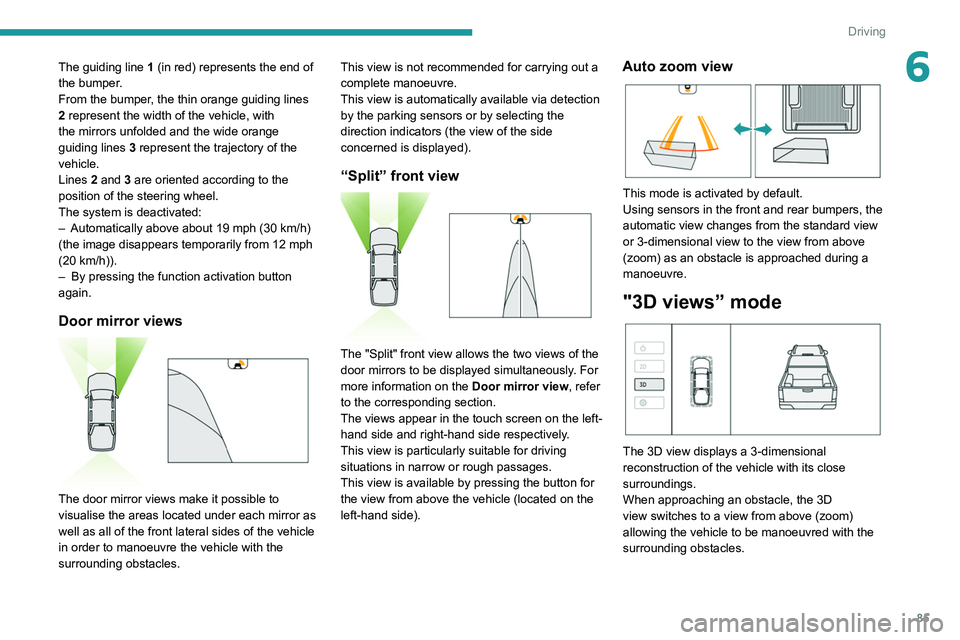
6The guiding line 1 (in red) represents the end of
the bumper.
From the bumper, the thin orange guiding
lines
2 represent the width of the vehicle, with
the mirrors unfolded and the wide orange
guiding
lines 3 represent the trajectory of the
vehicle.
Lines 2 and 3 are oriented according to the
position of the steering wheel.
The system is deactivated:
–
Automatically above about 19 mph (30
km/h)
(the image disappears temporarily from 12 mph
(20
km/h)).
–
By pressing the function activation button
again.
Door mirror views
The door mirror views make it possible to
visualise the areas located under each mirror as
well as all of the front lateral sides of the vehicle
in order to manoeuvre the vehicle with the
surrounding obstacles. This view is not recommended for carrying out a
complete manoeuvre.
This view is automatically available via detection
by the parking sensors or by selecting the
direction indicators (the view of the side
concerned is displayed).
“Split” front view
The "Split" front view allows the two views of the
door mirrors to be displayed simultaneously. For
more information on the
Door mirror view, refer
to the corresponding section.
The views appear in the touch screen on the left-
hand side and right-hand side respectively.
This view is particularly suitable for driving
situations in narrow or rough passages.
This view is available by pressing the button for
the view from above the vehicle (located on the
left-hand side).
Auto zoom view
This mode is activated by default.
Using sensors in the front and rear bumpers, the
automatic view changes from the standard view
or 3-dimensional view to the view from above
(zoom) as an obstacle is approached during a
manoeuvre.
"3D views” mode
The 3D view displays a 3-dimensional
reconstruction of the vehicle with its close
surroundings.
When approaching an obstacle, the 3D
view switches to a view from above (zoom)
allowing the vehicle to be manoeuvred with the
surrounding obstacles.
Page 88 of 176
86
Driving
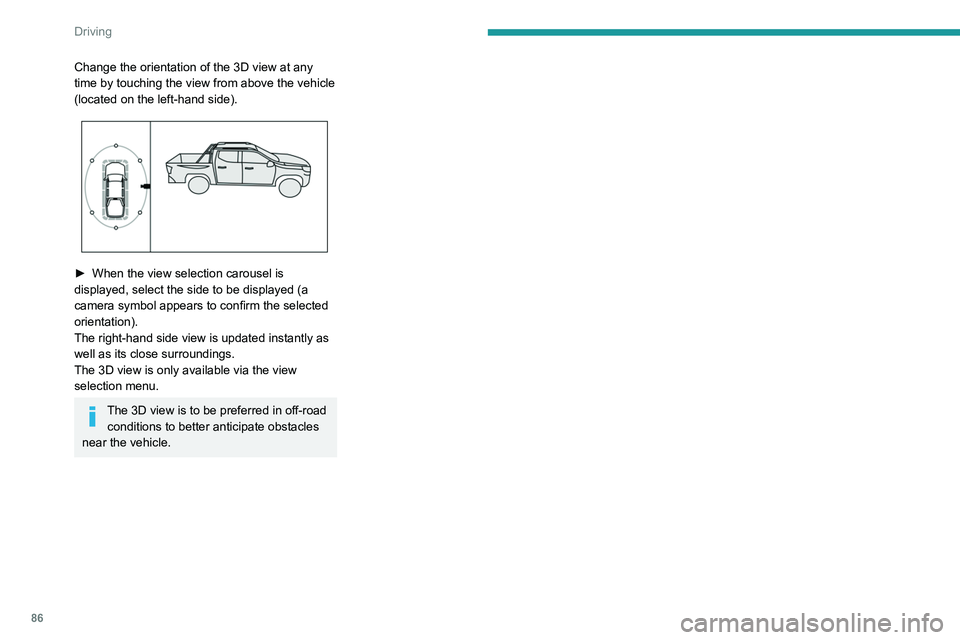
Change the orientation of the 3D view at any
time by touching the view from above the vehicle
(located on the left-hand side).
► When the view selection carousel is
displayed, select the side to be displayed (a
camera symbol appears to confirm the selected
orientation).
The right-hand side view is updated instantly as
well as its close surroundings.
The 3D view is only available via the view
selection menu.
The 3D view is to be preferred in off-road conditions to better anticipate obstacles
near the vehicle.
Page 129 of 176
127
Bluetooth® radio
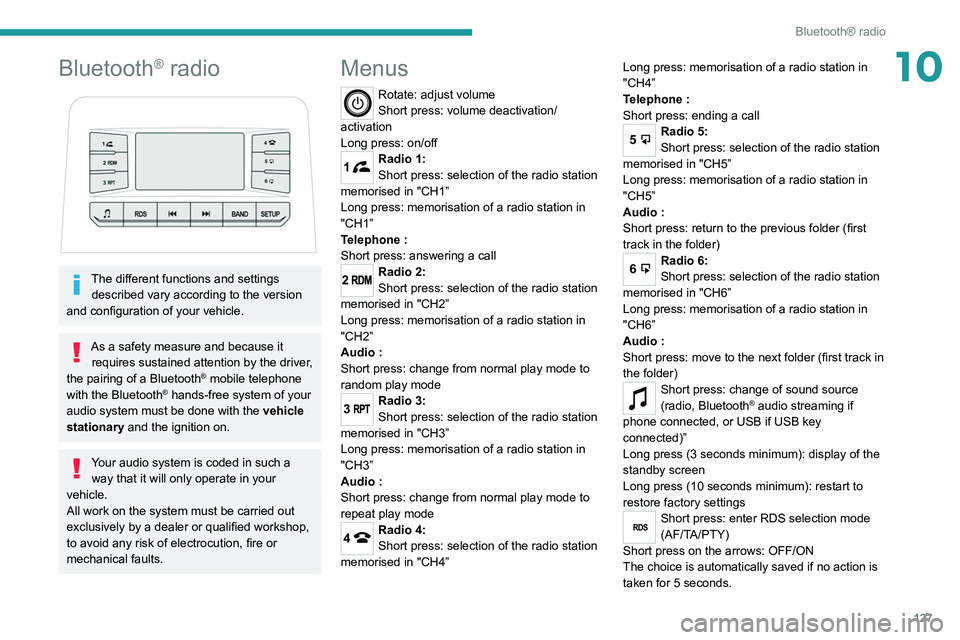
10Bluetooth® radio
The different functions and settings described vary according to the version
and configuration of your vehicle.
As a safety measure and because it requires sustained attention by the driver,
the pairing of a Bluetooth
® mobile telephone
with the Bluetooth® hands-free system of your
audio system must be done with the vehicle
stationary and the ignition on.
Your audio system is coded in such a way that it will only operate in your
vehicle.
All work on the system must be carried out
exclusively by a dealer or qualified workshop,
to avoid any risk of electrocution, fire or
mechanical faults.
Menus
Rotate: adjust volume
Short press: volume deactivation/
activation
Long press: on/off
1Radio 1:
Short press: selection of the radio station
memorised in "CH1”
Long press: memorisation of a radio station in
"CH1”
Telephone
:
Short press: answering a call
2Radio 2:
Short press: selection of the radio station
memorised in "CH2”
Long press: memorisation of a radio station in
"CH2”
Audio
:
Short press: change from normal play mode to
random play mode
3Radio 3:
Short press: selection of the radio station
memorised in "CH3”
Long press: memorisation of a radio station in
"CH3”
Audio
:
Short press: change from normal play mode to
repeat play mode
4Radio 4:
Short press: selection of the radio station
memorised in "CH4” Long press: memorisation of a radio station in
"CH4”
Telephone
:
Short press: ending a call
5Radio 5:
Short press: selection of the radio station
memorised in "CH5”
Long press: memorisation of a radio station in
"CH5”
Audio
:
Short press: return to the previous folder (first
track in the folder)
6Radio 6:
Short press: selection of the radio station
memorised in "CH6”
Long press: memorisation of a radio station in
"CH6”
Audio
:
Short press: move to the next folder (first track in
the folder)
Short press: change of sound source
(radio, Bluetooth® audio streaming if
phone connected, or USB if USB key
connected)”
Long press (3 seconds minimum): display of the
standby screen
Long press (10 seconds minimum): restart to
restore factory settings
RDSShort press: enter RDS selection mode
(AF/TA/PTY)
Short press on the arrows: OFF/ON
The choice is automatically saved if no action is
taken for 5 seconds.
Page 132 of 176
130
Bluetooth® radio
The services available depend on the network, the SIM card and the
compatibility of the Bluetooth
® devices used.
Refer to your telephone’s user guide and your
service provider to check which services you
are able to access.
Procedure from the telephone
Activate the telephone’s Bluetooth®
function.
Select the name of the system in the list of
detected devices.
A message appears on the Bluetooth
® radio
screen to confirm the connection between the
two devices.
Completing the pairing
To complete the pairing, whichever procedure is used (from the telephone or
from the system), confirm that the code is the
same in the system and in the telephone and
validate.
If pairing fails, the number of attempts is not
restricted.
A message appears on the screen confirming the
pairing as well as the Bluetooth
® symbol at the
top left of the screen.
Information and advice
Go to the Brand's website for more
information (compatibility, more help,
etc.).
Managing connections
The telephone connection automatically includes hands free operation and audio
streaming.
Receiving a call
An incoming call is announced by a ring and a
superimposed display on the screen.
The volume of the telephone is independent of
the volume of the radio and the media.
1Answer the call.
Accept the call using the steering- mounted controls.
Ending a call
4During a call, press this button.
End the call (using the steering-mounted
controls).
Page 133 of 176

131
Peugeot Connect 10" Touchscreen
11Peugeot Connect 10"
Touchscreen
GPS navigation -
Applications - Multimedia
audio system - Bluetooth
®
telephone
The functions and settings described
vary according to the vehicle version and
configuration, as well as the country of sale.
For safety reasons and because they
require sustained attention by the driver,
the following operations must be carried out
with the vehicle stationary and the ignition
on:
–
Pairing the smartphone with the system via
Bluetooth.
–
Using the smartphone.
– Connection to the CarPlay®, MirrorLinkTM
or Android Auto applications (certain
applications interrupt their display while the
vehicle is moving).
–
W
atching a video (the video stops when the
vehicle starts to move again).
–
Changing the system settings and
configuration.
To perform system and map updates, visit a Peugeot dealer.
First steps
With the engine running, a short press
mutes the sound. A long press (3 sec)
puts the system on standby. A very long press
(10 sec) restarts the system.
With the ignition off, a short press turns the
system on.
Increase or decrease the volume using the
thumbwheel.
Use the main menu buttons on the touch screen
to access the sub-menus.
Press this button to return to the menu
carousel.
Slide your finger on the touch screen from
top to bottom to display a set of quick
settings (Bluetooth
® connection, volume,
brightness) and notifications.
Press this button to directly access the
quick settings (depending on equipment).
Press the back arrow to go back a level.
The touch screen is of the "capacitive" type.
To clean the screen, use a soft, non-abrasive
cloth (e.g. spectacles cloth) with no additional
product.
Do not use sharp objects on the screen.
Do not touch the screen with wet hands.
Steering mounted controls
Short press: change of multimedia
source.
Long press: access to smartphone voice
commands via the system (available only via the
CarPlay
® or Android Auto).Decrease volume.
Increase volume.
Telephone: refuse an incoming call, hang
up a call in progress.
Radio: short press, access to the previous
memorised station; long press, automatic search
for the previous station.
Media: short press, access to the previous track/
video; long press, fast-rewind in the track/video.
Telephone: answering an incoming call.
Radio: access to the next memorised
station; long press, automatic search for the next
station.
Page 134 of 176

132
Peugeot Connect 10" Touchscreen
Android Auto
Run certain smartphone applications via
the Android Auto function.
Navigation
Navigation home screen
Press Navigation to display the
navigation home screen.
Press "Search" to enter an address or a
name.
Press this button to display the 3D/2D
mode.
Press this button to activate/deactivate
the volume or only the alerts.
Press this button to display the main
menu of the various options.
Main menu
Press Navigation to display the
navigation home screen.
Press this button to display the main
menu of the various options.
Select “Search” to enter an address,
name or certain points of interest.
Select “Add home” using an address or
by selecting a place on the screen.
Select “Recent destinations” to display
the last destinations searched.
Media: short press, access to the next track/
video; long press, fast-forward in the track/video.
Menus
Navigation
Enter navigation settings and choose a
destination.
Music player
Select an audio source.
Access information about the media
currently being played.
Radio
102.7FM
MHz
102.7 100.1 97.0 96.3 94.69 3.7
Select a radio station.
Telephone
Connect a mobile phone via Bluetooth®.
Settings
Customise the display, update the
system, adjust the audio and
Bluetooth
® settings.
Vehicle settings
Activate, deactivate or configure certain vehicle functions.
File management
Access audio, video or image files stored locally or on a USB device.
Hard drive capacity: 10 GB.
CarPlay®
Run certain smartphone applications via
the CarPlay® function.
MirrorLinkTM
Run certain smartphone applications via
the MirrorLinkTM function.
Page 135 of 176

133
Peugeot Connect 10" Touchscreen
11Android Auto
Run certain smartphone applications via
the Android Auto function.
Navigation
Navigation home screen
Press Navigation to display the
navigation home screen.
Press "Search" to enter an address or a
name.
Press this button to display the 3D/2D
mode.
Press this button to activate/deactivate
the volume or only the alerts.
Press this button to display the main
menu of the various options.
Main menu
Press Navigation to display the
navigation home screen.
Press this button to display the main
menu of the various options.
Select “Search” to enter an address,
name or certain points of interest.
Select “Add home” using an address or
by selecting a place on the screen.
Select “Recent destinations” to display
the last destinations searched.
Select “Current trip” to open another
menu and perform various actions on the
current route planned.
Select “My places” for quick access to
saved places.
Select “My trips” to display the preferred
routes.
Select “Parking” to display the various
parking options in the region.
Select “Service station” to display the
different service stations on the current
route or near the current location.
Select “Settings” to display map, display,
vehicle type, voice, voice guidance
language and destination options.
Select this button to display details on
software versions as well as legal
information. Details of the Open Source software
libraries used and their licence URLs.
Select this button to customise the
settings screen.
Radio
Selecting a station
Press Radio to display the main page.
Press one of the buttons to carry out a
manual search up/down for radio
frequencies.
Or
Press “Search” to perform an automatic search
for radio stations.
Press this button to return to the menu
carousel.
Radio reception may be affected by the
use of electrical equipment not approved
by the Brand, such as a USB charger
connected to the 12
V socket.
The external environment (hills, buildings,
tunnels, basement car parks, etc.) may block
reception. This is a normal effect of the way in
which radio waves are transmitted and does
not indicate any failure of the audio system.
Memorising a station
Select a radio station or frequency.Press this button to memorise the station.
Press “Local radio ” to display the
memorised stations.
Changing the waveband
To change the waveband, press " Band"
displayed at the bottom of the screen.
Music player
Selecting the source
Press Music player to display the main
page.