2021 Peugeot Landtrek steering
[x] Cancel search: steeringPage 95 of 176
93
Practical information
7Oil grade
Before topping up or changing the
engine oil, check that the oil is suitable
for your engine and complies with the
recommendations in the service schedule
supplied with the vehicle (or available
from your PEUGEOT dealer or qualified
workshop).
Use of non-recommended oil may invalidate
your warranty in the event of engine failure.
Topping up the engine oil level
For the location of the engine oil filler cap, please
refer to the corresponding engine compartment
illustration.
Never remove the oil filler cap with the
engine running. Risk of burns and
splashes inside the engine compartment.
►
Add oil in small quantities, avoiding any spills
on engine components (risk of fire).
►
W
ait a few minutes before checking the level
again using the dipstick.
►
T
op up the level if necessary.
►
After checking the level, carefully screw the
oil filler cap back on
and replace the dipstick in
its tube.
Brake fluid
�� ������ ��
The level of this fluid should be close to
the "MAX" mark. If not, check the brake
pad wear.
To know how often the brake fluid should be
replaced, refer to the manufacturer's servicing
schedule.
Clean the cap before removing it to refill.
Use only DOT4 brake fluid from a sealed
container.
Power steering fluid
The level of this fluid should be close to the "MAX" mark. Check it, with the
vehicle parked on level ground and with the
engine cold.
Engine coolant
It is normal to top up this fluid between
two services.
The check and top-up must only be done with
the engine cold.
A level of coolant that is too low risks causing
major damage to the engine; the coolant level
must be close to the "MAX" mark without ever
going above it.
If the level is close to or below the " MIN” mark, it
is essential to top up.
When topping up with a cold engine, start the
engine and slowly add coolant until it reaches
the "MAX" mark.
When the engine is hot, the temperature of the
coolant is regulated by the fan.
As the cooling system is pressurised, wait at
least one hour after switching off the engine
before carrying out any work.
In order to avoid the risk of scalding if you need
to top up in an emergency, wrap a cloth around
the cap and unscrew the cap by two turns to
allow the pressure to drop.
Once the pressure has dropped, remove the cap
and top up to the required level.
Filling up with engine coolant
Do this when the engine coolant reservoir is
empty or when the cooling system has been
drained.
►
Open the cap on the reservoir and top up
until the level reaches the " MAX
" mark.
►
Replace the cap on the engine coolant
reservoir
.
►
Increase engine speed to 2,000 rpm until the
radiator's intake hose becomes hot.
►
Allow the engine to cool and add coolant until
the level reaches the " MAX
" mark.
►
Do this repeatedly until the level in the
reservoir no longer drops.
We recommend using a coolant that
contains a glycol-based long-life
anti-freeze agent.
Never use water to fill or top up the
coolant system - risk of freezing and
damaging the engine!
Page 97 of 176
95
Practical information
7Particle filter (Diesel)
(Depending on version)The start of clogging of the particle filter is indicated by the temporary lighting of this
warning lamp, accompanied by an alert
message.
As soon as the traffic conditions permit,
regenerate the filter by driving at a speed of at
least 37
mph (60 km/h) until the warning lamp
goes off.
If the warning lamp stays on, this
indicates a low Diesel additive level.
For more information on Checking levels,
refer to the corresponding section.
Following prolonged operation of the
vehicle at very low speed or at idle, you
may, in exceptional circumstances, notice
water vapour coming from the exhaust while
accelerating. These emissions have no
impact on the vehicle’s behaviour and the
environment.
New vehicle
During the first few particle filter
regeneration operations, you may notice a
"burning" smell. This is perfectly normal.
Manual gearbox
The gearbox does not require any maintenance (no oil change).
Automatic gearbox
The gearbox does not require any maintenance (no oil change).
Brake pads
Brake wear depends on the style of
driving, particularly in the case of vehicles
used in town, over short distances. It may be
necessary to have the condition of the brakes
checked, even between vehicle services.
Unless there is a leak in the circuit, a drop in the
brake fluid level indicates that the brake pads
are worn.
After washing the vehicle, moisture, or in wintry conditions, ice can form on the
brake discs and pads: braking efficiency may
be reduced. Gently dab the brakes to dry and
defrost them.
Brake disc wear
For information on checking brake disc
wear, contact a PEUGEOT dealer or a
qualified workshop.
Manual parking brake
If you notice excessive brake lever travel
or decreased effectiveness, the parking
brake must be adjusted, even between two
services.
This system must be checked by a PEUGEOT
dealer or a qualified workshop.
Steering wheel
Play or a loss of precision in the steering
means that this system needs to be
checked.
This system must be checked by a PEUGEOT
dealer or a qualified workshop.
Wheels and tyres
The inflation pressure of all tyres, including the spare wheel, must be
checked on "cold” tyres at least once a month.
The pressures indicated on the tyre pressure
label are valid for "cold" tyres. If you have driven
for more than 10 minutes or more than 6 miles
(10 kilometres) at over 31 mph (50
km/h), add
0.3 bar (30 kPa) to the values indicated on the
label.
The pressure difference between the left-hand
side and right-hand side tyres must not exceed
0.05 bar (5 kPa).
Under-inflation increases energy
consumption. Non-compliant tyre
pressures cause tyres to wear prematurely
and have an adverse effect on the vehicle's
road holding - risk of accident!
Driving with worn or damaged tyres reduces the
braking and road holding performance of the
vehicle. Regularly check the condition of the
tyres (tread and sidewalls) and rims as well as
the presence of the valve caps.
Page 99 of 176
97
Practical information
7In the event of contact with the eyes,
immediately rinse the eyes with large
amounts of water or with an eye wash
solution for at least 15 minutes. Seek medical
attention if you feel a persistent burning
sensation or irritation.
Never go underneath the vehicle raised
using a jack; always use an axle
stand-type support.
When working on the vehicle's electrical
system, take care not to cause a short circuit -
risk of burns and fire.
Flammable products and all sources of heat
(sparks, for example) must be kept away from
the battery, the fuel tank and all components
of the fuel system.
Never run the engine in a closed space
without sufficient ventilation; always use a
ventilation system such as an exhaust gas
extractor, for example.
Never leave liquids (oil, coolant) unattended.
Keep these liquids out of the reach of children
and animals.
The liquids and components replaced must have the same characteristics and
comply with the manufacturer's
recommendations.
General checks
Check the following components to ensure
proper operation and longevity of the vehicle.
For more information on the components
to be
checked, refer to the Checking levels, Checks
and Advice on care
sections.
Daily checks
Check that all vehicle lamps (front and
rear) are working properly.
Check the condition of the door mirrors and
the adjustment controls.
Check that all the doors can be opened,
closed and locked correctly.
Regularly check all levels, the condition of the
tyres and the bodywork.
Monthly checks
Check:
–
The engine coolant level.
–
The absence of leaks on all the pipes and
hoses visible on the vehicle as well as the
tanks.
–
The proper functioning of the elements of
the: •
Heating and ventilation system.
•
Air conditioning system.
•
Parking brake (application and release).
•
Horn.
–
The tightening of the wheel nuts (if
necessary
, retighten them to the specific
tightening values).
–
The good condition of the wipers.
– The absence of significant play in the
steering wheel and steering.
–
The correct travel of the brake pedal as
well as the clutch pedal.
General recommendations
related to maintenance
operations
Electronic engine management
computer
The electronic computer is not completely
waterproof. When performing maintenance
in the rain or washing the engine, it must be
protected from water.
Never remove or disconnect any part of the
electronic injection system to avoid the entry
of moisture, oil or any other foreign body.
Do not install a radio antenna or other
equipment likely to generate interference near
the electronic computer.
Do not expose the electronic computer to a
temperature higher than 105°C.
Before any welding operation on the vehicle,
it is essential to disconnect the electronic
computer - risk of damage to the electronic
system components.
Fuel system
All work on the fuel system must be
carried out only by a PEUGEOT dealer or a
qualified workshop.
Page 121 of 176
11 9
In the event of a breakdown
8► Switch off all electricity-consuming devices
(audio system, wipers, lamps, etc.).
►
Switch off the ignition and wait for 4
minutes.
After accessing the battery, it is only necessary
to disconnect the (+) terminal.
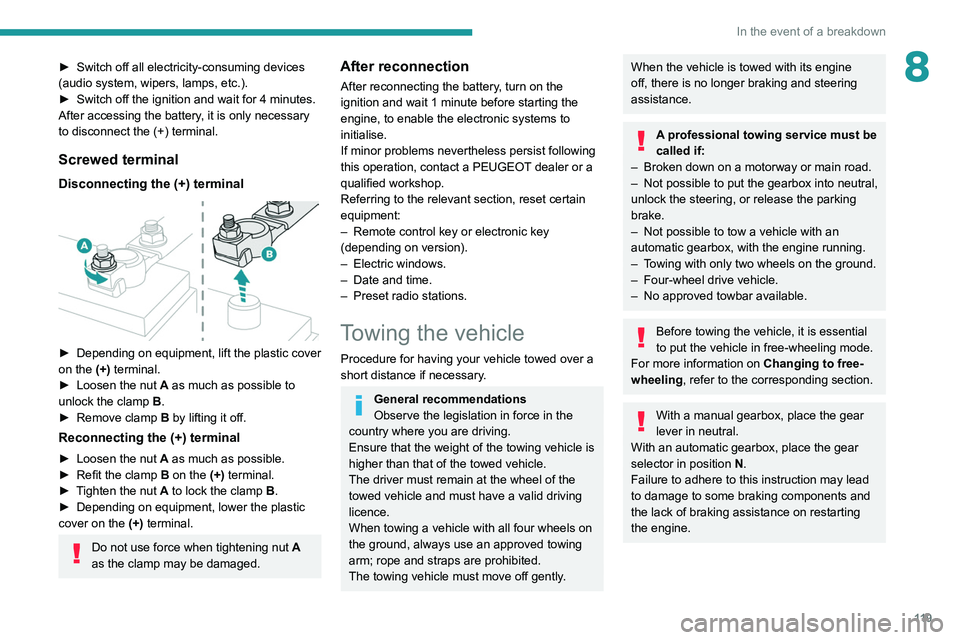
Screwed terminal
Disconnecting the (+) terminal
► Depending on equipment, lift the plastic cover
on the (+) terminal.
►
Loosen the nut
A as much as possible to
unlock the clamp B.
►
Remove clamp
B
by lifting it off.
Reconnecting the (+) terminal
► Loosen the nut A as much as possible.
► Refit the clamp B on the (+) terminal.
►
T
ighten the nut A to lock the clamp B.
►
Depending on equipment, lower the plastic
cover on the
(+) terminal.
Do not use force when tightening nut A
as the clamp may be damaged.
After reconnection
After reconnecting the battery, turn on the
ignition and wait 1 minute before starting the
engine, to enable the electronic systems to
initialise.
If minor problems nevertheless persist following
this operation, contact a PEUGEOT dealer or a
qualified workshop.
Referring to the relevant section, reset certain
equipment:
–
Remote control key or electronic key
(depending on version).
–
Electric windows.
–
Date and time.
–
Preset radio stations.
Towing the vehicle
Procedure for having your vehicle towed over a
short distance if necessary.
General recommendations
Observe the legislation in force in the
country where you are driving.
Ensure that the weight of the towing vehicle is
higher than that of the towed vehicle.
The driver must remain at the wheel of the
towed vehicle and must have a valid driving
licence.
When towing a vehicle with all four wheels on
the ground, always use an approved towing
arm; rope and straps are prohibited.
The towing vehicle must move off gently.
When the vehicle is towed with its engine
off, there is no longer braking and steering
assistance.
A professional towing service must be
called if:
–
Broken down on a motorway or main road.
–
Not possible to put
the gearbox into neutral,
unlock the steering, or release the parking
brake.
–
Not possible to tow a vehicle with an
automatic gearbox, with the engine running.
–
T
owing with only two wheels on the ground.
–
Four-wheel drive vehicle.
–
No approved towbar available.
Before towing the vehicle, it is essential
to put the vehicle in free-wheeling mode.
For more information on Changing to free-
wheeling , refer to the corresponding section.
With a manual gearbox, place the gear
lever in neutral.
With an automatic gearbox, place the gear
selector in position N.
Failure to adhere to this instruction may lead
to damage to some braking components and
the lack of braking assistance on restarting
the engine.
Page 122 of 176
120
In the event of a breakdown
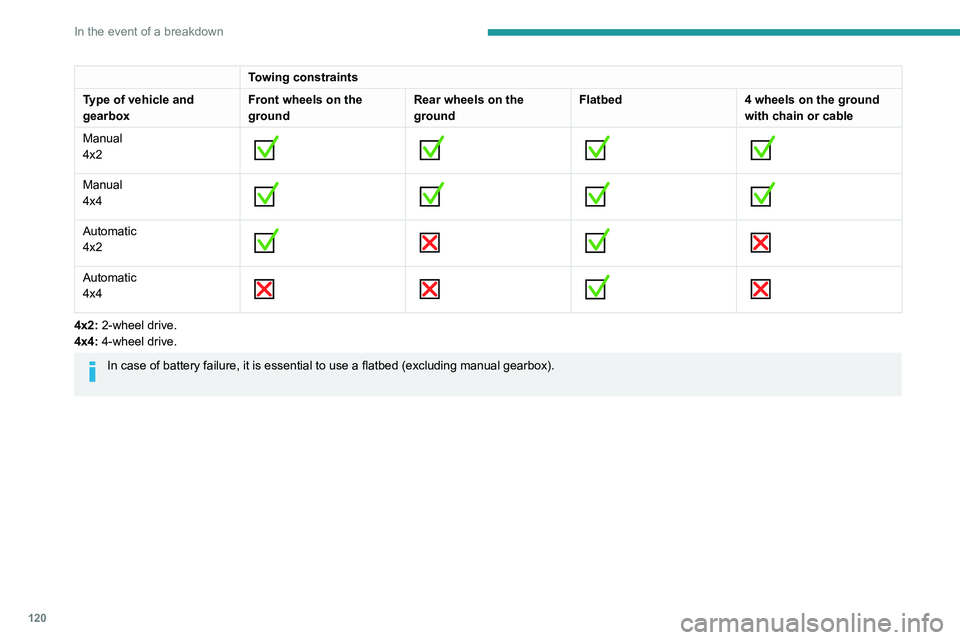
Towing constraints
Type of vehicle and
gearbox Front wheels on the
groundRear wheels on the
groundFlatbed
4 wheels on the ground
with chain or cable
Manual
4x2
Manual
4x4
Automatic
4x2
Automatic
4x4
4x2: 2-wheel drive.
4x4: 4-wheel drive.
In case of battery failure, it is essential to use a flatbed (excluding manua
l gearbox).
Towing your vehicle
Access to the front hooks
The tow hooks are located under the front
bumper.
To be towed:
► Securely install cables or chains to the tow
hooks.
► Put the gearbox into neutral.
Failure to observe this instruction could
result in damage to certain components
(braking, transmission, etc.) and to the
absence of braking assistance the next time
the engine is started.
Automatic gearbox: never tow the vehicle with the driving wheels on the ground
and the engine off.
► Unlock the steering and release the parking
brake.
► Depending on version, place the transmission
selector in the 2H position (2-wheel drive).
Page 123 of 176
121
In the event of a breakdown
8Towing your vehicle
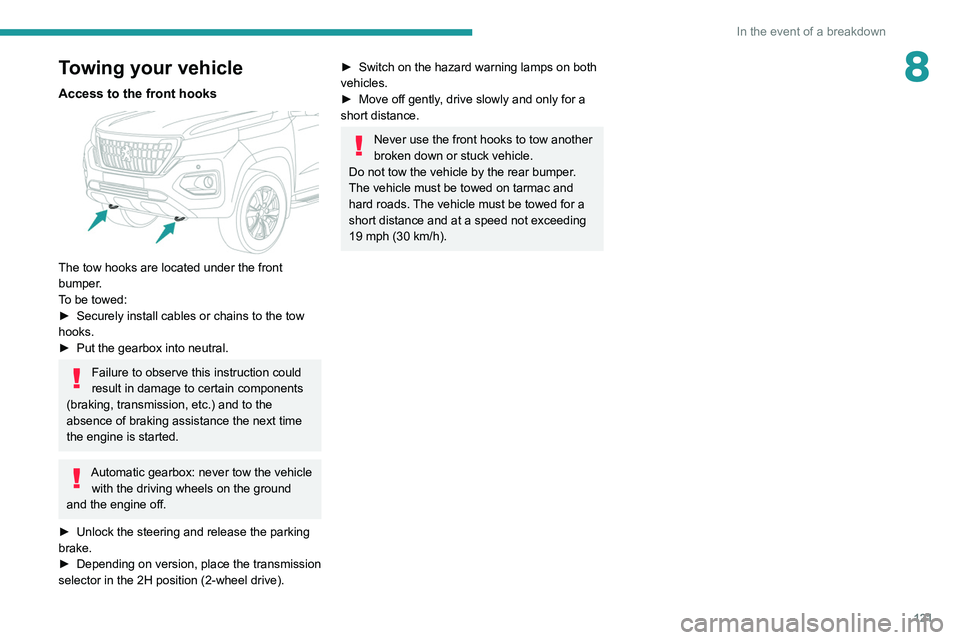
Access to the front hooks
The tow hooks are located under the front
bumper.
To be towed:
►
Securely install cables or chains to the tow
hooks.
►
Put the gearbox into neutral.
Failure to observe this instruction could
result in damage to certain components
(braking, transmission, etc.) and to the
absence of braking assistance the next time
the engine is started.
Automatic gearbox: never tow the vehicle with the driving wheels on the ground
and the engine off.
►
Unlock the steering and release the parking
brake.
►
Depending on version, place the transmission
selector in the 2H position (2-wheel drive).
► Switch on the hazard warning lamps on both
vehicles.
►
Move off gently
, drive slowly and only for a
short distance.
Never use the front hooks to tow another
broken down or stuck vehicle.
Do not tow the vehicle by the rear bumper.
The vehicle must be towed on tarmac and
hard roads. The vehicle must be towed for a
short distance and at a speed not exceeding
19 mph (30 km/h).
Page 130 of 176

128
Bluetooth® radio
Media
USB socket
Insert a USB memory stick in the USB
socket.
The system changes automatically to "USB"
source and the "USB" symbol appears at the top
left of the screen.
To protect the system, do not use a USB hub.
Any additional devices connected to the system must comply with the standard
applicable to the product and/or the standard
IEC 60950-1.
When the USB socket is used, the
portable device charges automatically.
Play mode
The play modes available are:
– Normal: the tracks are played in order,
according to the classification of the selected
files.
– Random: the tracks in an album or folder are
played in a random order.
– Random on all media : all of the tracks saved
in the media are played in random order.
– Repeat: the tracks played are only those from
the current album or folder.
Radio:
Short press: Manual step-by-step search
up/down for radio stations
Long press: automatic search of a radio station
Audio
:
Short press: go to the previous/next track
Long press: fast navigation in a track
Short press: selection of the wave ranges
(FM1/FM2/FM3/AM1/AM2)
Radio/Audio:
Short press: enter configuration mode
(time, sound environment, language settings,
etc.)
Short press on the arrows: combination of
settings.
The settings are automatically saved if no action
is taken for 5 seconds.
Steering mounted controls
Change of sound source (radio,
Bluetooth® audio streaming if phone
connected, or USB if USB key connected)”.
Volume adjustment.
Telephone: ending a call.
Radio: selection of the previous radio
station (among the memorised radio stations).
Audio: go to the previous track.
Telephone: answering a call.
Radio: selection of the next radio station (among
the memorised radio stations).
Audio: go to the next track.
Radio
Selecting a station
Press this button to select the radio.
Press consecutively to select the
waveband (FM1/FM2/FM3/AM1/AM2).
Short press: manual search up/down for
radio stations
Long press: automatic search for radio stations
Memorising a station
123456
Once the radio station has been selected, press
and hold one of these buttons to save it.
RDS
The external environment (hills, buildings, tunnels, car parks,
underground, etc.) may block reception,
including in RDS
tracking mode. This is a
normal effect of the way in which radio waves
are transmitted and does not indicate any
failure of the audio system.
RDS, if activated, allows you to continue
listening to the same station by
automatically retuning to alternative
frequencies. However, in certain conditions,
RDS station tracking may not be possible
nationwide, as radio stations do not always
cover the entire country. This can explain the
loss of reception of a station during a journey.
Procedure
Press this button several times to access
the RDS mode (AF - TA - PTY).
Press these buttons to activate/deactivate
the RDS mode (AF - TA - PTY).
AF: When the alternative frequency function
is activated, the system selects the best RDS
frequency (region code) of the station being
listened to. However, in certain conditions,
following this station is not guaranteed over the
whole country, because radio stations do not
cover 100% of the area. When the reception
is weak, the frequency switches to a regional
station.
PTY: the PTY function selects a type of
programme that radio stations broadcast. All this
information is transmitted via the RDS signal on
some radios.
Page 132 of 176
130
Bluetooth® radio
The services available depend on the network, the SIM card and the
compatibility of the Bluetooth
® devices used.
Refer to your telephone’s user guide and your
service provider to check which services you
are able to access.
Procedure from the telephone
Activate the telephone’s Bluetooth®
function.
Select the name of the system in the list of
detected devices.
A message appears on the Bluetooth
® radio
screen to confirm the connection between the
two devices.
Completing the pairing
To complete the pairing, whichever procedure is used (from the telephone or
from the system), confirm that the code is the
same in the system and in the telephone and
validate.
If pairing fails, the number of attempts is not
restricted.
A message appears on the screen confirming the
pairing as well as the Bluetooth
® symbol at the
top left of the screen.
Information and advice
Go to the Brand's website for more
information (compatibility, more help,
etc.).
Managing connections
The telephone connection automatically includes hands free operation and audio
streaming.
Receiving a call
An incoming call is announced by a ring and a
superimposed display on the screen.
The volume of the telephone is independent of
the volume of the radio and the media.
1Answer the call.
Accept the call using the steering- mounted controls.
Ending a call
4During a call, press this button.
End the call (using the steering-mounted
controls).