Page 110 of 176
108
In the event of a breakdown
Ensure that the occupants have left the
vehicle and are located in a safe place.
Never start the engine while the vehicle is on
the jack.
Never go underneath a vehicle raised using a
jack; use an axle stand.
Always place a chock against the wheel
diagonally opposite to the one being replaced.
► Loosen the nuts using the wheelbrace 2 .
Front
Rear
► Place the foot of jack 4 on the ground and
ensure that it is directly below the front A or
rear
B jacking point on the underbody, whichever
is closest to the wheel to be changed.
► Extend the jack 4, using the knob integrated
to the jack, until its head comes into contact
with the jacking point
A
or B, whichever is being
used; the vehicle contact area
A
or B must be
perfectly flat against the head of the jack.
►
Raise the vehicle, using the extension 3
and
the wheelbrace 2, until there is sufficient space
between the wheel and the ground, to then
easily fit the spare (not punctured) wheel.
Page 111 of 176

109
In the event of a breakdown
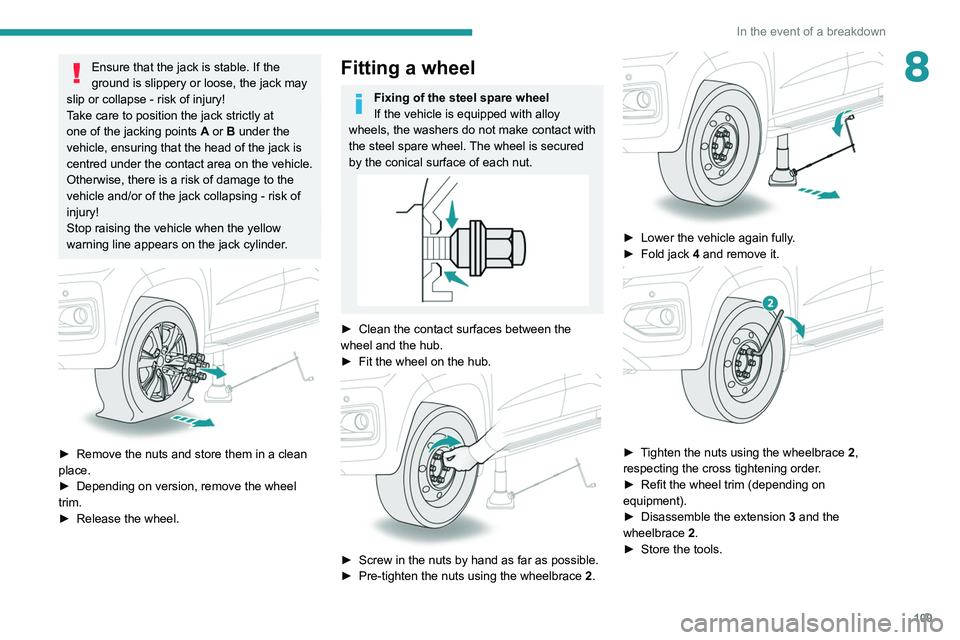
8Ensure that the jack is stable. If the
ground is slippery or loose, the jack may
slip or collapse - risk of injury!
Take care to position the jack strictly at
one of the jacking points
A
or B under the
vehicle, ensuring that the head of the jack is
centred under the contact area on the vehicle.
Otherwise, there is a risk of damage to the
vehicle and/or of the jack collapsing - risk of
injury!
Stop raising the vehicle when the yellow
warning line appears on the jack cylinder.
► Remove the nuts and store them in a clean
place.
►
Depending on version, remove the wheel
trim.
►
Release the wheel.
Fitting a wheel
Fixing of the steel spare wheel
If the vehicle is equipped with alloy
wheels, the washers do not make contact with
the steel spare wheel. The wheel is secured
by the conical surface of each nut.
► Clean the contact surfaces between the
wheel and the hub.
►
Fit the wheel on the hub.
► Screw in the nuts by hand as far as possible.
► Pre-tighten the nuts using the wheelbrace 2
.
► Lower the vehicle again fully.
► Fold jack 4 and remove it.
► Tighten the nuts using the wheelbrace 2,
respecting the cross tightening order.
►
Refit the wheel trim (depending on
equipment).
►
Disassemble the extension 3
and the
wheelbrace 2.
►
Store the tools.
Page 112 of 176

11 0
In the event of a breakdown
After changing a wheel
Visit a PEUGEOT dealer or a qualified
workshop as soon as possible to have
the tightness of the nuts and the pressure of
the spare wheel checked.
Have the punctured tyre examined. After
inspection, the technician will advise you on
whether the tyre can be repaired or if it must
be replaced.
Changing a bulb
In some weather conditions (e.g. low
temperature or humidity), misting on the
internal surface of the glass of the headlamps
and rear lamps is normal, and will disappear
after the lamps have been on for a few
minutes.
The headlamps have polycarbonate lenses with a protective coating:
►
do not clean them with a dry or
abrasive cloth, nor with detergent or
solvent products,
►
use a sponge and soapy water or a pH
neutral product,
►
when using a high-pressure washer on
persistent marks, do not keep the lance
directed towards the lamps or their edges for
too long, so as not to damage their protective
coating and seals.
Changing a bulb must only be done with
the ignition off and after the lamp has
been switched off for several minutes - risk of
serious burns!
Do not touch the bulb directly with your
fingers, use a lint-free cloth.
It is essential only to use anti-ultraviolet
(UV) type bulbs, so as not to damage the
headlamp.
Always replace a failed bulb with a new bulb
of the same type and specification.
After changing a bulb
To refit, carry out the operations in
reverse order to removal.
Close the protective cover very carefully to
guarantee the sealing of the lamps.
Light-emitting diode (LED)
headlamps and lamps
Depending on version, the affected types of
headlamps / lamps are:
–
Offset daytime running lamps.
–
Direction indicator side repeaters.
–
Rear sidelamps.
–
Third brake lamp and loading bay lighting.
For the replacement of this type of bulb,
you must contact a PEUGEOT dealer or
a qualified workshop.
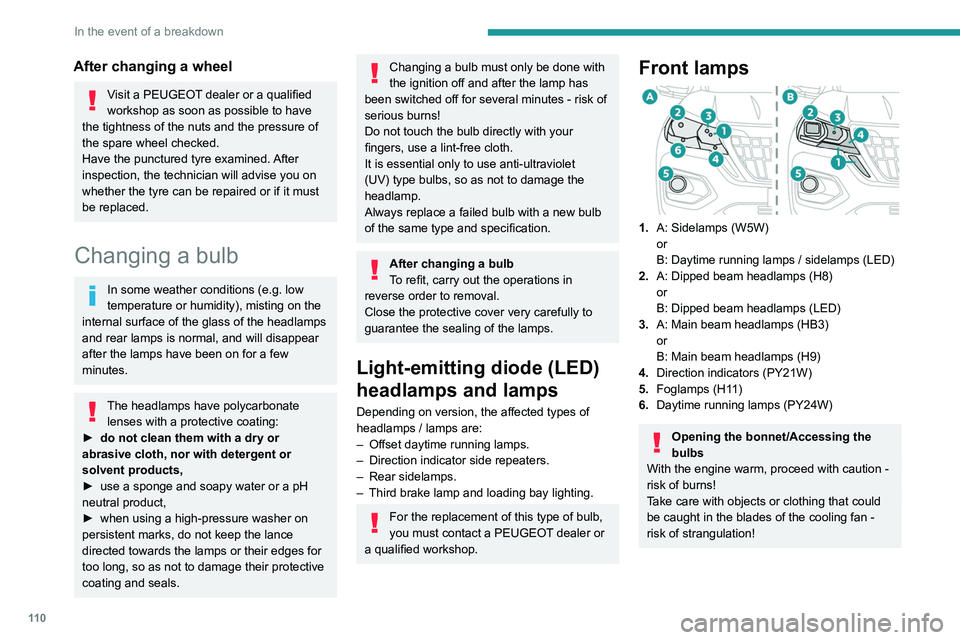
Front lamps
1. A: Sidelamps (W5W)
or
B: Daytime running lamps / sidelamps (LED)
2. A: Dipped beam headlamps (H8)
or
B: Dipped beam headlamps (LED)
3. A: Main beam headlamps (HB3)
or
B: Main beam headlamps (H9)
4. Direction indicators (PY21W)
5. Foglamps (H11)
6. Daytime running lamps (PY24W)
Opening the bonnet/Accessing the
bulbs
With the engine warm, proceed with caution -
risk of burns!
Take care with objects or clothing that could
be caught in the blades of the cooling fan -
risk of strangulation!
Halogen bulbs (Hx)
To ensure good quality lighting, check
that the bulb is correctly positioned in its
housing.
Sidelamps
► Remove the protective cover by giving it a
quarter turn.
► Pull the bulb holder backwards to remove it.
► Pull out the bulb and replace it.
When refitting the bulb holder in its housing,
press until you hear a click which means it is
locked in place.
Page 144 of 176

142
Alphabetical index
Serial number, vehicle 125
Servicing
94, 96
Settings, equipment
13–15
Sidelamps
43–44, 110, 112
Snow chains
89
Socket, 12 V accessory
36
Speed limiter
75–76
Speedometer
7, 75
Sport mode
71
Stability control (ESC)
49–50
Starting a Diesel engine
88
Starting the engine
63
Starting the vehicle
63–65
Starting using another battery
66, 117
Station, radio
128, 133
Stay, bonnet
91
Steering mounted controls, audio
128, 131
Steering wheel
95
Steering wheel, adjustment
27
Stickers, customising ~ Stickers,
expressive
103
Stopping the vehicle
63–65
Storage
36–40
Storage boxes
39
Storage compartments
36
Stowing rings
39
Sunshine sensor
31
Sun visor
36
Suspension
96
Switching off the engine
63
Synchronising the remote control
21T
Tables of engines 123–124
Tables of fuses
113, 115
Tailgate
22
Tank, fuel
88
Technical data
123–124
Telephone
129–130, 134–135
Temperature, coolant
11
Ticket holder
36
Time (setting)
13, 136
Tipper truck fittings
39
Tipper truck lighting
40
Tools
105–106, 106–107
Top Tether (fixing)
59
Total distance recorder
12
Touch screen
14
Towbar
50, 89
Towed loads
122
Towing another vehicle
119, 121
Traction control (ASR)
49–50
Trailer
50, 89
Trailer stability assist (TSA)
50
Trajectory control systems
49
Triangle, warning
104
Trip computer
12–13
Trip distance recorder
12
Tyres
95, 126
Tyre under-inflation detection
73
U
Under-inflation (detection) 73
Unlocking
16–18
Unlocking from the inside
19
Unlocking the doors
19
Updating the time
136
USB
129, 133–135
V
Ventilation 31–33
Visibility
35
W
Warning and indicator lamps 8
Warning lamp, driver''s seat belt
not fastened
53
Warning lamps
8
Warning lamp, seat belts
53
Warnings and indicators
8
Washing
75
Washing (advice)
102–103
Weights
122
Wheel, spare
95, 105–107
Windscreen wipers
45, 47
Wiper blades (changing)
46
Wipers
45, 47
Wipers, automatic rain sensitive
47
Page 172 of 176

6
In the event of a breakdown
Spare wheel
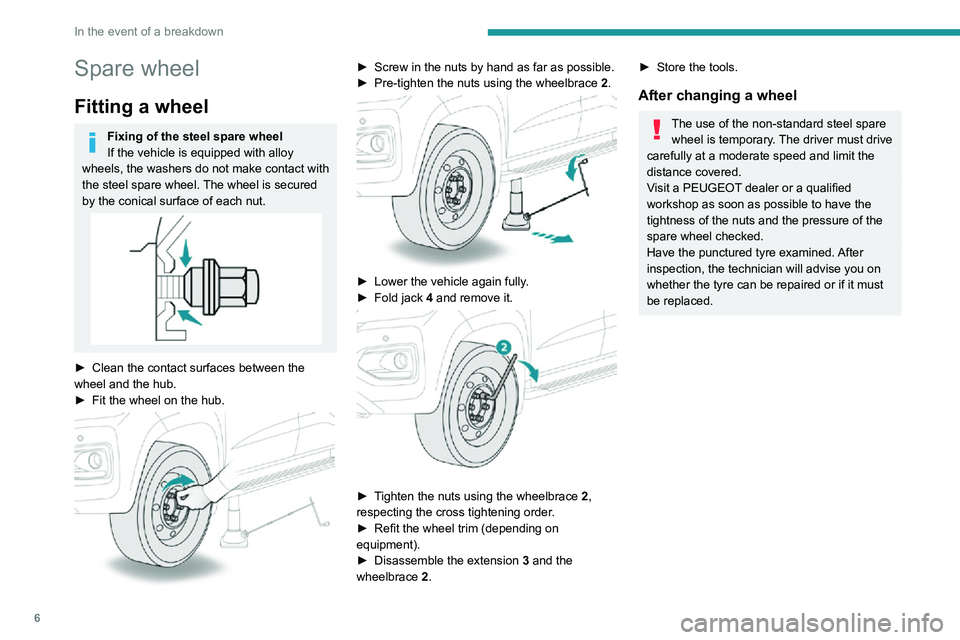
Fitting a wheel
Fixing of the steel spare wheel
If the vehicle is equipped with alloy
wheels, the washers do not make contact with
the steel spare wheel. The wheel is secured
by the conical surface of each nut.
► Clean the contact surfaces between the wheel and the hub.► Fit the wheel on the hub.
► Screw in the nuts by hand as far as possible.► Pre-tighten the nuts using the wheelbrace 2.
► Lower the vehicle again fully .► Fold jack 4 and remove it.
► Tighten the nuts using the wheelbrace 2,
respecting the cross tightening order.
► Refit the wheel trim (depending on equipment).► Disassemble the extension 3 and the
wheelbrace 2.
► Store the tools.
After changing a wheel
The use of the non-standard steel spare
wheel is temporary. The driver must drive
carefully at a moderate speed and limit the
distance covered.
Visit a PEUGEOT dealer or a qualified
workshop as soon as possible to have the
tightness of the nuts and the pressure of the
spare wheel checked.
Have the punctured tyre examined. After
inspection, the technician will advise you on
whether the tyre can be repaired or if it must
be replaced.