2021 PEUGEOT BOXER ad blue
[x] Cancel search: ad bluePage 42 of 212
40
Ease of use and comfort
If the vehicle is equipped with an additional
air conditioning unit, located at the rear of the
vehicle: the distribution rail located in the roof
and the individualised air vents ensure a perfect
diffusion of cold air.
The hot air diffused from the front air conditioning
unit to the floor is distributed at the height of the
rear passengers' feet in rows 2 and 3.
A hot air vent, located on the left-hand rear
wheel arch, may complement the system for the
rear passengers’ feet in row 3.
Activation/Deactivation
► From the driver's seat, press this
button located on the MODE
control panel
to activate the operation of the rear controls. The
indicator lamp comes on.
Pressing again on this button deactivates the
operation of the rear controls. The indicator lamp
goes off.
Setting the comfort
temperature
► Turn control 1 to select a position between
blue (cold) and red (hot) so as to adjust the
temperature to your requirements.
The OFF control on the "Mono-zone" central control panel switches the
function off.
However, a back-up system will automatically
ventilate the rear circuit, even if the control is
in position 0, to avoid the formation of mist.
Air flow
► Set control 2 to the desired position to
increase or decrease the air flow.
Additional programmable heating
The additional programmable heating gradually
brings the engine to a good temperature to
facilitate its starting.
An built-in clock allows the time of its triggering
to be programmed. The passenger compartment
will warm up faster.
The warming-up of the passenger
compartment, de-icing and demisting are
facilitated. The control panel for the programmable
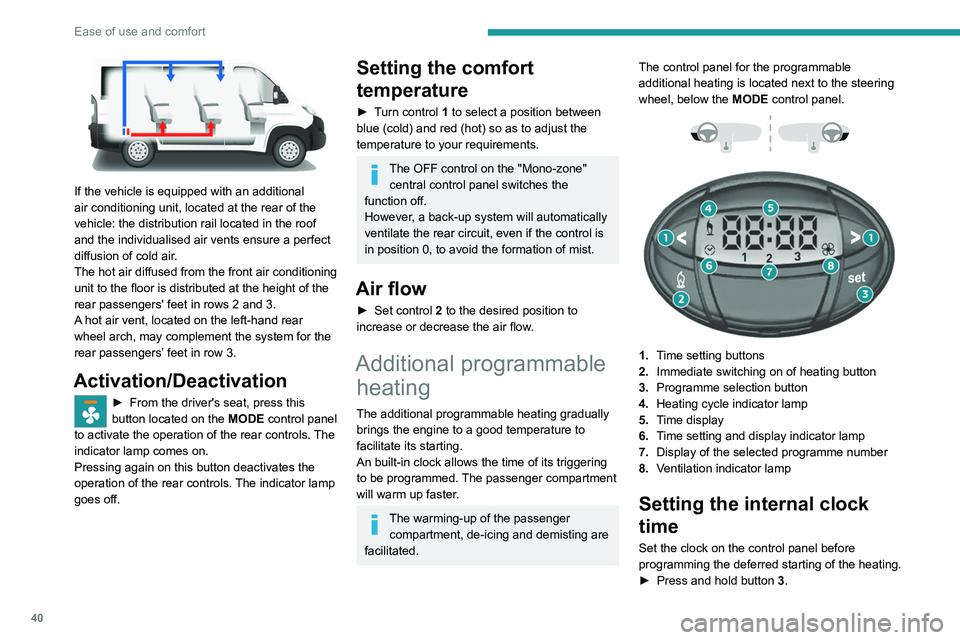
additional heating is located next to the steering
wheel, below the
MODE control panel.
1. Time setting buttons
2. Immediate switching on of heating button
3. Programme selection button
4. Heating cycle indicator lamp
5. Time display
6. Time setting and display indicator lamp
7. Display of the selected programme number
8. Ventilation indicator lamp
Setting the internal clock
time
Set the clock on the control panel before
programming the deferred starting of the heating.
►
Press and hold button 3
.
Page 113 of 212
111
Practical information
7Check the coolant level regularly
according to how much you use your
vehicle (every 3,000 miles (5,000 km)/3
months).
(Electric)
Do not top up the coolant.
If the level is close to or below
the
"MIN" mark, it is essential to contact a
PEUGEOT dealer or a qualified workshop.
Heating circuit fluid
( Electric)
Do not top up the heating circuit fluid.
Contact a PEUGEOT dealer or a qualified
workshop.
Screenwash and headlamp
washer fluid
To check the level or top up this fluid on vehicles fitted with headlamp washers,
immobilise the vehicle and switch off the engine.
Reservoir capacity: approximately 5.5 litres.
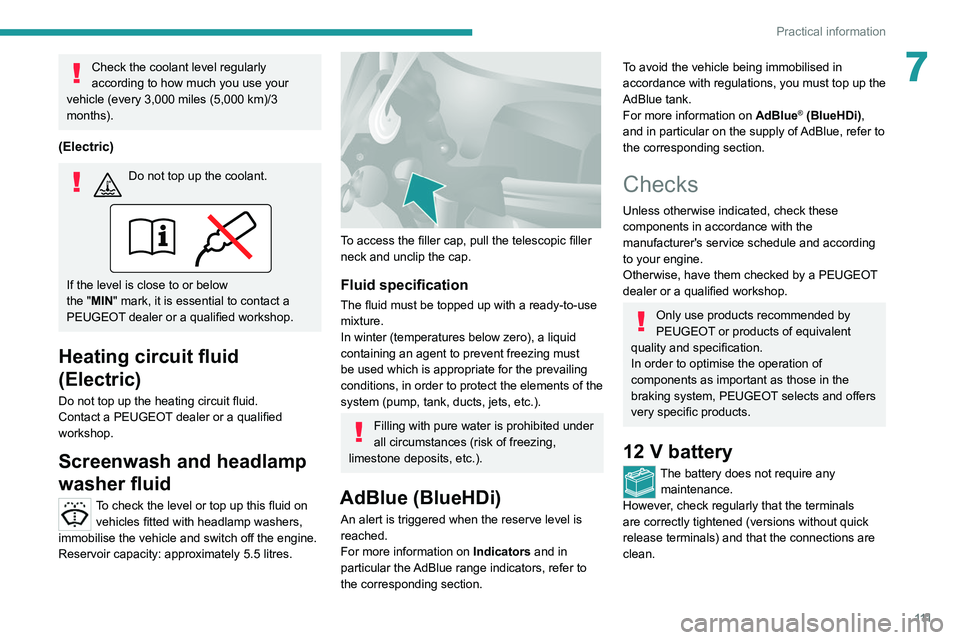
To access the filler cap, pull the telescopic filler
neck and unclip the cap.
Fluid specification
The fluid must be topped up with a ready-to-use
mixture.
In winter (temperatures below zero), a liquid
containing an agent to prevent freezing must
be used which is appropriate for the prevailing
conditions, in order to protect the elements of the
system (pump, tank, ducts, jets, etc.).
Filling with pure water is prohibited under
all circumstances (risk of freezing,
limestone deposits, etc.).
AdBlue (BlueHDi)
An alert is triggered when the reserve level is
reached.
For more information on Indicators and in
particular the AdBlue range indicators, refer to
the corresponding section.
To avoid the vehicle being immobilised in
accordance with regulations, you must top up the
AdBlue tank.
For more information on AdBlue
® (BlueHDi),
and in particular on the supply of AdBlue, refer to
the corresponding section.
Checks
Unless otherwise indicated, check these
components in accordance with the
manufacturer's service schedule and according
to your engine.
Otherwise, have them checked by a PEUGEOT
dealer or a qualified workshop.
Only use products recommended by
PEUGEOT or products of equivalent
quality and specification.
In order to optimise the operation of
components as important as those in the
braking system, PEUGEOT selects and offers
very specific products.
12 V battery
The battery does not require any maintenance.
However, check regularly that the terminals
are correctly tightened (versions without quick
release terminals) and that the connections are
clean.
Page 116 of 212
11 4
Practical information
Driving with worn or damaged tyres reduces the
braking and road holding performance of the
vehicle. Regularly check the condition of the
tyres (tread and sidewalls) and rims as well as
the presence of the valve caps.
When the wear indicators no longer appear set
back from the tread, the depth of the grooves is
less than 1.6 mm; replace the tyres as soon as
possible.
Using different size wheels and tyres from those
specified can affect the lifetime of tyres, wheel
rotation, ground clearance, the speedometer
reading and have an adverse effect on road
holding.
Fitting different tyres on the front and rear axles
can cause the ESC to mistime.
Always mark the direction of rotation on the tyres
that will be stored when fitting winter or summer
tyres. Store them in a cool, dry place and away
from direct exposure to the sun's rays.
Winter or 4-seasons tyres can be
identified by this symbol on their
sidewalls.
AdBlue® (BlueHDi
engines)
To respect the environment and ensure
compliance with the Euro 6 standard, without
adversely affecting the performance or fuel
consumption of its Diesel engines, PEUGEOT
has taken the decision to equip its vehicles
with a system that associates SCR (Selective
Catalytic Reduction) with a Diesel Particle Filter
(DPF) for the treatment of exhaust gases.
SCR system
Using a liquid called AdBlue® that contains
urea, a catalytic converter turns up to 85% of
the nitrogen oxides (NOx) into nitrogen and
water, which are harmless to health and the
environment.
The AdBlue® is contained in a special
tank holding about 19 litres.
Its capacity allows a driving range of
approximately 2,500 miles (4,000 km), which
may vary considerably depending on your
driving style.
An alert system is triggered once the reserve
level is reached: it is then possible to drive for a
further 1,500 miles (2,400
km) before the tank is
empty and the vehicle is immobilised.
For more information on the Warning
and indicator lamps and the associated
alerts, or the Indicators, please refer to the
corresponding sections.
Once the AdBlue® tank is empty, a device
required by law prevents the engine from
being restarted.
If the SCR system is faulty, the level of
emissions from the vehicle will no longer meet
the Euro 6 standard and the vehicle starts
polluting the environment.
In the event of a confirmed SCR system
malfunction, it is essential to visit a
PEUGEOT dealer or a qualified workshop as
soon as possible. After 250 miles (400 km),
a device is automatically activated to prevent
the engine from starting.
In both cases, a range indicator indicates
the distance that can be travelled before the
vehicle is immobilised.
Page 117 of 212
11 5
Practical information
7Freezing of the AdBlue®
AdBlue® freezes at temperatures below
around -11°C.
The SCR system includes a heater for the
AdBlue
® tank, allowing you to continue driving
in very cold conditions.
Supply of AdBlue®
It is recommended that the AdBlue® be topped
up as soon as the first alert is issued indicating
that the reserve level has been reached.
For the correct operation of the SCR
system:
–
Use
only AdBlue
® fluid that meets the ISO
22241 standard.
–
Never
transfer AdBlue
® to another container
as it would lose its purity.
–
Never dilute
AdBlue
® with water.
It is possible to obtain AdBlue
® from a PEUGEOT
dealer or a qualified workshop.
You can also visit a service station equipped with AdBlue® pumps specially
designed for passenger vehicles.
Recommendations on storage
AdBlue® freezes at about -11°C and deteriorates
above +25°C. Containers should be stored in a
cool area and protected from direct sunlight.
Under these conditions, the fluid can be kept for
at least a year.
If the fluid has frozen, it can be used once it has
completely thawed out at room temperature.
Never store AdBlue® containers in your
vehicle.
Precautions for use
AdBlue® is a urea-based solution. This fluid is
non-flammable, colourless and odourless (when
kept in a cool place).
In the event of contact with the skin, wash the
affected area with soap and running water. In the
event of contact with the eyes, immediately rinse
the eyes with large amounts of water or with an
eye wash solution for at least 15 minutes. Seek
medical attention if you feel a persistent burning
sensation or irritation.
If swallowed, immediately wash out the mouth
with clean water and then drink plenty of water.
In certain conditions (high temperature, for
example), the risk of release of ammonia cannot
be excluded: do not inhale the fluid. Ammonia
vapours have an irritant effect on mucous
membranes (eyes, nose and throat).
Store AdBlue® out of the reach of
children, in its original container.
Procedure
Before starting the top-up procedure, ensure that
the vehicle is parked on a flat and level surface.
In wintry conditions, ensure that the temperature
of the vehicle is above -11 °C. Otherwise the
AdBlue
® may be frozen and so cannot be poured
into its tank. Park the vehicle in a warmer area
for a few hours to allow the top-up to be carried
out.
Never put the AdBlue® into the Diesel
fuel tank.
If any AdBlue® is splashed, or if there are
any spillages on the bodywork, rinse
immediately with cold water or wipe with a
damp cloth.
If the fluid has crystallised, clean it off using a
sponge and hot water.
Important: in the event of a top-up after
an AdBlue breakdown, you must wait
about 5
minutes before switching on the
ignition, without opening the driver's door,
unlocking the vehicle or bringing the
electronic key into the passenger
compartment.
Switch on the ignition, then wait for 10
seconds before starting the engine.
►
Switch off the ignition and remove the key
from the switch to switch off the engine.
Page 118 of 212
11 6
Practical information
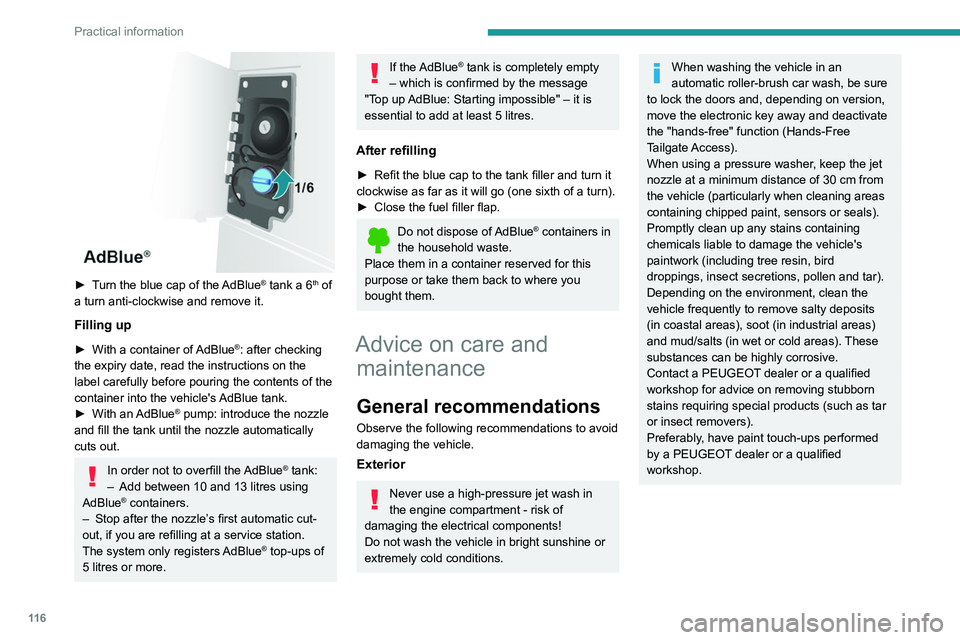
► Turn the blue cap of the AdBlue® tank a 6th of
a turn anti-clockwise and remove it.
Filling up
► With a container of AdBlue®: after checking
the expiry date, read the instructions on the
label carefully before pouring the contents of the
container
into the vehicle's AdBlue tank.
►
With an
AdBlue® pump: introduce the nozzle
and fill the tank until the nozzle automatically
cuts out.
In order not to overfill the AdBlue® tank:
–
Add between 10 and 13 litres using
AdBlue® containers.
–
Stop after the nozzle’ s first automatic cut-
out, if you are refilling at a service station.
The system only registers AdBlue
® top-ups of
5
litres or more.
If the AdBlue® tank is completely empty
– which is confirmed by the message
"Top up
AdBlue: Starting impossible" – it is
essential to add at least 5 litres.
After refilling
► Refit the blue cap to the tank filler and turn it
clockwise as far as it will go (one sixth of a turn).
►
Close the fuel filler flap.
Do not dispose of AdBlue® containers in
the household waste.
Place them in a container reserved for this
purpose or take them back to where you
bought them.
Advice on care and maintenance
General recommendations
Observe the following recommendations to avoid
damaging the vehicle.
Exterior
Never use a high-pressure jet wash in
the engine compartment - risk of
damaging the electrical components!
Do not wash the vehicle in bright sunshine or
extremely cold conditions.
When washing the vehicle in an
automatic roller-brush car wash, be sure
to lock the doors and, depending on version,
move the electronic key away and deactivate
the "hands-free" function (Hands-Free
Tailgate Access).
When using a pressure washer, keep the jet
nozzle at a minimum distance of 30 cm from
the vehicle (particularly when cleaning areas
containing chipped paint, sensors or seals).
Promptly clean up any stains containing
chemicals liable to damage the vehicle's
paintwork (including tree resin, bird
droppings, insect secretions, pollen and tar).
Depending on the environment, clean the
vehicle frequently to remove salty deposits
(in coastal areas), soot (in industrial areas)
and mud/salts (in wet or cold areas). These
substances can be highly corrosive.
Contact a PEUGEOT dealer or a qualified
workshop for advice on removing stubborn
stains requiring special products (such as tar
or insect removers).
Preferably, have paint touch-ups performed
by a PEUGEOT dealer or a qualified
workshop.
Page 138 of 212
136
Technical data
Diesel engines
Euro 6.3 Diesel engines
Engines2.2 BlueHDi 120 S&S2.2 BlueHDi 140 S&S2.2 BlueHDi 165 S&S
Gearbox Manual 6-speed (BVM6) Manual 6-speed (BVM6) Manual 6-speed (BVM6)
Cubic capacity (cc) 2,1972,1972,197
Max. power - EC standard (kW) 88103 121
Fuel DieselDieselDiesel
Euro 6.1 Diesel engines
Engines 2.0 BlueHDi 1302.0 BlueHDi 160
Gearbox Manual 6-speed (BVM6)Manual 6-speed (BVM6)
Cubic capacity (cc) 1,9971,997
Max. power - EC standard (kW) 96120
Fuel DieselDiesel
Euro 4/Euro 5 Diesel engines
(Depending on country of sale)
Engines 2.2 HDi 130
2.2 e-HDi 130 2.2 HDi 150
2.2 e-HDi 150
Gearbox Manual 6-speed (BVM6)Manual 6-speed (BVM6)
Cubic capacity (cc) 2,1982,198
Max. power - EC standard (kW) 9611 0
Fuel DieselDiesel
Page 164 of 212
162
Audio system
Audio system
Multimedia audio system -
Bluetooth
® telephone
The system is protected in such a way that it will only operate in your vehicle.
For safety reasons, the driver must only
carry out operations that require close
attention with the
vehicle stationary.
When the engine is switched off and to
prevent discharging of the battery, the
system switches off after activation of energy
economy mode.
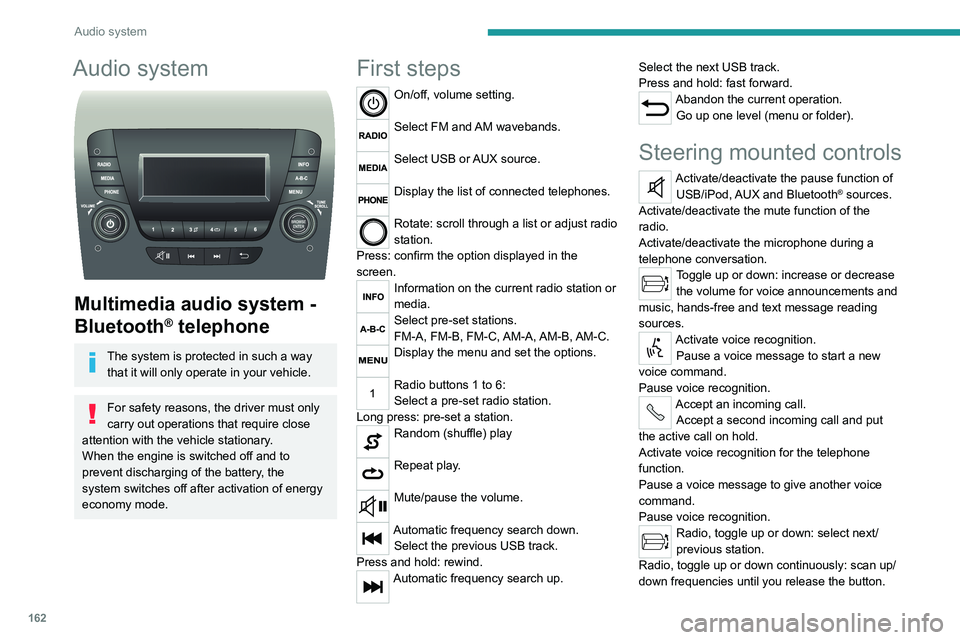
First steps
On/off, volume setting.
Select FM and AM wavebands.
Select USB or AUX source.
Display the list of connected telephones.
Rotate: scroll through a list or adjust radio
station.
Press: confirm the option displayed in the
screen.
Information on the current radio station or
media.
Select pre-set stations.
FM-A, FM-B, FM-C, AM-A, AM-B, AM-C.
Display the menu and set the options.
Radio buttons 1 to 6:
Select a pre-set radio station.
Long press: pre-set a station.
Random (shuffle) play
Repeat play.
Mute/pause the volume.
Automatic frequency search down. Select the previous USB track.
Press and hold: rewind.
Automatic frequency search up. Select the next USB track.
Press and hold: fast forward.
Abandon the current operation.
Go up one level (menu or folder).
Steering mounted controls
Activate/deactivate the pause function of USB/iPod, AUX and Bluetooth® sources.
Activate/deactivate the mute function of the
radio.
Activate/deactivate the microphone during a
telephone conversation.
Toggle up or down: increase or decrease the volume for voice announcements and
music, hands-free and text message reading
sources.
Activate voice recognition. Pause a voice message to start a new
voice command.
Pause voice recognition.
Accept an incoming call. Accept a second incoming call and put
the active call on hold.
Activate voice recognition for the telephone
function.
Pause a voice message to give another voice
command.
Pause voice recognition.
Radio, toggle up or down: select next/
previous station.
Radio, toggle up or down continuously: scan up/
down frequencies until you release the button.
Page 167 of 212
165
Audio system
11Telephone
Pairing a Bluetooth®
telephone
For safety reasons and because it
requires sustained attention by the driver,
the pairing of a Bluetooth
® mobile phone with
the hands-free kit of your audio system must
be done with the vehicle stationary.
Activate the Bluetooth
® function on the telephone
and ensure that it is "visible to all" (telephone
configuration).
Press the "Phone" button.
If no mobile phone has yet been paired
with the system, a special page is displayed in
the screen.
Select "Connect the telephone" to start
the pairing procedure and then search for
the name of the system on the mobile phone.
Using the telephone keypad, enter the PIN
displayed on the screen of the system or confirm
the PIN displayed on the mobile phone.
During pairing, a screen page is displayed
showing the progress of the
operation.
If the pairing procedure fails, we
recommend deactivating and then
reactivating the Bluetooth
® function on the
telephone.
* If your telephone i s fully compatible with the system.
Once the pairing procedure is complete, a
screen page with "Connection
successful" appears:
Confirm to display the menus.
In particular, the telephone menu provides
access to the following functions: " List. of
calls", "Contacts"*, "Num. keypad.".
Receiving a call
An incoming call is announced by a ring and a
display overlaid on the screen.
Press this button to accept the call.
Or press this steering-mounted button to
accept the call.
Ending a call
To refuse the call, press this steering- mounted button.
Making a call
Select "List of calls" to access the latest
dialled numbers.
Select "Contacts" to access your
contacts list, then navigate using the
knob.
To dial a number, use "Num. keypad" in the system.
Settings
System settings
Press the “MENU” button.
Select “System settings” then press to
view the list of settings and to activate or
deactivate the options:
–
"Reinitialise default value"
–
"20 min. delay to switch off "
–
“
Volume limit at start-up "
–
"Automatic"
Audio
Press the “MENU” button.
Select “Audio” then press to view the list
of settings and to activate or deactivate
the options:
–
"Treble"
–
“
Medium”
–
“
Bass ”
–
"Balance"
–
“
Volume adapted according to the speed ”
–
"Loudness"
The audio settings are different and independent for each audio source.