2021 PEUGEOT 508 window
[x] Cancel search: windowPage 89 of 292
87
Safety
5steering wheel, driver's side, and the dashboard,
passenger's side, to cushion their forward
movement.
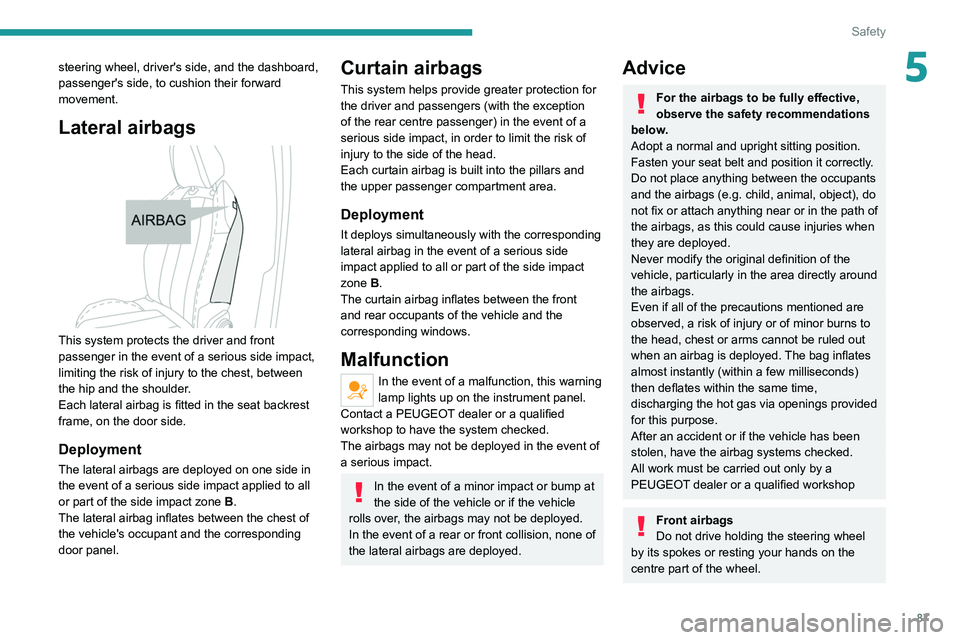
Lateral airbags
This system protects the driver and front
passenger in the event of a serious side impact,
limiting the risk of injury to the chest, between
the hip and the shoulder.
Each lateral airbag is fitted in the seat backrest
frame, on the door side.
Deployment
The lateral airbags are deployed on one side in
the event of a serious side impact applied to all
or part of the side impact zone B.
The lateral airbag inflates between the chest of
the vehicle's occupant and the corresponding
door panel.
Curtain airbags
This system helps provide greater protection for
the driver and passengers (with the exception
of the rear centre passenger) in the event of a
serious side impact, in order to limit the risk of
injury to the side of the head.
Each curtain airbag is built into the pillars and
the upper passenger compartment area.
Deployment
It deploys simultaneously with the corresponding
lateral airbag in the event of a serious side
impact applied to all or part of the side impact
zone B.
The curtain airbag inflates between the front
and rear occupants of the vehicle and the
corresponding windows.
Malfunction
In the event of a malfunction, this warning
lamp lights up on the instrument panel.
Contact a PEUGEOT dealer or a qualified
workshop to have the system checked.
The airbags may not be deployed in the event of
a serious impact.
In the event of a minor impact or bump at
the side of the vehicle or if the vehicle
rolls over, the airbags may not be deployed.
In the event of a rear or front collision, none of
the lateral airbags are deployed.
Advice
For the airbags to be fully effective,
observe the safety recommendations
below.
Adopt a normal and upright sitting position.
Fasten your seat belt and position it correctly.
Do not place anything between the occupants
and the airbags (e.g.
child, animal, object), do
not fix or attach anything near or in the path of
the airbags, as this could cause injuries when
they are deployed.
Never modify the original definition of the
vehicle, particularly in the area directly around
the airbags.
Even if all of the precautions mentioned are
observed, a risk of injury or of minor burns to
the head, chest or arms cannot be ruled out
when an airbag is deployed. The bag inflates
almost instantly (within a few milliseconds)
then deflates within the same time,
discharging the hot gas via openings provided
for this purpose.
After an accident or if the vehicle has been
stolen, have the airbag systems checked.
All work must be carried out only by a
PEUGEOT dealer or a qualified workshop
Front airbags
Do not drive holding the steering wheel
by its spokes or resting your hands on the
centre part of the wheel.
Page 91 of 292
89
Safety
5Child seats
The regulations on carrying children are specific to each country. Refer to the
legislation in force in your country.
For maximum safety, please observe the
following recommendations:
–
In accordance with European regulations,
all children under the age of 12 or less than
1,5 metres tall must travel in approved child
seats suited to their weight , on seats fitted with
a seat belt or ISOFIX mountings.
–
Statistically
, the safest seats in your
vehicle for carrying children are the rear
seats.
–
Children weighing less than 9 kg must
travel in the "rearward facing" position,
whether in the front or rear of the vehicle.
It is recommended that children travel
on the rear seats of the vehicle:
–
‘rearward facing’ up to the age of 3,
–
‘forward facing’ over the age of 3.
Make sure that the seat belt is correctly
positioned and tightened.
For child seats with a support leg, ensure that
the support leg is in firm and steady contact
with the floor.
An incorrectly installed child seat in a vehicle compromises the child's safety in
the event of an accident.
Ensure that there is no seat belt or seat belt
buckle under the child seat, as this could
destabilise it.
Remember to fasten the seat belts or the
child seat harness keeping the slack relative
to the child's body to a minimum, even for
short journeys.
When installing a child seat using the seat
belt, ensure that the seat belt is tightened
correctly on the child seat and that it secures
the child seat firmly on the vehicle seat. If
the passenger seat is adjustable, move it
forwards if necessary.
Remove the head restraint before
installing a child seat with a backrest on a
passenger seat.
Ensure that the head restraint is stored or
attached securely to prevent it from being
thrown around the vehicle in the event of
sharp braking. Refit the head restraint once
the child seat has been removed.
Installing a booster seat
The chest part of the seat belt must be
positioned on the child's shoulder without
touching the neck.
Ensure that the lap part of the seat belt
passes correctly over the child's thighs.
Use a booster seat with a backrest, equipped
with a belt guide at shoulder level.
Additional protections
To prevent accidental opening of the
doors and rear windows, use the "Child lock".
Take care not to open the rear windows by
more than one third.
To protect young children from the sun's rays,
fit side blinds on the rear windows.
As a safety measure, do not leave:
–
A
child alone and unsupervised inside a
vehicle.
–
A
child or an animal in a vehicle which is
exposed to the sun, with the windows closed.
–
The keys within reach of children inside the
vehicle.
Child seat at the rear
Forward-facing or rearward-facing
► Move the vehicle's front seat forward and
straighten the backrest so that the legs of the
child in the forward-facing or rearward-facing
child seat itself do not touch the vehicle's front
seat.
Page 100 of 292
98
Safety
Activation/Deactivation
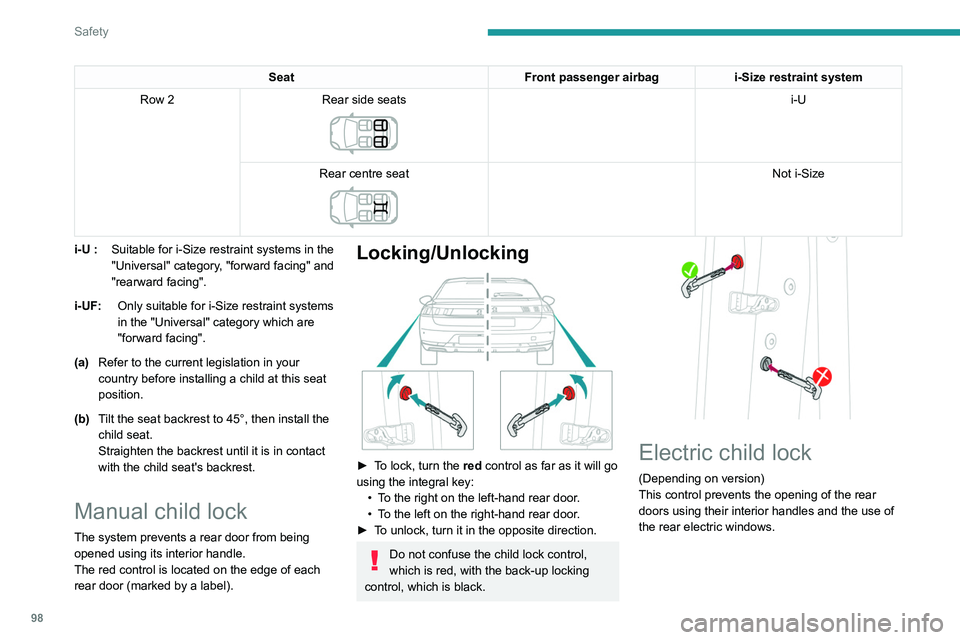
► With the ignition on, press this button to
activate/deactivate the child lock.
When the indicator lamp is on, the child lock is
activated.
With the child lock activated, it is still
possible to open the doors from outside
and to operate the rear electric windows from
the driver's controls.
This system is independent and in no circumstances does it take the place of
the central locking control.
Check the status of the child lock each time
you switch on the ignition.
Always keep the electronic key with you when
leaving the vehicle, even for a short time.
In the event of a serious impact, the electric
child lock is switched off automatically to
permit the exit of the rear passengers.
Seat Front passenger airbagi-Size restraint system
Row 2 Rear side seats
i-U
Rear centre seat
Not i-Size
i-U
: Suitable for i-Size restraint systems in the
"Universal" category, "forward facing" and
"rearward facing".
i-UF: Only suitable for i-Size restraint systems
in the "Universal" category which are
"forward facing".
(a) Refer to the current legislation in your
country before installing a child at this seat
position.
(b) Tilt the seat backrest to 45°, then install the
child seat.
Straighten the backrest until it is in contact
with the child seat's backrest.
Manual child lock
The system prevents a rear door from being
opened using its interior handle.
The red control is located on the edge of each
rear door (marked by a label).
Locking/Unlocking
► To lock, turn the red control as far as it will go
using the integral key:
•
T
o the right on the left-hand rear door.
•
T
o the left on the right-hand rear door.
►
T
o unlock, turn it in the opposite direction.
Do not confuse the child lock control,
which is red, with the back-up locking
control, which is black.
Electric child lock
(Depending on version)
This control prevents the opening of the rear
doors using their interior handles and the use of
the rear electric windows.
Page 101 of 292
99
Safety
5Activation/Deactivation
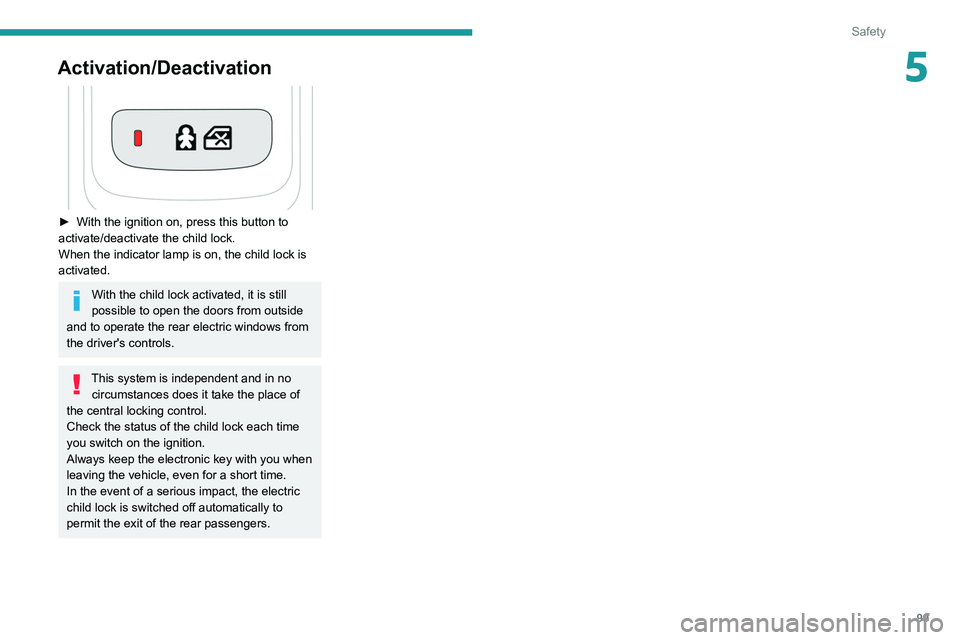
► With the ignition on, press this button to
activate/deactivate the child lock.
When the indicator lamp is on, the child lock is
activated.
With the child lock activated, it is still
possible to open the doors from outside
and to operate the rear electric windows from
the driver's controls.
This system is independent and in no circumstances does it take the place of
the central locking control.
Check the status of the child lock each time
you switch on the ignition.
Always keep the electronic key with you when
leaving the vehicle, even for a short time.
In the event of a serious impact, the electric
child lock is switched off automatically to
permit the exit of the rear passengers.
Page 144 of 292

142
Driving
Take care not to cover the warning zone in
the door mirrors, or the detection zones on
the front and rear bumpers with adhesive
labels or other objects; they may hamper
correct operation of the system.
Active Blind Spot Detection
In addition to the fixed warning lamp in the
door mirror on the side in question, a trajectory
correction will be felt if you attempt to cross
a lane marking with the direction indicator
activated, to help you avoid a collision.
This system is a combination of the Active
lane departure warning system and Blind spot
monitoring functions.
These two functions must be activated and in
operation.
The vehicle speed must be between 43 and
87 mph (70 and 140 km/h).
These functions are especially suitable for
driving on motorways and main roads.
For more information on the Active lane
departure warning system and Blind spot
monitoring , refer to the corresponding sections.
Parking sensors
For more information, refer to the
General recommendations on the use
of driving and manoeuvring aids .
This system detects and signals the proximity of
obstacles (e.g.
pedestrian, vehicle, tree, barrier)
using sensors located in the bumper.
Rear parking sensors
► Engage reverse gear to start the system
(confirmed by an audible signal).
The system is switched off when reverse gear is
disengaged.
Audible assistance
The system signals the presence of obstacles
which are both within the sensors’ detection zone
and in the vehicle path defined by the direction of
the steering wheel.
Depending on version, in the example shown,
only the obstacles present in the shaded area
will be signalled by the audible assistance.
The proximity information is given by an
intermittent audible signal, the frequency of
which increases as the vehicle approaches the
obstacle.
When the distance between the vehicle and
the obstacle becomes less than about thirty
centimetres, the audible signal becomes
continuous.
The sound emitted by the speaker (right or
left) indicates the side on which the obstacle is
located.
Adjusting the audible signalDepending on version, with
PEUGEOT Connect Radio or
PEUGEOT Connect Nav, pressing this button
opens the window for adjusting the volume of
the audible signal.
Visual assistance
This supplements the audible signal, without
taking account of the vehicle's trajectory, by
displaying bars on the screen whose location
represents the distance between the obstacle
and the vehicle (white: more distant, orange:
close, red: very close).
When the obstacle is very close, the "Danger"
symbol is displayed on the screen.
Front parking sensors
Supplementing the rear parking sensors, the
front parking sensors are triggered when an
obstacle is detected in front and the speed of the
vehicle is below 6 mph (10 km/h).
Front parking sensor operation is suspended if
the vehicle stops for more than three seconds in
forward gear, if an obstacle is no longer detected
or the vehicle speed exceeds 6 mph (10 km/h).
The sound emitted by the speaker (front or rear) locates the obstacle relative to
the vehicle, whether in front of or behind it on
its path.
Page 154 of 292

152
Driving
Activation/Deactivation
To activate assistance when approaching a
parking area:
►
Reduce the speed of the vehicle to a
maximum of 19
mph (30 km/h).
► Press the button on the gear selector or , on
the touch screen, select Driving/Vehicle > Full
Park Assist.
Activating the system deactivates Blind spot monitoring.
Sequence
Once the system is activated, the following steps
will be performed successively:
–
Select the type of manoeuvre via the touch
screen.
–
Search for an available space.
–
Prepare for the manoeuvre.
–
Perform the manoeuvre.
–
Finalise the manoeuvre.
You can deactivate the system at any time up until the start of the manoeuvre,
by pressing the red arrow in the top left corner
of the window.
Full Park Assist is not always able to
react automatically and appropriately due
to the performance limits inherent to the
system.
The manoeuvre remains the responsibility
of the driver, who must not leave the driving
position and must never try to lock the system
control button.
The driver's seat belt must remain fastened
during the manoeuvre.
Manoeuvre type selection
and parking space search
Depending on whether the vehicle has been
driven or not since the ignition was switched
on, the function offers to enter or exit a parking
space on the touch screen.
► Select the type and side of the manoeuvre to
activate the parking space search.
This lamp comes on to confirm activation.
You can change the type of manoeuvre at any
time, including during the available parking
space search phase.
►
Drive at a distance of 0.50 to 1.50
m from the
row of parked vehicles, not exceeding 19
mph
(30
km/h), until the system finds an available
space (indicated by OK on the display and an
audible signal).
For "parallel" parking, the space must at
least equal to the length of your vehicle
plus 1
m.
For "bay" parking, the space must at least
equal to the width of your vehicle plus 0.70
m.
Preparing for the
manoeuvre
► Move very slowly until the request to stop
the vehicle and the " ST
OP" sign are displayed,
accompanied by an audible signal.
Once the vehicle has stopped, an instructions
page is displayed on the screen.
►
T
o prepare for the manoeuvre, you must fulfil
all of these instructions.
This symbol will be displayed automatically when the instruction has
been applied.
When all of the instructions have been validated,
a new page is displayed, indicating that you can
undertake the manoeuvre.
► To undertake the manoeuvre, press
this button.
► While holding down the button, gradually
release the brake pedal.
The button must be held down
throughout the manoeuvre.
The start of the manoeuvre is indicated by
the display of a window with the message
"Manoeuvre in progress", accompanied by an
audible signal.
The Visiopark 1 or Visiopark 2 and
the parking sensors are automatically
activated to help monitor the vehicle's close
surroundings throughout the manoeuvre.
Performing the manoeuvre
As soon as the driver releases the brake
pedal, the system automatically takes control
of choosing the travel direction, forwards or
reverse, acceleration, braking and the steering
direction.
The manoeuvring status is indicated by these
symbols:
Manoeuvre in progress.
Manoeuvre interrupted.
Manoeuvre completed or aborted.
Page 155 of 292

153
Driving
6When all of the instructions have been validated,
a new page is displayed, indicating that you can
undertake the manoeuvre.
► To undertake the manoeuvre, press
this button.
►
While holding down the button, gradually
release the brake pedal.
The button must be held down
throughout the manoeuvre.
The start of the manoeuvre is indicated by
the display of a window with the message
"Manoeuvre in progress", accompanied by an
audible signal.
The Visiopark 1 or Visiopark 2 and
the parking sensors are automatically
activated to help monitor the vehicle's close
surroundings
throughout the manoeuvre.
Performing the manoeuvre
As soon as the driver releases the brake
pedal, the system automatically takes control
of choosing the travel direction, forwards or
reverse, acceleration, braking and the steering
direction.
The manoeuvring status is indicated by these
symbols:
Manoeuvre in progress.
Manoeuvre interrupted.
Manoeuvre completed or aborted.
The white arrows indicate that the driver must
take back control of the vehicle.
The direction of the manoeuvre is indicated by
these symbols:
Forward gear.
Reverse gear.
The central arrow is green whilst the vehicle
is moving, or white to indicate the next
manoeuvring direction.
Throughout the whole manoeuvre, indicated by the green " AUTO" symbol,
the driver must hold down the function control
button.
During manoeuvring phases, the steering
wheel performs rapid turns: do not hold
the steering wheel or put your hands between
the spokes of the steering wheel. Beware of
any object likely to block the manoeuvre
(e.g.
loose clothing, scarves, ties) - risk of
injury!
If the vehicle slows down significantly,
the brake lamps may come on.
Suspending/resuming the manoeuvre
The manoeuvre can be interrupted temporarily
at any time, either automatically by the system if
an obstacle is detected, or by driver action. If the driver notices a hazard, they may also interrupt
the manoeuvre permanently.
To suspend the manoeuvre, the driver can:
–
Release the function control button.
–
Depress the brake pedal.
–
Resume control of the steering.
–
Change the gearbox status (except changing
to
P).
The vehicle is immediately immobilised if the
manoeuvre is suspended.
This is confirmed by the display of this symbol, accompanied by the message
"Manoeuvre suspended".
Resuming the manoeuvre after resolving the
conditions for suspending it:
►
Release all controls (brake pedal, function
control button, steering wheel, gear selector).
►
Press the function control button again.
Permanent interruption after suspending the
manoeuvre:
►
Depress the brake pedal and engage a gear
.
Aborting the manoeuvre
The manoeuvre is aborted in the following
situations:
–
No action by the driver within 30 seconds of
the manoeuvre being suspended.
–
Intentional application of the parking brake.
–
Gearbox mode P
engaged by the driver.
–
Driver's seat belt unfastened.
–
Opening of a door or the boot.
–
Activation of the direction indicator lamps on
the opposite side to that of the manoeuvre.
Page 198 of 292
196
In the event of a breakdown
Before disconnecting the battery:
► Close all openings (doors, boot, windows,
roof).
► Switch off all electricity-consuming devices
(audio system, wipers, lamps, etc.).
► Switch off the ignition and wait for 4 minutes.
After accessing the battery, it is only necessary
to disconnect the (+) terminal.
Quick-release terminal clamp
Disconnecting the (+) terminal
► Depending on equipment, lift the plastic cover
on the (+) terminal.
► Raise lever A fully to release clamp B.
► Remove clamp B by lifting it off.
► Refit the plastic cover to the (+) terminal, if
the vehicle has one.
►
Allow the engine to run for at least
30
minutes, with the vehicle stationary, so that
the battery reaches an adequate state of charge.
Driving immediately without having
reached a sufficient level of charge may
affect some of the vehicle's functionalities.
Automatic gearbox
Never try to start the engine by pushing
the vehicle.
Charging the battery using a
battery charger
For optimum service life of the battery, it is
essential to maintain an adequate state of
charge.
In some circumstances, it may be necessary to
charge the battery:
–
When using the vehicle mainly for short
journeys.
–
If the vehicle is to be taken off the road for
several weeks.
Consult a PEUGEOT
dealer or a qualified
workshop.
To charge the vehicle's battery yourself, use only a charger compatible with
lead-acid batteries with a nominal voltage of
12
V.
Follow the instructions provided by the
manufacturer of the charger.
Never reverse polarities.
It is not necessary to disconnect the
battery.
►
Switch the ignition off.
►
Switch off all electrical consumers (audio
system, lighting, wipers, etc.).
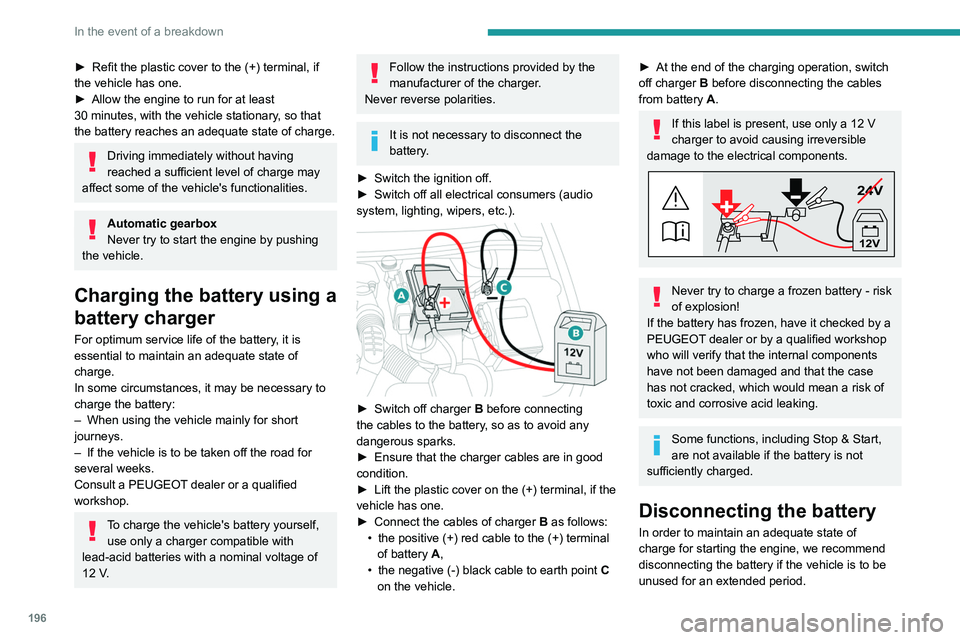
► Switch off charger B before connecting
the cables to the battery, so as to avoid any
dangerous sparks.
►
Ensure that the charger cables are in good
condition.
►
Lift the plastic cover on the (+) terminal, if the
vehicle has one.
►
Connect the cables of charger B
as follows:
•
the positive (+) red cable to the (+) terminal
of battery
A,
•
the negative (-) black cable to earth point C
on the vehicle.
► At the end of the charging operation, switch
off charger B
before disconnecting the cables
from battery A.
If this label is present, use only a 12 V
charger to avoid causing irreversible
damage to the electrical components.
24V
12V
Never try to charge a frozen battery - risk
of explosion!
If the battery has frozen, have it checked by a
PEUGEOT dealer or by a qualified workshop
who will verify that the internal components
have not been damaged and that the case
has not cracked, which would mean a risk of
toxic and corrosive acid leaking.
Some functions, including Stop & Start,
are not available if the battery is not
sufficiently charged.
Disconnecting the battery
In order to maintain an adequate state of
charge for starting the engine, we recommend
disconnecting the battery if the vehicle is to be
unused for an extended period.