2021 PEUGEOT 508 park assist
[x] Cancel search: park assistPage 156 of 292

154
Driving
– In certain cases, when a wheel of the vehicle
hits a pavement or a low obstacle.
–
T
riggering of anti-slip regulation on a slippery
road.
–
Sudden appearance in the field of the
manoeuvre of an obstacle not detected by the
system before the manoeuvre was started,
with the obstacle remaining for more than 30
seconds.
–
After 10 manoeuvres to enter or exit a
"parallel" parking space and after 7 manoeuvres
to enter a "bay" parking space,
–
System malfunction during the manoeuvre.
Abandoning the manoeuvre immediately
triggers the vehicle’
s brakes and automatically
deactivates the function.
This symbol is displayed accompanied by the message "Manoeuvre aborted".
A message prompts the driver to take back
control of the vehicle.
The function is deactivated after a few seconds; this indicator lamp goes off and
the initial display is resumed.
The system automatically engages gearbox
mode P after 4 seconds.
End of manoeuvre
The vehicle stops as soon as the manoeuvre is
completed.
This symbol is displayed accompanied by the message "Manoeuvre completed".
When the function is deactivated, this
indicator lamp goes off and the original
display is restored.
–
If entering a parking space, the driver may
be required to complete the manoeuvre.
The gearbox changes to
P
4 seconds after
completion of the manoeuvre.
–
When exiting a parking space, the gearbox
changes to
N when the manoeuvre is complete.
A message and symbols prompt the driver to
take back control of the vehicle.
The gearbox automatically changes to mode
P if no action is taken by the driver within 30
seconds.
Operating limits
– The system may suggest an inappropriate
parking space (parking prohibited, work in
progress with damaged road surface, location
alongside a ditch, etc.).
–
The system may indicate that a space has
been found but will not offer it because of a fixed
obstacle on the opposite side of the manoeuvre,
which does not allow the vehicle to follow the
trajectory required for parking.
–
The system may indicate that a space has
been found but the manoeuvre will not be
triggered because the width of the lane is
insufficient.
–
The system is not designed to perform parking
manoeuvres on a steep slope or on a sharp
curve.
– The system does not detect spaces that
are much larger than the vehicle itself or that
are delimited by obstacles that are too low
(pavements, studs, etc.) or too thin (trees, posts,
wire fences, etc.).
–
The system may be impaired by incorrect
inflation of the vehicle’
s tyres.
–
The tilting of the vehicle if the boot is heavily
loaded can affect the distance measurements.
Do not use the function under the
following exterior conditions:
–
Alongside a soft shoulder (ditch) or quay or
on the edge of a drop.
–
When the road surface is slippery (ice).
Do not use the function in the presence
of one of the following malfunctions:
–
If a tyre is under-inflated.
–
If one of the bumpers is damaged.
–
If one of the cameras is faulty
.
–
If the brake lamps are not working.
Do not use the function if the vehicle has
been subject to one of the following
modifications:
–
When carrying an object extending beyond
the dimensions of the vehicle (ladder on the
roof bars, bicycle carrier on the tailgate, etc.).
–
With a non-approved towball in place.
–
With snow chains fitted.
–
When driving on a small-diameter or
"space-saver" type spare wheel.
– When the wheels fitted are a different size
from the original ones.
– After modifying one or both bumpers
(added protection).
– If the sensors have been repainted outside
the PEUGEOT dealer network.
– With sensors not approved for the vehicle.
Malfunctions
When the function is not activated, the
temporary flashing of this indicator lamp
and an audible signal indicate a Full Park Assist
malfunction.
If the malfunction occurs while in use, the
indicator lamp goes off.
If the parking sensor malfunction occurs
during Full Park Assist use, indicated by
this warning lamp coming on, the function is
deactivated.
Consult a PEUGEOT dealer or a qualified
workshop.
In the event of a power steering
malfunction, this warning lamp lights up
on the instrument panel, accompanied by a
message.
You must stop the vehicle.
Stop as soon as it is safe to do so and
switch off the ignition.
Contact a PEUGEOT dealer or a qualified
workshop.
Page 157 of 292

155
Driving
6– When the wheels fitted are a different size
from the original ones.
–
After modifying one or both bumpers
(added protection).
–
If the sensors have been repainted outside
the PEUGEOT
dealer network.
–
With sensors not approved for the vehicle.
Malfunctions
When the function is not activated, the
temporary flashing of this indicator lamp
and an audible signal indicate a Full Park Assist
malfunction.
If the malfunction occurs while in use, the
indicator lamp goes off.
If the parking sensor malfunction occurs
during Full Park Assist use, indicated by
this warning lamp coming on, the function is
deactivated.
Consult a PEUGEOT dealer or a qualified
workshop.
In the event of a power steering
malfunction, this warning lamp lights up
on the instrument panel, accompanied by a
message.
You must stop the vehicle.
Stop as soon as it is safe to do so and
switch off the ignition.
Contact a PEUGEOT dealer or a qualified
workshop.
Page 171 of 292

169
Practical information
7function, and a towing device has been fitted
outside the PEUGEOT dealer network, it
is essential to visit a PEUGEOT dealer or
a qualified workshop to have the detection
system recalibrated - risk of malfunction of the
Hands-Free Tailgate Access function.
Certain driving or manoeuvring aid functions
are automatically deactivated while an
approved towing system is in use.
For more information about driving with a
towing device fitted to a trailer and associated
with the Trailer stability assist, refer to the
corresponding section.
Comply with the maximum authorised
towable weight, as indicated on your
vehicle's registration certificate, on the
manufacturer's label and in the Technical
data section of this guide.
If using accessories attached to the
towing device (e.g. bicycle carriers, tow
boxes):
–
Comply with the maximum authorised nose
weight.
–
Do not transport more than 4 conventional
bicycles or 2 electric bicycles.
When loading bicycles onto a bicycle carrier
on a towball, be sure to place the heaviest
bicycles as close as possible to the vehicle.
Observe the legislation in force in the
country where you are driving.
Vehicle equipped with motorised
tailgate with hands-free function
(Hands-Free Tailgate Access)
To avoid unintentionally opening the
motorised tailgate when operating the towing
device:
–
Deactivate this function in advance in the
vehicle's configuration menu.
–
Or remove the electronic key from the
recognition zone, with the tailgate closed.
Towing device with retractable ball joint
When this towing device is not in use, it is folded
away underneath the rear bumper.
No tools are required to install or stow it.
Before any operation, the vehicle must
be stationary with the parking brake
applied.
The area close to the exhaust pipe may reach
a high temperature: risk of burns!
Vehicle equipped with motorised
tailgate with hands-free function
To avoid unintentional opening of the tailgate,
follow the recommendations on the Towing
device by referring to the corresponding
section.
Unlocking handle
The towball is locked in either the storage
position or the usage position.
The unlocking handle is behind the rear bumper,
protected by a storage case.
To reach the handle:
► Pass your hand flat under the rear bumper
with the palm facing upwards.
►
Insert your hand into the storage case and
grasp the handle.
T
o unlock the towball:
Page 197 of 292
195
In the event of a breakdown
8Take used remote control batteries and
vehicle batteries to a special collection point.
Protect your eyes and face before
handling the battery.
All operations on the battery must be carried
out in a well ventilated area and away from
naked flames and sources of sparks, to avoid
any risk of explosion or fire.
Wash your hands afterwards.
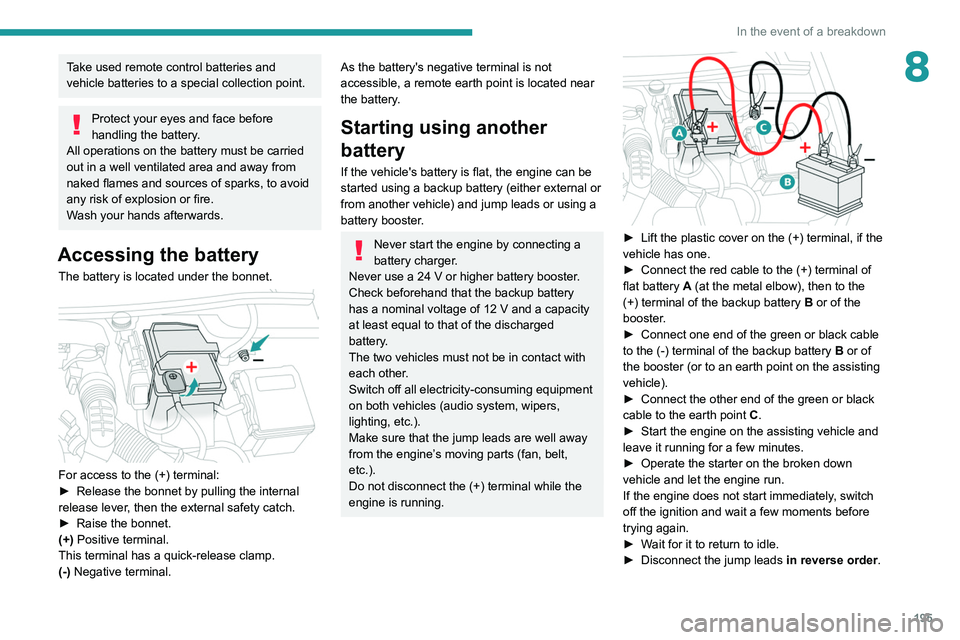
Accessing the battery
The battery is located under the bonnet.
For access to the (+) terminal:
► Release the bonnet by pulling the internal
release lever
, then the external safety catch.
►
Raise the bonnet.
(+)
Positive terminal.
This terminal has a quick-release clamp.
(-) Negative terminal.
As the battery's negative terminal is not
accessible, a remote earth point is located near
the battery.
Starting using another
battery
If the vehicle's battery is flat, the engine can be
started using a backup battery (either external or
from another vehicle) and jump leads or using a
battery booster.
Never start the engine by connecting a
battery charger.
Never use a 24
V or higher battery booster.
Check beforehand that the backup battery
has a nominal voltage of 12
V and a capacity
at least equal to that of the discharged
battery.
The two vehicles must not be in contact with
each other.
Switch off all electricity-consuming equipment
on both vehicles (audio system, wipers,
lighting, etc.).
Make sure that the jump leads are well away
from the engine’s moving parts (fan, belt,
etc.).
Do not disconnect the (+) terminal while the
engine is running.
► Lift the plastic cover on the (+) terminal, if the
vehicle has one.
►
Connect the red cable to the (+) terminal of
flat battery
A (at the metal elbow), then to the
(+) terminal of the backup battery
B or of the
booster.
►
Connect one end of the green or black cable
to the (-) terminal of the backup battery
B or of
the booster (or to an earth point on the assisting
vehicle).
►
Connect the other end of the green or black
cable to the earth point
C
.
►
Start the engine on the assisting vehicle and
leave it running for a few minutes.
►
Operate the starter on the broken down
vehicle and let the engine run.
If the engine does not start immediately
, switch
off the ignition and wait a few moments before
trying again.
►
W
ait for it to return to idle.
►
Disconnect the jump leads in reverse order.
Page 202 of 292
200
In the event of a breakdown
Accessing the tools
Hatchback
Reconnection
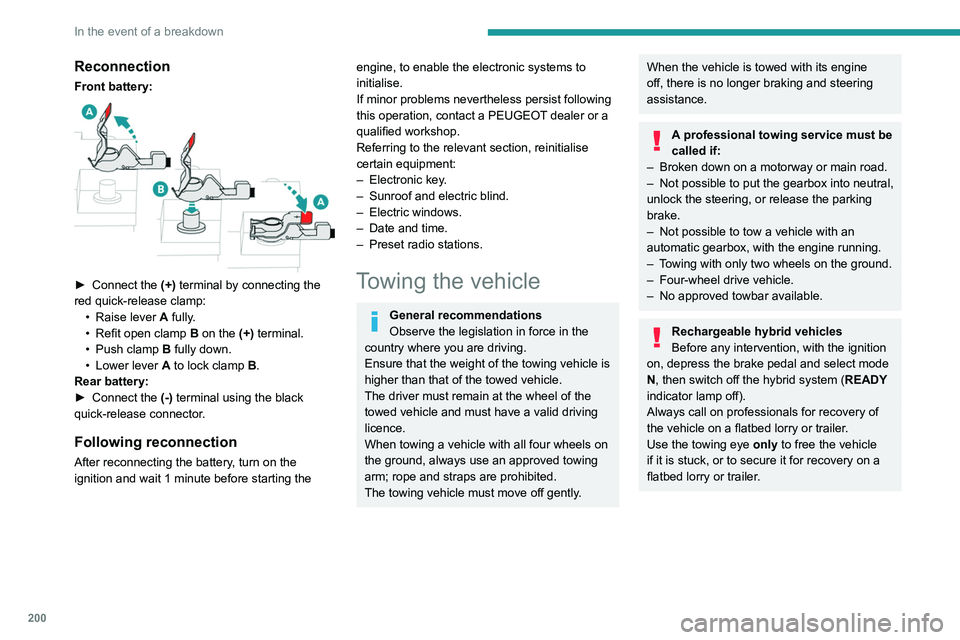
Front battery:
► Connect the (+) terminal by connecting the
red quick-release clamp: •
Raise lever
A
fully.
•
Refit open clamp
B
on the (+) terminal.
•
Push clamp
B fully down.
•
Lower lever
A
to lock clamp B.
Rear battery:
►
Connect the
(-) terminal using the black
quick-release connector.
Following reconnection
After reconnecting the battery, turn on the
ignition and wait 1 minute before starting the
engine, to enable the electronic systems to
initialise.
If minor problems nevertheless persist following
this operation, contact a PEUGEOT dealer or a
qualified workshop.
Referring to the relevant section, reinitialise
certain equipment:
–
Electronic key
.
–
Sunroof and electric blind.
–
Electric windows.
–
Date and time.
–
Preset radio stations.
Towing the vehicle
General recommendations
Observe the legislation in force in the
country where you are driving.
Ensure that the weight of the towing vehicle is
higher than that of the towed vehicle.
The driver must remain at the wheel of the
towed vehicle and must have a valid driving
licence.
When towing a vehicle with all four wheels on
the ground, always use an approved towing
arm; rope and straps are prohibited.
The towing vehicle must move off gently.
When the vehicle is towed with its engine
off, there is no longer braking and steering
assistance.
A professional towing service must be
called if:
–
Broken down on a motorway or main road.
–
Not possible to put
the gearbox into neutral,
unlock the steering, or release the parking
brake.
–
Not possible to tow a vehicle with an
automatic gearbox, with the engine running.
–
T
owing with only two wheels on the ground.
–
Four-wheel drive vehicle.
–
No approved towbar available.
Rechargeable hybrid vehicles
Before any intervention, with the ignition
on, depress the brake pedal and select mode
N, then switch off the hybrid system (READY
indicator lamp off).
Always call on professionals for recovery of
the vehicle on a flatbed lorry or trailer.
Use the towing eye only
to free the vehicle
if it is stuck, or to secure it for recovery on a
flatbed lorry or trailer.
Page 204 of 292
202
In the event of a breakdown
Towing your vehicle
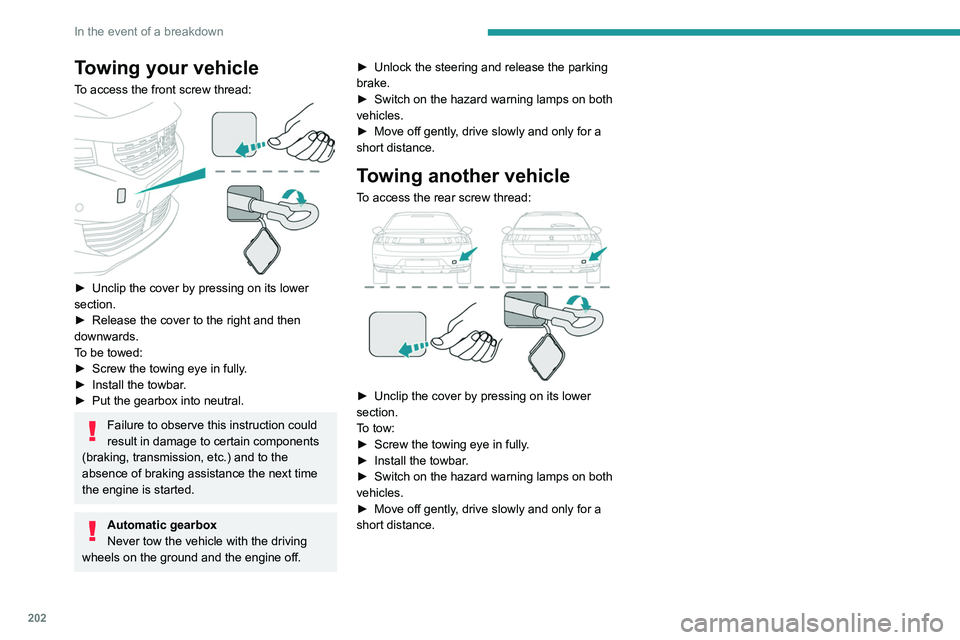
To access the front screw thread:
► Unclip the cover by pressing on its lower
section.
►
Release the cover to the right and then
downwards.
T
o be towed:
►
Screw the towing eye in fully
.
►
Install the towbar
.
►
Put the gearbox into neutral.
Failure to observe this instruction could
result in damage to certain components
(braking, transmission, etc.) and to the
absence of braking assistance the next time
the engine is started.
Automatic gearbox
Never tow the vehicle with the driving
wheels on the ground and the engine off. ►
Unlock the steering and release the parking
brake.
►
Switch on the hazard warning lamps on both
vehicles.
►
Move off gently
, drive slowly and only for a
short distance.
Towing another vehicle
To access the rear screw thread:
► Unclip the cover by pressing on its lower
section.
T
o tow:
►
Screw the towing eye in fully
.
►
Install the towbar
.
►
Switch on the hazard warning lamps on both
vehicles.
►
Move off gently
, drive slowly and only for a
short distance.
Page 255 of 292
253
Alphabetical index
E
EBFD 82
Eco-driving (advice)
8
ECO mode
111
Economy mode
173
Electric automatic gearbox (Rechargeable
hybrid)
109
Electric windows
41
Electronic brake force distribution (EBFD)
82
Emergency braking assistance (EBA)
82
Emergency call
80–81
Emergency switching off
103
Emergency warning lamps
79, 183
Emissions control system, SCR
20, 178
Energy economy mode
173
Energy flows
25
Energy recovery
21, 109
Engine
178
Engine compartment
173–174
Engine, Diesel
157, 175, 183, 206–207
Engine, petrol
112, 174, 204
Engines
203–204, 206–207
Environment
8, 32, 57
e-Save function (energy reserve)
26
ESC (electronic stability control)
82
Expanded traffic sign recognition
121
Exterior lighting
72
F
Fatigue detection 136
Filling the AdBlue® tank
176, 179
Filling the fuel tank
157–158
Filter, air
177
Filter, oil
177
Filter, particle
176–177
Filter, passenger compartment
52, 177
Fitting a wheel
189–190
Fitting roof bars
170–171
Fittings, boot
64
Fittings, interior
59
Fittings, rear
63
Flap, charging
168
Flap, fuel filler
157–158
Flashing indicators
70, 193
Flat bed (recovery)
200
Fluid, brake
176
Fluid, engine coolant
176
Foglamps, rear
69, 194
Folding the rear seats
50–51
Four-wheel drive (4WD)
113, 172
Frequency (radio)
238
Fuel
8, 157
Fuel consumption
8, 21
Fuel tank
157–159
Full Park Assist
151
Fuses
194
G
Gauge, fuel 157
Gearbox, automatic
106–108, 110, 177, 196
Gearbox, manual
11 0
Gear shift indicator ~ Gear efficiency
indicator
11 3
Glove box
59
G.P.S.
232
Grab handles
59
H
Hands-free access 39–40
Hands-free tailgate
38–40
Hazard warning lamps
79, 183
Headlamp adjustment
71
Headlamp adjustment
71
Headlamps, automatic dipping
72–73
Headlamps, automatic illumination
71
Headlamps, dipped beam
192–193
Headlamps, halogen
71, 192
Headlamps, main beam
72, 192–193
Head restraints, front
45
Head restraints, rear
50–51
Heating
51, 56–57
Heating, additional
56–57
Heating, programmable
26, 56–58
Hi-Fi system
61
High voltage
159
Hill start assist
11 0 – 111
Page 256 of 292
254
Alphabetical index
Histogramme, fuel consumption 25–26
Horn
80
I
i-Cockpit® amplify function 47
Ignition
103, 242
Ignition on
103
Immobiliser, electronic
101
Indicator, AdBlue® range
20
Indicator, coolant temperature
19
Indicator, engine oil level
19
Indicators, direction
70, 193
Inflating tyres
178, 210
Inflating tyres and accessories
(using the kit)
185, 187
Infrared camera
74, 117
Instrument panel
10–11, 11, 22–23, 23, 118
Instrument panel (Rechargeable hybrid)
10
Internet browser
233, 236
ISOFIX mountings
93
J
Jack 184–185, 188, 239
Jump starting
195
K
Key 27–28, 31
Key, electronic
29–30
Keyless Entry and Starting
29–31, 101–102
Key not recognised
103
Key with remote control
27, 101
Kit, hands-free
219, 241
Kit, puncture repair
184–185
Kit, temporary puncture repair
184–187
L
Labels 6
Labels, identification
210
Lamp, boot
68
Lamps, parking
70
Lamps, rear
193–194
Lams with Full LED technology
71, 73, 192
Lane assist
125, 129–131
Lane departure warning active
137, 142
Leather (care)
182
LEDs - Light-emitting diodes
70, 192–194
Level, AdBlue®
176
Level, brake fluid
176
Level, Diesel additive
176–177
Level, engine coolant
19, 176
Level, engine oil
19, 175
Levels and checks
175–177
Level, screenwash fluid
76, 176
Light-emitting diodes - LEDs
70, 192–194
Lighting, cornering 73–74
Lighting dimmer
22
Lighting, exterior
69, 72
Lighting, guide-me home
28, 71–72
Lighting, interior
62–63
Lighting, mood
63
Lighting, welcome
71–72
Loading
170–171
Load reduction mode
173
Locating your vehicle
28
Locking
28, 30
Locking from the inside
33
Locking the doors
33
Long objects, transporting
64
Low fuel level
157
Lumbar
45–46
M
Mains socket (domestic network) 161–162
Maintenance (advice)
160, 181
Maintenance, routine
117, 176, 178
Manoeuvring aids (recommendations)
11 6
Map reading lamps
62
Markings, identification
210
Massage function
47
Massage, multi-point
47
Mat
62, 117
Memorising a speed
125
Menu
218
Menu, main
24