2021 PEUGEOT 508 lock
[x] Cancel search: lockPage 50 of 292

48
Ease of use and comfort
Adjustment
► Move control A to the right or to the left to
select the corresponding mirror.
► Move control B in any of the four directions
to adjust.
► Return control A to its central position.
Electric folding
Depending on equipment, the door mirrors can
be folded electrically.
► From the inside, with the
ignition on, place control A in the
central position.
► Pull control A backwards.
► Lock the vehicle from the outside.
From the front seat:► Press this button; its green indicator
lamp comes on.
The settings page is displayed on the touch
screen with the last memorised settings.
If the settings suit you and you make no
changes, the display returns to its previous state,
and the function activates immediately
.
Seats must be adjusted one after another,
starting with the driver's seat.
To modify the settings:
►
Begin with the driver
’s seat.
►
Select a massage intensity from the three
levels offered: " 1
" (Low), "2" (Normal) or "3"
(High).
►
Select another type of massage from those
offered.
►
W
ait for the driver's seat settings page to
disappear.
►
Next, proceed with the passenger's seat in
the same way
.
The changes are applied immediately.
Once activated, the system starts a one hour
massage cycle, made up of sequences of 6
minutes of massage followed by 3 minutes at
rest.
The system automatically stops at the end of the
cycle; the indicator lamp for the button goes off.Steering wheel
adjustment
► When stationary , pull the control to release
the steering wheel.
►
Adjust the height and reach to suit your
driving position.
►
Push the control to lock the steering wheel.
For safety reasons, these adjustments
must only be carried out with the vehicle
stationary.
PEUGEOT i-Cockpit®
The instrument panel information is
visible above the steering wheel, for greater
safety and driving comfort.
Adjust the steering wheel height so that it
does not obstruct the instrument panel.
Mirrors
Door mirrors
Depending on version, the electrochrome system
uses a sensor that detects the level of exterior
brightness and that coming from the rear of the
vehicle, in order to automatically and gradually
switch between day and night usage.
As a safety measure, the mirrors should be adjusted to reduce the "blind spots".
The objects that you see in the mirrors are
in fact closer than they appear. Take this
into account in order to correctly judge the
distance of vehicles approaching from behind.
Demisting/Defrosting
The demisting/defrosting of the door mirrors works with the demisting/
defrosting of the rear screen.
For more information on Rear screen
demisting/defrosting , refer to the
corresponding section.
Page 51 of 292

49
Ease of use and comfort
3Adjustment
► Move control A to the right or to the left to
select the corresponding mirror.
►
Move control
B in any of the four directions
to adjust.
►
Return control A
to its central position.
Electric folding
Depending on equipment, the door mirrors can
be folded electrically.
► From the inside, with the
ignition on, place control A
in the
central position.
►
Pull control A
backwards.
►
Lock the vehicle from the outside.
If the mirrors are folded using control A,
they will not unfold when the vehicle is
unlocked.
Electric unfolding
► From outside: unlock the vehicle.
► From inside: with the ignition on, place
control
A in the central position and then pull it
rearwards.
The automatic door mirror folding/ unfolding function is configured via the
Driving
/ Vehicle touch screen menu.
Manual folding
The mirrors can be folded manually (parking
obstruction, narrow garage, etc.).
►
T
urn the mirror towards the vehicle.
Automatic tilting in reverse gear
Depending on version, this function allows to
automatically tilt the mirrors downwards to assist
with parking manoeuvres in reverse gear.
With the engine running, on engaging reverse
gear, the mirror glasses tilt downwards.
They return to their initial position:
–
A
few seconds after coming out of reverse
gear.
–
Once the vehicle speed exceeds 6 mph
(10
km/h).
–
When the engine is switched off.
This function is set via the Driving/Vehicle touch screen menu.
Electrochrome interior rear
view mirror
Equipped with an anti-dazzle system, which
darkens the mirror glass and reduces the
nuisance to the driver caused by the sun,
headlamps of other vehicles, etc.
The electrochrome system uses a sensor that
detects the level of exterior brightness and that
coming from the rear of the vehicle, in order to
automatically and gradually switch between day
and night usage.
To ensure optimum visibility while manoeuvring, the mirror automatically
brightens when reverse gear is engaged.
The system is deactivated if the load in the
boot exceeds the height of the load space
Page 60 of 292

58
Ease of use and comfort
Front fittings
1.Sun visor
2. Card holder
3. Illuminated glove box
4. Door pockets
5. USB socket(s) / Front 12 V socket (120 W)
Storage compartment or Wireless
smartphone charger
6. Cup holder
7. Front armrest with storage
8. USB ports or Rear 12 V socket (120 W)
Sun visor
► With the ignition on, raise the concealing
flap; depending on the version, the mirror is
illuminated automatically.
This sun visor is also equipped with a ticket
holder.
To avoid the risk of poisoning or asphyxia, the programmable heating
must not be used, even for short periods, in a
closed environment such as a garage or
workshop which is not equipped with an
exhaust gas extraction system.
Do not park the vehicle on a flammable
surface (dry grass, dead leaves, paper, etc.)
- Risk of fire!
Glazed surfaces such as the rear screen
or windscreen can become very hot in
places.
Never put objects on these surfaces; never
touch these surfaces - Risk of burns!
Temperature pre-conditioning
(Rechargeable hybrid)
This function allows you to programme the
temperature in the passenger compartment to
reach a pre-defined, non-modifiable temperature
(approx. 21°C) before you enter the vehicle, on
the days and at the times of your choice.
This function is available when the vehicle is
connected or not connected.
Programming
(With PEUGEOT Connect Nav)
In the Climate > OPTIONS menu:
Select Temperature conditioning .
►
Press
+ to add a programme.
►
Select the time of entry into the vehicle and
the desired days. Press
OK.
►
Press
ON to activate this programming.
The pre-conditioning sequence begins
approximately 45 minutes before the
programmed time when the vehicle is connected
(20 minutes when it is not connected) and is
maintained for 10 minutes after.
This indicator lamp comes on fixed when
a temperature pre-conditioning cycle is
programmed. It flashes when temperature pre-
conditioning is in progress.
You can set multiple programmes. Each one is saved in the system.
To optimise the driving range, we recommend
starting a programme while the vehicle is
connected.
Programming can also be carried out
from a smartphone using the
MYPEUGEOT APP application.
With PEUGEOT Connect Radio, programming
can only be carried out from a smartphone using
the application.
For more information on Remote functions,
refer to the corresponding section.
The fan noise that occurs during temperature pre-conditioning is perfectly
normal.
Operating conditions
– The function is only activated when the
ignition is switched off and the
vehicle
locked.
–
When the vehicle is not connected, the
function is only activated if the battery charge
level is greater than 20%.
–
When the vehicle is not connected and a
recurring programme is active (e.g. from Monday
to Friday), if two temperature pre-conditioning
sequences are run without the vehicle being
used, the programme will be deactivated.
Page 64 of 292

62
Ease of use and comfort
Front touch-sensitive
courtesy lamp
It comes on gradually:
– when the vehicle is unlocked.
– when the ignition is switched off.
– when a door is opened.
– when the remote control locking button is
activated, in order to locate the vehicle.
It switches off:
– when the vehicle is locked.
– when the ignition is switched on.
– 30 seconds after the last door is closed.
The front and rear touch-sensitive reading lamps
come on and go off at the same time as the
courtesy lamp.
A long press on the courtesy lamp completely
deactivates it from coming on (confirmed by the
“OFF" symbol).
Touch-sensitive reading
lamps
► With the ignition on, press the corresponding
reading lamp.
Interior ambient lighting
The dimmed passenger compartment lighting
improves visibility in the vehicle when the light
is poor.
At night, the ambient lighting comes on/goes off
automatically when the sidelamps are switched
on/off.
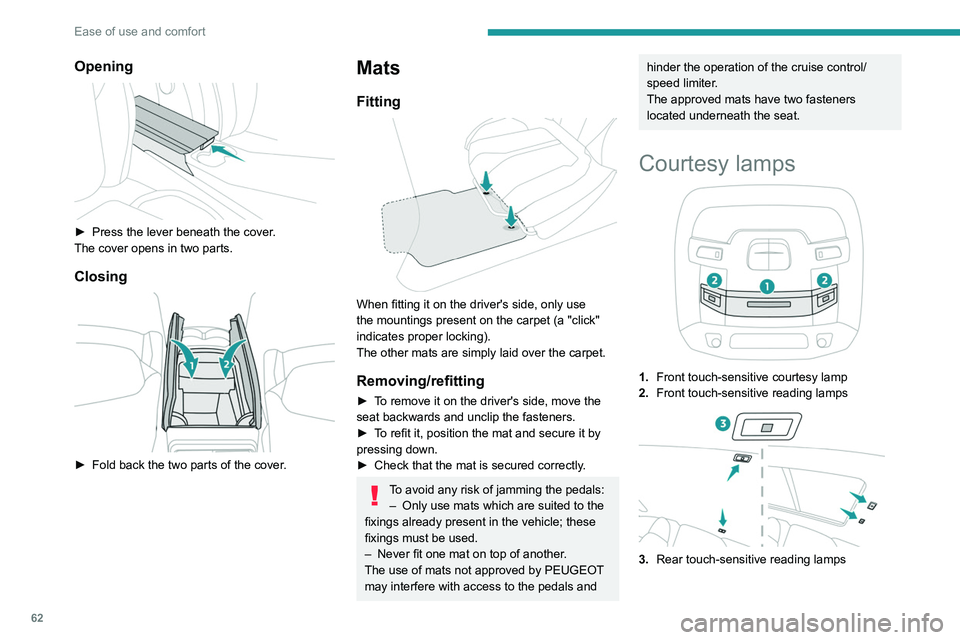
Opening
► Press the lever beneath the cover .
The cover opens in two parts.
Closing
► Fold back the two parts of the cover .
Mats
Fitting
When fitting it on the driver's side, only use
the mountings present on the carpet (a "click"
indicates proper locking).
The other mats are simply laid over the carpet.
Removing/refitting
► To remove it on the driver's side, move the
seat backwards and unclip the fasteners.
►
T
o refit it, position the mat and secure it by
pressing down.
►
Check that the mat is secured correctly
.
To avoid any risk of jamming the pedals:– Only use mats which are suited to the
fixings already present in the vehicle; these
fixings must be used.
–
Never fit one mat on top of another
.
The use of mats not approved by PEUGEOT
may interfere with access to the pedals and
hinder the operation of the cruise control/
speed limiter.
The approved mats have two fasteners
located underneath the seat.
Courtesy lamps
1. Front touch-sensitive courtesy lamp
2. Front touch-sensitive reading lamps
3.Rear touch-sensitive reading lamps
Page 65 of 292

63
Ease of use and comfort
3Front touch-sensitive
courtesy lamp
It comes on gradually:
– when the vehicle is unlocked.
–
when the ignition is switched off.
–
when a door is opened.
–
when the remote control locking button is
activated, in order to locate the vehicle.
It switches off:
–
when the vehicle is locked.
–
when the ignition is switched on.
–
30 seconds after the last door is closed.
The front and rear touch-sensitive reading lamps
come on and go off at the same time as the
courtesy lamp.
A
long press on the courtesy lamp completely
deactivates it from coming on (confirmed by the
“OFF" symbol).
Touch-sensitive reading
lamps
► With the ignition on, press the corresponding
reading lamp.
Interior ambient lighting
The dimmed passenger compartment lighting
improves visibility in the vehicle when the light
is poor.
At night, the ambient lighting comes on/goes off
automatically when the sidelamps are switched
on/off.
Activation / deactivation and adjustment of the light intensity are set via the
Driving
/ Vehicle touch screen menu.
Rear fittings
12 V accessory socket
► To connect a 12 V accessory (maximum
power: 120 W), lift the cover and plug in a
suitable adaptor.
The connection of an electrical device not approved by PEUGEOT, such as a
USB charger, may adversely affect the
operation of vehicle electrical systems,
causing faults such as poor radio reception or
interference with displays in the screens.
USB sockets
Each USB socket is used only to power or
recharge a portable device.
Rear armrest
The armrest incorporates two cup holders.
Page 68 of 292

66
Ease of use and comfort
► Check that the net is hooked and tightened
correctly.
Never reposition the rear seats while the
net's roller is attached to the folded
backrests.
Row 2
► Roll up then remove the load space cover.
► Fold down the rear seats.
► Position the left-hand end of the net roller in
side support 3 by reaching from the left-hand
side of the passenger compartment.
► Position the right-hand end of the net roller in
side support 4 by reaching from the right-hand
side of the passenger compartment.
► Press each side to lock in the roller; the red
indicators must not be visible.
► Unroll the net from the boot.
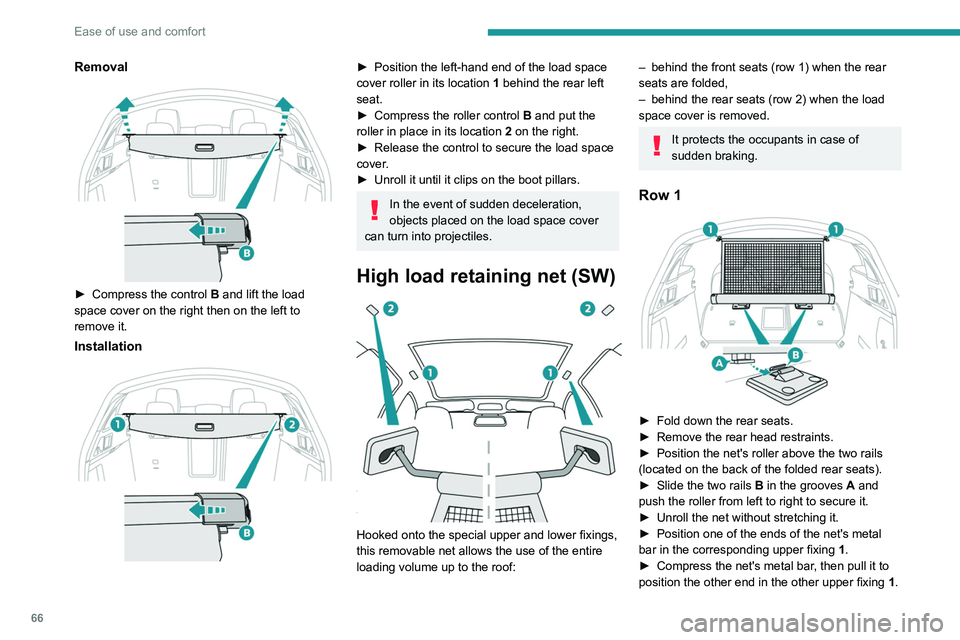
Removal
► Compress the control B and lift the load
space cover on the right then on the left to
remove it.
Installation
► Position the left-hand end of the load space
cover roller in its location 1
behind the rear left
seat.
►
Compress the roller control B
and put the
roller in place in its location 2 on the right.
►
Release the control to secure the load space
cover
.
►
Unroll it until it clips on the boot pillars.
In the event of sudden deceleration,
objects placed on the load space cover
can turn into projectiles.
High load retaining net (SW)
Hooked onto the special upper and lower fixings,
this removable net allows the use of the entire
loading volume up to the roof:
– behind the front seats (row 1) when the rear
seats are folded,
–
behind the rear seats (row 2) when the load
space cover is removed.
It protects the occupants in case of
sudden braking.
Row 1
► Fold down the rear seats .
► Remove the rear head restraints.
►
Position the net's roller above the two rails
(located on the back of the folded rear seats).
►
Slide the two rails B
in the grooves A and
push the roller from left to right to secure it.
►
Unroll the net without stretching it.
►
Position one of the ends of the net's metal
bar in the corresponding upper fixing 1
.
►
Compress the net's metal bar
, then pull it to
position the other end in the other upper fixing 1.
Page 69 of 292

67
Ease of use and comfort
3► Check that the net is hooked and tightened
correctly .
Never reposition the rear seats while the
net's roller is attached to the folded
backrests.
Row 2
► Roll up then remove the load space cover .
► Fold down the rear seats.
►
Position the left-hand end of the net roller in
side support 3
by reaching from the left-hand
side of the passenger compartment.
►
Position the right-hand end of the net roller in
side support 4
by reaching from the right-hand
side of the passenger compartment.
►
Press each side to lock in the roller; the red
indicators must not be visible.
►
Unroll the net from the boot.
► Position one of the ends of the net's metal
bar in the corresponding upper fixing 2
.
►
Compress the net's metal bar
, then pull it to
position the other end in the other upper fixing 2.
►
Check that the net is hooked and tightened
correctly
.
►
Lift up and lock the rear seats.
12 V accessory socket
► To connect a 12 V accessory (maximum
power: 120 W), lift the cover and plug in a
suitable adaptor.
►
Switch on the ignition.
The connection of an electrical device not approved by PEUGEOT, such as a
USB charger, may adversely affect the
operation of vehicle electrical systems,
causing faults such as poor radio reception or
interference with displays in the screens.
Stowing rings
Hatchback
SW
The boot has four stowing rings to secure
luggage using different types of retaining nets.
For the SW, two of the rings are fixed and the
other two are movable in tracks.
For more information on the various nets,
contact a PEUGEOT dealer.
Page 70 of 292

68
Ease of use and comfort
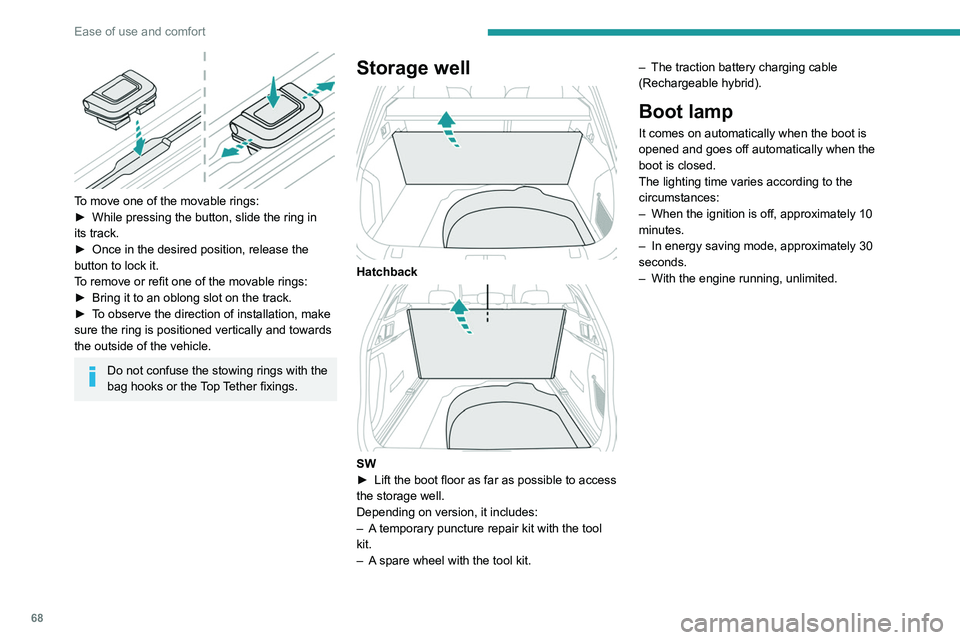
To move one of the movable rings:
► While pressing the button, slide the ring in
its track.
►
Once in the desired position, release the
button to lock it.
T
o remove or refit one of the movable rings:
►
Bring it to an oblong slot on the track.
►
T
o observe the direction of installation, make
sure the ring is positioned vertically and towards
the outside of the vehicle.
Do not confuse the stowing rings with the
bag hooks or the Top Tether fixings.
Storage well
Hatchback
SW
► Lift the boot floor as far as possible to access
the storage well.
Depending on version, it includes:
–
A
temporary puncture repair kit with the tool
kit.
–
A
spare wheel with the tool kit. –
The traction battery charging cable
(Rechargeable hybrid).
Boot lamp
It comes on automatically when the boot is
opened and goes off automatically when the
boot is closed.
The lighting time varies according to the
circumstances:
–
When the ignition is off, approximately 10
minutes.
–
In energy saving mode, approximately 30
seconds.
–
With the engine running, unlimited.