2021 PEUGEOT 508 check engine
[x] Cancel search: check enginePage 136 of 292
134
Driving
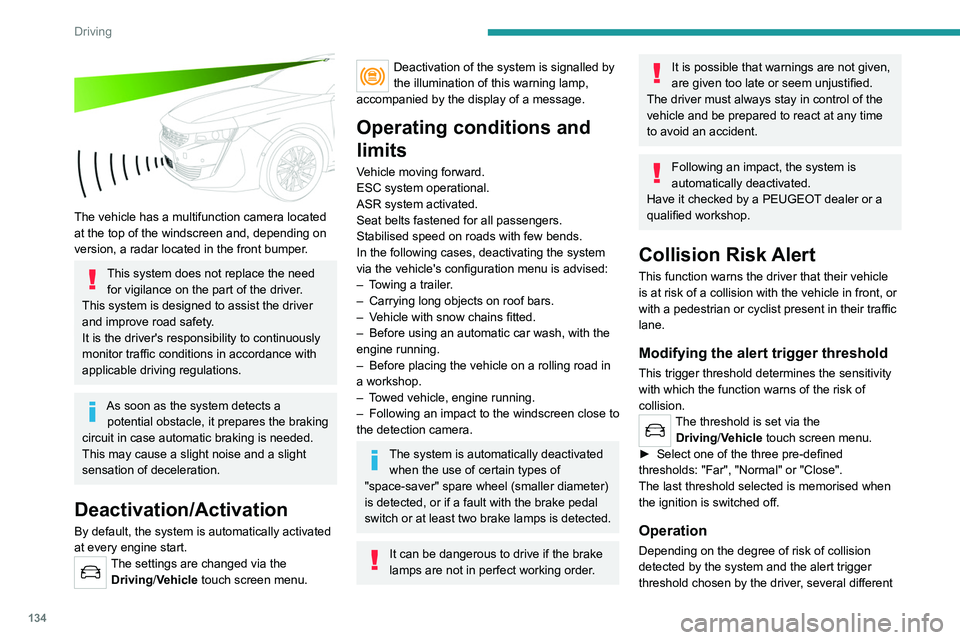
The vehicle has a multifunction camera located
at the top of the windscreen and, depending on
version, a radar located in the front bumper.
This system does not replace the need for vigilance on the part of the driver.
This system is designed to assist the driver
and improve road safety.
It is the driver's responsibility to continuously
monitor traffic conditions in accordance with
applicable driving regulations.
As soon as the system detects a potential obstacle, it prepares the braking
circuit in case automatic braking is needed.
This may cause a slight noise and a slight
sensation of deceleration.
Deactivation/Activation
By default, the system is automatically activated
at every engine start.
The settings are changed via the Driving/Vehicle touch screen menu.
Deactivation of the system is signalled by
the illumination of this warning lamp,
accompanied by the display of a message.
Operating conditions and
limits
Vehicle moving forward.
ESC system operational.
ASR system activated.
Seat belts fastened for all passengers.
Stabilised speed on roads with few bends.
In the following cases, deactivating the system
via the vehicle's configuration menu is advised:
–
T
owing a trailer.
–
Carrying long objects on roof bars.
–
V
ehicle with snow chains fitted.
–
Before using an automatic car wash, with the
engine running.
–
Before placing the vehicle on a rolling road in
a workshop.
–
T
owed vehicle, engine running.
–
Following
an impact to the windscreen close to
the detection camera.
The system is automatically deactivated when the use of certain types of
"space-saver" spare wheel (smaller diameter)
is detected, or if a fault with the brake pedal
switch or at least two brake lamps is detected.
It can be dangerous to drive if the brake
lamps are not in perfect working order.
It is possible that warnings are not given,
are given too late or seem unjustified.
The driver must always stay in control of the
vehicle and be prepared to react at any time
to avoid an accident.
Following an impact, the system is
automatically deactivated.
Have it checked by a PEUGEOT dealer or a
qualified workshop.
Collision Risk Alert
This function warns the driver that their vehicle
is at risk of a collision with the vehicle in front, or
with a pedestrian or cyclist present in their traffic
lane.
Modifying the alert trigger threshold
This trigger threshold determines the sensitivity
with which the function warns of the risk of
collision.
The threshold is set via the Driving/Vehicle touch screen menu.
►
Select one of the three pre-defined
thresholds: "Far", "Normal" or "Close".
The last threshold selected is memorised when
the ignition is switched off.
Operation
Depending on the degree of risk of collision
detected by the system and the alert trigger
threshold chosen by the driver, several different
Page 138 of 292
136
Driving
The brake pedal may vibrate slightly while the function is operating.
If the vehicle comes to a complete stop,
automatic braking is maintained for 1 to 2
seconds.
Malfunction
In the event of a malfunction, this warning
lamp lights up on the instrument panel,
accompanied by the display of a message and
an audible signal.
Have it checked by a PEUGEOT dealer or a
qualified workshop.
If these warning lamps come on
after the engine has been switched
off and then restarted, contact a PEUGEOT
dealer or a qualified workshop to have the
system checked.
These warning lamps light up on the instrument panel to indicate
that the driver's and/or front passenger's seat
belt is not fastened (depending on version). The
automatic braking system is deactivated until the
seat belts are fastened.
Distraction detection
For more information, refer to the
General recommendations on the use
of driving and manoeuvring aids .
The function comprises the "Driver Attention
Warning" system combined with the "Driver
Attention Warning by Camera" system.
These systems are in no way designed
to keep the driver awake or to prevent
the driver from falling asleep at the wheel.
It is the driver’s responsibility to stop if feeling
tired.
Take a break if you are feeling tired or at least
every 2 hours.
Activation/Deactivation
This function is set via the touch screen Driving/Vehicle menu.
The state of the system is memorised when the
ignition is switched off.
Driver Attention Warning
The system triggers an alert when it detects that the driver has not taken a
break after two hours of driving at a speed above
43 mph (70
km/h).
This alert is issued via the display of a message
encouraging the driver to take a break,
accompanied by an audible signal.
If the driver does not follow this advice, the alert
is repeated hourly until the vehicle is stopped.
The system resets itself if one of the following
conditions is met:
–
With the engine running, the vehicle has been
stationary for more than 15 minutes.
– The ignition has been switched off for a few
minutes.
–
The driver's seat belt is unfastened and their
door is opened.
As soon as the speed of the vehicle drops below 43 mph (70 km/h), the
system goes into standby.
Driving time starts being counted again once
the speed reaches above 43
mph (70 km/h).
Driver Attention Warning by
Camera
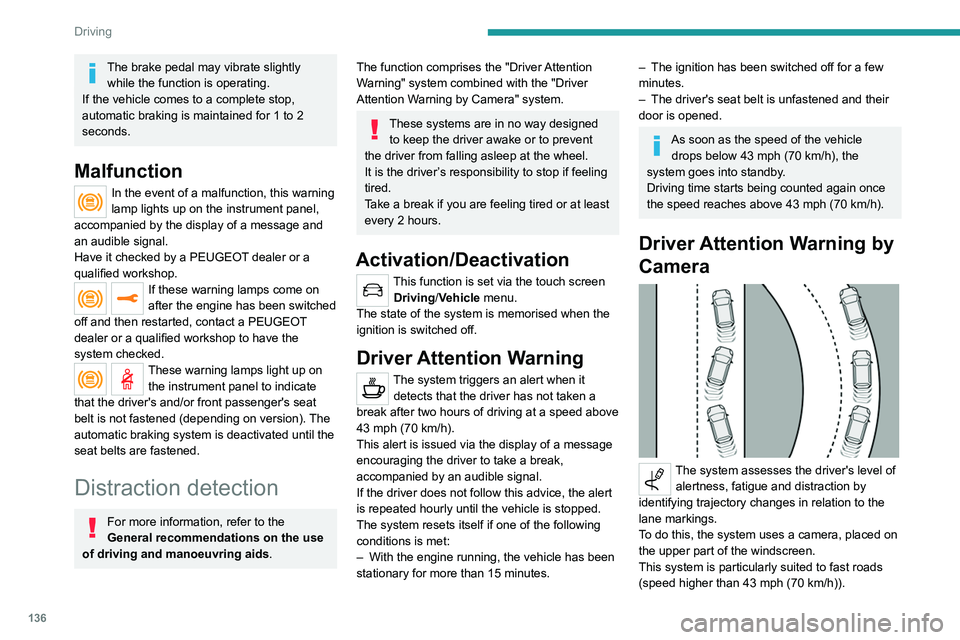
The system assesses the driver's level of alertness, fatigue and distraction by
identifying trajectory changes in relation to the
lane markings.
To do this, the system uses a camera, placed on
the upper part of the windscreen.
This system is particularly suited to fast roads
(speed higher than 43 mph (70
km/h)).
At a first alert level, the driver is warned by the
message "Be vigilant!", accompanied by an
audible signal.
After three first-level alerts, the system triggers
a further alert with the message " Dangerous
driving: take a break", accompanied by a more
pronounced audible signal.
In certain driving conditions (poor road
surface or strong winds), the system may
give alerts independent of the driver's level of
vigilance.
The following situations may interfere with the operation of the system or
prevent it from working:
– lane markings absent, worn, hidden (snow,
mud) or multiple (roadworks);
– close to the vehicle ahead (lane markings
not detected);
– roads that are narrow, winding, etc.
Active lane departure
warning system
For more information, refer to the
General recommendations on the use
of driving and manoeuvring aids .
The system corrects the vehicle's trajectory by
alerting the driver as soon as it detects a risk of
Page 146 of 292

144
Driving
Malfunction
In the event of a malfunction when
changing into reverse gear, this
warning lamp lights up on the instrument panel,
accompanied by the display of a message and
an audible signal (short beep).
Have it checked by a PEUGEOT dealer or a
qualified workshop.
Visiopark 1 - Visiopark 2
For more information, refer to the
General recommendations on the use
of driving and manoeuvring aids .
With the engine running, these systems allow
views of your vehicle’s close surroundings to be
displayed on the touch screen using one camera
for Visiopark 1 and two cameras for Visiopark 2.
The screen is divided into two parts with a
contextual view and a view from above the
vehicle in its close surroundings.
The parking sensors supplement the information
on the view from above the vehicle.
Various contextual views may be displayed:
–
Standard view
.
–
180° view
.
–
Zoom view
.
AUTO mode is activated by default.
In this mode, the system chooses the best
view
to display (standard or zoom).
You can change the type of view at any time
during a manoeuvre.
►
Press the button in the bottom left-hand
corner of the touch screen.
►
Select the type of view:
•
"Standard view".
•
"180° view".
•
"Zoom view".
•
"AUTO view".
The display is immediately updated with the type
of view selected.
The system status is not saved when the ignition
is switched off.Operating principle
Using one or two cameras, the close
surroundings of the vehicle are recorded whilst
manoeuvring at low speed.
An image from above your vehicle in its close
surroundings is reconstructed (represented
between the brackets) in real time and as the
manoeuvre progresses.
It facilitates the alignment of your vehicle when
parking and allows obstacles close to the vehicle
to be seen. It is automatically deleted if the
vehicle remains stationary for too long.
With Visiopark 2, the image is created using
both cameras, when going forward and when
reversing.
When the function is activated, it is possible
that the view from above is not displayed. If
the system is activated when the vehicle has
already moved, the view from above can be fully
displayed.
Visiopark 1
Rear view
To activate the camera located near the number
plate lamps, engage reverse gear and do not
exceed a speed of 6 mph (10 km/h).
The system is deactivated:
– Automatically, at speeds above approximately
6 mph (10 km/h),
– Automatically, if the tailgate is opened.
– Upon changing out of reverse gear (the image
remains displayed for 7 seconds).
– By pressing the white arrow in the upper-left
corner of the touch screen.
Page 149 of 292

147
Driving
6The rear vision views are similar to those for the
Visiopark 1 function.
For more information on the Visiopark
1
function, refer to the corresponding section.
Front and rear vision
With the engine running and the speed
below 12 mph (20 km/h), the system is
activated via the Driving/Vehicle touch screen
menu:
►
Select "
Visual parking assistance".
AUTO mode is displayed by default, with front
vision, if the gearbox is in neutral or with a
gear engaged, or with rear vision, if reverse is
engaged.
The system is deactivated:
–
Automatically above about 19 mph (30
km/h)
(the image disappears temporarily from 12 mph
(20
km/h)).
–
By pressing the white arrow in the upper-left
corner of the touch screen.
Standard view
The area in front of your vehicle is displayed on
the screen.
The orange lines 1 represent the width of your
vehicle, with the mirrors unfolded; their direction
changes according to the position of the steering
wheel.
The red line 2 represents a distance of 30 cm
from the front bumper; the two orange lines 3
and 4 represent 1 m and 2 m, respectively.
This view is available with AUTO mode or in the
view selection menu.
Zoom view
The camera records the vehicle's surroundings
during the manoeuvre in order to create a
view from above the front of the vehicle in its
near surroundings, allowing the vehicle to be
manoeuvred around obstacles nearby.
This view is available with AUTO mode or in the
view selection menu.
Obstacles may appear further away than
they actually are.
It is important to check the sides of the
vehicle during the manoeuvre, using the
mirrors.
The parking sensors also supplement the
information on the vehicle's surroundings.
Page 152 of 292

150
Driving
The manoeuvring status is indicated by these
symbols:
Manoeuvre in progress (green).
Manoeuvre cancelled or finished (red)
(the arrows indicate that the driver must
resume control of the vehicle).
The maximum speeds during manoeuvres are
indicated by these symbols:
75 mph or 7 km/h, for parking space entry.
53 mph or 5 km/h, for parking space exit.
During manoeuvring phases, the steering
wheel performs rapid turns: do not hold
the steering wheel or put your hands between
the spokes of the steering wheel. Watch out
for any objects that could interfere with the
manoeuvre (loose clothing, scarf, tie, etc.).
Risk of injury!
It is the driver's responsibility to constantly
monitor the traffic, especially vehicles coming
towards you.
The driver should check that no objects or
people are obstructing the vehicle’s path.
The images from the camera(s) displayed on the touch screen may be
distorted by the terrain.
In shady areas, or in inadequate sunlight
or lighting conditions, the image may be
darkened and with lower contrast. The manoeuvre can be permanently interrupted
at any time, either by the driver or automatically
by the system.
Interruption by the driver:
–
taking over control of the steering.
–
activating the direction indicator lamps on the
opposite side to that of the manoeuvre.
–
unfastening the driver's seat belt.
–
switching off the ignition.
Interruption by the system:
–
vehicle exceeding the speed limit of
5
mph (7 km/h) during parking space entry
manoeuvres, or 3 mph (5 km/h) during parking
space exit manoeuvres.
–
activation of anti-slip regulation on a slippery
road.
–
opening of a door or the boot.
–
engine stall.
–
system malfunction.
–
after 10 manoeuvres to enter or exit a parallel
parking space and after 7 manoeuvres to enter a
parking bay
.
Interrupting the manoeuvre automatically
deactivates the function.
The manoeuvre symbol is displayed in red,
accompanied by the " Manoeuvre cancelled"
message on the touch screen.
A message prompts the driver to take back
control of the vehicle.
The function is deactivated after a few seconds; this indicator lamp goes off and
the function returns to the initial display.
End of the parking space
entry or exit manoeuvre
The vehicle stops as soon as the manoeuvre is
completed.
The manoeuvre symbol is displayed in red,
accompanied by the message " Manoeuvre
completed" on the touch screen.
When the function is deactivated, this
indicator lamp goes off, accompanied by
an audible signal.
When entering a parking space, the driver may
be required to complete the manoeuvre.
Operating limits
– The system may suggest an inappropriate
parking space (parking prohibited, work in
progress with damaged road surface, location
alongside a ditch, etc.).
–
The system may indicate that a space has
been found but will not offer it because of a fixed
obstacle on the opposite side of the manoeuvre,
which would not allow the vehicle to follow a
trajectory required for parking.
–
The system may indicate that a space has
been found but the manoeuvre will not be
triggered, because the width of the lane is
insufficient.
–
The system is not designed for performing the
parking manoeuvre on a sharp bend.
–
The system does not detect spaces that
are much larger than the vehicle itself or that
are delimited by obstacles that are too low
(pavements, studs, etc.) or too thin (trees, posts,
wire fences, etc.).
– If the boot is heavily loaded, the tilt of the
vehicle towards the rear may interfere with the
distance measurements.
Do not use the function under the
following exterior conditions:
– Alongside a soft shoulder (e.g. ditch) or
quay or on the edge of a drop.
– When the road surface is slippery (e.g. ice).
If any of the following malfunctions
occurs, do not use the system:
– If a tyre is under-inflated.
– If one of the bumpers is damaged.
– If one of the cameras is faulty.
If the vehicle has undergone any of the
following modifications, do not use the
function:
– When carrying an object extending beyond
the dimensions of the vehicle (ladder on the
roof bars, bicycle carrier on the tailgate, etc.).
– With a non-approved towball in place.
– With snow chains fitted.
– When driving on a small-diameter or
"space-saver" type spare wheel.
– When the wheels fitted are a different size
from the original ones.
– After modifying one or both bumpers
(added protection).
Page 160 of 292
158
Practical information
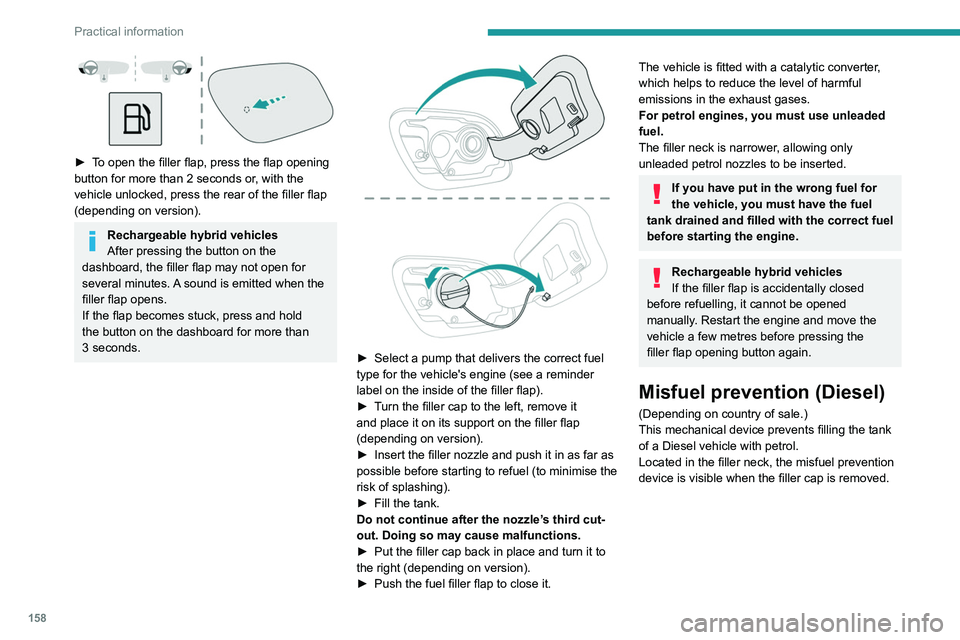
► To open the filler flap, press the flap opening
button for more than 2 seconds or, with the
vehicle unlocked, press the rear of the filler flap
(depending on version).
Rechargeable hybrid vehicles
After pressing the button on the
dashboard, the filler flap may not open for
several minutes. A sound is emitted when the
filler flap opens.
If the flap becomes stuck, press and hold
the button on the dashboard for more than
3
seconds.
► Select a pump that delivers the correct fuel
type for the vehicle's engine (see a reminder
label on the inside of the filler flap).
►
T
urn the filler cap to the left, remove it
and place it on its support on the filler flap
(depending on version).
►
Insert the filler nozzle and push it in as far as
possible before starting to refuel (to minimise the
risk of splashing).
►
Fill the tank.
Do not continue after the nozzle’
s third cut-
out. Doing so may cause malfunctions.
►
Put the filler cap back in place and turn it to
the right (depending on version).
►
Push the fuel filler flap to close it.
The vehicle is fitted with a catalytic converter,
which helps to reduce the level of harmful
emissions in the exhaust gases.
For petrol engines, you must use unleaded
fuel.
The filler neck is narrower, allowing only
unleaded petrol nozzles to be inserted.
If you have put in the wrong fuel for
the vehicle, you must have the fuel
tank drained and filled with the correct fuel
before starting the engine.
Rechargeable hybrid vehicles
If the filler flap is accidentally closed
before refuelling, it cannot be opened
manually. Restart the engine and move the
vehicle a few metres before pressing the
filler
flap opening button again.
Misfuel prevention (Diesel)
(Depending on country of sale.)
This mechanical device prevents filling the tank
of a Diesel vehicle with petrol.
Located in the filler neck, the misfuel prevention
device is visible when the filler cap is removed.
Operation
When a petrol filler nozzle is introduced into the
fuel filler neck of a Diesel vehicle, it comes into
contact with the flap. The system remains closed
and prevents filling.
Do not persist but introduce a Diesel type
filler nozzle.
The misfuel prevention device does not prevent filling with a jerrycan, regardless
of the fuel type.
Travelling abroad
As Diesel fuel pump nozzles may be
different in other countries, the presence
of the misfuel prevention device may make
refuelling impossible.
Before travelling abroad, it is advisable to
check with a PEUGEOT dealer if the vehicle
is suitable for the distribution equipment of the
countries visited.
Page 162 of 292
160
Practical information
When washing
Before washing the vehicle, always
check that the charging flap is closed
correctly.
Never wash the vehicle while the battery is
on charge.
High-pressure washing
To avoid damaging the electrical
components, it is expressly prohibited to
use high-pressure washing in the engine
compartment or under the body.
Do not use a pressure greater than 80 bar
when washing the bodywork.
Never allow water or dust to enter the
connector or charging nozzle - risk of
electrocution or fire!
Never connect / disconnect the charging
nozzle or cable with wet hands - risk of
electrocution!
Traction battery
The Li-ion (Lithium-ion) traction battery stores
the electrical energy needed to propel the
vehicle.
It is located under the rear seats.
The traction battery's range varies depending
on the type of driving, the route, the use of
thermal comfort equipment and the ageing of its
components.
The traction battery ageing depends on several factors, such as climatic
conditions and the distance travelled.
In the event of damage to the traction
battery
It is strictly prohibited to work on the vehicle
yourself.
Do not touch liquids coming from the traction
battery; in the event of contact between the
skin and these products, wash abundantly
with water and contact a doctor as soon as
possible.
Charging flap
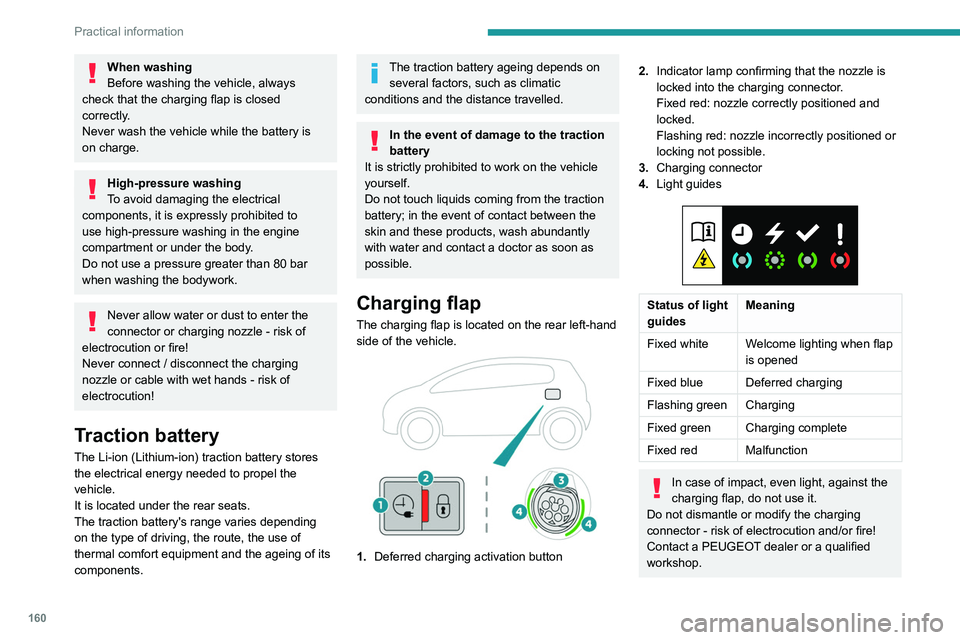
The charging flap is located on the rear left-hand
side of the vehicle.
1. Deferred charging activation button
2.Indicator lamp confirming that the nozzle is
locked into the charging connector.
Fixed red: nozzle correctly positioned and
locked.
Flashing red: nozzle incorrectly positioned or
locking not possible.
3. Charging connector
4. Light guides
Status of light
guides Meaning
Fixed white Welcome lighting when flap
is opened
Fixed blue Deferred charging
Flashing green Charging
Fixed green Charging complete
Fixed red Malfunction
In case of impact, even light, against the
charging flap, do not use it.
Do not dismantle or modify the charging
connector - risk of electrocution and/or fire!
Contact a PEUGEOT dealer or a qualified
workshop.
Charging cables, sockets
and chargers
The traction battery can be charged using
several different types of cables.
The charging cable supplied with the vehicle is
compatible with the electrical installations of the
country of sale. If you are travelling abroad, refer
to the following tables to check the compatibility
of local electrical installations with the charging
cable.
Page 168 of 292
166
Practical information
4.The weight of the control unit must not be
borne by the electrical socket, plug and
cables.
5. Never use this charging cable if it is
defective or in any way damaged.
6. Never attempt to repair or open this
charging cable. It contains no repairable
parts - replace the charging cable if it is
damaged.
7. Never immerse this charging cable in water.
8. Never use this charging cable with an
extension cable, a multi-plug socket, a
conversion adaptor or on a damaged
electrical socket.
9. Do not unplug the plug from the wall as a
means of stopping charging.
10. Immediately stop charging, by locking and
then unlocking the vehicle using the remote
control key, if the charging cable or wall
socket feel burning hot to the touch.
11 . This charging cable includes components
liable to cause electrical arcing or sparks.
Do not expose to flammable vapours.
12. Only use this charging cable with PEUGEOT
vehicles.
13. Never plug the cable into the wall socket (or
unplug it) with wet hands.
14. Do not force the connector if it is locked into
the vehicle.Charging the traction
battery (Rechargeable
hybrid)
For a full charge, follow the charging procedure
without interrupting it, until it stops automatically.
Charging may be performed either immediately
(by default) or deferred.
Deferred charging is set via the touch
screen or the
MYPEUGEOT APP
application.
When the vehicle is connected, the following
information is displayed on the instrument panel:
–
Status of the battery (%).
–
Remaining range (miles or km).
–
Estimated charging time (calculation may take
a few seconds).
–
Charging speed (kW/h).
After the instrument panel has been put into
standby mode, this information can be displayed
again by unlocking the vehicle or opening a door
.
It is also possible to monitor the charging
progress using the MYPEUGEOT APP
application.
For more information on Remote functions,
refer to the corresponding section.
Lounge mode
When the vehicle is connected, it is
possible to switch on the ignition and use
certain functions such as the audio and
telematics system and the air conditioning
system for several hours.
Vehicle immobilised for 1 to 12
months
Discharge the traction battery down to 2 or
3 bars on the charge level indicator on the
instrument panel.
Do not connect the charging cable.
Always park the vehicle in a place with
temperatures between -10°C and 30°C
(parking in a place with extreme temperatures
can damage the traction battery).
Refer to the Accessory battery
(Rechargeable hybrid) section for the
battery disconnection procedure.
Precautions
Rechargeable hybrid vehicles have
been developed in accordance with the
recommendations for maximum electromagnetic
field limits established by the ICNIRP
(International Commission on Non-Ionizing
Radiation Protection - 1998 Guidelines).
Wearers of pacemakers or equivalent
devices should consult a doctor to
enquire about any applicable precautionary
measures, or contact the manufacturer of their
implanted electronic medical device to check that
it is guaranteed to operate in an environment
compliant with the ICNIRP guidelines.
If in doubt , during charging, do not remain
inside or near the vehicle, near the charging
cable or the charging unit, even for a short time.
Before charging
Depending on the context:
► Have a professional check that the
electrical system to be used complies with
applicable standards and is compatible with
the vehicle.
► Have a professional electrician install
a dedicated domestic power socket or
accelerated charging unit (Wallbox)
compatible with the vehicle.
Use the charging cable supplied with the
vehicle.
For more information, contact a PEUGEOT
dealer or a qualified workshop.
(During charging)
As a safety measure, the engine will
not start if the charging cable is plugged into
the connector on the vehicle. A warning is
displayed on the instrument panel.
While charging is in progress, unlocking the
vehicle will cause the charging to stop.
If no action is taken on one of the openings
(door or boot) or on the charging nozzle, the
vehicle will lock again after 30 seconds and
charging will resume automatically.
Never work under the bonnet:
– Some areas remain very hot, even an hour
after charging ends - risk of burns!