2021 PEUGEOT 508 charging
[x] Cancel search: chargingPage 169 of 292
167
Practical information
7If in doubt, during charging, do not remain
inside or near the vehicle, near the charging
cable or the charging unit, even for a short time.
Before charging
Depending on the context:
►
Have a professional check that the
electrical system to be used complies with
applicable standards and is compatible with
the vehicle.
►
Have a professional electrician install
a dedicated domestic power socket or
accelerated charging unit (W
allbox)
compatible with the vehicle.
Use the charging cable supplied with the
vehicle.
For more information, contact a PEUGEOT
dealer or a qualified workshop.
(During charging)
As a safety measure, the engine will
not start if the charging cable is plugged into
the connector on the vehicle. A warning is
displayed on the instrument panel.
While charging is in progress, unlocking the
vehicle will cause the charging to stop.
If no action is taken on one of the openings
(door or boot) or on the charging nozzle, the
vehicle will lock again after 30 seconds and
charging will resume automatically.
Never work under the bonnet:
–
Some areas remain very hot, even an hour
after charging ends - risk of burns!
– The fan may start at any time - risk of cuts
or strangulation!
After charging
Check that the charging flap is closed.
Do not leave the cable connected to the
domestic power socket - risk of short-circuit
or electrocution in the event of contact with or
immersion in water!
Charging procedure
Connection
► Before charging, check that the gear selector
is in mode P and the ignition is off, otherwise
charging is impossible.
►
Press on the rear of the charging flap to open
it and check that there are no foreign bodies on
the vehicle's charging connector
.
The light guides in the flap come on white.
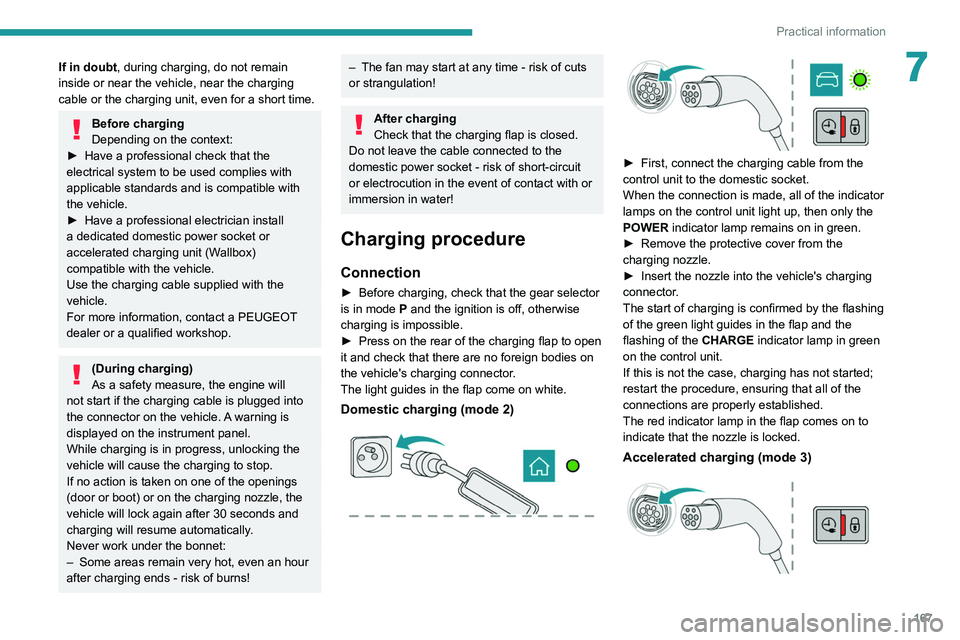
Domestic charging (mode 2)
► First, connect the charging cable from the
control unit to the domestic socket.
When the connection is made, all of the indicator
lamps on the control unit light up, then only the
POWER
indicator lamp remains on in green.
►
Remove the protective cover from the
charging nozzle.
►
Insert the nozzle into the vehicle's charging
connector
.
The start of charging is confirmed by the flashing
of the green light guides in the flap and the
flashing of the
CHARGE indicator lamp in green
on the control unit.
If this is not the case, charging has not started;
restart the procedure, ensuring that all of the
connections are properly established.
The red indicator lamp in the flap comes on to
indicate that the nozzle is locked.
Accelerated charging (mode 3)
Page 170 of 292
168
Practical information
► Follow the accelerated charging unit
(W allbox) user instructions.
►
Remove the protective cover from the
charging nozzle.
►
Insert the nozzle into the vehicle's charging
connector
.
The start of charging is confirmed by the flashing
of the green light guides in the flap.
If this is not the case, charging has not
started; restart the procedure ensuring that all
connections are properly established.
The red indicator lamp in the flap comes on to
indicate that the nozzle is locked.
Disconnection
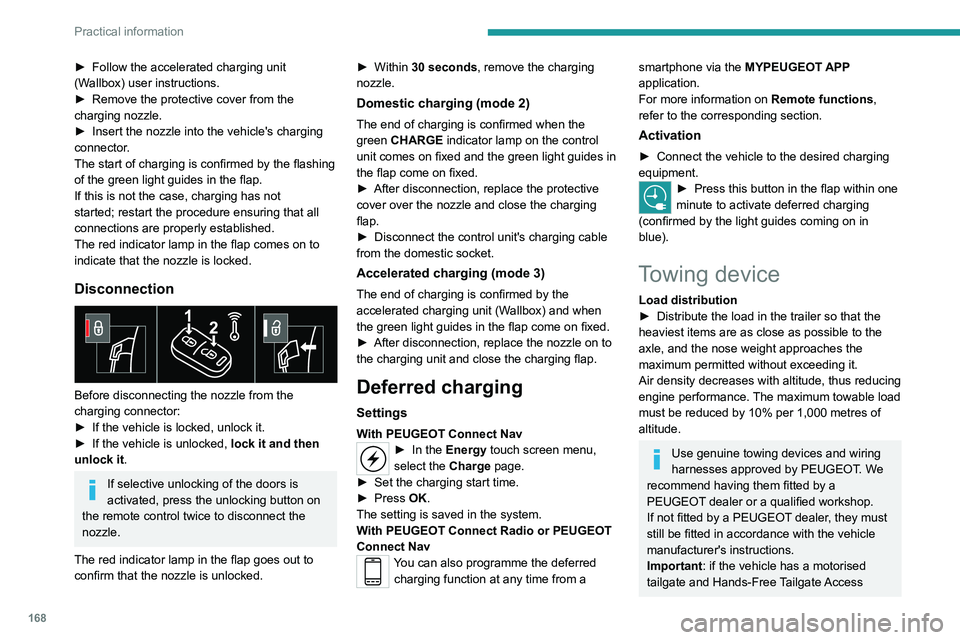
Before disconnecting the nozzle from the
charging connector:
►
If the vehicle is locked, unlock it.
►
If the vehicle is unlocked, lock it and then
unlock it .
If selective unlocking of the doors is
activated, press the unlocking button on
the remote control twice to disconnect the
nozzle.
The red indicator lamp in the flap goes out to
confirm that the nozzle is unlocked. ►
Within
30 seconds, remove the charging
nozzle.
Domestic charging (mode 2)
The end of charging is confirmed when the
green CHARGE indicator lamp on the control
unit comes on fixed and the green light guides in
the flap come on fixed.
►
After disconnection, replace the protective
cover over the nozzle and close the charging
flap.
►
Disconnect the control unit's charging cable
from the domestic socket.
Accelerated charging (mode 3)
The end of charging is confirmed by the
accelerated charging unit (Wallbox) and when
the green light guides in the flap come on fixed.
►
After disconnection, replace the nozzle on to
the charging unit and close the charging flap.
Deferred charging
Settings
With PEUGEOT Connect Nav► In the Energy touch screen menu,
select the Charge page.
►
Set the charging start time.
►
Press
OK.
The setting is saved in the system.
With PEUGEOT Connect Radio or PEUGEOT
Connect Nav
You can also programme the deferred charging function at any time from a
smartphone via the MYPEUGEOT APP
application.
For more information on Remote functions,
refer to the corresponding section.
Activation
► Connect the vehicle to the desired charging
equipment.
► Press this button in the flap within one
minute to activate deferred charging
(confirmed by the light guides coming on in
blue).
Towing device
Load distribution
► Distribute the load in the trailer so that the
heaviest items are as close as possible to the
axle, and the nose weight approaches the
maximum permitted without exceeding it.
Air density decreases with altitude, thus reducing
engine performance.
The maximum towable load
must be reduced by 10% per 1,000
metres of
altitude.
Use genuine towing devices and wiring
harnesses approved by PEUGEOT. We
recommend having them fitted by a
PEUGEOT dealer or a qualified workshop.
If not fitted by a PEUGEOT dealer, they must
still be fitted in accordance with the vehicle
manufacturer's instructions.
Important: if the vehicle has a motorised
tailgate and Hands-Free Tailgate Access
Page 175 of 292
173
Practical information
7Energy economy mode
This system manages the duration of use of
certain functions, in order to conserve a sufficient
level of charge in the battery with the ignition off.
After switching off the engine and for a maximum
cumulative period of around 30 minutes, you can
continue to use functions such as the audio and
telematics system, dipped beam headlamps or
courtesy lamps.
Selecting the mode
A confirmation message is displayed when
energy economy mode is entered, and the active
functions are placed on standby.
If a telephone call is in progress at the
time, it will be maintained for around 10
minutes via the audio system’s hands-free
system.
Exiting the mode
These functions are automatically reactivated the
next time the vehicle is used.
To restore the use of these functions
immediately, start the engine and let it run:
–
For less than 10 minutes, to use the
equipment for approximately 5 minutes.
–
For more than 10 minutes, to use the
equipment for approximately 30 minutes.
Let the engine run for the specified duration to
ensure that the battery charge is sufficient.
To recharge the battery, avoid repeatedly or
continuously restarting the engine.
A flat battery prevents the engine from starting.
For more information on the 12
V battery,
refer to the corresponding section.
Load reduction mode
This system manages the use of certain
functions according to the level of charge
remaining in the battery.
When the vehicle is being driven, the load
reduction function temporarily deactivates certain
functions, such as the air conditioning and the
heated rear screen.
The deactivated functions are reactivated
automatically as soon as conditions permit.
Bonnet
For more information on the Active bonnet,
refer to the corresponding section.
Stop & Start
Before doing anything under the bonnet,
you must switch off the ignition to avoid any
risk of the engine restarting automatically.
Take care with objects or clothing that could
be caught in the blades of the cooling fan
or in certain moving components - risk of
strangulation and serious injury!
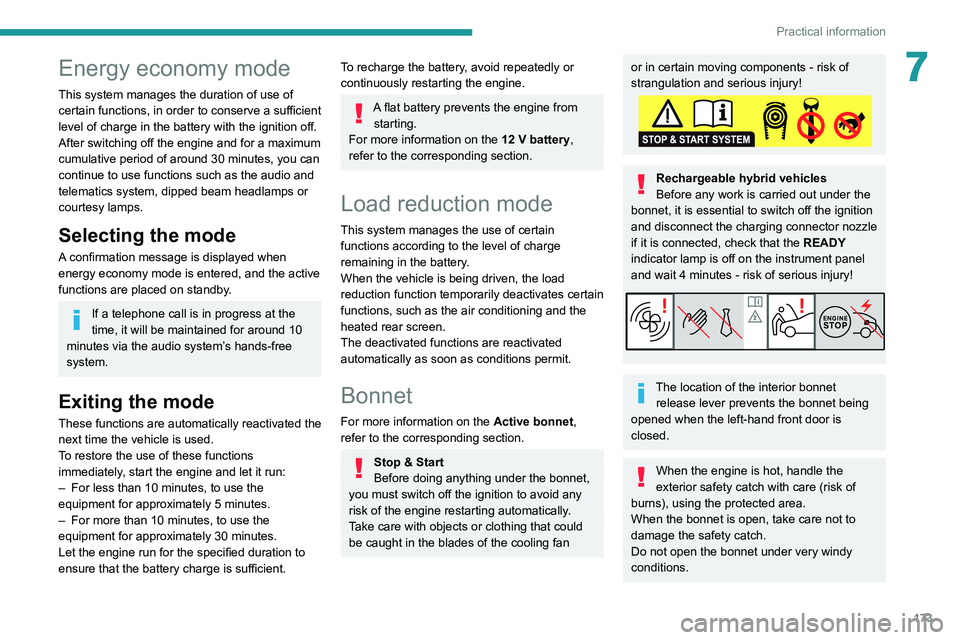
Rechargeable hybrid vehicles
Before any work is carried out under the
bonnet, it is essential to switch off the ignition
and disconnect the charging connector nozzle
if it is connected, check that the READY
indicator lamp is off on the instrument panel
and wait 4 minutes - risk of serious injury!
The location of the interior bonnet release lever prevents the bonnet being
opened when the left-hand front door is
closed.
When the engine is hot, handle the
exterior safety catch with care (risk of
burns), using the protected area.
When the bonnet is open, take care not to
damage the safety catch.
Do not open the bonnet under very windy
conditions.
Page 196 of 292
194
In the event of a breakdown
Take used remote control batteries and
vehicle batteries to a special collection point.
Protect your eyes and face before
handling the battery.
All operations on the battery must be carried
out in a well ventilated area and away from
naked flames and sources of sparks, to avoid
any risk of explosion or fire.
Wash your hands afterwards.
Accessing the battery
The battery is located under the bonnet.
For access to the (+) terminal:
► Release the bonnet by pulling the internal
release lever, then the external safety catch.
► Raise the bonnet.
(+) Positive terminal.
This terminal has a quick-release clamp.
(-) Negative terminal.
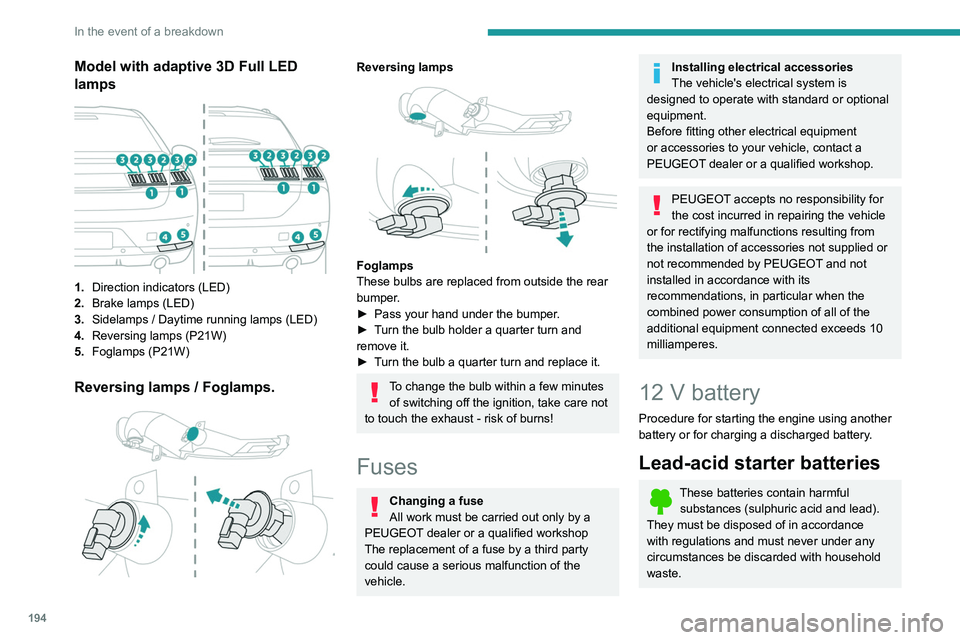
Model with adaptive 3D Full LED
lamps
1. Direction indicators (LED)
2. Brake lamps (LED)
3. Sidelamps / Daytime running lamps (LED)
4. Reversing lamps (P21W)
5. Foglamps (P21W)
Reversing lamps / Foglamps.
Reversing lamps
Foglamps
These bulbs are replaced from outside the rear
bumper.
►
Pass your hand under the bumper
.
►
T
urn the bulb holder a quarter turn and
remove it.
►
T
urn the bulb a quarter turn and replace it.
To change the bulb within a few minutes of switching off the ignition, take care not
to touch the exhaust - risk of burns!
Fuses
Changing a fuse
All work must be carried out only by a
PEUGEOT dealer or a qualified workshop
The replacement of a fuse by a third party
could cause a serious malfunction of the
vehicle.
Installing electrical accessories
The vehicle's electrical system is
designed to operate with standard or optional
equipment.
Before fitting other electrical equipment
or accessories to your vehicle, contact a
PEUGEOT dealer or a qualified workshop.
PEUGEOT accepts no responsibility for
the cost incurred in repairing the vehicle
or for rectifying malfunctions resulting from
the installation of accessories not supplied or
not recommended by PEUGEOT and not
installed in accordance with its
recommendations, in particular when the
combined power consumption of all of the
additional equipment connected exceeds 10
milliamperes.
12 V battery
Procedure for starting the engine using another
battery or for charging a discharged battery.
Lead-acid starter batteries
These batteries contain harmful substances (sulphuric acid and lead).
They must be disposed of in accordance
with regulations and must never under any
circumstances be discarded with household
waste.
Page 198 of 292
196
In the event of a breakdown
Before disconnecting the battery:
► Close all openings (doors, boot, windows,
roof).
► Switch off all electricity-consuming devices
(audio system, wipers, lamps, etc.).
► Switch off the ignition and wait for 4 minutes.
After accessing the battery, it is only necessary
to disconnect the (+) terminal.
Quick-release terminal clamp
Disconnecting the (+) terminal
► Depending on equipment, lift the plastic cover
on the (+) terminal.
► Raise lever A fully to release clamp B.
► Remove clamp B by lifting it off.
► Refit the plastic cover to the (+) terminal, if
the vehicle has one.
►
Allow the engine to run for at least
30
minutes, with the vehicle stationary, so that
the battery reaches an adequate state of charge.
Driving immediately without having
reached a sufficient level of charge may
affect some of the vehicle's functionalities.
Automatic gearbox
Never try to start the engine by pushing
the vehicle.
Charging the battery using a
battery charger
For optimum service life of the battery, it is
essential to maintain an adequate state of
charge.
In some circumstances, it may be necessary to
charge the battery:
–
When using the vehicle mainly for short
journeys.
–
If the vehicle is to be taken off the road for
several weeks.
Consult a PEUGEOT
dealer or a qualified
workshop.
To charge the vehicle's battery yourself, use only a charger compatible with
lead-acid batteries with a nominal voltage of
12
V.
Follow the instructions provided by the
manufacturer of the charger.
Never reverse polarities.
It is not necessary to disconnect the
battery.
►
Switch the ignition off.
►
Switch off all electrical consumers (audio
system, lighting, wipers, etc.).
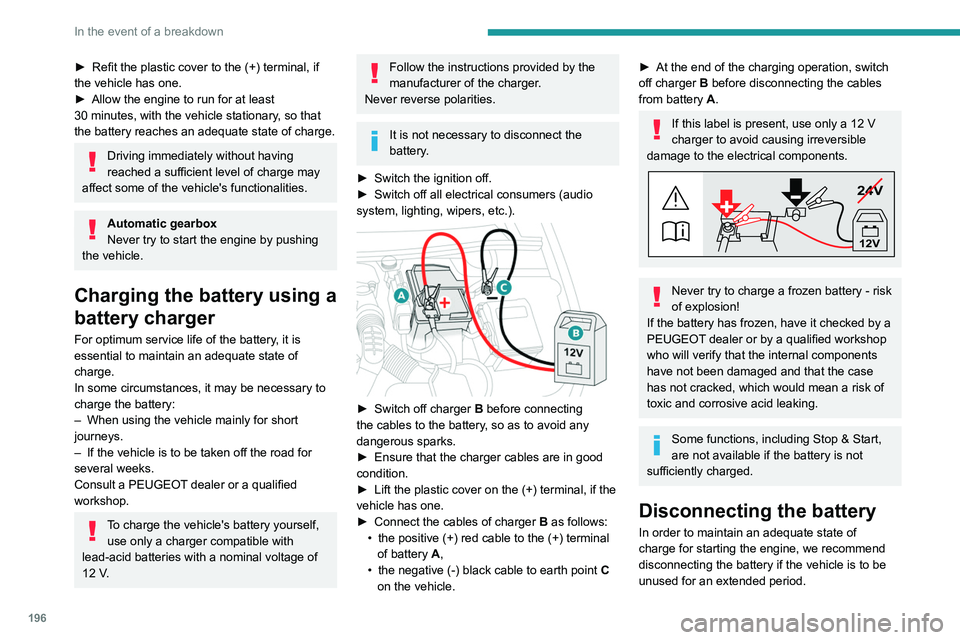
► Switch off charger B before connecting
the cables to the battery, so as to avoid any
dangerous sparks.
►
Ensure that the charger cables are in good
condition.
►
Lift the plastic cover on the (+) terminal, if the
vehicle has one.
►
Connect the cables of charger B
as follows:
•
the positive (+) red cable to the (+) terminal
of battery
A,
•
the negative (-) black cable to earth point C
on the vehicle.
► At the end of the charging operation, switch
off charger B
before disconnecting the cables
from battery A.
If this label is present, use only a 12 V
charger to avoid causing irreversible
damage to the electrical components.
24V
12V
Never try to charge a frozen battery - risk
of explosion!
If the battery has frozen, have it checked by a
PEUGEOT dealer or by a qualified workshop
who will verify that the internal components
have not been damaged and that the case
has not cracked, which would mean a risk of
toxic and corrosive acid leaking.
Some functions, including Stop & Start,
are not available if the battery is not
sufficiently charged.
Disconnecting the battery
In order to maintain an adequate state of
charge for starting the engine, we recommend
disconnecting the battery if the vehicle is to be
unused for an extended period.
Page 200 of 292
198
In the event of a breakdown
The batteries contain harmful substances (sulphuric acid and lead).
They must be disposed of in accordance
with regulations and must never under any
circumstances be discarded with household
waste.
Take used remote control batteries and
vehicle batteries to a special collection point.
Protect your eyes and face before
handling batteries.
All operations on the batteries must be carried
out in a well ventilated area and away from
naked flames and sources of sparks, so as to
avoid the risk of explosion or fire.
Wash your hands afterwards.
Replacing the batteries
Contact a PEUGEOT dealer or a
qualified workshop.
Jump-starting another vehicle
Do not start or jump start another vehicle
from the vehicle’s batteries.
Accessing the batteries
Front
The front battery is located under the bonnet.
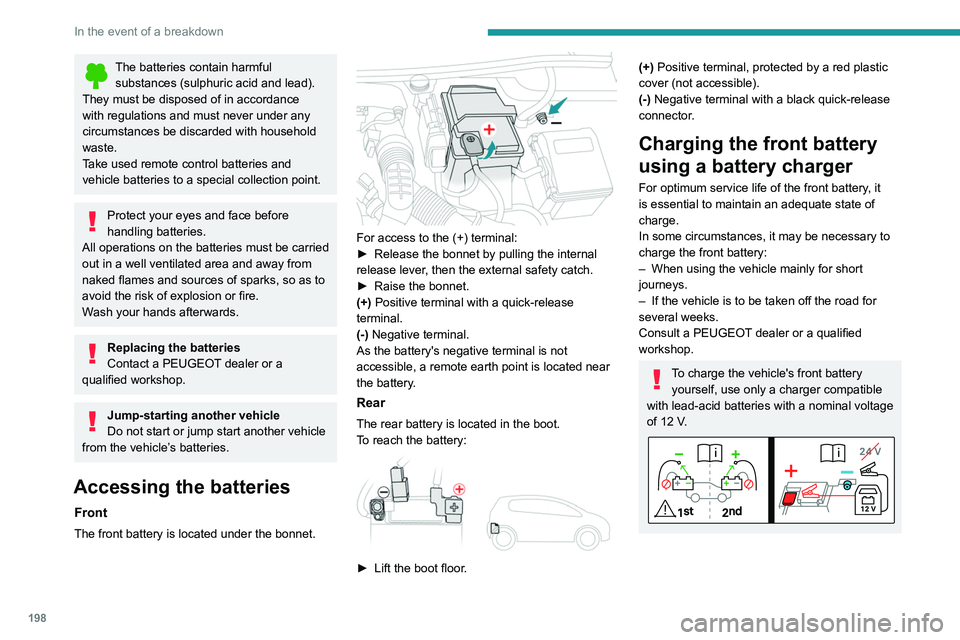
For access to the (+) terminal:
► Release the bonnet by pulling the internal
release lever
, then the external safety catch.
►
Raise the bonnet.
(+)
Positive terminal with a quick-release
terminal.
(-) Negative terminal.
As the battery's negative terminal is not
accessible, a remote earth point is located near
the battery.
Rear
The rear battery is located in the boot.
To reach the battery:
► Lift the boot floor .
(+) Positive terminal, protected by a red plastic
cover (not accessible).
(-) Negative terminal with a black quick-release
connector.
Charging the front battery
using a battery charger
For optimum service life of the front battery, it
is essential to maintain an adequate state of
charge.
In some circumstances, it may be necessary to
charge the front battery:
–
When using the vehicle mainly for short
journeys.
–
If the vehicle is to be taken off the road for
several weeks.
Consult a PEUGEOT
dealer or a qualified
workshop.
To charge the vehicle's front battery yourself, use only a charger compatible
with lead-acid batteries with a nominal voltage
of 12
V.
Page 201 of 292
199
In the event of a breakdown
8Follow the instructions provided by the
manufacturer of the charger.
Never reverse polarities.
It is not necessary to disconnect the
battery.
►
Switch the ignition off.
►
Switch off all electrical consumers (audio
system, lighting, wipers, etc.).
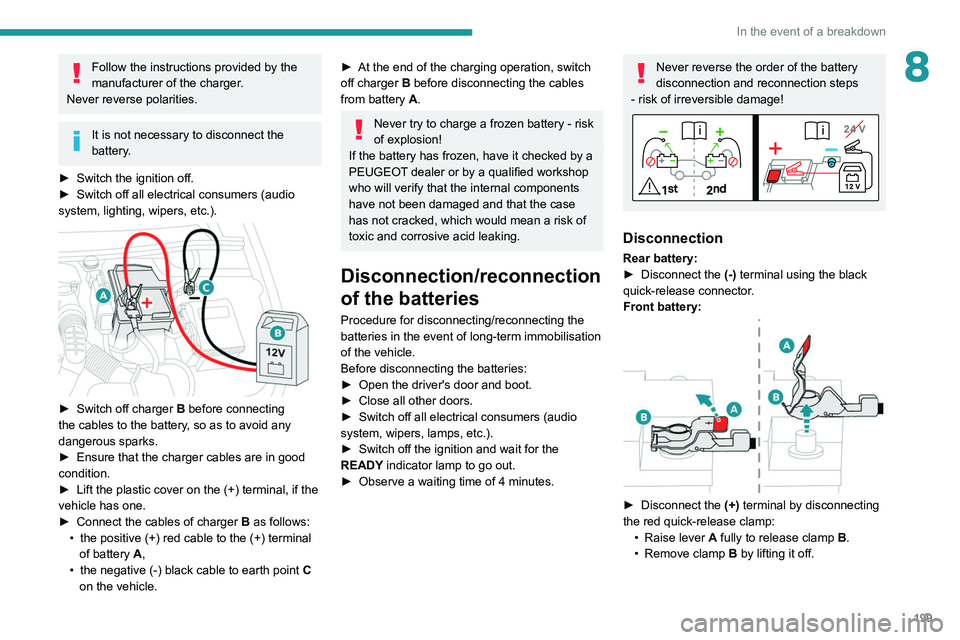
► Switch off charger B before connecting
the cables to the battery, so as to avoid any
dangerous sparks.
►
Ensure that the charger cables are in good
condition.
►
Lift the plastic cover on the (+) terminal, if the
vehicle has one.
►
Connect the cables of charger B
as follows:
•
the positive (+) red cable to the (+) terminal
of battery
A,
•
the negative (-) black cable to earth point C
on the vehicle.
► At the end of the charging operation, switch
off charger B
before disconnecting the cables
from battery A.
Never try to charge a frozen battery - risk
of explosion!
If the battery has frozen, have it checked by a
PEUGEOT dealer or by a qualified workshop
who will verify that the internal components
have not been damaged and that the case
has not cracked, which would mean a risk of
toxic and corrosive acid leaking.
Disconnection/reconnection
of the batteries
Procedure for disconnecting/reconnecting the
batteries in the event of long-term immobilisation
of the vehicle.
Before disconnecting the batteries:
►
Open the driver's door and boot.
►
Close all other doors.
►
Switch off all electrical consumers (audio
system, wipers, lamps, etc.).
►
Switch off the ignition and wait for the
READY
indicator lamp to go out.
►
Observe a waiting time of 4 minutes.
Never reverse the order of the battery
disconnection and reconnection steps
- risk of irreversible damage!
Disconnection
Rear battery:
► Disconnect the (-)
terminal using the black
quick-release connector.
Front battery:
► Disconnect the (+) terminal by disconnecting
the red quick-release clamp: •
Raise lever
A
fully to release clamp
B
.
•
Remove clamp
B
by lifting it off.
Page 236 of 292
234
PEUGEOT Connect Nav
Activate or deactivate:
–
"No data sharing except for company
vehicles".
–
"Only data sharing "
–
"Sharing data and vehicle position "
Settings specific to
connected navigation
Press Navigation to display the main
page.
Press the "MENU" button to access the
secondary page.
Select "Settings".
Select the "Map” tab.
Activate or deactivate: – "Allow declaration of danger zones ".
–
"Guidance to final destination on foot ".
These settings must be configured for each
profile.
Press “OK” to confirm your selection.
Select the "Alerts” tab.
Activate or deactivate:
–
"Advise of car park nearby ".
–
"Filling station alert ".
–
“Risk areas alert " then press the warning icon
(triangle) to configure the alerts.
– "Give an audible warning ".
– "Advise proximity of POI 1 ".
–
"Advise proximity of POI 2 ".
Press “OK” to confirm your selection.
The "Notifications", located in the upper
bar, can be accessed at any time.
Danger zone alerts may or may not be
displayed, depending on the applicable
legislation and subscription to the
corresponding service.
When "TOMTOM TRAFFIC” appears, the
services are available.
The services offered with connected navigation are as follows.
A Connected Services pack:
–
Weather,
–
Filling stations,
–
Car park,
–
T
raffic,
–
POI local search.
A
Danger area pack (optional).
Declaration: "Risk areas
alert"
To send information about danger zones, select the option:Allow declaration of
danger zones
Press Navigation to display the main
page.
Press the "Declare a new danger zone"
button located in the side bars or the
upper bar of the touch screen (depending on
equipment).
Select the "Type” option to select the type
of "Danger area".
Select the ""Speed" option and enter it
using the virtual keypad.
Press "OK" to save and send the
information.
Displaying fuel information
Press Navigation to display the main
page.
Press this button to display the list of
services.
Press "POI on map" to display the list
of points of interest.
Press one of the buttons to search for
"Stations".
Activate/deactivate "Stations".
Press this button to display a secondary
page.
Select the "Settings” tab.
Select the desired fuel.
Press "OK" to save.
Displaying charging station
details
Press Navigation to display the main
page.
Press this button to display the list of
services.
Press "POI on map" to display the list
of points of interest.
Press one of the buttons to search for
"Stations".
Activate/deactivate "Stations".
Press this button to display a secondary
page.
Select the "Settings" tab.
Select the desired connector type.
Press "OK" to save.
Displaying weather
information
Press Navigation to display the main
page.
Press this button to display the list of
services.
Select "View map".
Select "Weather".