2021 PEUGEOT 5008 neutral
[x] Cancel search: neutralPage 188 of 292
186
Practical information
Store AdBlue® out of the reach of
children, in its original container.
Procedure
Before starting the top-up procedure, ensure that
the vehicle is parked on a flat and level surface.
In wintry conditions, ensure that the temperature
of the vehicle is above -11°C. Otherwise the
AdBlue
® may be frozen and so cannot be poured
into the tank. Park the vehicle in a warmer area
for a few hours to allow the top-up to be carried
out.
Never pour the AdBlue® into the Diesel
fuel tank.
If any AdBlue® is splashed, or if there are
any spillages on the bodywork, rinse
immediately with cold water or wipe with a
damp cloth.
If the fluid has crystallised, clean it off using a
sponge and hot water.
Important: in the event of a top-up after
an AdBlue breakdown, you must wait
about 5
minutes before switching on the
ignition, without opening the driver's door,
unlocking the vehicle or bringing the
electronic key into the passenger
compartment.
Switch on the ignition, then wait for 10
seconds before starting the engine. ►
Press the "
START/STOP" button to switch off
the engine.
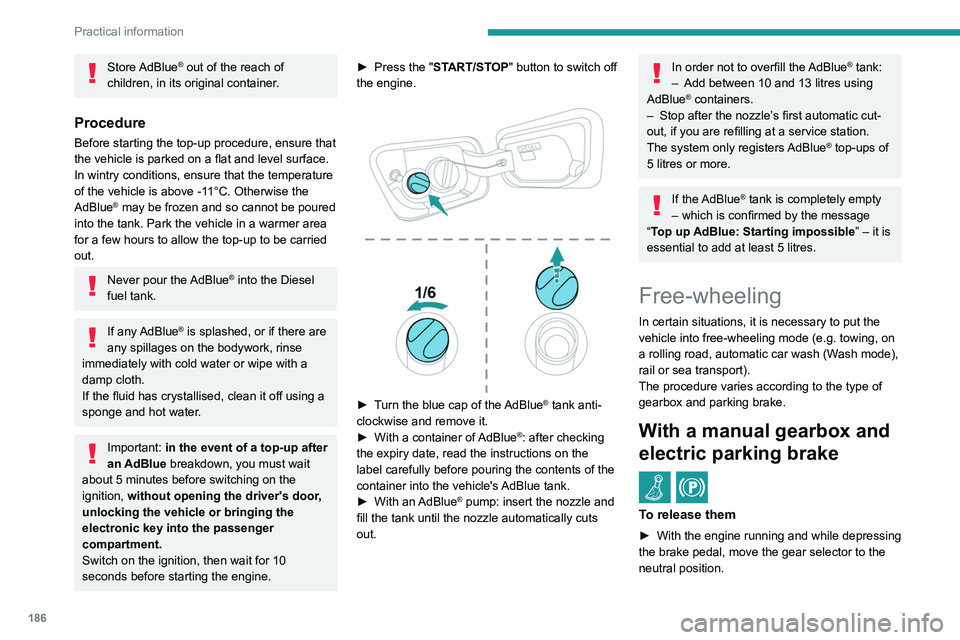
► Turn the blue cap of the AdBlue® tank anti-
clockwise and remove it.
►
With a container of
AdBlue
®: after checking
the expiry date, read the instructions on the
label carefully before pouring the contents of the
container into the vehicle's AdBlue tank.
►
With an
AdBlue® pump: insert the nozzle and
fill the tank until the nozzle automatically cuts
out.
In order not to overfill the AdBlue® tank:
–
Add between 10 and 13 litres using
AdBlue® containers.
–
Stop after the nozzle’ s first automatic cut-
out, if you are refilling at a service station.
The system only registers AdBlue
® top-ups of
5
litres or more.
If the AdBlue® tank is completely empty
– which is confirmed by the message
“Top up
AdBlue: Starting impossible ” – it is
essential to add at least 5 litres.
Free-wheeling
In certain situations, it is necessary to put the
vehicle into free-wheeling mode (e.g. towing, on
a rolling road, automatic car wash (Wash mode),
rail or sea transport).
The procedure varies according to the type of
gearbox and parking brake.
With a manual gearbox and
electric parking brake
/
To release them
► With the engine running and while depressing
the brake pedal, move the gear selector to the
neutral position.
► While depressing the brake pedal, switch off
the ignition.
► Release the brake pedal, then switch on the
ignition again.
► While depressing the brake pedal, press the
control lever to release the parking brake.
► Release the brake pedal, then switch off the
ignition.
Reverting to normal operation
► While depressing the brake pedal, restart the
engine.
With an automatic gearbox
and electric parking brake
/
Release procedure
► With the vehicle stationary and the engine
running, select mode N and switch off the
ignition.
Within 5 seconds:
► Switch on the ignition again.
► While depressing the brake pedal, move the
push selector forwards or backwards to confirm
mode N.
► While depressing the brake pedal, press the
control lever to release the parking brake.
► Release the brake pedal, switch off the
ignition.
Page 190 of 292
188
Practical information
the controls located on the centre console. Be
vigilant!
Bodywork
High-gloss paint
Do not use abrasive products, solvents,
petrol or oil to clean the bodywork.
Never use an abrasive sponge to clean
stubborn stains - risk of scratching the
paintwork!
Do not apply polish in strong sunshine, or to
plastic or rubber parts.
Use a soft cloth and soapy water or a pH
neutral product.
Gently wipe the bodywork with a clean
microfibre cloth.
Apply polish with the vehicle clean and dry.
Comply with the instructions for use stated on
the product.
Textured paint
This type of paint reacts under the effect of
light, through variations in appearance and
finish that highlight the lines and contours of the
vehicle. Its varnish is enriched with particles that
remain visible and create a unique satin effect
with relief. Its slightly granular texture gives it a
surprising touch.
Never attempt to clean without water.
Never clean your vehicle in an automatic
roller-brush car wash.
Never select the programme with hot wax
finish.
Never use high-pressure lances equipped
with brushes - risk of scratching paint!
Never apply glossy polish or preservatives to
the bodywork or alloy wheels; these products
irreversibly reveal glossy or spotted areas.
Choose high-pressure wash, or at least
high-flow water jet.
Rinse the vehicle with demineralised water.
Only a clean microfibre cloth
is recommended
for wiping the vehicle; pass it over the vehicle
without rubbing.
Carefully wipe off any fuel spilt on the
bodywork using a soft cloth, then allow to dry.
Clean off minor marks (for example, finger
marks), using a maintenance product
recommended by PEUGEOT.
Decals
(Depending on version)
Do not use a high-pressure washer to
clean the vehicle - risk of damaging or
detaching the decals!
Use a high-flow hose (temperature
between 25°C and 40°C).
Place the jet of water perpendicular to the
surface to be cleaned.
Rinse the vehicle with demineralised water.
Leather
Leather is a natural product. Appropriate regular
care is essential for its durability.
It must be protected and nourished using a
specific leather product, to keep it supple and
preserve its original appearance.
Do not clean leather using unsuitable
cleaning agents such as solvents,
detergents, petrol or pure alcohol.
When cleaning items partly made from
leather, take care not to damage the other
materials with the specific leather product.
Before cleaning greasy stains or liquids,
quickly mop up any surplus.
Before cleaning, wipe off any residues liable
to scuff the leather, using a cloth that has
been dampened with demineralised water
and thoroughly wrung out.
Clean leather using a soft cloth moistened
with soapy water or a pH-neutral product.
Dry with a soft, dry cloth.
Page 202 of 292
200
In the event of a breakdown
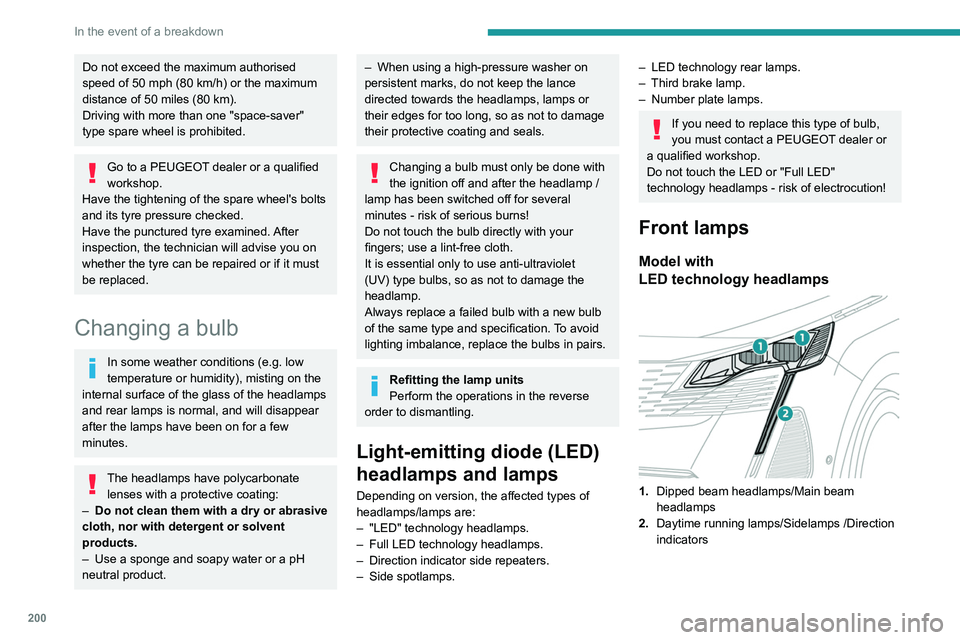
Model with Full
LED technology headlamps
1.Dipped beam headlamps/Main beam
headlamps
2. Static cornering lamps
3. Daytime running lamps/Sidelamps /Direction
indicators
Rear lamps
Do not exceed the maximum authorised
speed of 50 mph (80 km/h) or the maximum
distance of 50 miles (80 km).
Driving with more than one "space-saver"
type spare wheel is prohibited.
Go to a PEUGEOT dealer or a qualified
workshop.
Have the tightening of the spare wheel's bolts
and its tyre pressure checked.
Have the punctured tyre examined. After
inspection, the technician will advise you on
whether the tyre can be repaired or if it must
be replaced.
Changing a bulb
In some weather conditions (e.g. low
temperature or humidity), misting on the
internal surface of the glass of the headlamps
and rear lamps is normal, and will disappear
after the lamps have been on for a few
minutes.
The headlamps have polycarbonate lenses with a protective coating:
–
Do not clean them with a dry or abrasive
cloth, nor with detergent or solvent
products.
–
Use a sponge and soapy water or a pH
neutral product.
– When using a high-pressure washer on
persistent marks, do not keep the lance
directed towards the headlamps, lamps or
their edges for too long, so as not to damage
their protective coating and seals.
Changing a bulb must only be done with
the ignition off and after the headlamp /
lamp has been switched off for several
minutes - risk of serious burns!
Do not touch the bulb directly with your
fingers; use a lint-free cloth.
It is essential only to use anti-ultraviolet
(UV) type bulbs, so as not to damage the
headlamp.
Always replace a failed bulb with a new bulb
of the same type and specification. To avoid
lighting imbalance, replace the bulbs in pairs.
Refitting the lamp units
Perform the operations in the reverse
order to dismantling.
Light-emitting diode (LED)
headlamps and lamps
Depending on version, the affected types of
headlamps/lamps are:
–
"LED" technology headlamps.
–
Full LED technology headlamps.
–
Direction indicator side repeaters.
–
Side spotlamps.
– LED technology rear lamps.
– Third brake lamp.
–
Number plate lamps.
If you need to replace this type of bulb,
you must contact a PEUGEOT dealer or
a qualified workshop.
Do not touch the LED or "Full LED"
technology headlamps - risk of electrocution!
Front lamps
Model with
LED technology headlamps
1.Dipped beam headlamps/Main beam
headlamps
2. Daytime running lamps/Sidelamps /Direction
indicators
Page 214 of 292
212
In the event of a breakdown
Accessing the tools
General recommendations
Observe the legislation in force in the country where you are driving.
Check that the towing vehicle is heavier than the towed vehicle.
The driver must remain at the wheel of the towed vehicle and must have a\
valid driving licence.
When towing a vehicle with all four wheels on the ground, always use an \
approved towbar; ropes and straps are prohibited.
The towing vehicle must move off gently.
When the vehicle is towed with its engine off, there is no longer braking and steering assistance.
A professional recovery service must be called in the following cases:
– broken down on a motorway or main road;
–
not possible to put the gearbox into neutral, unlock the steering, or re\
lease the parking brake;
–
not possible to tow a vehicle with an automatic gearbox, with the engine\
running;
–
towing with only two wheels on the ground;
–
four-wheel drive vehicle;
–
no approved towbar available.
Rechargeable hybrid vehicles
Before any intervention, with the ignition
on, depress the brake pedal and select mode N, then switch off the hybrid system (READY
indicator lamp off).
Always call on professionals for recovery of
the vehicle on a flatbed lorry or trailer.Use the towing eye only to free the vehicle
if it is stuck, or to secure it for recovery on a
flatbed lorry or trailer.
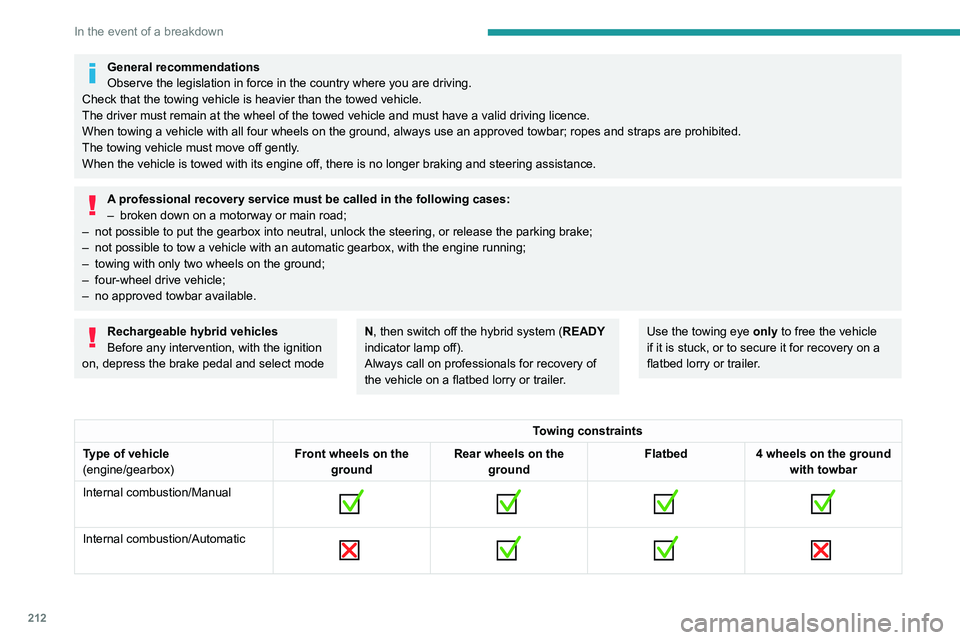
Towing constraints
Type of vehicle
(engine/gearbox) Front wheels on the
ground Rear wheels on the
ground Flatbed
4 wheels on the ground
with towbar
Internal combustion/Manual
Internal combustion/Automatic
Page 216 of 292
214
In the event of a breakdown
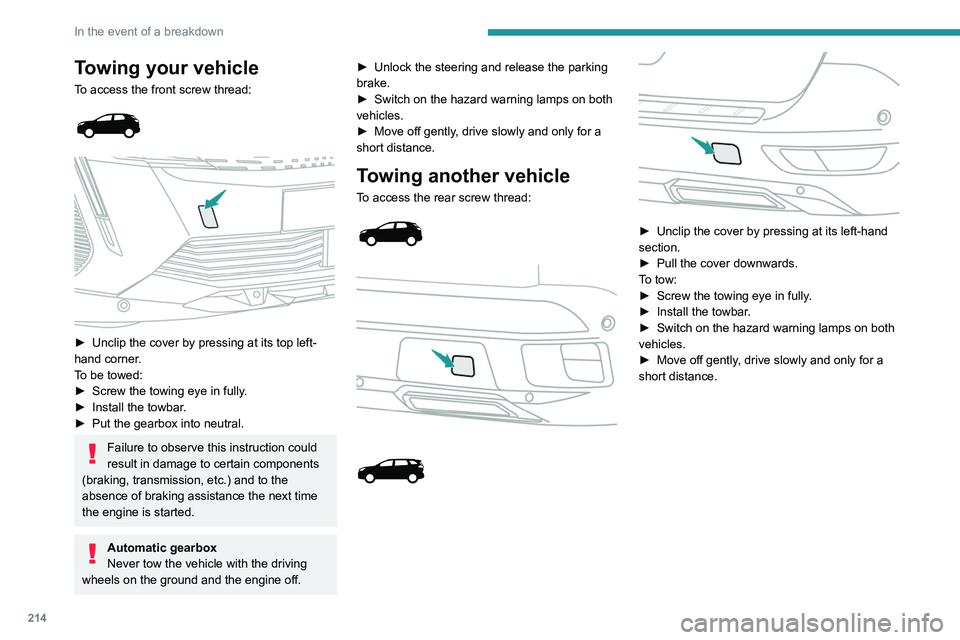
Towing your vehicle
To access the front screw thread:
► Unclip the cover by pressing at its top left-
hand corner .
To be towed:
►
Screw the towing eye in fully
.
►
Install the towbar
.
►
Put the gearbox into neutral.
Failure to observe this instruction could
result in damage to certain components
(braking, transmission, etc.) and to the
absence of braking assistance the next time
the engine is started.
Automatic gearbox
Never tow the vehicle with the driving
wheels on the ground and the engine off. ►
Unlock the steering and release the parking
brake.
►
Switch on the hazard warning lamps on both
vehicles.
►
Move off gently
, drive slowly and only for a
short distance.
Towing another vehicle
To access the rear screw thread:
► Unclip the cover by pressing at its left-hand
section.
►
Pull the cover downwards.
T
o tow:
►
Screw the towing eye in fully
.
►
Install the towbar
.
►
Switch on the hazard warning lamps on both
vehicles.
►
Move off gently
, drive slowly and only for a
short distance.