2021 PEUGEOT 5008 neutral
[x] Cancel search: neutralPage 119 of 292
11 7
Driving
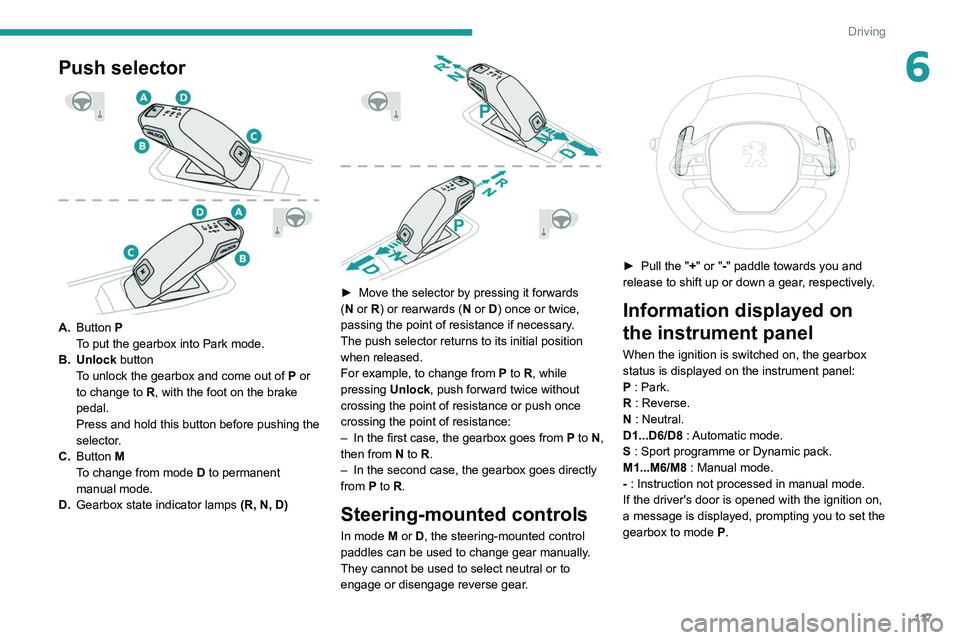
6Push selector
A.Button P
To put the gearbox into Park mode.
B. Unlock button To unlock the gearbox and come out of
P
or
to change to
R, with the foot on the brake
pedal.
Press and hold this button before pushing the
selector.
C. Button M
To change from mode
D
to permanent
manual mode.
D. Gearbox state indicator lamps (R, N, D)
► Move the selector by pressing it forwards
( N or R) or rearwards (N or D) once or twice,
passing the point of resistance if necessary.
The push selector returns to its initial position
when released.
For example, to change from
P to R, while
pressing Unlock, push forward twice without
crossing the point of resistance or push once
crossing the point of resistance:
–
In the first case, the gearbox goes from
P to N,
then from
N to R.
–
In the second case, the gearbox goes directly
from
P to R.
Steering-mounted controls
In mode M or D, the steering-mounted control
paddles can be used to change gear manually .
They cannot be used to select neutral or to
engage or disengage reverse gear.
► Pull the " +" or "-" paddle towards you and
release to shift up or down a gear, respectively.
Information displayed on
the instrument panel
When the ignition is switched on, the gearbox
status is displayed on the instrument panel:
P : Park.
R : Reverse.
N : Neutral.
D1...D6/D8 : Automatic mode.
S : Sport programme or Dynamic pack.
M1...M6/M8 : Manual mode.
- : Instruction not processed in manual mode.
If the driver's door is opened with the ignition on,
a message is displayed, prompting you to set the
gearbox to mode P.
Page 120 of 292
11 8
Driving
Operation
With the engine running, if it is necessary to
press the brake pedal and/or the Unlock button
in order to change mode, an alert message is
displayed in the instrument panel.
Only appropriate attempted changes of mode
are accepted.
With the engine running and the brakes
released, if R, D or M is selected, the
vehicle moves off, even without pressing the
accelerator pedal.
Never press the accelerator and brake
pedals at the same time - risk of damage
to the gearbox!
In the event of a battery failure, you must
place the chocks supplied with the vehicle
tools against one of the wheels to immobilise
the vehicle.
Unlocking the gearbox
– From mode P:
► Fully depress the brake pedal.
►
Press the
Unlock button.
►
While continuing to press the brake pedal
and the
Unlock button, select another mode.
–
From neutral
N, at a speed below 3 mph
(5
km/h):
►
Fully depress the brake pedal.
►
While continuing to depress the brake
pedal, select another mode.
Engaging reverse gear
► Slow down until you come to a stop.
► Depress the brake pedal, then press the
Unlock
button.
►
While maintaining the presses, select
mode
R.
Manual mode
Entering the mode:
► With mode D initially selected.
►
Press button
M; the green indicator lamp in
the button comes on.
Exiting the mode:
►
Push forwards once to return to
D.
or
►
Press button
M; the indicator lamp in the
button goes off.
Switching off the ignition
To switch off the ignition, the vehicle must be
stationary.
Changing to free-wheeling
For more information on Changing to free-
wheeling , refer to the corresponding section.
If you open the driver's door while mode
N is engaged, an audible signal will
sound. It will stop when you close the driver's
door again.
Special aspects of automatic mode
The gearbox selects the gear that provides
optimal performance based on ambient temperature, road profile, vehicle loading and
driving style.
For maximum acceleration, press the accelerator
fully down (kick-down). The gearbox changes
down automatically or holds the selected gear
until the maximum engine speed is reached.
Steering mounted controls allow the driver to
temporarily select a gear, if the vehicle speed
and engine speed conditions permit.
Special aspects of manual mode
The gearbox only changes from one gear to
another if the vehicle speed and engine speed
conditions permit.
Starting the vehicle
From mode P:
►
Fully depress the brake pedal.
►
Start the engine.
►
Maintaining pressure on the brake pedal,
press the
Unlock button.
►
Push once or twice rearwards to select
the automatic mode
D, or forwards to engage
reverse
R.
From neutral
N:
►
Fully depress the brake pedal.
►
Start the engine.
►
Maintaining pressure on the brake pedal,
push rearwards to select the automatic mode
D
,
or forwards, while pressing the Unlock
button to
engage reverse
R
.
Then, from
D or R:
►
Release the brake pedal.
► Accelerate gradually to automatically release
the electric parking brake.
The vehicle moves off immediately.
Automatic gearbox
Never try to start the engine by pushing
the vehicle.
Switching the vehicle off
Regardless of the current gearbox mode, mode
P is immediately engaged automatically when
the ignition is switched off.
However, in mode N, mode P will be engaged
after a delay of 5 seconds (time to enable free-
wheeling mode).
Check that mode P has been engaged and
that the electric parking brake was applied
automatically; if not, apply it manually.
The corresponding indicator lamps on the gear selector and the electric parking
brake control must be on, as well as the
indicator lamps on the instrument panel.
Gearbox malfunction
This warning lamp comes on, accompanied by an audible signal and the
display of a message.
Go to a PEUGEOT dealer or a qualified
workshop.
Do not drive faster than 62 mph (100 km/h),
keeping to the speed limit.
Page 121 of 292

11 9
Driving
6► Accelerate gradually to automatically release
the electric parking brake.
The vehicle moves off immediately
.
Automatic gearbox
Never try to start the engine by pushing
the vehicle.
Switching the vehicle off
Regardless of the current gearbox mode, mode
P is immediately engaged automatically when
the ignition is switched off.
However, in mode N, mode P will be engaged
after a delay of 5 seconds (time to enable free-
wheeling mode).
Check that mode
P has been engaged and
that the electric parking brake was applied
automatically; if not, apply it manually.
The corresponding indicator lamps on the gear selector and the electric parking
brake control must be on, as well as the
indicator
lamps on the instrument panel.
Gearbox malfunction
This warning lamp comes on, accompanied by an audible signal and the
display of a message.
Go to a PEUGEOT dealer or a qualified
workshop.
Do not drive faster than 62
mph (100 km/h),
keeping to the speed limit.
Switching of the gearbox to back-up mode
Mode D locks in third gear.
The paddles on the steering wheel do not work
and mode M is no longer accessible.
You may feel a significant jolt on engaging
reverse gear. This will not damage the gearbox.
Selector malfunction
Minor malfunction
This warning lamp comes on, accompanied by the display of a message
and an audible signal.
Drive carefully.
Go to a PEUGEOT dealer or a qualified
workshop.
In some cases, the selector indicator lamps may
no longer come on, but the gearbox state is still
displayed on the instrument panel.
Major malfunction
This warning lamp comes on, accompanied by the display of a
message.
You must stop the vehicle.
Stop as soon as it is safe to do so and
switch off the ignition.
Contact a PEUGEOT dealer or a qualified
workshop.
e-EAT8 electric automatic
gearbox (Rechargeable
hybrid)
Automatic 8-speed gearbox with a push selector and regenerative braking function.
With the exception of manual mode, the
“Sport” button and the regenerative braking,
the operation is identical to that of other EAT8
gearboxes.
For more information on the Operation or the
Malfunctions of the EAT8 gearbox, refer to the
corresponding sections.
Gearbox selector positions
P. Car park
For parking the vehicle: the front wheels
are blocked.
R. Reverse gear
N. Neutral
For moving the vehicle with the ignition
off: in certain car washing machines,
when towing the vehicle, etc.
Page 122 of 292
120
Driving
D/B.Automatic forward gear ( D) or automatic
forward gear with regenerative braking
(B)
The gearbox manages gear changes
according to the style of driving, the road
profile and the vehicle load. With the
regenerative braking function activated,
the gearbox also controls braking when
the accelerator pedal is released.
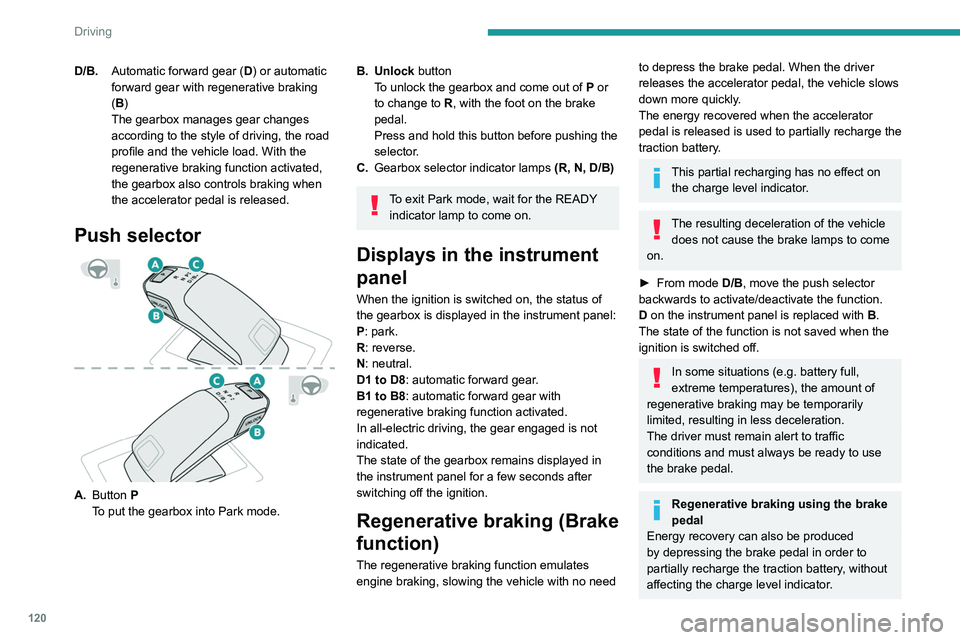
Push selector
A. Button P
To put the gearbox into Park mode.
B. Unlock button To unlock the gearbox and come out of P or
to change to
R, with the foot on the brake
pedal.
Press and hold this button before pushing the
selector.
C. Gearbox selector indicator lamps (R, N, D/B)
To exit Park mode, wait for the READY
indicator lamp to come on.
Displays in the instrument
panel
When the ignition is switched on, the status of
the gearbox is displayed in the instrument panel:
P: park.
R: reverse.
N: neutral.
D1 to D8: automatic forward gear.
B1 to B8: automatic forward gear with
regenerative braking function activated.
In all-electric driving, the gear engaged is not
indicated.
The state of the gearbox remains displayed in
the instrument panel for a few seconds after
switching off the ignition.
Regenerative braking (Brake
function)
The regenerative braking function emulates
engine braking, slowing the vehicle with no need
to depress the brake pedal. When the driver
releases the accelerator pedal, the vehicle slows
down more quickly.
The energy recovered when the accelerator
pedal is released is used to partially recharge the
traction battery.
This partial recharging has no effect on the charge level indicator.
The resulting deceleration of the vehicle does not cause the brake lamps to come
on.
►
From mode
D/B, move the push selector
backwards to activate/deactivate the function.
D on the instrument panel is replaced with B.
The state of the function is not saved when the
ignition is switched off.
In some situations (e.g. battery full,
extreme temperatures), the amount of
regenerative braking may be temporarily
limited, resulting in less deceleration.
The driver must remain alert to traffic
conditions and must always be ready to use
the brake pedal.
Regenerative braking using the brake
pedal
Energy recovery can also be produced
by depressing the brake pedal in order to
partially recharge the traction battery, without
affecting the charge level indicator.
Hill start assist
This system keeps the vehicle briefly stationary
(for approximately 2 seconds) when making a hill
start, while you transfer your foot from the brake
pedal to the accelerator pedal.
The system is only active when:
– The vehicle is completely stationary, with your
foot on the brake pedal.
– Certain slope conditions are met.
– The driver’s door is closed.
Do not leave the vehicle while it is being
held temporarily by hill start assist.
If someone needs to get out of the vehicle
with the engine running, apply the parking
brake manually. Then check that the parking
brake indicator lamp and the P indicator lamp
in the electric parking brake control are on
fixed.
The hill start assist function cannot be deactivated. However, using the parking
brake to immobilise the vehicle interrupts its
operation.
Page 123 of 292
121
Driving
6Hill start assist
This system keeps the vehicle briefly stationary
(for approximately 2 seconds) when making a hill
start, while you transfer your foot from the brake
pedal to the accelerator pedal.
The system is only active when:
–
The vehicle is completely stationary
, with your
foot on the brake pedal.
–
Certain slope conditions are met.
–
The driver
’s door is closed.
Do not leave the vehicle while it is being
held temporarily by hill start assist.
If someone needs to get out of the vehicle
with the engine running, apply the parking
brake manually. Then check that the parking
brake indicator lamp and the P indicator lamp
in the electric parking brake control are on
fixed.
The hill start assist function cannot be deactivated. However, using the parking
brake to immobilise the vehicle interrupts its
operation.
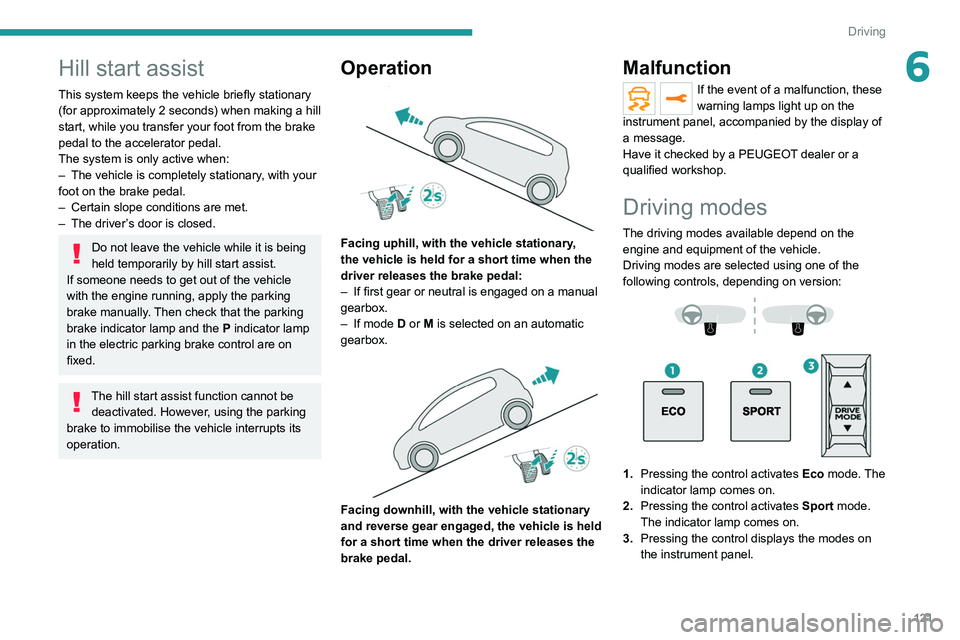
Operation
Facing uphill, with the vehicle stationary,
the vehicle is held for a short time when the
driver releases the brake pedal:
–
If first gear or neutral is engaged on a manual
gearbox.
–
If mode
D or M is selected on an automatic
gearbox.
Facing downhill, with the vehicle stationary
and reverse gear engaged, the vehicle is held
for a short time when the driver releases the
brake pedal.
Malfunction
If the event of a malfunction, these
warning lamps light up on the
instrument panel, accompanied by the display of
a message.
Have it checked by a PEUGEOT dealer or a
qualified workshop.
Driving modes
The driving modes available depend on the engine and equipment of the vehicle.
Driving modes are selected using one of the
following controls, depending on version:
1. Pressing the control activates Eco mode. The
indicator lamp comes on.
2. Pressing the control activates Sport mode.
The indicator lamp comes on.
3. Pressing the control displays the modes on
the instrument panel.
Page 126 of 292
124
Driving
any risk of injury caused by the engine
restarting automatically.
Driving on flooded roads
Before entering into a flooded area, it is
strongly recommended that you deactivate
the Stop & Start system.
For more information on Driving
recommendations, particularly on flooded
roads, refer to the corresponding section.
Operation
Main conditions for operation
– The driver ’s door must be closed.
– The driver's seat belt must be fastened.
–
The level of charge in the battery must be
sufficient.
–
The temperature of the engine must be within
its nominal operating range.
–
The outside temperature must be between
0°C and 35°C.
Putting the engine into standby
(STOP mode)
The engine automatically enters standby mode
as soon as the driver indicates their intention to
stop: –
W
ith a manual gearbox,
at speeds below 2
mph (3 km/h) on 1.5 BlueHDi versions, or with
the vehicle stationary on 1.2 PureTech versions,
when you place the gear lever in neutral and
release the clutch pedal.
–
W
ith an automatic gearbox,
at speeds below
12 mph (20 km/h) on BlueHDi versions, or with
the vehicle stationary on other versions, when
you depress the brake pedal or place the gear
selector in mode N.
Time counter
A time counter adds up the time spent in standby
during the journey. It is reset to zero every time
the ignition is switched on.
Special cases:
The engine will not go into standby if the
conditions for operation are not met and in the
following cases:
–
Steep slope (ascending or descending).
–
V
ehicle has not exceeded 6 mph (10 km/h)
since the last engine start (with the key or the
START/STOP button).
–
Electric parking brake applied or being
applied.
–
Needed
to maintain a comfortable temperature
in the passenger compartment.
–
Demisting active.
In these cases, this indicator lamp flashes
for a few seconds, then goes off.
After the engine has restarted, STOP mode is not available until the vehicle
has reached a speed of 5 mph (8
km/h).
During parking manoeuvres, STOP mode
is not available for a few seconds after
coming out of reverse gear or turning the
steering wheel.
Restarting the engine (START mode)
The engine automatically restarts as soon as the
driver indicates the intention of moving off again:
With a manual gearbox: with the clutch pedal
fully depressed.
With an automatic gearbox:
–
With the selector in mode
D or M: with the
brake pedal released.
–
With the selector in mode
N and the brake
pedal released: with the selector at D or M.
–
With the selector in mode
P and the brake
pedal depressed: with the selector at R, N, D
or M.
–
With reverse gear engaged.
Special cases
The engine will restart automatically if the
conditions for operation are met again and in the
following cases:
–
V
ehicle speed exceeds 16 mph (25 km/h)
with
2.0 BlueHDi versions with automatic
gearbox in mode D, or 2 mph (3 km/h) with
other
versions.
– The electric parking brake is being applied.In these cases, this indicator lamp flashes
for a few seconds, then goes off.
Malfunctions
In the event of a fault with the system, this
warning lamp flashes for a few moments
on the instrument panel, then remains on,
accompanied by the display of a message.
Have it checked by a PEUGEOT dealer or a
qualified workshop.
The vehicle stalls in STOP mode
All of the instrument panel warning lamps come
on if there is a fault.
► Switch off the ignition then start the engine
again with the key or the " START/STOP" button.
12 V battery
The Stop & Start system requires a
12 V battery of specific technology and
specification.
All work must be carried out only by a
PEUGEOT dealer or a qualified workshop.
Tyre under-inflation detection
This system alerts the driver when one or more
tyres have a drop in pressure.
The alert is raised when the vehicle is moving,
not when stationary.
Page 158 of 292
156
Driving
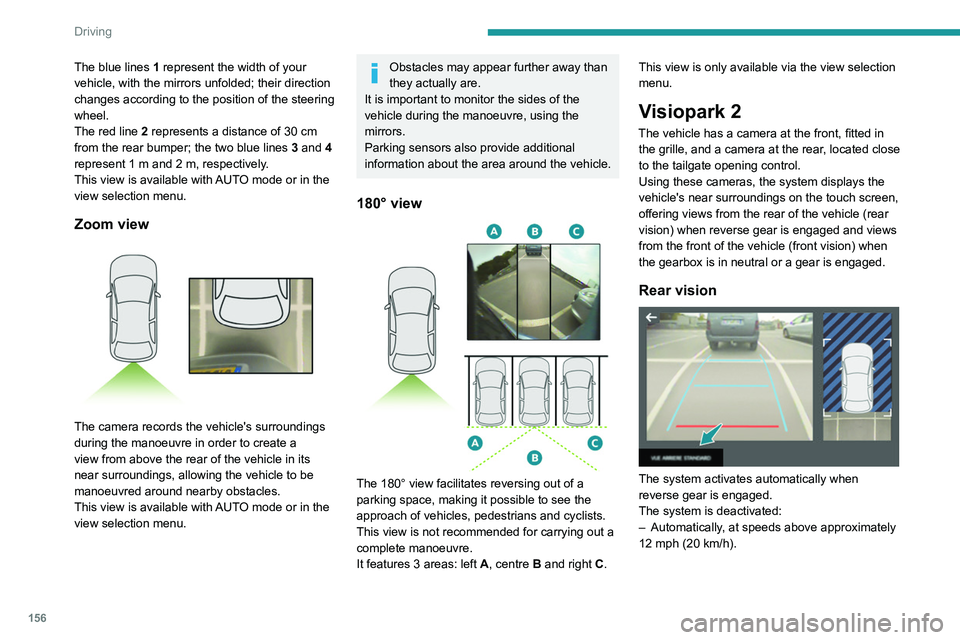
The blue lines 1 represent the width of your
vehicle, with the mirrors unfolded; their direction
changes according to the position of the steering
wheel.
The red line 2 represents a distance of 30
cm
from the rear bumper; the two blue lines 3 and 4
represent 1
m and 2 m, respectively.
This view is available with AUTO mode or in the
view selection menu.
Zoom view
The camera records the vehicle's surroundings
during the manoeuvre in order to create a
view from above the rear of the vehicle in its
near surroundings, allowing the vehicle to be
manoeuvred around nearby obstacles.
This view is available with AUTO mode or in the
view selection menu.
Obstacles may appear further away than
they actually are.
It is important to monitor the sides of the
vehicle during the manoeuvre, using the
mirrors.
Parking sensors also provide additional
information about the area around the vehicle.
180° view
The 180° view facilitates reversing out of a
parking space, making it possible to see the
approach of vehicles, pedestrians and cyclists.
This view is not recommended for carrying out a
complete manoeuvre.
It features 3 areas: left A, centre B and right C. This view is only available via the view selection
menu.
Visiopark 2
The vehicle has a camera at the front, fitted in
the grille, and a camera at the rear, located close
to the tailgate opening control.
Using these cameras, the system displays the
vehicle's near surroundings on the touch screen,
offering views from the rear of the vehicle (rear
vision) when reverse gear is engaged and views
from the front of the vehicle (front vision) when
the gearbox is in neutral or a gear is engaged.
Rear vision
The system activates automatically when
reverse gear is engaged.
The system is deactivated:
–
Automatically
, at speeds above approximately
12 mph (20
km/h).
– When shifting out of reverse (the front vision
image replaces the rear vision image for 7
seconds).
– By pressing the white arrow in the upper-left
corner of the touch screen.
If a trailer or a bicycle carrier is fitted to
the towball, the area behind the vehicle
on the view from above goes dark.
The surroundings are reconstructed by the
front camera only.
The rear vision views are similar to those for the
Visiopark 1 function.
For more information on the Visiopark
1 function, refer to the corresponding section.
Front and rear vision
With the engine running and the speed
below 12 mph (20 km/h), the system is
activated via the Driving/Vehicle touch screen
menu:
► Select "Visual parking assistance".
Page 159 of 292
157
Driving
6– When shifting out of reverse (the front vision
image replaces the rear vision image for 7
seconds).
–
By pressing the white arrow in the upper-left
corner of the touch screen.
If a trailer or a bicycle carrier is fitted to
the towball, the area behind the vehicle
on the view from above goes dark.
The surroundings are reconstructed by the
front camera only.
The rear vision views are similar to those for the
Visiopark 1 function.
For more information on the Visiopark
1
function, refer to the corresponding section.
Front and rear vision
With the engine running and the speed
below 12 mph (20 km/h), the system is
activated via the Driving/Vehicle touch screen
menu:
►
Select "
Visual parking assistance". AUTO mode is displayed by default, with front
vision, if the gearbox is in neutral or with a
gear engaged, or with rear vision, if reverse is
engaged.
The system is deactivated:
–
Automatically above about 19 mph (30
km/h)
(the image disappears temporarily from 12 mph
(20 km/h)).
–
By pressing the white arrow in the upper-left
corner of the touch screen.
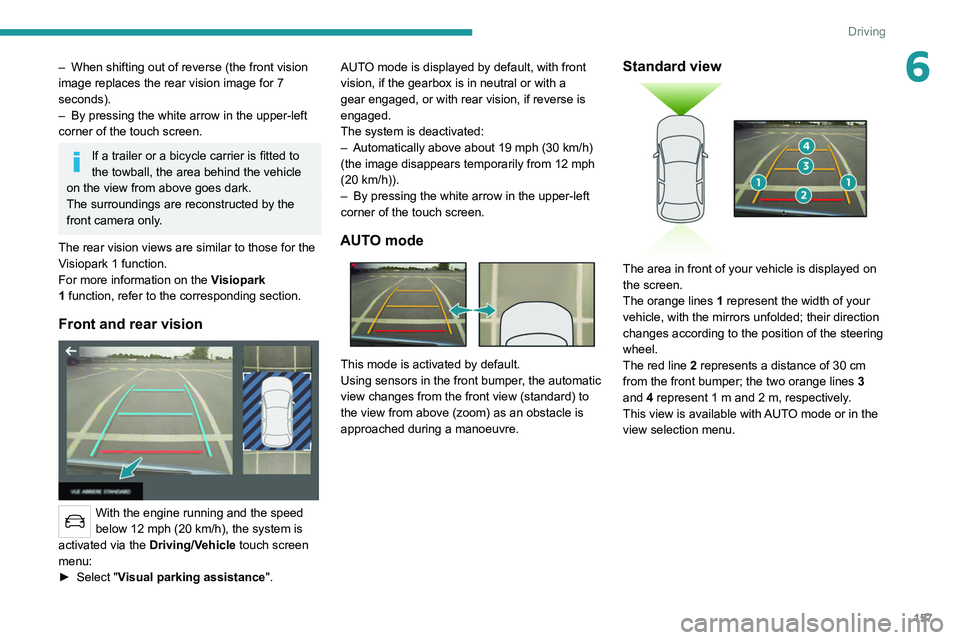
AUTO mode
This mode is activated by default.
Using sensors in the front bumper, the automatic
view changes from the front view (standard) to
the view from above (zoom) as an obstacle is
approached during a manoeuvre.
Standard view
The area in front of your vehicle is displayed on
the screen.
The orange lines 1 represent the width of your
vehicle, with the mirrors unfolded; their direction
changes according to the position of the steering
wheel.
The red line 2 represents a distance of 30 cm
from the front bumper; the two orange lines 3
and 4 represent 1 m and 2 m, respectively.
This view is available with AUTO mode or in the
view selection menu.