2021 PEUGEOT 5008 ECU
[x] Cancel search: ECUPage 103 of 292
101
Safety
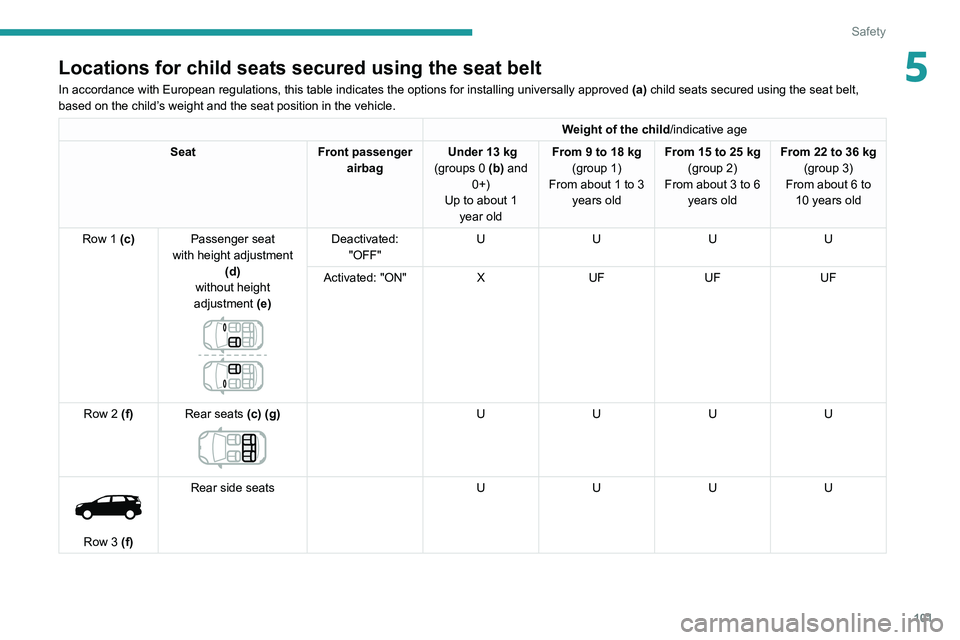
5Locations for child seats secured using the seat belt
In accordance with European regulations, this table indicates the option\
s for installing universally approved (a) child seats secured using the seat belt,
based on the child’s weight and the seat position in the vehicle.
Weight of the child /indicative age
Seat Front passenger
airbag Under 13
kg
(groups 0 (b) and 0+)
Up to about 1 year old From 9 to 18
kg
(group 1)
From about 1 to 3 years old From 15 to 25
kg
(group 2)
From about 3 to 6 years old From 22 to 36
kg
(group 3)
From about 6 to 10 years old
Row 1 (c) Passenger seat
with height adjustment (d)
without height
adjustment (e)
Deactivated: "OFF" U
UUU
Activated: "ON" XUF UFUF
Row 2 (f) Rear seats (c) (g)
U UUU
Row 3 (f)Rear side seats
UUUU
Page 104 of 292
102
Safety
U:Seat position suitable for the installation of
a child seat secured using the seat belt and
universally approved for "rearward facing"
and/or "forward facing" use.
UF: Seat position suitable for the installation a
child seat secured using the seat belt and
universally approved for "forward facing"
use.
X: Seat position not suitable for the installation
of a child seat for the specified weight
group.
(a) Universal child seat: child seat that can be
installed in all vehicles using the seat belt.
(b) Group 0: from birth to 10
kg.
Carrycots and "car" infant carriers cannot be
installed on the front passenger seat.
Carrycots and "car" infant carriers cannot be
installed on the front passenger seat or in
the 3
rd row.
(c) Refer to the current legislation in your
country before installing your child on this
seat. (d)
Maximum height position
(e) Backrest straightened.
(f) To install a "rearward facing" or "forward
facing" child seat at the rear, move the front
seat forward, then straighten the backrest to
allow enough room for the child seat and the
child's legs.
(g)
A child seat with a support leg must never
be installed on the centre rear seat.
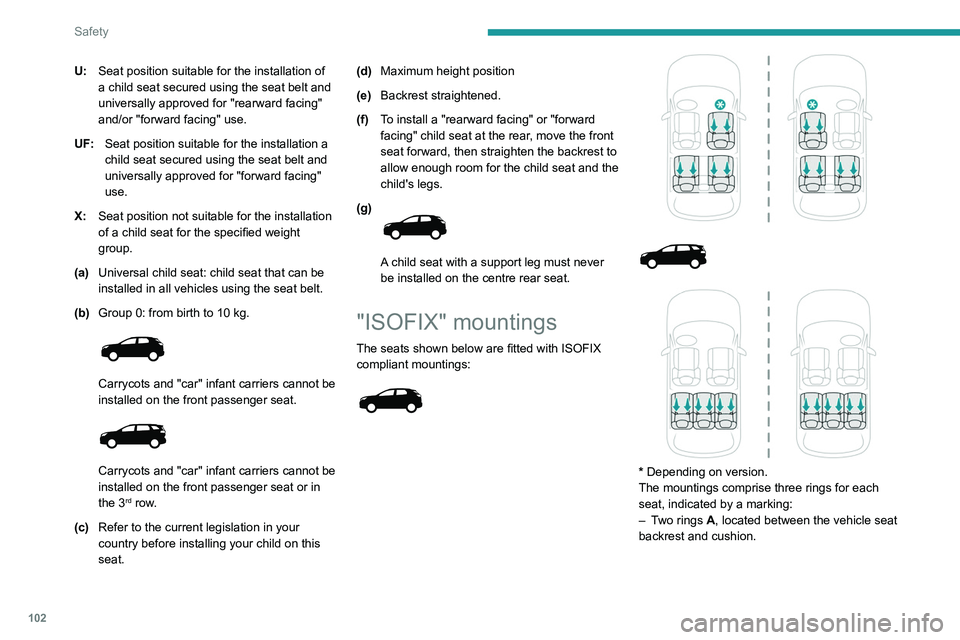
"ISOFIX" mountings
The seats shown below are fitted with ISOFIX
compliant mountings:
* Depending on version.
The mountings comprise three rings for each
seat, indicated by a marking:
–
T
wo rings A, located between the vehicle seat
backrest and cushion.
Page 105 of 292
103
Safety
5
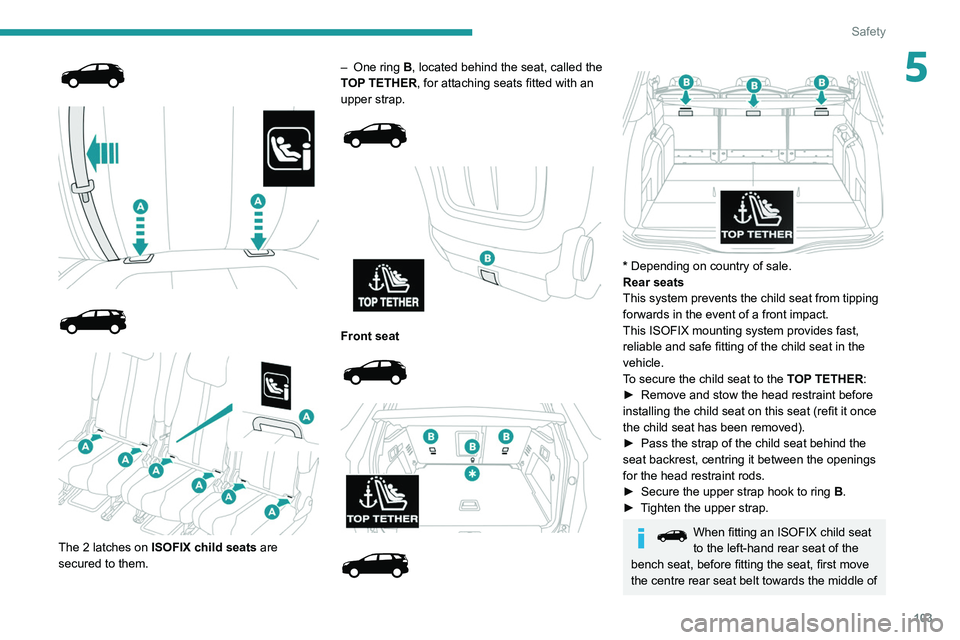
The 2 latches on ISOFIX child seats are
secured to them. –
One ring
B, located behind the seat, called the
TOP TETHER, for attaching seats fitted with an
upper strap.
Front seat
* Depending on country of sale.
Rear seats
This system prevents the child seat from tipping
forwards in the event of a front impact.
This ISOFIX mounting system provides fast,
reliable and safe fitting of the child seat in the
vehicle.
To secure the child seat to the TOP TETHER:
►
Remove and stow the head restraint before
installing the child seat on this seat (refit it once
the child seat has been removed).
►
Pass the strap of the child seat behind the
seat backrest, centring it between the openings
for the head restraint rods.
►
Secure the upper strap hook to ring
B
.
►
T
ighten the upper strap.
When fitting an ISOFIX child seat
to the left-hand rear seat of the
bench seat, before fitting the seat, first move
the centre rear seat belt towards the middle of
Page 106 of 292
104
Safety
the vehicle, so as to avoid the seat interfering
with the operation of the seat belt.
An incorrectly installed child seat in a vehicle compromises the child's safety in
the event of an accident.
Strictly observe the fitting instructions
provided in the user guide supplied with the
child seat.
For information about the options for
fitting ISOFIX child seats in your vehicle,
refer to the summary table.
Recommended ISOFIX child
seats
Also consult the user guide from the child seat’s manufacturer to find out how to
install and remove the seat.
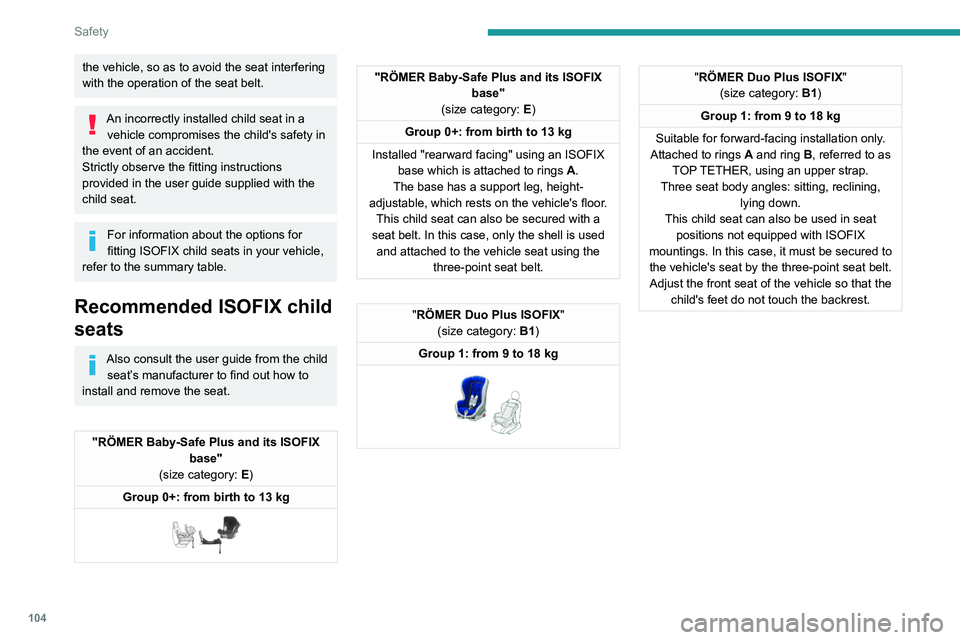
"RÖMER Baby-Safe Plus and its ISOFIX base"
(size category: E)
Group 0+: from birth to 13 kg
"RÖMER Baby-Safe Plus and its ISOFIX base"
(size category: E)
Group 0+: from birth to 13 kg
Installed "rearward facing" using an ISOFIX base which is attached to rings
A
.
The base has a support leg, height-
adjustable, which rests on the vehicle's floor. This child seat can also be secured with a
seat belt. In this case, only the shell is used and attached to the vehicle seat using the three-point seat belt.
"RÖMER Duo Plus ISOFIX "
(size category: B1)
Group 1: from 9 to 18 kg
"RÖMER Duo Plus ISOFIX "
(size category: B1)
Group 1: from 9 to 18 kg
Suitable for forward-facing installation only.
Attached to rings
A and ring B, referred to as
TOP TETHER, using an upper strap.
Three seat body angles: sitting, reclining, lying down.
This child seat can also be used in seat positions not equipped with ISOFIX
mountings. In this case, it must be secured to the vehicle's seat by the three-point seat belt. Adjust the front seat of the vehicle so that the child's feet do not touch the backrest.Locations for ISOFIX child seats
In accordance with European regulations, this table shows the options for installing ISOFIX child seats on vehicle seats fitted with ISOFIX mountings.
In the case of universal and semi-universal ISOFIX child seats, the ISOF\
IX size category, as determined by a letter from A to G, is indicated on the child
seat next to the i-Size logo.
Weight of the child / indicative age
Under 10 kg
(group 0)
Up to about 6 months old Under 10 kg
Under 13 kg
(group 0)
(group 0+)
Up to about 1 year old From 9 to 18 kg
(group 1)
From about 1 to 3 years old
Type of ISOFIX child seat Carrycot"Rearward facing" "Rearward
facing" "Forward facing
"
ISOFIX size category F G C D E C D A B B1
Seat Front
passenger airbag
Row 1 (a) Passenger
seat
with or
without height adjustment Deactivated:
"OFF" X
IL ILIUF/IL
Activated: "ON" X
XXIUF/IL
Row 2 Rear side seats IL (b)
ILILIUF/IL
Rear central seat Not ISOFIX
Page 108 of 292
106
Safety
Weight of the child / indicative age
Under 10 kg
(group 0)
Up to about 6 months old Under 10
kg
Under 13 kg
(group 0)
(group 0+)
Up to about 1 year old From 9 to 18
kg
(group 1)
From about 1 to 3 years old
Type of ISOFIX child seat Carrycot"Rearward facing" "Rearward
facing" "Forward facing
"
ISOFIX size category F G C D E C D A B B1
Seat Front
passenger airbag
Row 1 (a) Passenger
seat
with or
without height adjustment Deactivated:
"OFF" Not ISOFIX
Activated: "ON"
Row 2 Rear seat behind the
driver's seat X
IL (b) IL ILIUF/IL
Rear seat
behind the
passenger seat IL (b)
X IL ILIUF/IL
Rear central seat X
IL ILIUF/IL
Row 3 Rear side seats Not ISOFIX
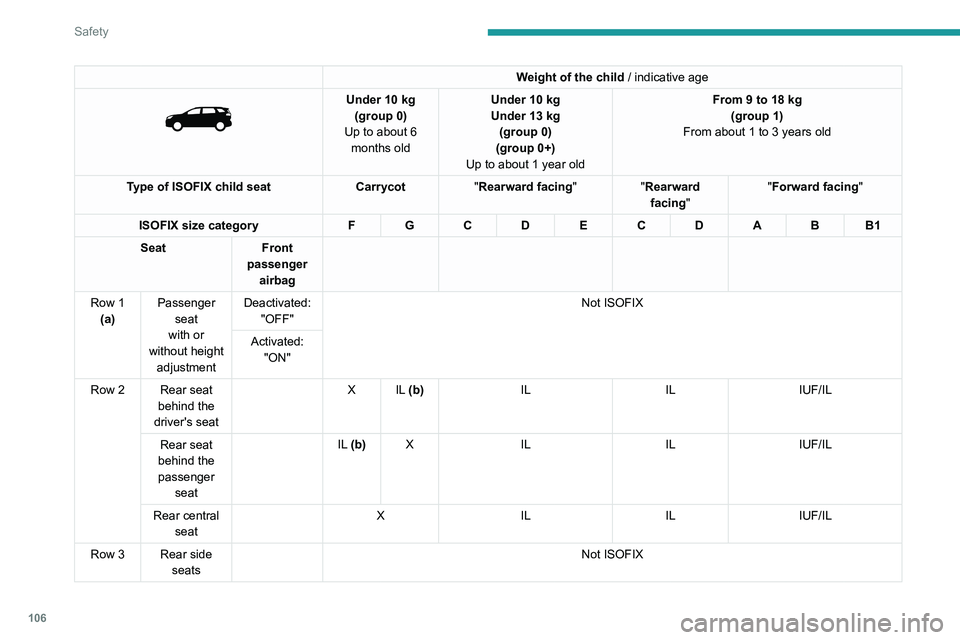
IUF: Seat position suitable for the installation of an
Isofix Universal seat, "Forward facing", secured using the upper strap.
IL: Seat position suitable for the installation of an Isofix Semi-Universal seat, either:
– "rearward facing" fitted with an upper strap or a support leg.
– “forward facing”, fitted with a support leg.
– a carrycot fitted with an upper strap or a support leg.
For securing the upper strap using the ISOFIX mountings, refer to the corresponding section.
X: Seat position not suitable for the installation of an ISOFIX seat or carrycot for the specified weight group.
(a) Refer to the current legislation in your country before placing a child\
in this seat position.
(b) The installation of a carrycot on this seat may prevent the use of one o\
r more of the other seats in this row.
i-Size child seats
i-Size child seats have two latches that are anchored to the two rings A.
These i-Size child seats also have:
– either an upper strap that is attached to ring B.
– or a support leg that rests on the vehicle floor, compatible with the approved i-Size seat position.
Their role is to prevent the child seat from tipping forward in the even\
t of a collision.
For more information on the ISOFIX mountings, refer to the corresponding section.
In accordance with European regulations, this table indicates the options for installing i-Size child seats on seats in the vehicle fitted with ISOFIX
mountings approved for i-Size.
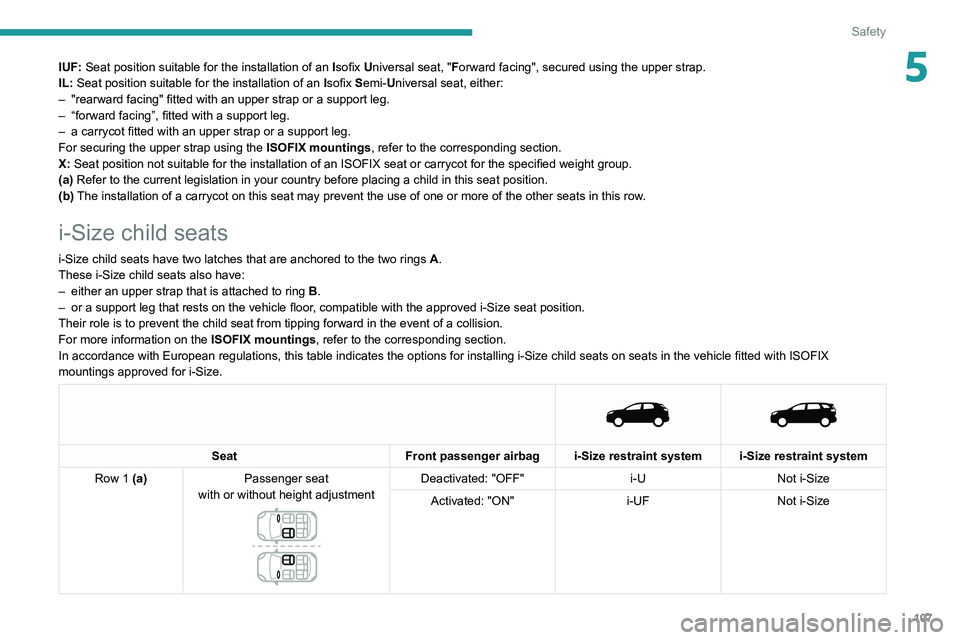
Seat
Front passenger airbag i-Size restraint system i-Size restraint system
Row 1 (a) Passenger seat
with or without height adjustment
Deactivated: "OFF" i-UNot i-Size
Activated: "ON" i-UFNot i-Size
Page 109 of 292
107
Safety
5IUF: Seat position suitable for the installation of an Isofix Universal seat, "Forward facing", secured using the upper strap.
IL: Seat position suitable for the installation of an Isofix Semi-Universal seat, either:
–
"rearward facing" fitted with an upper strap or a support leg.
–
“forward facing”, fitted with a support leg.
–
a carrycot fitted with an upper strap or a support leg.
For securing the upper strap using the ISOFIX mountings, refer to the corresponding section.
X:
Seat position not suitable for the installation of an ISOFIX seat or carrycot for the specified weight group.
(a) Refer to the current legislation in your country before placing a child\
in this seat position.
(b)
The installation of a carrycot on this seat may prevent the use of one o\
r more of the other seats in this row
.
i-Size child seats
i-Size child seats have two latches that are anchored to the two rings A.
These i-Size child seats also have:
–
either an upper strap that is attached to ring B
.
–
or a support leg that rests on the vehicle floor
, compatible with the approved i-Size seat position.
Their role is to prevent the child seat from tipping forward in the even\
t of a collision.
For more information on the ISOFIX mountings, refer to the corresponding section.
In accordance with European regulations, this table indicates the options for installing i-Size child seats on seats in the vehicle fitted with ISOFIX
mountings approved for i-Size.
Seat
Front passenger airbag i-Size restraint system i-Size restraint system
Row 1 (a) Passenger seat
with or without height adjustment
Deactivated: "OFF" i-UNot i-Size
Activated: "ON" i-UFNot i-Size
Page 129 of 292
127
Driving
6Manoeuvring aids
The driver must always check the
surroundings of the vehicle before and during
the whole manoeuvre, in particular using the
mirrors.
Radar(s)
The operation of the radar(s), along with
any associated functions, may be affected
by the accumulation of dirt (e.g.
mud, ice),
in poor weather conditions (e.g.
heavy rain,
snow), or if the bumpers are damaged.
If the front bumper is to be repainted, contact
a PEUGEOT dealer or a qualified workshop;
certain types of paint could interfere with the
operation of the radar(s).
Driving aids camera
This camera and its associated functions
may be impaired or not work if the windscreen
area in front of the camera is dirty, misty,
frosty, covered with snow, damaged or
masked by a sticker.
In humid and cold weather, demist the
windscreen regularly.
Poor visibility (inadequate street lighting,
heavy rain, thick fog, snowfall), dazzle
(headlamps of an oncoming vehicle, low sun,
reflections on a damp road, leaving a tunnel,
alternating shade and light) can also impair
detection performance.
In the event of a windscreen replacement,
contact a PEUGEOT dealer or a qualified
workshop to recalibrate the camera;
otherwise, the operation of the associated
driving aids may be disrupted.
Other cameras
The images from the camera(s)
displayed on the touch screen or on the
instrument panel may be distorted by the
terrain.
In the presence of areas in shade, or in
conditions of bright sunlight or inadequate
lighting, the image may be darkened and with
lower contrast.
Obstacles may appear further away than they
actually are.
Sensors
The operation of the sensors, as well as
any associated functions, may be disrupted
by noise pollution such as that emitted by
noisy vehicles and machinery (e.g. lorries,
pneumatic drills), by the accumulation of
snow or dead leaves on the road or in the
event of damaged bumpers and mirrors.
When reverse gear is engaged, an audible
signal (long beep) indicates that the sensors
may be dirty.
A front or rear impact to the vehicle can
upset the sensors’ settings, which is not
always detected by the system: distance
measurements may be distorted.
The sensors do not systematically detect
obstacles that are too low (pavements, studs)
or too thin (trees, posts, wire fences).
Certain obstacles located in the sensors’ blind
spots may not be detected or may no longer
be detected during the manoeuvre.
Certain materials (fabrics) absorb sound
waves: pedestrians may not be detected.
Maintenance
Clean the bumpers and door mirrors and
the field of vision of the cameras regularly.
When washing your vehicle at high pressure,
direct the spray from at least 30
cm away
from the radar, sensors and cameras.
Mats
The use of mats not approved by
PEUGEOT may interfere with the operation of
the speed limiter or cruise control.
To avoid any risk of jamming the pedals:
–
Ensure that the mat is secured correctly
.
–
Never fit one mat on top of another
.
Units of speed
Ensure that the units of speed displayed
in the instrument panel (mph or km/h) are
those for the country you are driving in.
Page 176 of 292
174
Practical information
Observe the legislation in force in the
country where you are driving.
Vehicle equipped with motorised
tailgate with Hands-Free Access
function
To avoid unintentionally opening the tailgate
while operating the towing device:
–
Deactivate this function in advance in your
vehicle's configuration menu.
–
Or remove the electronic key from the
recognition zone, with the tailgate closed.
Towing device with quickly detachable towball
Presentation
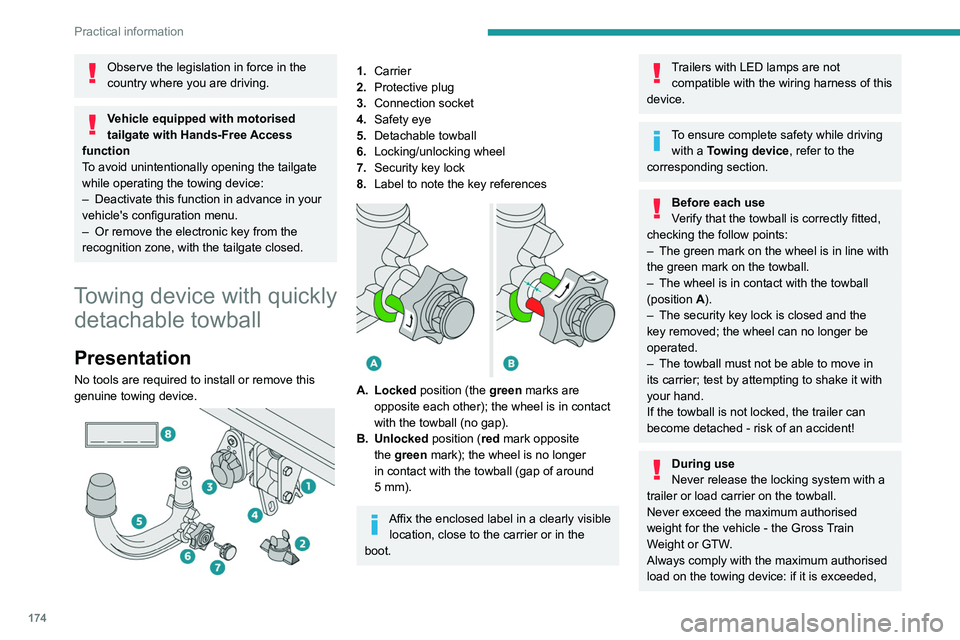
No tools are required to install or remove this
genuine towing device.
1. Carrier
2. Protective plug
3. Connection socket
4. Safety eye
5. Detachable towball
6. Locking/unlocking wheel
7. Security key lock
8. Label to note the key references
A. Locked position (the green marks are
opposite each other); the wheel is in contact
with the towball (no gap).
B. Unlocked position (red mark opposite the green mark); the wheel is no longer
in contact with the towball (gap of around
5
mm).
Affix the enclosed label in a clearly visible location, close to the carrier or in the
boot.
Trailers with LED lamps are not compatible with the wiring harness of this
device.
To ensure complete safety while driving with a Towing device , refer to the
corresponding section.
Before each use
Verify that the towball is correctly fitted,
checking the follow points:
–
The green mark on the wheel is in line with
the green mark on the towball.
–
The wheel is in contact with the towball
(position A
).
–
The security key lock is closed and the
key removed; the wheel can no longer be
operated.
–
The towball must not be able to move in
its carrier; test by attempting to shake it with
your hand.
If the towball is not locked, the trailer can
become detached - risk of an accident!
During use
Never release the locking system with a
trailer or load carrier on the towball.
Never exceed the maximum authorised
weight for the vehicle - the Gross Train
Weight or GTW.
Always comply with the maximum authorised
load on the towing device: if it is exceeded,
this device may become detached from the
vehicle - risk of an accident!
Before driving, check the headlamp height
adjustment and check that the lamps on the
trailer operate correctly.
For more information on Headlamp height
adjustment, refer to the corresponding
section.
After use
When travelling without a trailer or
load carrier, remove the towball and fit the
protective plug into the carrier, to provide
clear visibility of the number plate and/or its
lighting.
Fitting the towball
► Below the rear bumper, remove the protective
plug 2 from the carrier 1.