2021 Peugeot 308 height adjustment
[x] Cancel search: height adjustmentPage 4 of 244

2
Contents
■
Overview
Labels 4
■
Eco-driving
1Instruments
Digital instrument panel 7
Warning and indicator lamps 8
Indicators 14
Manual test 17
Total distance recorder 17
Lighting dimmer 17
Trip computer 18
2Access
Electronic key with remote control function
and built-in key, 19 Keyless Entry and Starting 21
Back-up procedures 23
Doors 25
Boot 25
Alarm 26
Electric windows 28
3Ease of use and comfort
PEUGEOT i-Cockpit 30
Front seats 30
Steering wheel adjustment
33
Mirrors 33
Rear seats (saloon) 35
Rear seats (SW) 35
Interior fittings 37
Front armrest 38
Boot fittings (hatchback) 40
Boot fittings (SW) 40
Warning triangle (stowing) 41
Heating and Ventilation 42
Manual air conditioning 43
Dual-zone automatic air conditioning 44
Front demisting - defrosting 46
Rear screen demisting/defrosting 47
Panoramic sunroof 47
Courtesy lamps 48
Interior ambient lighting 49
4Lighting and visibility
Exterior lighting control stalk 50
Automatic illumination of headlamps 51
Automatic headlamp dipping 52
Guide-me-home and welcome lighting 53
Direction indicators 53
Headlamp beam height adjustment 54
Wiper control stalk 54
Changing a wiper blade 56
Automatic wipers 56
5Safety
General safety recommendations 58
Hazard warning lamps 58
Emergency or assistance call
59
Horn 61
Electronic stability control (ESC) 62
Seat belts 64
Airbags 66
Child seats 68
Deactivating the front passenger airbag 70
ISOFIX child seats 74
Child lock 79
6Driving
Driving recommendations 81
Starting/switching off the engine 82
Manual parking brake 85
Electric parking brake 86
Hill start assist 89
5-speed manual gearbox 89
6-speed manual gearbox 90
Automatic gearbox EAT6 90
Automatic gearbox EAT8 93
Driver Sport Pack 96
Gear efficiency indicator 97
Stop & Start 97
Under-inflation detection 99
Driving and manoeuvring aids - General
recommendations
100
Speed Limit Recognition and
Recommendation
102
Speed limiter 104
Cruise control 106
Adaptive Cruise Control 107
Active Safety Brake with Distance Alert and
Intelligent emergency braking assistance
11 2
Distraction detection
11 4
Active Lane Keeping Assistance 11 5
Blind Spot Monitoring 11 9
Page 7 of 244

5
Overview
1.Bonnet release
2. Dashboard fuses
3. Courtesy lamp
Warning lamps display for seat belts and front
passenger airbag
Interior ambience lighting
Interior rear view mirror
Emergency and assistance call buttons
4. Touch screen with PEUGEOT Connect Radio
or PEUGEOT Connect Nav
5. Air conditioning controls
6. Stop & Start button
Gearbox controls
Driver Sport Pack
7. Manual parking brake
Electric parking brake
8. USB socket
9. Horn
10. Digital instrument panelSteering-mounted controls
1.Exterior lighting control stalks/Direction
indicators
2. Wipers/Screenwash/Trip computer control
stalk
3. Audio volume controls/Choice of instrument
panel display mode
4. Controls for Cruise control/Speed limiter/
Adaptive Cruise Control
Side control bar
1.Deactivation/Reactivation of DSC and ASR
(GTi version) 2.
Deactivation/Reactivation of Stop & Start
3. Deactivation/Reactivation of Active Lane
Departure Warning System
4. Deactivation of the interior volumetric and
anti-tilt monitoring alarm
5. Headlamp beam height adjustment wheel
Central control bar
1.Hazard warning lamps switch
2. Locking/unlocking from inside control
Page 32 of 244

30
Ease of use and comfort
PEUGEOT i-Cockpit
Before going out on the road and to benefit from
the ergonomic layout of the PEUGEOT i-Cockpit,
adjust in the following order:
–
the height of the head restraint,
–
the seat backrest angle,
–
the seat cushion height,
–
the longitudinal position of the seat,
–
the depth and then the height of the steering
wheel,
–
the rear view mirror and door mirrors.
Once these adjustments have been
made, ensure that from your driving
position you can see the "head-up" instrument
panel clearly, over the reduced diameter
steering wheel.
Front head restraints
Adjusting the height
Upward:
► pull the head restraint up to the desired
position; the head restraint can be felt to click
into position.
Downward:
►
press lug
A and push the head restraint down
to the desired position.
The head restraint is correctly adjusted when its upper edge is level with the top
of the passenger’s head.
Removing a head restraint
► Pull the head restraint up as far as it will go.
► Press the lug A to release the head restraint
and remove it completely.
►
Stow the head restraint securely
.
Refitting a head restraint
► Insert the head restraint rods into the guides
in the seat backrest.
► Push the head restraint down as far as it will
go.
►
Press lug
A to free the head restraint and
push it down.
►
Adjust the height of the head restraint.
Never drive with the head restraints
removed; they should be in place and
correctly adjusted for the occupant of the
seat.
Manually-adjusted front
seats
For safety reasons, seat adjustments
must only be made when the vehicle is
stationary.
Longitudinal
► Lift the control and slide the seat forwards or
backwards.
Page 33 of 244

31
Ease of use and comfort
3Before moving the seat backwards,
ensure that there is nothing that might
prevent the full travel of the seat.
There is a risk of trapping or pinching
passengers if present in the rear seats or
jamming the seat if large objects are placed
on the floor behind the seat.
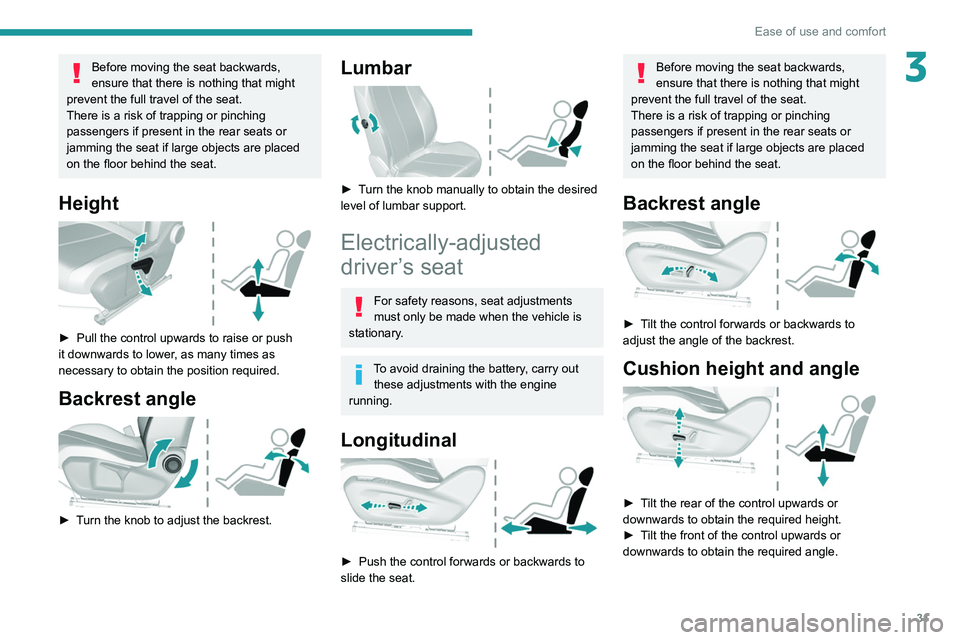
Height
► Pull the control upwards to raise or push
it downwards to lower , as many times as
necessary to obtain the position required.
Backrest angle
► Turn the knob to adjust the backrest.
Lumbar
► Turn the knob manually to obtain the desired
level of lumbar support.
Electrically-adjusted
driver’s seat
For safety reasons, seat adjustments
must only be made when the vehicle is
stationary.
To avoid draining the battery, carry out these adjustments with the engine
running.
Longitudinal
► Push the control forwards or backwards to
slide the seat.
Before moving the seat backwards,
ensure that there is nothing that might
prevent the full travel of the seat.
There is a risk of trapping or pinching
passengers if present in the rear seats or
jamming the seat if large objects are placed
on the floor behind the seat.
Backrest angle
► Tilt the control forwards or backwards to
adjust the angle of the backrest.
Cushion height and angle
► Tilt the rear of the control upwards or
downwards to obtain the required height.
►
T
ilt the front of the control upwards or
downwards to obtain the required angle.
Page 35 of 244

33
Ease of use and comfort
3
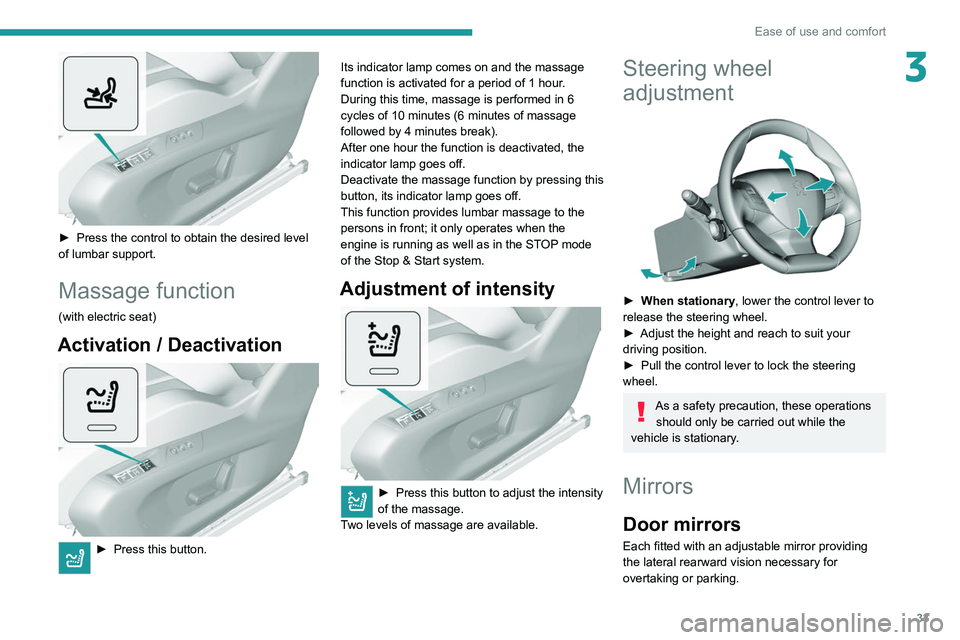
► Press the control to obtain the desired level
of lumbar support.
Massage function
(with electric seat)
Activation / Deactivation
► Press this button. Its indicator lamp comes on and the massage
function is activated for a period of 1 hour
.
During this time, massage is performed in 6
cycles of 10 minutes (6 minutes of massage
followed by 4 minutes break).
After one hour the function is deactivated, the
indicator lamp goes off.
Deactivate the massage function by pressing this
button, its indicator lamp goes off.
This function provides lumbar massage to the persons in front; it only operates when the
engine is running as well as in the STOP mode
of the Stop & Start system.
Adjustment of intensity
► Press this button to adjust the intensity
of the massage.
T
wo levels of massage are available.
Steering wheel
adjustment
► When stationary , lower the control lever to
release the steering wheel.
►
Adjust the height and reach to suit your
driving position.
►
Pull the control lever to lock the steering
wheel.
As a safety precaution, these operations should only be carried out while the
vehicle is stationary.
Mirrors
Door mirrors
Each fitted with an adjustable mirror providing
the lateral rearward vision necessary for
overtaking or parking.
Page 40 of 244

38
Ease of use and comfort
2.12 V accessory socket (120 W)
Observe the maximum power rating to avoid
damaging the accessory.
3. USB socket
4. Cup holder (depending on version)
5. Storage (depending on version)
6. Storage - Removable cup/can holder
Move the
support to access the cup/can
holder.
7. Front armrest
8. 220
V socket (120 W) or USB
socket
(depending on version)
Observe the maximum power rating to avoid
damaging the accessory.
Mats
Fitting
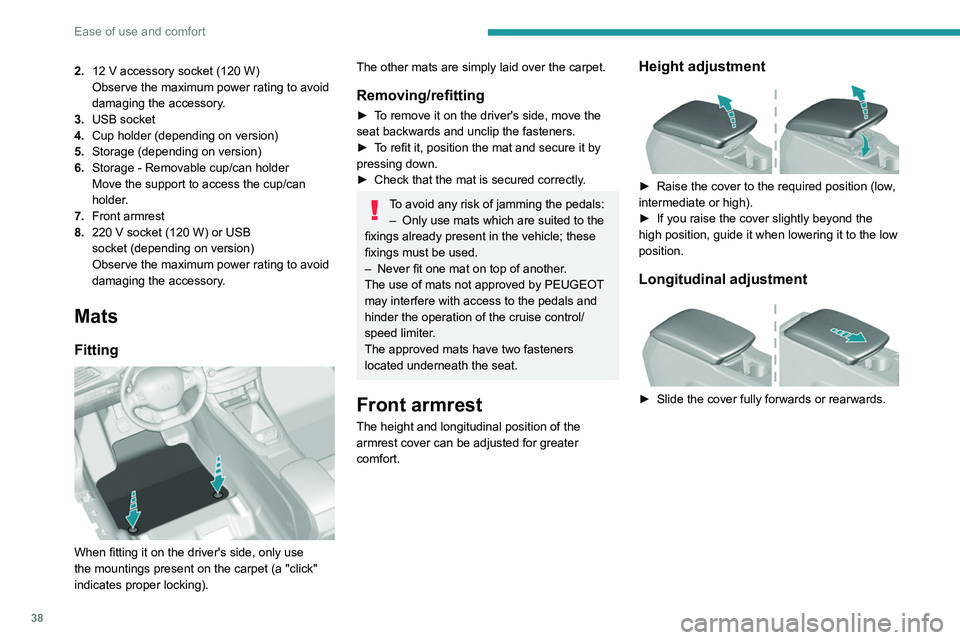
When fitting it on the driver's side, only use
the mountings present on the carpet (a "click"
indicates proper locking).
The other mats are simply laid over the carpet.
Removing/refitting
► To remove it on the driver's side, move the
seat backwards and unclip the fasteners.
►
T
o refit it, position the mat and secure it by
pressing down.
►
Check that the mat is secured correctly
.
To avoid any risk of jamming the pedals:– Only use mats which are suited to the
fixings already present in the vehicle; these
fixings must be used.
–
Never fit one mat on top of another
.
The use of mats not approved by PEUGEOT
may interfere with access to the pedals and
hinder the operation of the cruise control/
speed limiter.
The approved mats have two fasteners
located underneath the seat.
Front armrest
The height and longitudinal position of the
armrest cover can be adjusted for greater
comfort.
Height adjustment
► Raise the cover to the required position (low ,
intermediate or high).
►
If you raise the cover slightly beyond the
high position, guide it when lowering it to the low
position.
Longitudinal adjustment
► Slide the cover fully forwards or rearwards.
Page 56 of 244

54
Lighting and visibility
Three flashes
► Press briefly upwards or downwards, without
going beyond the point of resistance; the
direction indicators will flash 3 times.
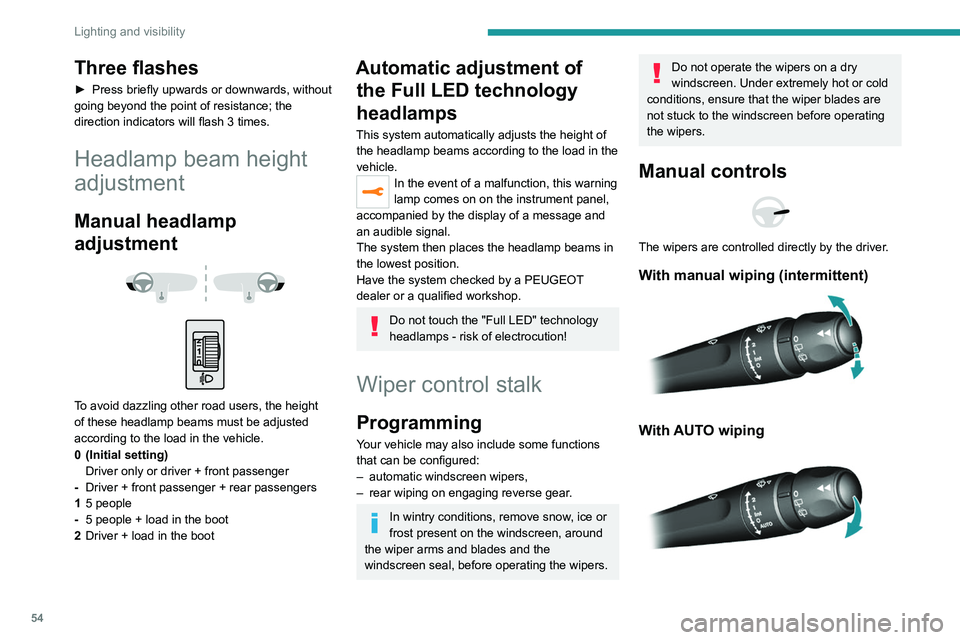
Headlamp beam height
adjustment
Manual headlamp
adjustment
To avoid dazzling other road users, the height
of these headlamp beams must be adjusted
according to the load in the vehicle.
0 (Initial setting) Driver only or driver + front passenger
- Driver + front passenger + rear passengers
1 5 people
- 5 people + load in the boot
2 Driver + load in the boot
Automatic adjustment of
the Full LED technology
headlamps
This system automatically adjusts the height of
the headlamp beams according to the load in the
vehicle.
In the event of a malfunction, this warning
lamp comes on on the instrument panel,
accompanied by the display of a message and
an audible signal.
The system then places the headlamp beams in
the lowest position.
Have the system checked by a PEUGEOT
dealer or a qualified workshop.
Do not touch the "Full LED" technology
headlamps - risk of electrocution!
Wiper control stalk
Programming
Your vehicle may also include some functions
that can be configured:
–
automatic windscreen wipers,
–
rear wiping on engaging reverse gear
.
In wintry conditions, remove snow, ice or
frost present on the windscreen, around
the wiper arms and blades and the
windscreen seal, before operating the wipers.
Do not operate the wipers on a dry
windscreen. Under extremely hot or cold
conditions, ensure that the wiper blades are
not stuck to the windscreen before operating
the wipers.
Manual controls
The wipers are controlled directly by the driver.
With manual wiping (intermittent)
With AUTO wiping
Windscreen wipers
► To select the wiping speed: raise or lower the
stalk to the desired position.
Fast wiping (heavy rain)
Normal wiping (moderate rain)
Intermittent wiping (proportional to the
vehicle’s speed)
Switching off
Single wipe (press down and release).
or
Automatic wiping
Refer to the corresponding section.
Rear wiper
Rear wiper selection ring:Off.
Intermittent wiping.
Page 136 of 244

134
Practical information
Towing device
Load distribution
► Distribute the load in the trailer so that the
heaviest items are as close as possible to the
axle, and the nose weight approaches the
maximum permitted without exceeding it.
Air density decreases with altitude, thus reducing
engine performance.
The maximum towable load
must be reduced by 10% per 1,000
metres of
altitude.
Use genuine towing devices and their
wiring harnesses approved by
PEUGEOT. We recommend having them
fitted by a PEUGEOT dealer or a qualified
workshop.
If not fitted by a PEUGEOT dealer, they must
still be fitted in accordance with the vehicle
manufacturer's instructions.
Certain driving or manoeuvring aid functions
are automatically deactivated while an
approved towing system is in use.
Comply with the maximum authorised
towable weight, as indicated on your
vehicle's registration certificate, on the
manufacturer's label and in the Technical
data section of this guide.
Complying with the maximum authorised
nose weight (towball weight) also includes
the use of accessories (bicycle carriers,
tow boxes, etc.).
Observe the legislation in force in the
country where you are driving.
GTi towing
Your vehicle cannot be fitted with a
tow-bar.
Towing device with towball
Before each use
To ensure the towball is correctly fitted,
check the follow points:
Saloon:
–
The green mark on the wheel is in line with
the green mark on the towball.
–
The wheel is in contact with the towball
(position A
).
–
The safety lock is on and the key removed;
the wheel can no longer be operated.
–
The towball must not be able to move in
its carrier; test by attempting to move it with
your hand.
SW :
–
The towball is correctly engaged (position
A
).
–
The safety lock is on and the key removed;
the trigger can no longer be operated.
–
The towball must not be able to move in
its carrier; test by attempting to move it with
your hand.
If the towball is not engaged, the trailer can
become detached -
Accident risk!
During use
Never release the locking system when
a trailer or load carrier is connected to the
towball.
Never exceed the maximum authorised
weight for the vehicle - Gross Train Weight
or GTW.
Always comply with the maximum authorised
load on the towing device: if it is exceeded,
this device may become detached from the
vehicle - risk of an accident!
Check that the trailer lamps work correctly.
Before setting off, check and/or adjust
headlamp beam height.
For more information on Headlamp height
adjustment, refer to the corresponding
section.
Following use
When travelling without a trailer or load
on a towbar-mounted carrier, the towball
must be removed and the protective plug
inserted in the carrier. This measure applies
particularly where the towball might obscure
visibility of the number plate or its lighting.
Blanking plug
In the event of recovery, it is essential to remove
the blanking plug if your vehicle has one.
To do this, contact a PEUGEOT dealer or a
qualified workshop.
The blanking plug behind the lower air intake grille.
Towbar with quickly detachable towball
(hatchback)
Presentation
This genuine towing device can be fitted and
removed with no need for tools.