2021 Peugeot 308 ESP
[x] Cancel search: ESPPage 153 of 244
151
In the event of a breakdown
8With spare wheel
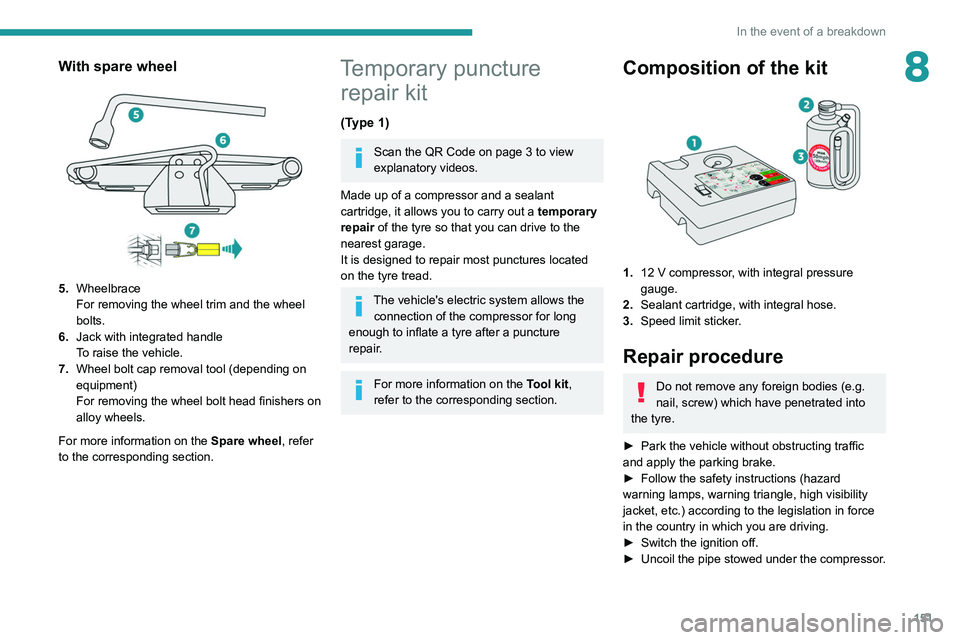
5.Wheelbrace
For removing the wheel trim and the wheel
bolts.
6. Jack with integrated handle
To raise the vehicle.
7. Wheel bolt cap removal tool (depending on
equipment)
For removing the wheel bolt head finishers on
alloy wheels.
For more information on the Spare wheel, refer
to the corresponding section.
Temporary puncture repair kit
(Type 1)
Scan the QR Code on page 3 to view
explanatory videos.
Made up of a compressor and a sealant
cartridge,
it allows you to carry out a temporary
repair of the tyre so that you can drive to the
nearest garage.
It is designed to repair most punctures located
on the tyre tread.
The vehicle's electric system allows the connection of the compressor for long
enough to inflate a tyre after a puncture
repair.
For more information on the Tool kit,
refer to the corresponding section.
Composition of the kit
1. 12 V compressor, with integral pressure
gauge.
2. Sealant cartridge, with integral hose.
3. Speed limit sticker.
Repair procedure
Do not remove any foreign bodies (e.g.
nail, screw) which have penetrated into
the tyre.
►
Park the vehicle without obstructing traffic
and apply the parking brake.
►
Follow the safety instructions (hazard
warning lamps, warning triangle, high visibility
jacket, etc.) according to the legislation in force
in the country in which you are driving.
►
Switch the ignition off.
►
Uncoil
the pipe stowed under the compressor.
Page 155 of 244
153
In the event of a breakdown
8The sealant product is harmful if swallowed and causes irritation to the
eyes.
Keep this product out of the reach of children.
The use-by date of the fluid is marked on the
bottle.
After use, do not discard the bottle in
standard waste, take it to a PEUGEOT dealer
or an authorised waste disposal site.
Do not forget to obtain a new bottle of
sealant, available from a PEUGEOT dealer or
a qualified workshop.
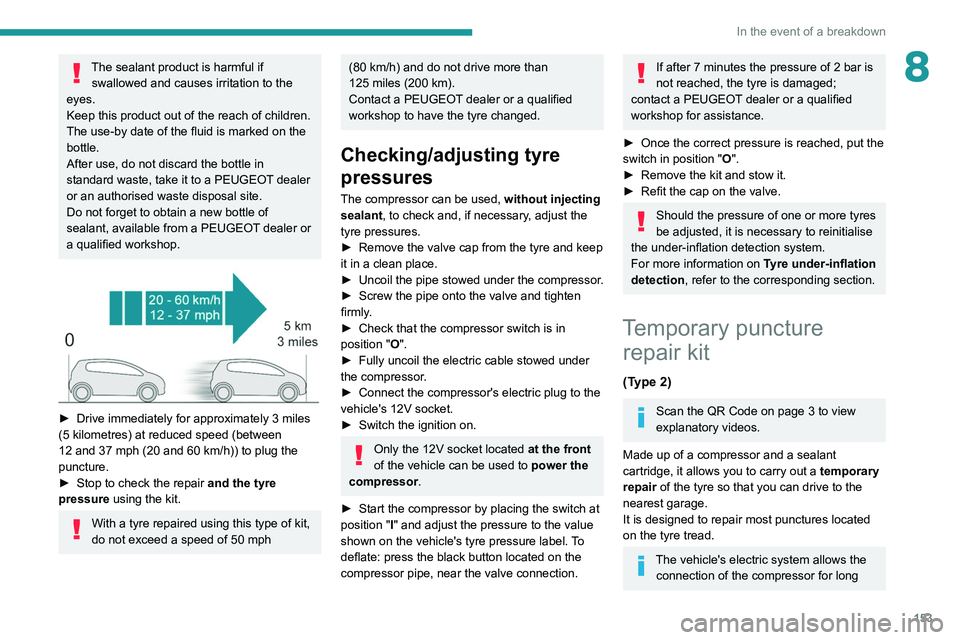
► Drive immediately for approximately 3 miles
(5 kilometres) at reduced speed (between
12 and 37 mph (20 and 60
km/h)) to plug the
puncture.
►
Stop to check the repair
and the tyre
pressure using the kit.
With a tyre repaired using this type of kit,
do not exceed a speed of 50
mph
(80 km/h) and do not drive more than
125 miles (200 km).
Contact a PEUGEOT dealer or a qualified
workshop to have the tyre changed.
Checking/adjusting tyre
pressures
The compressor can be used, without injecting
sealant, to check and, if necessary, adjust the
tyre pressures.
►
Remove the valve cap from the tyre and keep
it in a clean place.
►
Uncoil
the pipe stowed under the compressor.
►
Screw the pipe onto the valve and tighten
firmly
.
►
Check that the compressor switch is in
position " O
".
►
Fully uncoil the electric cable stowed under
the compressor
.
►
Connect the compressor's electric plug to the
vehicle's 12V socket.
►
Switch the ignition on.
Only the 12V socket located at the front
of the vehicle can be used to power the
compressor .
►
Start the compressor by placing the switch at
position " I
" and adjust the pressure to the value
shown on the vehicle's tyre pressure label. To
deflate: press the black button located on the
compressor pipe, near the valve connection.
If after 7 minutes the pressure of 2 bar is
not reached, the tyre is damaged;
contact a PEUGEOT dealer or a qualified
workshop for assistance.
►
Once the correct pressure is reached, put the
switch in position " O
".
►
Remove the kit and stow it.
►
Refit the cap on the valve.
Should the pressure of one or more tyres
be adjusted, it is necessary to reinitialise
the under-inflation detection system.
For more information on Tyre under-inflation
detection, refer to the corresponding section.
Temporary puncture repair kit
(Type 2)
Scan the QR Code on page 3 to view
explanatory videos.
Made up of a compressor and a sealant
cartridge,
it allows you to carry out a temporary
repair of the tyre so that you can drive to the
nearest garage.
It is designed to repair most punctures located
on the tyre tread.
The vehicle's electric system allows the connection of the compressor for long
Page 156 of 244
154
In the event of a breakdown
enough to inflate a tyre after a puncture
repair.
For more information on the Tool kit,
refer to the corresponding section.
Composition of the kit
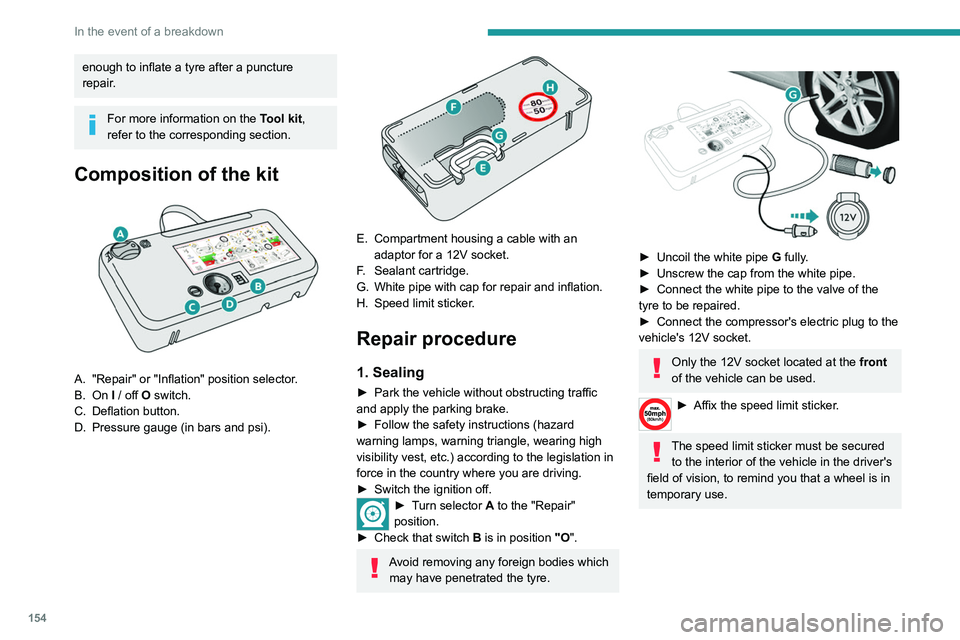
A. "Repair" or "Inflation" position selector.
B. On I / off O switch.
C. Deflation button.
D. Pressure gauge (in bars and psi).
E. Compartment housing a cable with an adaptor for a 12V socket.
F. Sealant cartridge.
G. White pipe with cap for repair and inflation.
H. Speed limit sticker.
Repair procedure
1. Sealing
► Park the vehicle without obstructing traffic
and apply the parking brake.
►
Follow the safety instructions (hazard
warning lamps, warning triangle, wearing high
visibility vest, etc.) according to the legislation in
force in the country where you are driving.
►
Switch the ignition off.
► Turn selector A to the "Repair"
position.
►
Check that switch
B is in position "O".
Avoid removing any foreign bodies which
may have penetrated the tyre.
► Uncoil the white pipe G fully.
► Unscrew the cap from the white pipe.
►
Connect the white pipe to the valve of the
tyre to be repaired.
►
Connect the compressor's electric plug to the
vehicle's 12V socket.
Only the 12V socket located at the front
of the vehicle can be used.
► Affix the speed li mit sticker.
The speed limit sticker must be secured
to the interior of the vehicle in the driver's
field of vision, to remind you that a wheel is in
temporary use.
Page 158 of 244

156
In the event of a breakdown
► Remove the kit and stow it.
Drive at reduced speed (50 mph
(80 km/h) max.), limiting the distance
travelled to approximately 125 miles
(200
km).
Removing the pipe and
cartridge
► Turn the pipe assembly 2 to the left until it
comes into contact with the unit.
►
Disconnect the connector 1
from the cartridge
by turning it a quarter turn anti-clockwise.
►
Pull the pipe assembly 2
out slightly, then
disconnect the connector 3 from the air intake
pipe by turning it a quarter turn anti-clockwise.
– Remove the pipe assembly 2 .
– Keep the compressor vertical.
–
Unscrew the cartridge 4
from the bottom.
To fit the new cartridge and new pipe, carry out
these operations in reverse order.
Be careful of fluid discharge.
The expiry date of the fluid is indicated
on the cartridge.
The sealant cartridge is designed for single
use; it must be replaced even if only partly
used.
After use, do not discard the cartridge into the
environment, take it to an authorised waste
disposal site or a PEUGEOT dealer.
Do not forget to obtain a new sealant
cartridge, available from PEUGEOT dealers
or from a qualified workshop.
Checking/adjusting tyre
pressures
Use the compressor, without injecting
any sealant, to check and, if necessary,
adjust the tyre pressures.
► Turn selector A to the "Inflation"
position.
►
Uncoil the white pipe G
fully.
►
Connect the pipe to the tyre valve.
►
Connect the compressor's electric plug to the
vehicle's 12V socket.
Only the 12V socket located at the front
of the vehicle can be used.
►
Restart the vehicle and leave the engine
running.
Tyre inflation pressures are indicated on this label.
► Adjust the pressure using the compressor
(to inflate: set switch B to position "I"; to deflate:
set switch B to position "O" and press button C),
following the vehicle's tyre pressure label.
If, after approximately seven minutes,
this pressure is not reached, this
indicates that the tyre is irreparable; contact a
PEUGEOT dealer or a qualified workshop for
assistance.
► Remove the kit and stow it.
Do not drive more than 125 miles
(200 km) with a repaired tyre; see a
PEUGEOT dealer or a qualified workshop to
have the tyre changed.
Should the pressure of one or more tyres
be adjusted, it is necessary to reinitialise
the under-inflation detection system.
For more information on Tyre under-inflation
detection, refer to the corresponding section.
Page 159 of 244
157
In the event of a breakdown
8Tyre inflation pressures are indicated on this label.
► Adjust the pressure using the compressor
(to inflate: set switch B to position "I"; to deflate:
set switch B to position "O" and press button C),
following the vehicle's tyre pressure label.
If, after approximately seven minutes,
this pressure is not reached, this
indicates that the tyre is irreparable; contact a
PEUGEOT dealer or a qualified workshop for
assistance.
►
Remove the kit and stow it.
Do not drive more than 125 miles
(200 km) with a repaired tyre; see a
PEUGEOT dealer or a qualified workshop to
have the tyre changed.
Should the pressure of one or more tyres
be adjusted, it is necessary to reinitialise
the under-inflation detection system.
For more information on Tyre under-inflation
detection, refer to the corresponding section.
Spare wheel
Scan the QR Code on page 3 to view
explanatory videos.
For more information on the Tool kit,
refer to the corresponding section.
The jack must only be used to change a wheel with a damaged or punctured tyre.
The jack does not require any maintenance.
The jack meets European standards, as
defined in the Machinery Directive 2006/42/
EC.
Some parts of the jack such as the
screws and hinges could cause injury:
avoid touching them.
Carefully remove any traces of grease.
Wheel with wheel trim
When refitting the wheel, refit the wheel
trim, starting by aligning the cutout with the
valve and then pushing the trim into place all
round its edge with the palm of your hand.
►
Park the vehicle without obstructing any
traffic and apply the parking brake.
►
Follow the safety instructions (hazard
warning lamps, warning triangle, wearing high
visibility vest, etc.) according to the legislation in
force in the country where you are driving. ►
Switch off the ignition.
Accessing the spare wheel
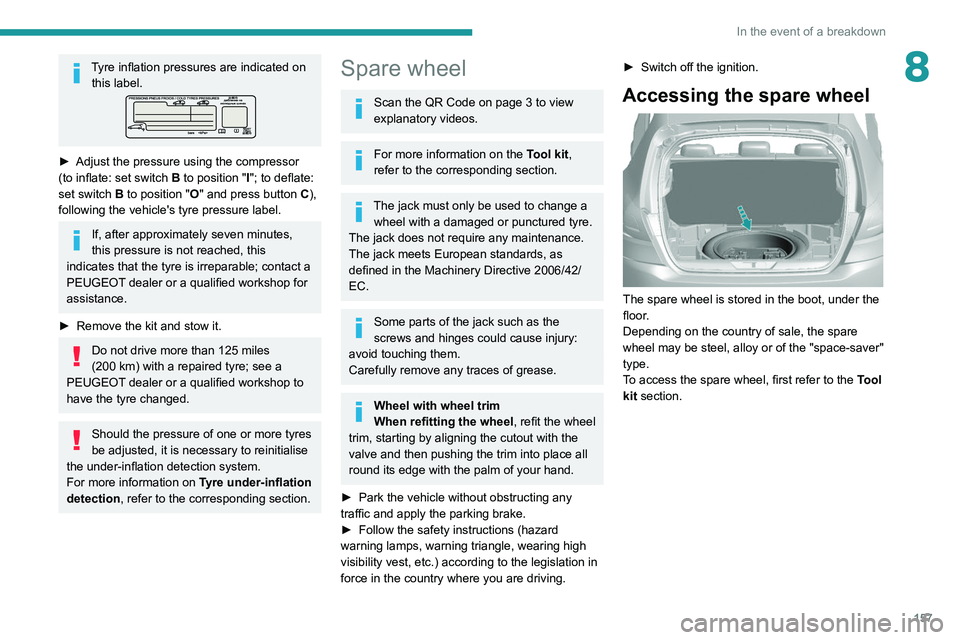
The spare wheel is stored in the boot, under the
floor.
Depending on the country of sale, the spare
wheel may be steel, alloy or of the "space-saver"
type.
To access the spare wheel, first refer to the Tool
kit section.
Page 162 of 244
160
In the event of a breakdown
If your vehicle is fitted with alloy wheels, when
tightening the bolts on fitting, it is normal to
notice that the washers do not come into
contact with the "space-saver" spare wheel.
The wheel is secured by the conical contact
of each bolt.
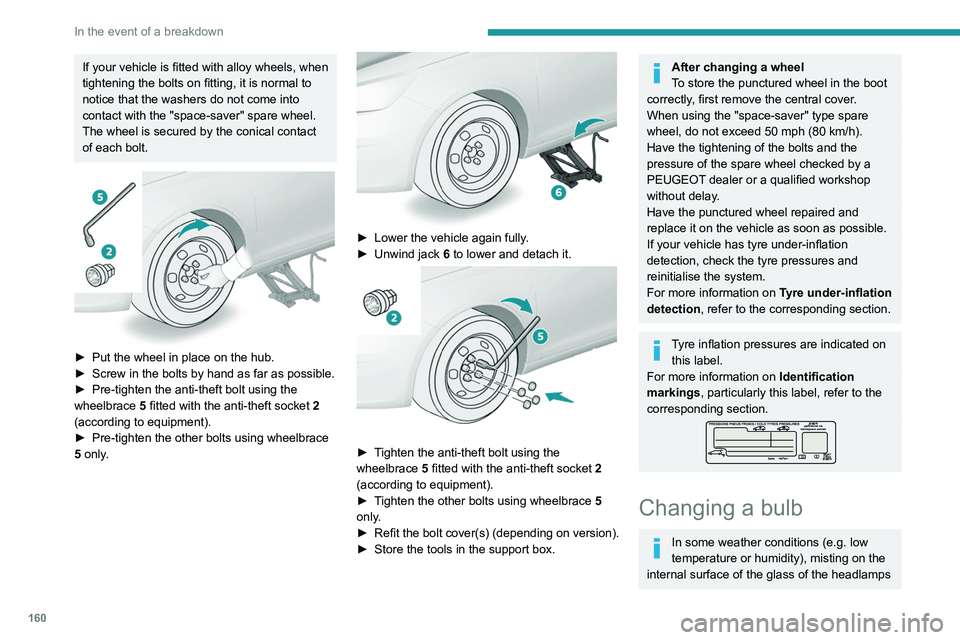
► Put the wheel in place on the hub.
► Screw in the bolts by hand as far as possible.
►
Pre-tighten the anti-theft bolt using the
wheelbrace 5
fitted with the anti-theft socket 2
(according to equipment).
►
Pre-tighten the other bolts using wheelbrace
5
only.
► Lower the vehicle again fully .
► Unwind jack 6
to lower and detach it.
► Tighten the anti-theft bolt using the
wheelbrace 5 fitted with the anti-theft socket 2
(according to equipment).
►
T
ighten the other bolts using wheelbrace 5
only.
►
Refit
the bolt cover(s) (depending on version).
►
Store the tools in the support box.
After changing a wheel
To store the punctured wheel in the boot
correctly, first remove the central cover.
When using the "space-saver" type spare
wheel, do not exceed 50 mph (80 km/h).
Have the tightening of the bolts and the
pressure of the spare wheel checked by a
PEUGEOT dealer or a qualified workshop
without delay.
Have the punctured wheel repaired and
replace it on the vehicle as soon as possible.
If your vehicle has tyre under-inflation
detection, check the tyre pressures and
reinitialise the system.
For more information on Tyre under-inflation
detection, refer to the corresponding section.
Tyre inflation pressures are indicated on this label.
For more information on Identification
markings, particularly this label, refer to the
corresponding section.
Changing a bulb
In some weather conditions (e.g. low
temperature or humidity), misting on the
internal surface of the glass of the headlamps
and rear lamps is normal, and will disappear
after the lamps have been on for a few
minutes.
The headlamps have polycarbonate lenses with a protective coating:
– Do not clean them with a dry or abrasive
cloth, nor with detergent or solvent
products.
– Use a sponge and soapy water or a pH
neutral product.
– When using a high-pressure washer on
persistent marks, do not keep the lance
directed towards the headlamps, lamps or
their edges for too long, so as not to damage
their protective coating and seals.
Changing a bulb must only be done with
the ignition off and after the headlamp /
lamp has been switched off for several
minutes - risk of serious burns!
Do not touch the bulb directly with your
fingers; use a lint-free cloth.
It is essential only to use anti-ultraviolet
(UV) type bulbs, so as not to damage the
headlamp.
Always replace a failed bulb with a new bulb
of the same type and specification. To avoid
lighting imbalance, replace the bulbs in pairs.
Page 165 of 244
163
In the event of a breakdown
8Front foglamps
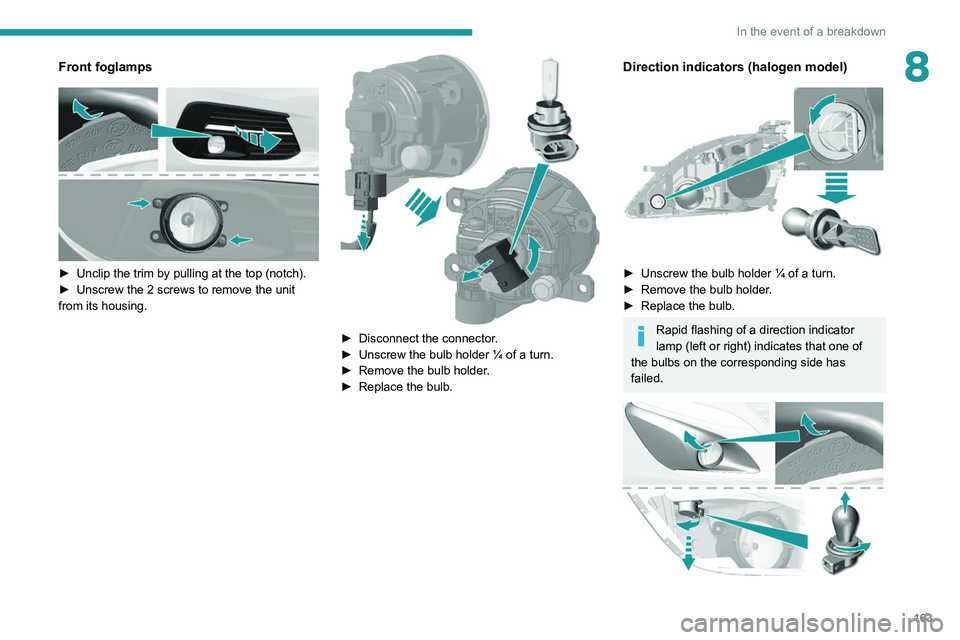
► Unclip the trim by pulling at the top (notch).
► Unscrew the 2 screws to remove the unit
from its housing.
► Disconnect the connector .
► Unscrew the bulb holder ¼ of a turn.
►
Remove the bulb holder
.
►
Replace the bulb.
Direction indicators (halogen model)
► Unscrew the bulb holder ¼ of a turn.
► Remove the bulb holder .
►
Replace the bulb.
Rapid flashing of a direction indicator
lamp (left or right) indicates that one of
the bulbs on the corresponding side has
failed.
Page 169 of 244

167
In the event of a breakdown
8► Identify the defective fuse using the current
allocation tables and diagrams.
T
o replace a fuse, it is essential to:
►
Use the special tweezers to extract the fuse
from its housing and check the condition of its
filament.
►
Always replace the failed fuse with a fuse of
the same rating (same colour); use of a different
rating may cause malfunctions - risk of fire!
If the fault recurs after replacing a fuse, have
the electrical system checked by a PEUGEOT
dealer or a qualified workshop.
The fuse allocation tables and the corresponding diagrams are available
from a PEUGEOT dealer or from a qualified
workshop.
The replacement of a fuse not shown in the allocation tables may cause a serious
malfunction of your vehicle. Contact a
PEUGEOT dealer or a qualified workshop.
Good
Failed
Tweezers
Installing electrical accessories
Your vehicle's electrical system is
designed to operate with standard or optional
equipment.
Before installing other electrical equipment
or accessories on your vehicle, contact a
PEUGEOT dealer or a qualified workshop.
PEUGEOT will not accept responsibility
for the cost incurred in repairing your
vehicle or for rectifying malfunctions resulting
from the installation of accessories not
supplied and not recommended by
PEUGEOT and not installed in accordance
with its instructions, in particular when the
combined consumption of all of the additional
equipment connected exceeds 10
milliamperes.
Fuses in the dashboard
The fusebox is located in the lower dashboard
(left-hand side).
Accessing the fuses
► Unclip the cover by pulling at the top left, then
right.