2021 Peugeot 308 steering wheel adjustment
[x] Cancel search: steering wheel adjustmentPage 4 of 244

2
Contents
■
Overview
Labels 4
■
Eco-driving
1Instruments
Digital instrument panel 7
Warning and indicator lamps 8
Indicators 14
Manual test 17
Total distance recorder 17
Lighting dimmer 17
Trip computer 18
2Access
Electronic key with remote control function
and built-in key, 19 Keyless Entry and Starting 21
Back-up procedures 23
Doors 25
Boot 25
Alarm 26
Electric windows 28
3Ease of use and comfort
PEUGEOT i-Cockpit 30
Front seats 30
Steering wheel adjustment
33
Mirrors 33
Rear seats (saloon) 35
Rear seats (SW) 35
Interior fittings 37
Front armrest 38
Boot fittings (hatchback) 40
Boot fittings (SW) 40
Warning triangle (stowing) 41
Heating and Ventilation 42
Manual air conditioning 43
Dual-zone automatic air conditioning 44
Front demisting - defrosting 46
Rear screen demisting/defrosting 47
Panoramic sunroof 47
Courtesy lamps 48
Interior ambient lighting 49
4Lighting and visibility
Exterior lighting control stalk 50
Automatic illumination of headlamps 51
Automatic headlamp dipping 52
Guide-me-home and welcome lighting 53
Direction indicators 53
Headlamp beam height adjustment 54
Wiper control stalk 54
Changing a wiper blade 56
Automatic wipers 56
5Safety
General safety recommendations 58
Hazard warning lamps 58
Emergency or assistance call
59
Horn 61
Electronic stability control (ESC) 62
Seat belts 64
Airbags 66
Child seats 68
Deactivating the front passenger airbag 70
ISOFIX child seats 74
Child lock 79
6Driving
Driving recommendations 81
Starting/switching off the engine 82
Manual parking brake 85
Electric parking brake 86
Hill start assist 89
5-speed manual gearbox 89
6-speed manual gearbox 90
Automatic gearbox EAT6 90
Automatic gearbox EAT8 93
Driver Sport Pack 96
Gear efficiency indicator 97
Stop & Start 97
Under-inflation detection 99
Driving and manoeuvring aids - General
recommendations
100
Speed Limit Recognition and
Recommendation
102
Speed limiter 104
Cruise control 106
Adaptive Cruise Control 107
Active Safety Brake with Distance Alert and
Intelligent emergency braking assistance
11 2
Distraction detection
11 4
Active Lane Keeping Assistance 11 5
Blind Spot Monitoring 11 9
Page 7 of 244

5
Overview
1.Bonnet release
2. Dashboard fuses
3. Courtesy lamp
Warning lamps display for seat belts and front
passenger airbag
Interior ambience lighting
Interior rear view mirror
Emergency and assistance call buttons
4. Touch screen with PEUGEOT Connect Radio
or PEUGEOT Connect Nav
5. Air conditioning controls
6. Stop & Start button
Gearbox controls
Driver Sport Pack
7. Manual parking brake
Electric parking brake
8. USB socket
9. Horn
10. Digital instrument panelSteering-mounted controls
1.Exterior lighting control stalks/Direction
indicators
2. Wipers/Screenwash/Trip computer control
stalk
3. Audio volume controls/Choice of instrument
panel display mode
4. Controls for Cruise control/Speed limiter/
Adaptive Cruise Control
Side control bar
1.Deactivation/Reactivation of DSC and ASR
(GTi version) 2.
Deactivation/Reactivation of Stop & Start
3. Deactivation/Reactivation of Active Lane
Departure Warning System
4. Deactivation of the interior volumetric and
anti-tilt monitoring alarm
5. Headlamp beam height adjustment wheel
Central control bar
1.Hazard warning lamps switch
2. Locking/unlocking from inside control
Page 32 of 244

30
Ease of use and comfort
PEUGEOT i-Cockpit
Before going out on the road and to benefit from
the ergonomic layout of the PEUGEOT i-Cockpit,
adjust in the following order:
–
the height of the head restraint,
–
the seat backrest angle,
–
the seat cushion height,
–
the longitudinal position of the seat,
–
the depth and then the height of the steering
wheel,
–
the rear view mirror and door mirrors.
Once these adjustments have been
made, ensure that from your driving
position you can see the "head-up" instrument
panel clearly, over the reduced diameter
steering wheel.
Front head restraints
Adjusting the height
Upward:
► pull the head restraint up to the desired
position; the head restraint can be felt to click
into position.
Downward:
►
press lug
A and push the head restraint down
to the desired position.
The head restraint is correctly adjusted when its upper edge is level with the top
of the passenger’s head.
Removing a head restraint
► Pull the head restraint up as far as it will go.
► Press the lug A to release the head restraint
and remove it completely.
►
Stow the head restraint securely
.
Refitting a head restraint
► Insert the head restraint rods into the guides
in the seat backrest.
► Push the head restraint down as far as it will
go.
►
Press lug
A to free the head restraint and
push it down.
►
Adjust the height of the head restraint.
Never drive with the head restraints
removed; they should be in place and
correctly adjusted for the occupant of the
seat.
Manually-adjusted front
seats
For safety reasons, seat adjustments
must only be made when the vehicle is
stationary.
Longitudinal
► Lift the control and slide the seat forwards or
backwards.
Page 35 of 244

33
Ease of use and comfort
3
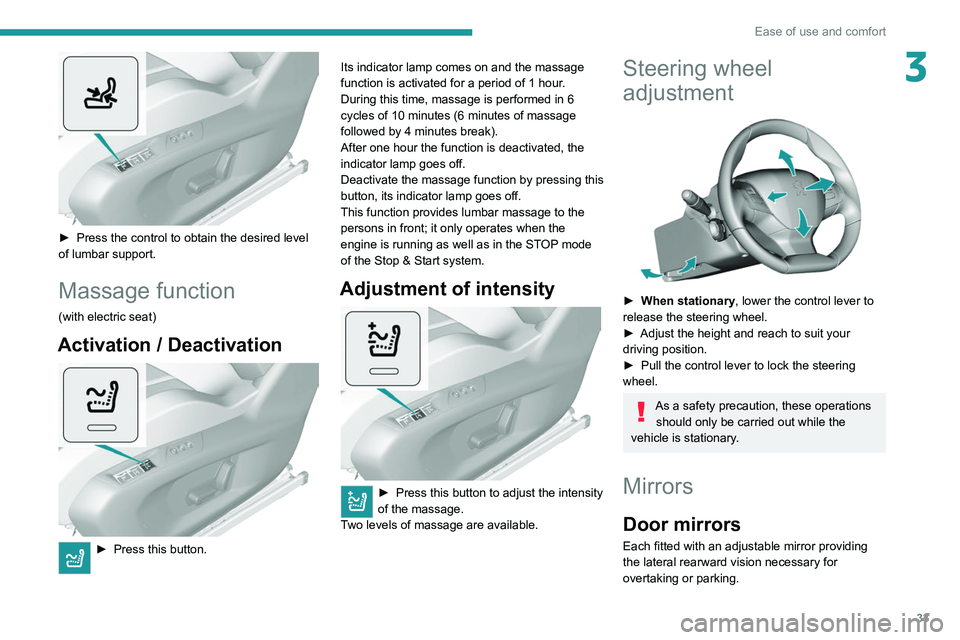
► Press the control to obtain the desired level
of lumbar support.
Massage function
(with electric seat)
Activation / Deactivation
► Press this button. Its indicator lamp comes on and the massage
function is activated for a period of 1 hour
.
During this time, massage is performed in 6
cycles of 10 minutes (6 minutes of massage
followed by 4 minutes break).
After one hour the function is deactivated, the
indicator lamp goes off.
Deactivate the massage function by pressing this
button, its indicator lamp goes off.
This function provides lumbar massage to the persons in front; it only operates when the
engine is running as well as in the STOP mode
of the Stop & Start system.
Adjustment of intensity
► Press this button to adjust the intensity
of the massage.
T
wo levels of massage are available.
Steering wheel
adjustment
► When stationary , lower the control lever to
release the steering wheel.
►
Adjust the height and reach to suit your
driving position.
►
Pull the control lever to lock the steering
wheel.
As a safety precaution, these operations should only be carried out while the
vehicle is stationary.
Mirrors
Door mirrors
Each fitted with an adjustable mirror providing
the lateral rearward vision necessary for
overtaking or parking.
Page 102 of 244

100
Driving
Driving aids
You should hold the steering wheel
with both hands, always use the interior and
exterior rear view mirrors, always keep the
feet close to the pedals and take a break
every two hours.
Manoeuvring aids
The driver must always check the
surroundings of the vehicle before and during
the whole manoeuvre, in particular using the
mirrors.
Radar
The operation of the radar as well as the
associated functions may be impaired through
the accumulation of dirt (mud, frost, etc.), in
certain difficult weather conditions (very heavy
rain, snow) or if the bumper is damaged.
If the front bumper is to be repainted, contact
a PEUGEOT dealer or a qualified workshop;
certain types of paint could interfere with the
operation of the radar.
Driving aids camera
This camera and its associated functions
may be impaired or not work if the windscreen
area in front of the camera is dirty, misty,
frosty, covered with snow, damaged or
masked by a sticker.
On versions with camera alone, this message
indicates to you that the camera is obstructed:
Checking tyre pressures
This check should be done when the
tyres are "cold" (vehicle stopped for 1 hour or
after a journey of less than 6 miles (10
km) at
moderate speeds).
Otherwise, add 0.3 bar to the pressures
shown on the label.
Snow chains
The system does not have to be
reinitialised after fitting or removing snow
chains.
Under-inflation alert
This is signalled by the fixed illumination of this warning lamp, accompanied by an
audible signal and, depending on equipment, the
display of a message.
►
Reduce speed immediately
, avoid excessive
steering movements and avoid sudden braking.
►
Stop the vehicle as soon as it is safe to do
so.
The loss of pressure detected does not always cause visible bulging of the tyre.
Do not rely on just a visual check.
►
Using a compressor
, such as the one in
the temporary puncture repair kit, check the
pressures of the four tyres when cold.
►
If it is not possible to make this check
immediately
, drive carefully at reduced speed.
► In the event of a puncture, use the
temporary puncture repair kit or the spare wheel
(depending on equipment).
The alert is kept active until the system is reinitialised.
Reinitialisation
The system must be reinitialised after any
adjustment to the pressure of one or more tyres,
and after changing one or more wheels.
Before reinitialising the system, make
sure that the pressures of the four tyres
are correct for the conditions of use of the
vehicle and conform to the values written on
the tyre pressure label.
Check the pressures of the four tyres before
performing the reinitialisation.
The system does not advise if a pressure is
incorrect at the time of reinitialisation.
With the vehicle stationary, the system is
reinitialised via the Driving/V ehicle touch
screen menu.
The reinitialisation is confirmed by the display of
a message and an audible signal.
Malfunction
These warning lamps come on in the event of a malfunction.
A message appears, accompanied by an audible
signal.
In this case, the tyre under-inflation monitoring
function is no longer performed.
Have the system checked by a PEUGEOT
dealer or a qualified workshop.
Driving and manoeuvring
aids - General
recommendations
Driving and manoeuvring aids cannot, in
any circumstances, replace the need for
vigilance on the part of the driver.
The driver must comply with the Highway
Code, must remain in control of the vehicle in
all circumstances and must be able to retake
control of it at all times. The driver must adapt
the speed to climactic conditions, traffic and
the state of the road.
It is the driver's responsibility to constantly
check the traffic, to assess the relative
distances and speeds of other vehicles and to
anticipate their movements before indicating
and changing lane.
The systems cannot exceed the limits of the
laws of physics.
Page 106 of 244

104
Driving
► press button 5 to display the memorised
speed settings,
► press the button for the desired speed
setting.
The selection screen closes after a few
moments.
This setting becomes the new limit speed.
To modify the cruise speed setting based on the speed suggested by the Speed Limit Recognition
and Recommendation, as shown on the
instrument panel:
► Press button 5 once; a message is displayed
to confirm the memorisation request.
► Press button 5 again to save the suggested
speed.
The speed is immediately shown on the
instrument panel as the new speed setting.
Temporarily exceeding the
speed setting
► Press the accelerator pedal down fully.
The speed limiter is deactivated temporarily and
the displayed speed setting flashes.
► Release the accelerator pedal to return to
below the programmed speed.
When the limit speed is exceeded but this is not
due to action by the driver (in case of a steep
slope, for example), an audible signal triggers
immediately.
On a steep descent or in the event of
sharp acceleration, the speed limiter will
► Press button 2again to confirm and save the
new speed setting.
The display then reverts to its previous state.
Speed limiter
Refer to the General recommendations on the
use of driving and manoeuvring aids .
This system prevents the vehicle from
exceeding the speed programmed by the
driver (speed setting).
The speed limiter is switched on manually.
The minimum speed setting is 19 mph (30
km/h).
The speed setting remains in the system
memory when the ignition is switched off.
Steering-mounted control
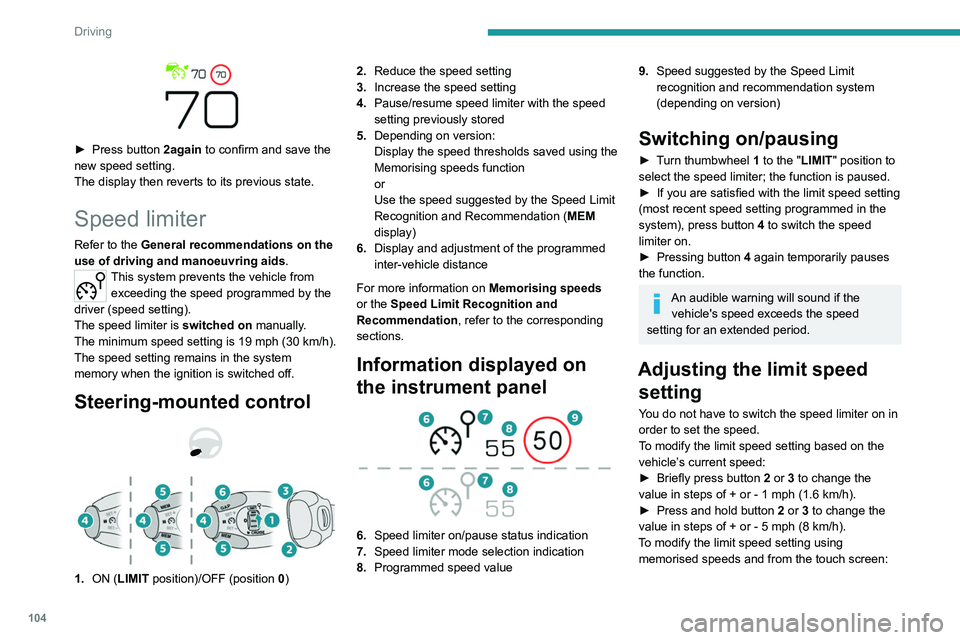
1. ON (LIMIT position)/OFF (position 0) 2.
Reduce the speed setting
3. Increase the speed setting
4. Pause/resume speed limiter with the speed
setting previously stored
5. Depending on version:
Display the speed thresholds saved using the
Memorising speeds function
or
Use the speed suggested by the Speed Limit
Recognition and Recommendation ( MEM
display)
6. Display and adjustment of the programmed
inter-vehicle distance
For more information on Memorising speeds
or the Speed Limit Recognition and
Recommendation, refer to the corresponding
sections.
Information displayed on
the instrument panel
6. Speed limiter on/pause status indication
7. Speed limiter mode selection indication
8. Programmed speed value
9.Speed suggested by the Speed Limit
recognition and recommendation system
(depending on version)
Switching on/pausing
► Turn thumbwheel 1 to the "LIMIT" position to
select the speed limiter; the function is paused.
►
If you are satisfied with the limit speed setting
(most recent speed setting programmed in the
system), press button
4 to switch the speed
limiter on.
►
Pressing button 4
again temporarily pauses
the function.
An audible warning will sound if the vehicle's speed exceeds the speed
setting for an extended period.
Adjusting the limit speed setting
You do not have to switch the speed limiter on in
order to set the speed.
To modify the limit speed setting based on the
vehicle’s current speed:
►
Briefly press button
2 or 3 to change the
value in steps of +
or - 1 mph (1.6 km/h).
►
Press and hold button
2
or 3 to change the
value in steps of +
or - 5 mph (8 km/h).
To modify the limit speed setting using memorised speeds and from the touch screen:
Page 110 of 244

108
Driving
Mode D or M must be selected.
► With the vehicle moving, press one of the
buttons 2 or 3: the current speed of your vehicle
becomes the cruise speed setting.
– the current speed of your vehicle, if it is over
19 mph (30 km/h),
– 19 mph (30 km/h), if it is below 19 mph
(30 km/h).
Saving your settings
Switching off the ignition cancels any speed
setting value chosen by the driver.
The inter-vehicle distance is set at " Normal"
(2 dashes) by default. Otherwise, the last
value selected will be used when the system is
switched on.
Pause
The cruise control can be paused manually:
– either by action by the driver:
• On the button 4 (Pause).
• On the brake pedal.
• On the electric parking brake control.
• On the clutch pedal, by pressing for
approximately 10 seconds or more.
• When changing from mode D to N with an
automatic gearbox.
– or automatically:
• If the ESC system is activated, for safety
reasons.
• When the speed of the vehicle goes below
19 mph (30 km/h) (1,100 rpm) with a manual
gearbox.
With the Stop function (with the EAT8 automatic
gearbox), the system manages braking until the
vehicle comes to a complete stop.
The brake lamps come on if the vehicle is slowed down by the system.
It can be dangerous to drive if the brake
lamps are not in perfect working order.
To do this, it uses a radar fitted in the front
bumper.
Primarily designed for driving on main
roads and motorways, this system only
works with moving vehicles driving in the
same direction as your vehicle.
If the driver operates a direction indicator
to overtake a slower vehicle, the cruise
control allows the vehicle to temporarily
approach the vehicle in front to assist the
overtaking manoeuvre, without ever
exceeding the speed setting.
Some vehicles present on the road may
not be properly detected or may be
misinterpreted by the camera and/or radar
(e.g. a lorry), which may lead to a poor
assessment of distances and lead to the
vehicle accelerating or braking
inappropriately.
Operating principle
The system automatically adapts the speed of
your vehicle to that of the vehicle in front, to
maintain a constant distance.
If the vehicle in front is driving more slowly,
the system slows, or even stops your vehicle
completely (with the EAT8 automatic gearbox),
using engine braking and the braking system.
If the vehicle in front accelerates or changes
lane, the cruise control progressively accelerates
your vehicle to return to the programmed speed.
The brake lamps illuminate as soon as the braking system is activated to
decelerate the vehicle.
This system is a driving aid that cannot, in any circumstances, replace the need
to observe speed limits and safety distances,
nor the need for vigilance on the part of the
driver.
The driver must remain in control of their
vehicle at all times by keeping both hands on
the steering wheel and keeping their feet near
the brake and accelerator pedals.
Steering-mounted controls
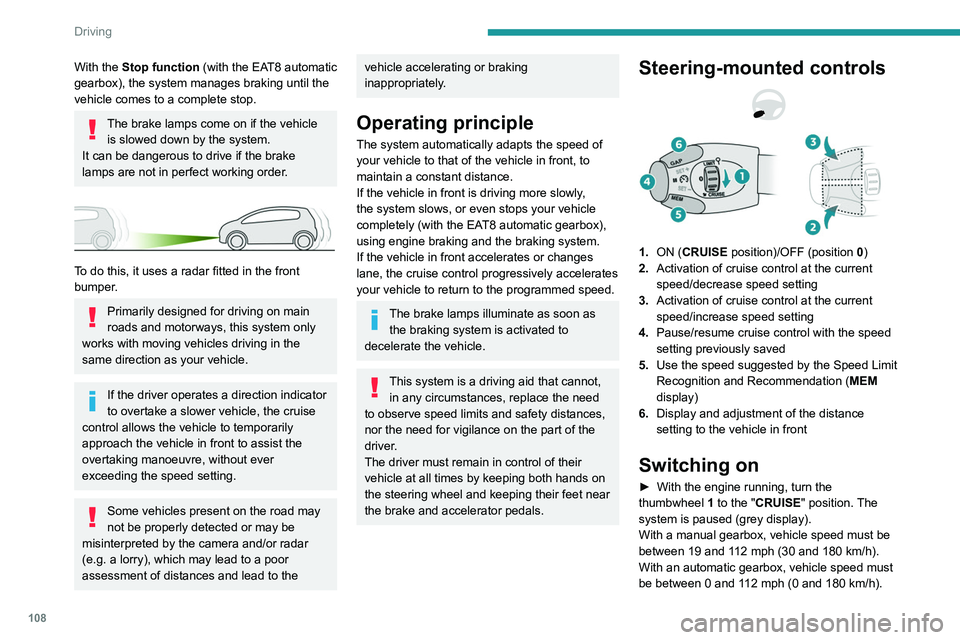
1. ON (CRUISE position)/OFF (position 0)
2. Activation of cruise control at the current
speed/decrease speed setting
3. Activation of cruise control at the current
speed/increase speed setting
4. Pause/resume cruise control with the speed
setting previously saved
5. Use the speed suggested by the Speed Limit
Recognition and Recommendation ( MEM
display)
6. Display and adjustment of the distance
setting to the vehicle in front
Switching on
► With the engine running, turn the
thumbwheel 1 to the "CRUISE" position. The
system is paused (grey display).
With a manual gearbox, vehicle speed must be
between 19 and 112 mph (30
and 180 km/h).
With an automatic gearbox, vehicle speed must
be between 0 and 112 mph (0
and 180 km/h).
Page 120 of 244

11 8
Driving
Deactivation/Activation
► Press this button to deactivate/reactivate the
system at any time.
Deactivation is signalled by the lighting of the
indicator lamp in the button.
Malfunction
In the event of a system
malfunction, these warning lamps
come on on the instrument panel, accompanied
by an onscreen message and an audible signal.
Have the system checked by a PEUGEOT
dealer or a qualified workshop.
Blind Spot Monitoring
Refer to the General recommendations on the
use of driving and manoeuvring aids .
Function statusIndicator lamp Display and/or associated
messageComments
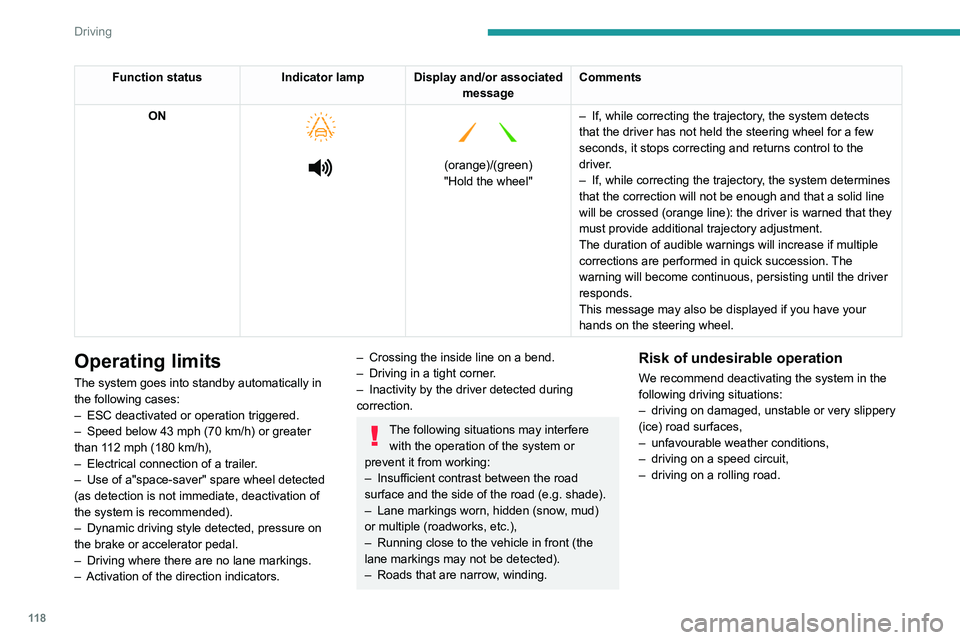
ON
(orange)/(green)
"Hold the wheel" –
If, while correcting the trajectory
, the system detects
that the driver has not held the steering wheel for a few
seconds, it stops correcting and returns control to the
driver.
– If, while correcting the trajectory , the system determines
that the correction will not be enough and that a solid line
will be crossed (orange line): the driver is warned that they
must provide additional trajectory adjustment.
The duration of audible warnings will increase if multiple
corrections are performed in quick succession. The
warning will become continuous, persisting until the driver
responds.
This message may also be displayed if you have your
hands on the steering wheel.
Operating limits
The system goes into standby automatically in
the following cases:
–
ESC deactivated or operation triggered.
–
Speed below 43 mph (70
km/h) or greater
than 112 mph (180
km/h),
–
Electrical connection of a trailer
.
–
Use of a"space-saver" spare wheel detected
(as detection is not immediate, deactivation of
the system is recommended).
–
Dynamic driving style detected, pressure on
the brake or accelerator pedal.
–
Driving where there are no lane markings.
–
Activation of the direction indicators.
– Crossing the inside line on a bend.
– Driving in a tight corner .
–
Inactivity by the driver detected during
correction.
The following situations may interfere with the operation of the system or
prevent it from working:
–
Insufficient contrast between the road
surface and the side of the road (e.g. shade).
–
Lane markings worn, hidden (snow
, mud)
or multiple (roadworks, etc.),
–
Running close to the vehicle in front (the
lane markings may not be detected).
–
Roads that are narrow
, winding.
Risk of undesirable operation
We recommend deactivating the system in the
following driving situations:
–
driving on damaged, unstable or very slippery
(ice) road surfaces,
–
unfavourable weather conditions,
–
driving on a speed circuit,
–
driving on a rolling road.