2021 Peugeot 308 boot
[x] Cancel search: bootPage 160 of 244

158
In the event of a breakdown
Taking out the wheel
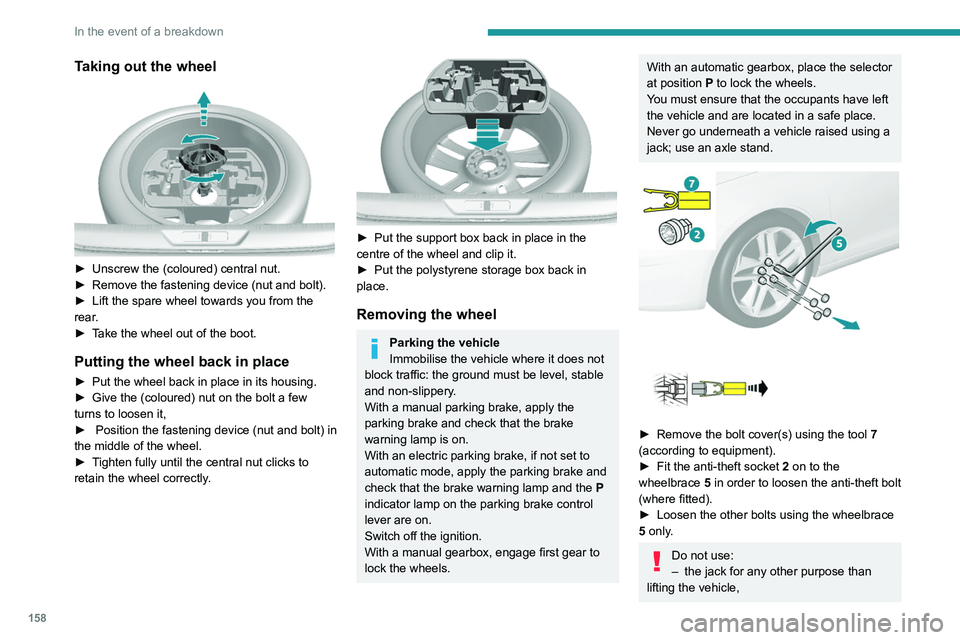
► Unscrew the (coloured) central nut.
► Remove the fastening device (nut and bolt).
►
Lift the spare wheel towards you from the
rear
.
►
T
ake the wheel out of the boot.
Putting the wheel back in place
► Put the wheel back in place in its housing.
► Give the (coloured) nut on the bolt a few
turns to loosen it,
►
Position the fastening device (nut and bolt) in
the middle of the wheel.
►
T
ighten fully until the central nut clicks to
retain the wheel correctly.
► Put the support box back in place in the
centre of the wheel and clip it.
►
Put the polystyrene storage box back in
place.
Removing the wheel
Parking the vehicle
Immobilise the vehicle where it does not
block traffic: the ground must be level, stable
and non-slippery.
With a manual parking brake, apply the
parking brake and check that the brake
warning lamp is on.
With an electric parking brake, if not set to
automatic mode, apply the parking brake and
check that the brake warning lamp and the P
indicator lamp on the parking brake control
lever are on.
Switch off the ignition.
With a manual gearbox, engage first gear to
lock the wheels.
With an automatic gearbox, place the selector
at position P to lock the wheels.
You must ensure that the occupants have left
the vehicle and are located in a safe place.
Never go underneath a vehicle raised using a
jack; use an axle stand.
► Remove the bolt cover(s) using the tool 7
(according to equipment).
►
Fit the anti-theft socket 2
on to the
wheelbrace 5 in order to loosen the anti-theft bolt
(where fitted).
►
Loosen the other bolts using the wheelbrace
5
only.
Do not use:
– the jack for any other purpose than
lifting the vehicle,
Page 162 of 244

160
In the event of a breakdown
If your vehicle is fitted with alloy wheels, when
tightening the bolts on fitting, it is normal to
notice that the washers do not come into
contact with the "space-saver" spare wheel.
The wheel is secured by the conical contact
of each bolt.
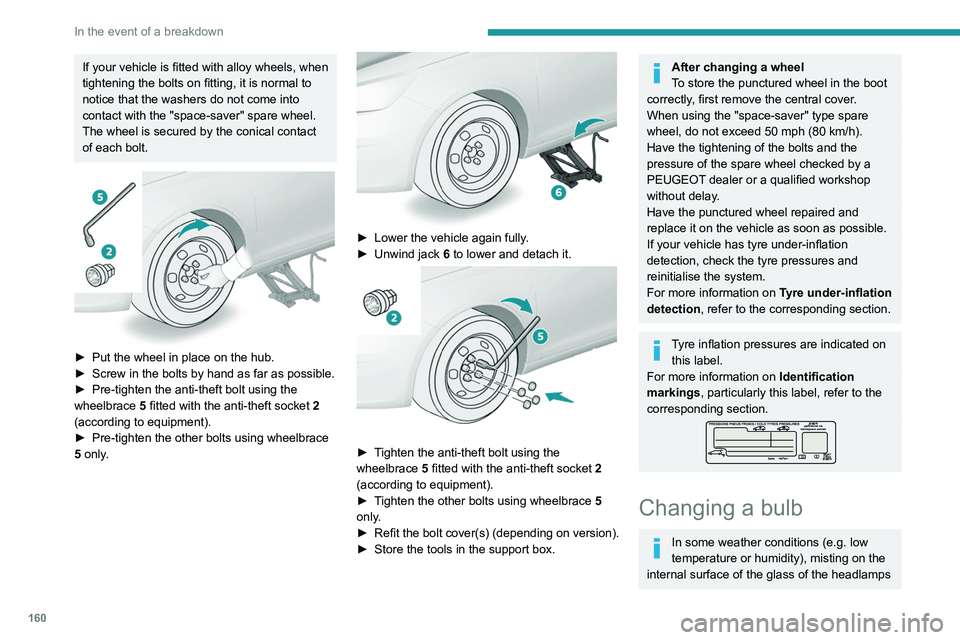
► Put the wheel in place on the hub.
► Screw in the bolts by hand as far as possible.
►
Pre-tighten the anti-theft bolt using the
wheelbrace 5
fitted with the anti-theft socket 2
(according to equipment).
►
Pre-tighten the other bolts using wheelbrace
5
only.
► Lower the vehicle again fully .
► Unwind jack 6
to lower and detach it.
► Tighten the anti-theft bolt using the
wheelbrace 5 fitted with the anti-theft socket 2
(according to equipment).
►
T
ighten the other bolts using wheelbrace 5
only.
►
Refit
the bolt cover(s) (depending on version).
►
Store the tools in the support box.
After changing a wheel
To store the punctured wheel in the boot
correctly, first remove the central cover.
When using the "space-saver" type spare
wheel, do not exceed 50 mph (80 km/h).
Have the tightening of the bolts and the
pressure of the spare wheel checked by a
PEUGEOT dealer or a qualified workshop
without delay.
Have the punctured wheel repaired and
replace it on the vehicle as soon as possible.
If your vehicle has tyre under-inflation
detection, check the tyre pressures and
reinitialise the system.
For more information on Tyre under-inflation
detection, refer to the corresponding section.
Tyre inflation pressures are indicated on this label.
For more information on Identification
markings, particularly this label, refer to the
corresponding section.
Changing a bulb
In some weather conditions (e.g. low
temperature or humidity), misting on the
internal surface of the glass of the headlamps
and rear lamps is normal, and will disappear
after the lamps have been on for a few
minutes.
The headlamps have polycarbonate lenses with a protective coating:
– Do not clean them with a dry or abrasive
cloth, nor with detergent or solvent
products.
– Use a sponge and soapy water or a pH
neutral product.
– When using a high-pressure washer on
persistent marks, do not keep the lance
directed towards the headlamps, lamps or
their edges for too long, so as not to damage
their protective coating and seals.
Changing a bulb must only be done with
the ignition off and after the headlamp /
lamp has been switched off for several
minutes - risk of serious burns!
Do not touch the bulb directly with your
fingers; use a lint-free cloth.
It is essential only to use anti-ultraviolet
(UV) type bulbs, so as not to damage the
headlamp.
Always replace a failed bulb with a new bulb
of the same type and specification. To avoid
lighting imbalance, replace the bulbs in pairs.
Page 166 of 244

164
In the event of a breakdown
The direction indicator bulb is located below the
front lamp.
►
Unclip the trim by pulling at the top (notch).
►
Unscrew the bulb holder ¼ of a turn.
►
Replace the bulb.
Rear lamps (hatchback)
1. Sidelamps (light-emitting diodes - LEDs).
2. Reversing lamps (W16W).
3. Direction indicators (PY-21W amber).
4. Brake lamps (light-emitting diodes - LEDs).
5. Foglamps (P21W).
Reversing lamps, direction indicators
(on the wings)
► Open the tailgate and then remove the
access cover .
► Disconnect the lamp unit connector .
► Remove the lamp fixing nut.
►
Extract the lamp unit carefully from the
outside.
►
Unscrew the bulb holder ¼ of a turn and
replace the bulb.
Foglamps (tailgate)
► Open the tailgate then remove the large
plastic cover .
► Unclip the 2 access covers, left and right.
► Unscrew the screws located in each opening.
►
Unclip the boot trim to access the lamp unit
connector
.
►
Disconnect the lamp unit connector
.
►
Remove the lamp unit fixing nut.
► Extract the lamp unit carefully from the
outside.
► Unscrew the bulb holder ¼ of a turn and
replace the bulb.
Rear lamps (SW)
1. Sidelamps (light emitting diodes - LEDs).
2. Direction indicators (PY-21W amber).
3. Brake lamps (light emitting diodes - LEDs).
4. Reversing lamps (W16W).
5. Foglamps (P21W).
Page 173 of 244

171
In the event of a breakdown
8Follow the instructions provided by the
manufacturer of the charger.
Never reverse polarities.
It is not necessary to disconnect the
battery.
►
Switch the ignition off.
►
Switch off all electrical consumers (audio
system, lighting, wipers, etc.).
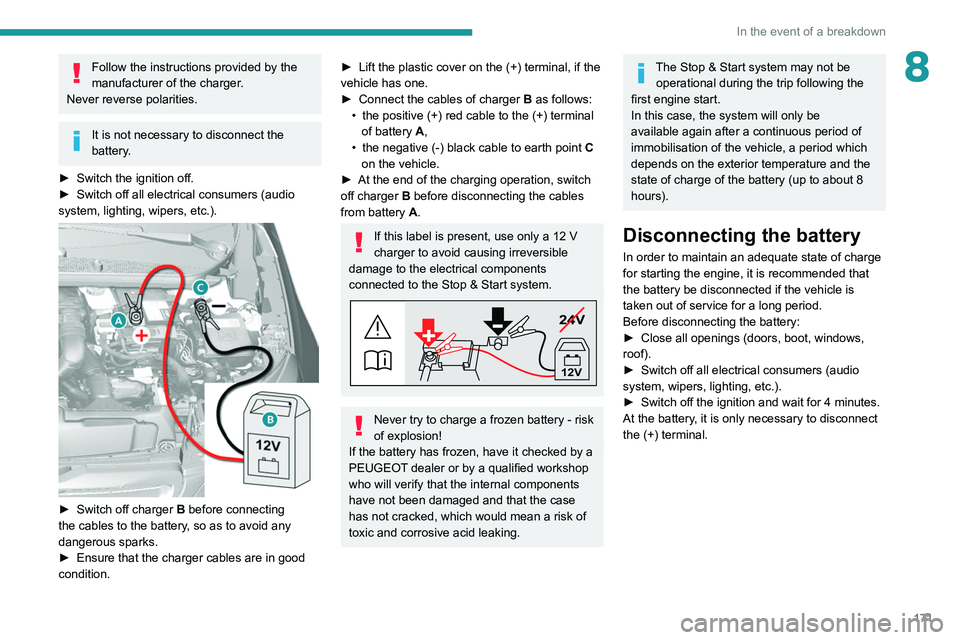
► Switch off charger B before connecting
the cables to the battery, so as to avoid any
dangerous sparks.
►
Ensure that the charger cables are in good
condition.
► Lift the plastic cover on the (+) terminal, if the
vehicle has one.
►
Connect the cables of charger B
as follows:
•
the positive (+) red cable to the (+) terminal
of battery
A,
•
the negative (-) black cable to earth point C
on the vehicle.
►
At the end of the charging operation, switch
off charger B
before disconnecting the cables
from battery A.
If this label is present, use only a 12 V
charger to avoid causing irreversible
damage to the electrical components
connected to the Stop & Start system.
24V
12V
Never try to charge a frozen battery - risk
of explosion!
If the battery has frozen, have it checked by a
PEUGEOT dealer or by a qualified workshop
who will verify that the internal components
have not been damaged and that the case
has not cracked, which would mean a risk of
toxic and corrosive acid leaking.
The Stop & Start system may not be operational during the trip following the
first engine start.
In this case, the system will only be
available again after a continuous period of
immobilisation of the vehicle, a period which
depends on the exterior temperature and the
state of charge of the battery (up to about 8
hours).
Disconnecting the battery
In order to maintain an adequate state of charge
for starting the engine, it is recommended that
the battery be disconnected if the vehicle is
taken out of service for a long period.
Before disconnecting the battery:
►
Close all openings (doors, boot, windows,
roof).
►
Switch off all electrical consumers (audio
system, wipers, lighting, etc.).
►
Switch off the ignition and wait for 4
minutes.
At the battery, it is only necessary to disconnect
the (+) terminal.
Page 184 of 244

182
Technical data
GTi hatchback
Commercial version
Number of seats: 2 people.
Effective boot volume: 1.31 m3
In metres (m)
Effective floor length 1.458
Effective
width at the
wheel arches 1.036
In metres (m)
Effective
width at the
centre 1.077
Effective height
–
at the centre 0.916
–
at the roof threshold 0.831
–
below the load space
cover 0.5
Identification markings
Various visible markings for vehicle identification
and vehicle search.
A. Vehicle Identification Number (VIN), under
the bonnet.
Stamped on the chassis, near the right-hand
front wheel arch.
B. Vehicle Identification Number (VIN), on the
dashboard.
Printed on an adhesive label visible through the
windscreen.
C. Manufacturer's label.
Affixed to the centre pillar, left-hand side or right-
hand side.
Bears the following information:
–
Manufacturer’s name.
Page 224 of 244

222
Alphabetical index
3D digital instrument panel 7
A
ABS 62
Accessories
26, 58, 84
Active Safety Brake
112–114
AdBlue®
15, 146
AdBlue® tank
147
Additive, Diesel
144
Adjusting headlamps
54
Adjusting head restraints
30
Adjusting seat
30–31
Adjusting the air distribution
44–46
Adjusting the air flow
44–46
Adjusting the date
195, 218
Adjusting the height and reach of
the steering wheel
33
Adjusting the lumbar support
31
Adjusting the seat angle
31
Adjusting the temperature
44–46
Adjusting the time
195, 218
Advice on care and maintenance
148
Advice on driving
6, 81
Affaire version
182
Airbags
66, 68, 70
Airbags, curtain
67–68
Airbags, front
67–68, 70
Airbags, lateral
67–68
Air conditioning
43, 43–44
Air conditioning, automatic
44–46
Air conditioning, digital 47
Air conditioning, manual
43–44
Air intake
46
Air vents
42
Alarm
26–28
Android Auto connection
210
Anti-lock braking system (ABS)
62
Anti-pinch
28–29, 47–48
Antitheft / Immobiliser
23
Apple CarPlay connection
191, 209
Applications
210
Armrest
37
Armrest, front
38–39
Armrest, rear
39
Assistance call
59–60
Assistance, emergency braking
62, 113
Audible warning
61
Audio streaming (Bluetooth)
190, 214
B
Battery 139, 169
Battery, 12 V
144, 169–172
Battery, charging
170–171
Battery, remote control
23–25
Bicycle carrier
26
Blanking screen (snow shield)
133, 135
Blind, panoramic roof
47–48
Blind spot monitoring system, active
120
Blind spot sensors
119–120
BlueHDi
15, 174
Bluetooth (hands-free) 192–193, 214–215
Bluetooth (telephone)
192–193, 214–215
Bodywork
149
Bonnet
141
Boot
20, 25
Boot light
40
Brake discs
145–146
Brake lamps
164–166
Brakes
145–146
Braking assistance system
62
Braking, automatic emergency
112–114
Braking, dynamic emergency
86–88
Brightness
194
Bulbs (changing)
160–161, 164–166
C
Cable, audio 213
Cable, Jack
213
Capacity, fuel tank
131–132
Cap, fuel filler
131–132
Care of the bodywork
149
CD
190
CD, MP3
190
Central locking
20–22
Changing a bulb
160–161, 164–166
Changing a fuse
166–168
Changing a wheel
150, 157–158
Changing a wiper blade
55–56
Changing the remote control battery
24–25
CHECK
17
Page 225 of 244

223
Alphabetical index
Checking the engine oil level 14
Checking the levels
142–143
Checking tyre pressures
(using the kit)
151, 153–156
Checks
141–142, 144–146
Checks, routine
144–146
Child lock
79
Children
65, 74–76
Children (safety)
79
Child seats
65, 68–72, 79
Child seats, conventional
71
Child seats, ISOFIX
74–76
Cleaning (advice)
148–149
Closing the boot
20, 25
Closing the doors
20–22, 25
Collision Risk Alert
112–113
Commercial
182
Connected applications
210
Connection, Bluetooth
192–193,
210–211, 214–215
Connection, MirrorLink
191–192
Connection, Wi-Fi network
2 11
Connectivity
209
Container, AdBlue®
147
Control, electric windows
28–29
Control, emergency boot release
26
Control, emergency door
23
Control, heated seats
32
Controls, steering mounted
93–96
Control stalk, lighting
50
Control stalk, wipers
54–57
Courtesy lamps
48–49Cover, load space 40–42
Cruise control
103, 105–110, 112
Cruise control, adaptive
107–108
Cruise control by speed limit recognition
103
Cruise control, dynamic with
Stop function
103, 108–110
Cup holder
37
D
DAB (Digital Audio Broadcasting) -
Digital radio
189, 213
Date (setting)
195, 218
Daytime running lamps
51, 161–162
Deactivating the passenger airbag
67, 70
Deactivation of DSC (ESC)
62
Deadlocking
20, 22
Defrosting
47
Demisting
47
Demisting, rear
33–34
Demisting, rear screen
33–34
Denon (audio system)
41–42
Dials and gauges
7
Digital instrument panel
7
Dimensions
181–182
Dipstick
14, 142
Direction indicators
53, 161–166
Display screen, instrument panel
97
Doors
25
Driver’s attention warning
11 5
Driver Sport Pack
96–97
Driving 81
Driving abroad
51
Driving aids camera (warnings)
101
Driving aids (recommendations)
100
Driving economically
6
Driving positions (storing)
32
Dynamic pack
96–97
Dynamic (sport)
96–97
Dynamic stability control (DSC)
62
E
EBFD 62
Eco-driving (advice)
6
Economy mode
139
Electric windows
28
Electronic brake force distribution (EBFD)
62
Emergency braking assistance (EBA)
62
Emergency call
59–60
Emergency switching off
85
Emergency warning lamps
41, 58
Emissions control system, SCR
16, 146
Energy economy mode
139
Engine compartment
141–142
Engine, Diesel
131, 142, 174, 179
Engine, petrol
141, 177, 179
Engines
176–177, 179
Environment
6, 24
ESC (electronic stability control)
62
Page 226 of 244

224
Alphabetical index
F
Fatigue detection 114–115
Filling the AdBlue® tank
147
Filling the fuel tank
131–132
Filter, air
144
Filter, oil
144
Filter, particle
144
Filter, passenger compartment
43, 144
Fitting a wheel
158–160
Fitting roof bars
140
Fittings, boot
40
Fittings, interior
37
Flap, fuel filler
131–132
Flashing indicators
53
Fluid, brake
143
Fluid, engine coolant
143
Foglamp, rear
50, 164–166
Foglamps, front
50, 163
Foglamps, rear
50
Folding the rear seats
35–36
Frequency (radio)
212
Fuel
6, 131
Fuel consumption
6
Fuel tank
131
Fusebox, dashboard
166
Fusebox, engine compartment
166, 168
Fuses
166–168
G
Gauge, fuel 131–132
Gearbox, automatic
89–91, 93–99, 145, 170
Gearbox, manual
89–90, 98–99, 145
Gear lever, automatic gearbox
91, 95
Gear lever, manual gearbox
89–90
Gear shift indicator ~ Gear efficiency
indicator
97
Glove box, refrigerated
37
G.P.S.
206
H
Hazard warning lamps 41, 58
headlamp adjustment
54
Headlamp adjustment
54
Headlamps, automatic dipping
52–53
Headlamps, automatic illumination
51
Headlamps, dipped beam
161–162
Headlamps, halogen
54, 161
Headlamps, main beam
161–162
Headlamp wash
55
Head restraints, front
30
Head restraints, rear
35–37
Heating
42–44
Hill start assist
89
Horn
61
I
Ignition 46, 84, 216
Ignition on
84
Immobiliser, electronic
23, 82
Indicator, AdBlue® range
15
Indicator, coolant temperature
15
Indicator, engine oil level
14
Indicators, direction
53
Inflating tyres
145, 183
Inflating tyres and accessories
(using the kit)
151, 153–156
Infrared camera
101
Instrument panel
7, 17–18, 102
Instrument panels
7
Internet browser
207, 210
ISOFIX
76
ISOFIX mountings
74–75
J
Jack 150–151, 157, 213
Jump starting
170
K
Key 19–21, 23, 25
Key, electronic
21–22
Keyless Entry and Starting
21–23, 84–85
Key not recognised
85