2021 Peugeot 308 belt
[x] Cancel search: beltPage 74 of 244
72
Safety
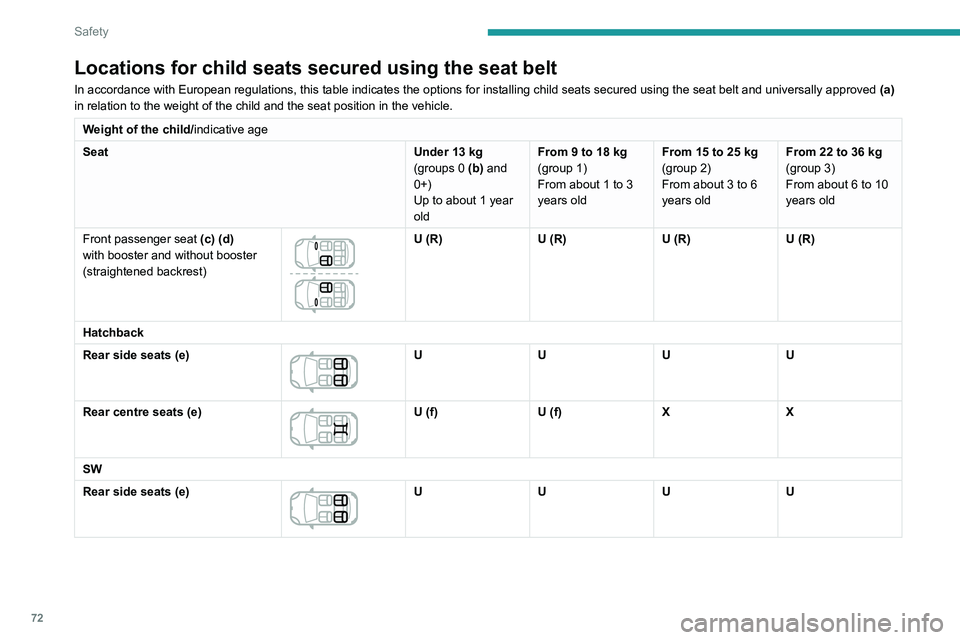
Locations for child seats secured using the seat belt
In accordance with European regulations, this table indicates the option\
s for installing child seats secured using the seat belt and universally\
approved (a)
in relation to the weight of the child and the seat position in the vehi\
cle.
Weight of the child/ indicative age
Seat Under 13
kg
(groups
0 (b) and
0+)
Up to about 1 year
old From 9 to 18
kg
(group 1)
From about 1 to 3
years old From 15 to 25
kg
(group 2)
From about 3 to 6
years old From 22 to 36
kg
(group 3)
From about 6 to 10
years old
Front passenger seat (c) (d)
with booster and without booster
(straightened backrest)
U (R) U (R)U (R)U (R)
Hatchback
Rear side seats (e)
U UUU
Rear centre seats (e)
U (f) U (f)XX
SW
Rear side seats (e)
U UUU
Page 75 of 244
73
Safety
5Weight of the child/indicative age
Seat Under 13
kg
(groups
0 (b) and
0+)
Up to about 1 year
old From 9 to 18
kg
(group 1)
From about 1 to 3
years old From 15 to 25
kg
(group 2)
From about 3 to 6
years old From 22 to 36
kg
(group 3)
From about 6 to 10
years old
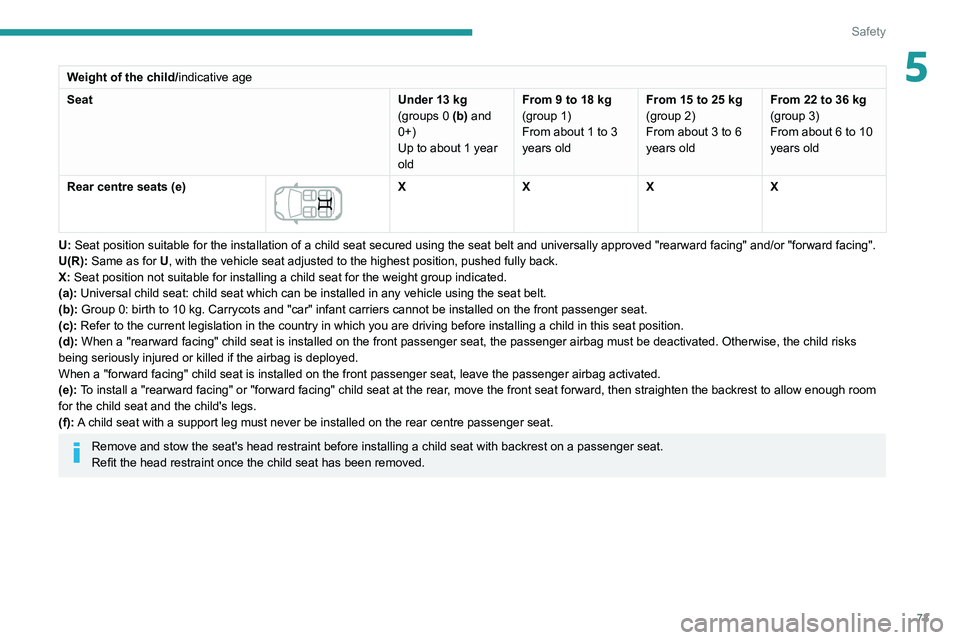
Rear centre seats
(e)
X XXX
U: Seat position suitable for the installation of a child seat secured usi\
ng the seat belt and universally approved "rearward facing" and/or "forw\
ard facing".
U(R): Same as for U, with the vehicle seat adjusted to the highest position, pushed fully b\
ack.
X: Seat position not suitable for installing a child seat for the weight g\
roup indicated.
(a): Universal child seat: child seat which can be installed in any vehicle \
using the seat belt.
(b): Group 0: birth to 10
kg. Carrycots and "car" infant carriers cannot be installed on the front\
passenger seat.
(c): Refer to the current legislation in the country in which you are drivin\
g before installing a child in this seat position.
(d): When a "rearward facing" child seat is installed on the front passenger\
seat, the passenger airbag must be deactivated. Otherwise, the child ri\
sks
being seriously injured or killed if the airbag is deployed.
When a "forward facing" child seat is installed on the front passenger s\
eat, leave the passenger airbag activated.
(e): To install a "rearward facing" or "forward facing" child seat at the rear\
, move the front seat forward, then straighten the backrest to allow eno\
ugh room
for the child seat and the child's legs.
(f): A child seat with a support leg must never be installed on the rear centr\
e passenger seat.
Remove and stow the seat's head restraint before installing a child seat\
with backrest on a passenger seat.
Refit the head restraint once the child seat has been removed.
Page 77 of 244
75
Safety
5For information about the options for
fitting ISOFIX child seats in your vehicle,
refer to the summary table.
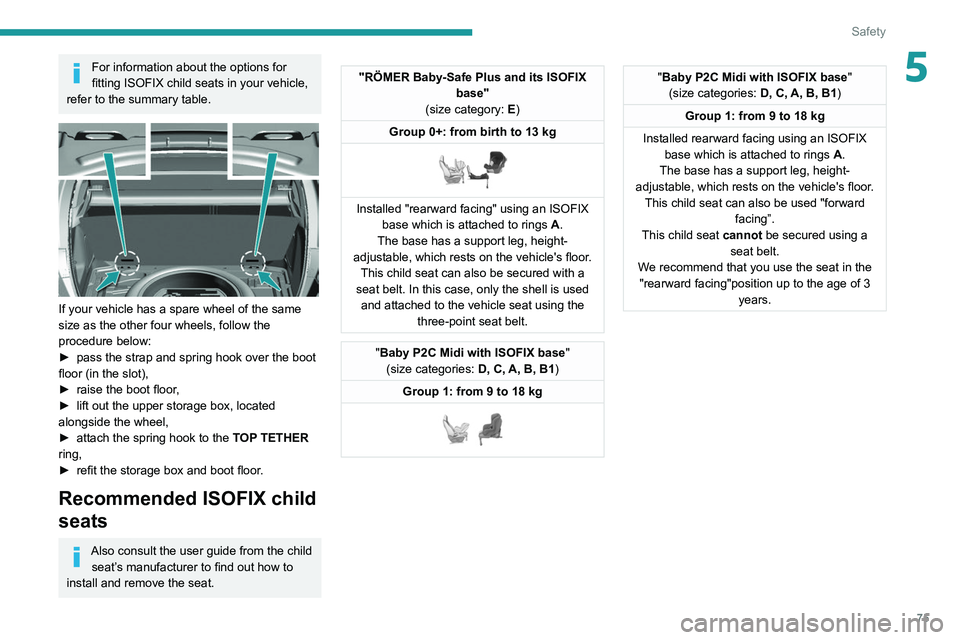
If your vehicle has a spare wheel of the same
size as the other four wheels, follow the
procedure below:
►
pass the strap and spring hook over the boot
floor (in the slot),
►
raise the boot floor
,
►
lift out the upper storage box, located
alongside the wheel,
►
attach the spring hook to the
TOP TETHER
ring,
►
refit the storage box and boot floor
.
Recommended ISOFIX child
seats
Also consult the user guide from the child seat’s manufacturer to find out how to
install and remove the seat.
"RÖMER Baby-Safe Plus and its ISOFIX base"
(size category: E)
Group 0+: from birth to 13 kg
Installed "rearward facing" using an ISOFIX base which is attached to rings A .
The base has a support leg, height-
adjustable, which rests on the vehicle's floor. This child seat can also be secured with a
seat belt. In this case, only the shell is used and attached to the vehicle seat using the three-point seat belt.
"Baby P2C Midi with ISOFIX base "
(size categories: D, C, A, B, B1)
Group 1: from 9 to 18 kg
"Baby P2C Midi with ISOFIX base "
(size categories: D, C, A, B, B1)
Group 1: from 9 to 18 kg
Installed rearward facing using an ISOFIX base which is attached to rings A.
The base has a support leg, height-
adjustable, which rests on the vehicle's floor. This child seat can also be used "forward facing”.
This child seat cannot be secured using a seat belt.
We recommend that you use the seat in the "rearward facing"position up to the age of 3 years.
Page 78 of 244
76
Safety
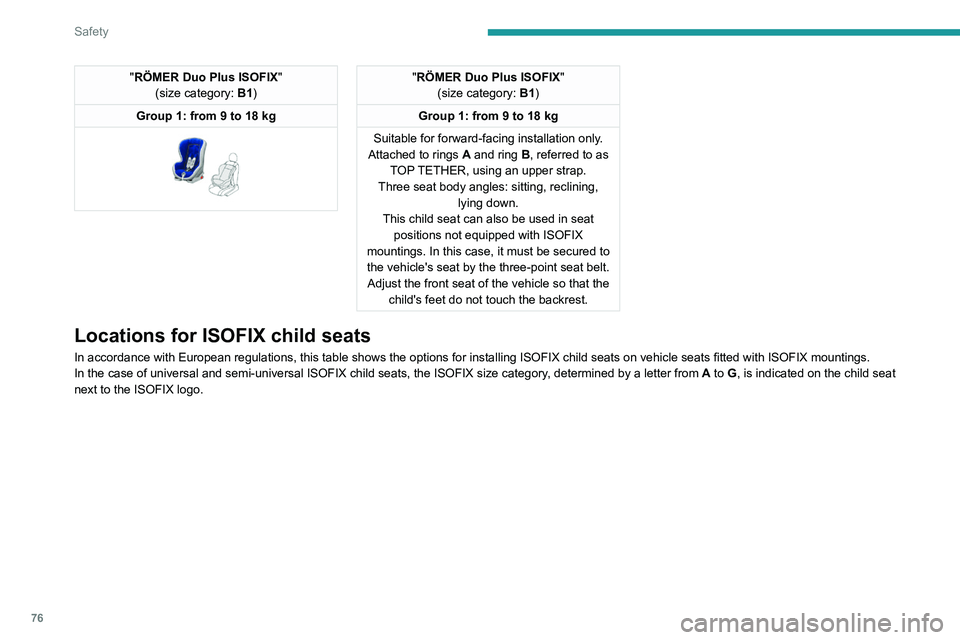
"RÖMER Duo Plus ISOFIX"
(size category: B1)
Group 1: from 9 to 18 kg
"RÖMER Duo Plus ISOFIX "
(size category: B1)
Group 1: from 9 to 18 kg
Suitable for forward-facing installation only.
Attached to rings
A and ring B, referred to as
TOP TETHER, using an upper strap.
Three seat body angles: sitting, reclining, lying down.
This child seat can also be used in seat positions not equipped with ISOFIX
mountings. In this case, it must be secured to the vehicle's seat by the three-point seat belt. Adjust the front seat of the vehicle so that the child's feet do not touch the backrest.
Locations for ISOFIX child seats
In accordance with European regulations, this table shows the options for installing ISOFIX child seats on vehicle seats fitted with ISOFIX mountings.
In the case of universal and semi-universal ISOFIX child seats, the ISOF\
IX size category, determined by a letter from A to G, is indicated on the child seat
next to the ISOFIX logo.
Page 81 of 244
79
Safety
5Child lock
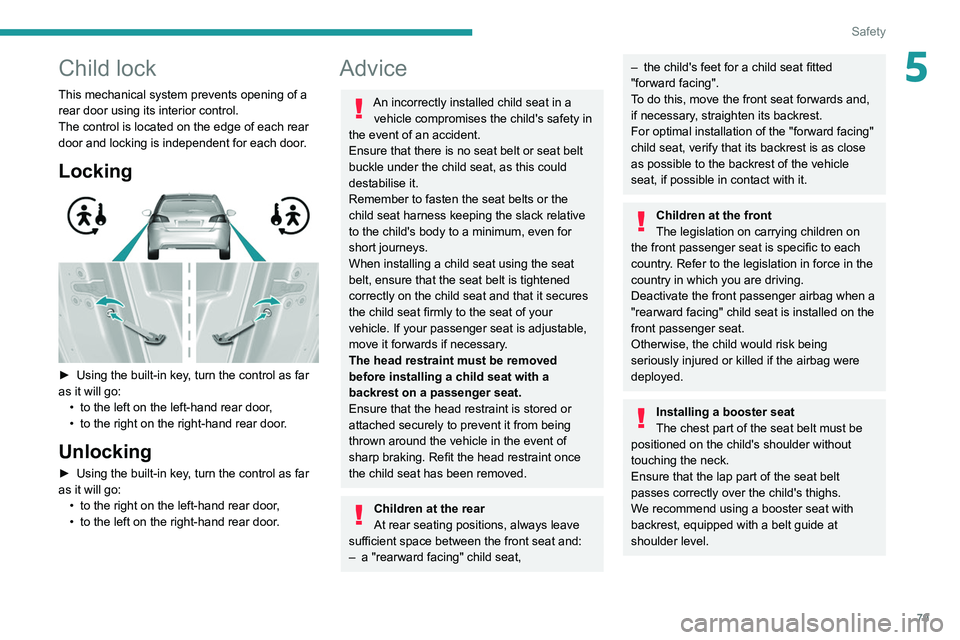
This mechanical system prevents opening of a
rear door using its interior control.
The control is located on the edge of each rear
door and locking is independent for each door.
Locking
► Using the built-in key, turn the control as far
as it will go: •
to the left on the left-hand rear door
,
•
to the right on the right-hand rear door
.
Unlocking
► Using the built-in key, turn the control as far
as it will go: •
to the right on the left-hand rear door
,
•
to the left on the right-hand rear door
.
Advice
An incorrectly installed child seat in a vehicle compromises the child's safety in
the event of an accident.
Ensure that there is no seat belt or seat belt
buckle under the child seat, as this could
destabilise it.
Remember to fasten the seat belts or the
child seat harness keeping the slack relative
to the child's body to a minimum, even for
short journeys.
When installing a child seat using the seat
belt, ensure that the seat belt is tightened
correctly on the child seat and that it secures
the child seat firmly to the seat of your
vehicle. If your passenger seat is adjustable,
move it forwards if necessary.
The head restraint must be removed
before installing a child seat with a
backrest on a passenger seat.
Ensure that the head restraint is stored or
attached securely to prevent it from being
thrown around the vehicle in the event of
sharp braking. Refit the head restraint once
the child seat has been removed.
Children at the rear
At rear seating positions, always leave
sufficient space between the front seat and:
–
a "rearward facing" child seat,
– the child's feet for a child seat fitted
"forward facing".
T
o do this, move the front seat forwards and,
if necessary, straighten its backrest.
For optimal installation of the "forward facing"
child seat, verify that its backrest is as close
as possible to the backrest of the vehicle
seat, if possible in contact with it.
Children at the front
The legislation on carrying children on
the front passenger seat is specific to each
country. Refer to the legislation in force in the
country in which you are driving.
Deactivate the front passenger airbag when a
"rearward facing" child seat is installed on the
front passenger seat.
Otherwise, the child would risk being
seriously injured or killed if the airbag were
deployed.
Installing a booster seat
The chest part of the seat belt must be
positioned on the child's shoulder without
touching the neck.
Ensure that the lap part of the seat belt
passes correctly over the child's thighs.
We recommend using a booster seat with
backrest, equipped with a belt guide at
shoulder level.
Page 100 of 244
98
Driving
vehicle has reached a speed of 5 mph
(8 km/h).
During parking manoeuvres, STOP mode
is not available for a few seconds after
coming out of reverse gear or turning the
steering wheel.
Engine restarting (START mode)
The engine automatically restarts as soon as the
driver indicates the intention of moving off again.
► With a manual gearbox: with the clutch
pedal fully depressed.
► With an automatic gearbox:
• With the selector in position D or M: with the
brake pedal released.
• With the selector in position N and the brake
pedal released: with the selector at D or M.
• With the selector in position P and the brake
pedal depressed: with the selector at R, N,
D or M.
• Reverse gear engaged.
Special cases
The engine will restart automatically if all
conditions for operation are met again and in the
following cases.
– The electric parking brake is being applied.
– Vehicle speed exceeds 2 mph (3 km/h).
– Some specific conditions (braking assistance,
air conditioning setting, etc.).
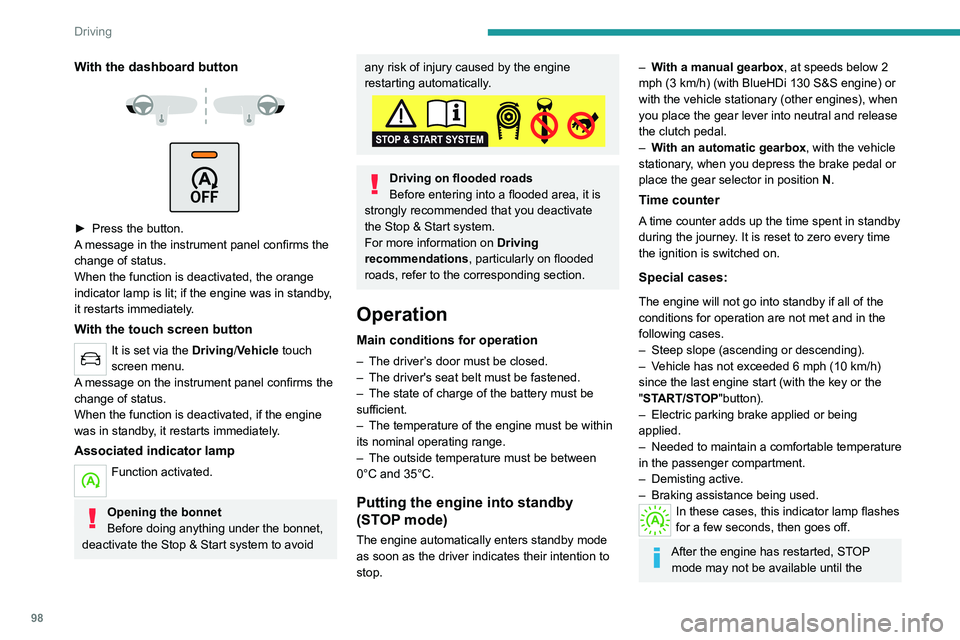
With the dashboard button
► Press the button.
A message in the instrument panel confirms the
change of status.
When the function is deactivated, the orange
indicator lamp is lit; if the engine was in standby,
it restarts immediately.
With the touch screen button
It is set via the Driving/Vehicle touch
screen menu.
A message on the instrument panel confirms the
change of status.
When the function is deactivated, if the engine
was in standby, it restarts immediately.
Associated indicator lamp
Function activated.
Opening the bonnet
Before doing anything under the bonnet,
deactivate the Stop & Start system to avoid
any risk of injury caused by the engine
restarting automatically.
Driving on flooded roads
Before entering into a flooded area, it is
strongly recommended that you deactivate
the Stop & Start system.
For more information on Driving
recommendations, particularly on flooded
roads, refer to the corresponding section.
Operation
Main conditions for operation
– The driver ’s door must be closed.
– The driver's seat belt must be fastened.
–
The state of charge of the battery must be
sufficient.
–
The temperature of the engine must be within
its nominal operating range.
–
The outside temperature must be between
0°C and 35°C.
Putting the engine into standby
(STOP mode)
The engine automatically enters standby mode
as soon as the driver indicates their intention to
stop.
– With a manual gearbox, at speeds below 2
mph (3 km/h) (with BlueHDi 130 S&S engine) or
with the vehicle stationary (other engines), when
you place the gear lever into neutral and release
the clutch pedal.
–
W
ith an automatic gearbox, with the vehicle
stationary, when you depress the brake pedal or
place the gear selector in position N.
Time counter
A time counter adds up the time spent in standby
during the journey. It is reset to zero every time
the ignition is switched on.
Special cases:
The engine will not go into standby if all of the
conditions for operation are not met and in the
following cases.
–
Steep slope (ascending or descending).
–
V
ehicle has not exceeded 6 mph (10 km/h)
since the last engine start (with the key or the
"START/STOP"button).
–
Electric parking brake applied or being
applied.
–
Needed
to maintain a comfortable temperature
in the passenger compartment.
–
Demisting active.
–
Braking assistance being used.
In these cases, this indicator lamp flashes
for a few seconds, then goes off.
After the engine has restarted, STOP mode may not be available until the
Page 114 of 244

11 2
Driving
Deactivation of the system is signalled by
the illumination of this warning lamp,
accompanied by the display of a message.
Operating conditions and
limits
Vehicle moving forward.
ESC system in working order.
DSC system activated.
Seat belts fastened for all passengers.
Stabilised speed on roads with few bends.
In the following cases, deactivating the system
via the vehicle's configuration menu is advised:
– Towing a trailer.
– Carrying long objects on roof bars or roof rack.
– Vehicle with snow chains fitted.
– Before using an automatic car wash, with the
engine running.
– Before placing the vehicle on a rolling road in
a workshop.
– Towed vehicle, engine running.
– If the brake lamps are not working.
– Damaged front bumper.
– Following an impact to the windscreen close to
the detection camera.
The system is automatically deactivated when the use of a "space-saver" type
spare wheel is detected, or if a fault with the
lateral brake lamps is detected.
It can be dangerous to drive if the brake
lamps are not in perfect working order.
The following situations may interfere with the operation of the system or
prevent it from working:
–
driving on a winding road,
–
poor visibility (inadequate street lighting,
falling snow
, heavy rain, thick fog, etc.),
–
dazzle (headlamps of an oncoming vehicle,
low sun, reflections on a damp road, leaving a
tunnel, alternating shade and light, etc.),
–
radar obstructed (mud, frost, snow
,
condensation, etc.).
In these situations, detection performance
may be reduced.
Malfunction
In the event of a cruise control
malfunction, dashes are displayed instead
of the cruise control speed setting.
This warning lamp comes on, accompanied by a warning message and
an audible signal, to indicate a system
malfunction.
Have the system checked by a PEUGEOT
dealer or a qualified workshop.
The adaptive cruise control deactivates automatically if the use of a “space-
saver” type spare wheel is detected or in the
event of a malfunction of the lateral brake
lamps or trailer brake lamps (for approved
trailers).
Active Safety Brake with Distance Alert and
Intelligent emergency
braking assistance
Refer to the General recommendations on the
use of driving and manoeuvring aids .
This system:
–
warns the driver that their vehicle is at risk of
collision with the vehicle in front.
–
reduces the vehicle's speed to avoid a
collision or limit its severity
.
This system is comprised of three functions:
–
Distance Alert.
–
Intelligent emergency braking assistance.
–
Active Safety Brake (automatic emergency
braking).
The vehicle has a multifunction camera located
at the top of the windscreen and, depending on
version, a radar located in the front bumper.
This system does not avoid the need for vigilance on the part of the driver.
This system is designed to assist the driver
and improve road safety.
It is the driver's responsibility to continuously
monitor traffic conditions in accordance with
applicable driving regulations.
As soon as the system detects a potential obstacle, it prepares the braking
circuit in case automatic braking is needed.
This may cause a slight noise and a slight
sensation of deceleration.
Deactivation / Activation
By default, the system is automatically activated
at every engine start.
Page 115 of 244

11 3
Driving
6Deactivation of the system is signalled by
the illumination of this warning lamp,
accompanied by the display of a message.
Operating conditions and
limits
Vehicle moving forward.
ESC system in working order.
DSC system activated.
Seat belts fastened for all passengers.
Stabilised speed on roads with few bends.
In the following cases, deactivating the system
via the vehicle's configuration menu is advised:
–
T
owing a trailer.
–
Carrying long objects on roof bars or roof rack.
–
V
ehicle with snow chains fitted.
–
Before using an automatic car wash, with the
engine running.
–
Before placing the vehicle on a rolling road in
a workshop.
–
T
owed vehicle, engine running.
–
If the brake lamps are not working.
–
Damaged front bumper
.
–
Following
an impact to the windscreen close to
the detection camera.
The system is automatically deactivated when the use of a "space-saver" type
spare wheel is detected, or if a fault with the
lateral brake lamps is detected.
It can be dangerous to drive if the brake
lamps are not in perfect working order.
It is possible that warnings are not given,
are given too late or seem unjustified.
The driver must always stay in control of the
vehicle and be prepared to react at any time
to avoid an accident.
After an impact, the function automatically stops operating. Contact a
PEUGEOT dealer or a qualified workshop to
have the system checked.
Distance Alert
This function warns the driver that their vehicle
is at risk of a collision with the vehicle in front or
with a pedestrian present in their traffic lane.
Modifying the alert trigger threshold
This trigger threshold determines the sensitivity
with which the function warns of the risk of
collision.
►
Select one of the three pre-defined
thresholds:
–
"Distant".
–
“Normal".
–
“Close".
The last threshold selected is memorised when
the ignition is switched off.
Operation
Depending on the degree of risk of collision
detected by the system and the alert trigger
threshold chosen by the driver, several different
levels of alert may be triggered and displayed in
the instrument panel.
The system takes account of the vehicle
dynamics, the speed of your vehicle and the one
in front, the environmental conditions and the
operation of the vehicle (actions on the pedals,
steering wheel, etc.) to trigger the alert at the
most relevant moment.
Level 1 (orange): visual alert only,
warning that the vehicle in front is very
close.
The message
"Vehicle close" is displayed.
Level 2 (red): visual and audible alert,
warning that a collision is imminent.
The message "Brake! " is displayed.
Where the speed of your vehicle is too
high approaching another vehicle, the
first level of alert may not be displayed: the
level 2 alert may be displayed directly.
Important: the level 1 alert is not displayed
when there is a stationary obstacle or
when the "Near " trigger threshold has been
selected.
Intelligent emergency
braking assistance
If the driver brakes, but not sufficiently to avoid a
collision, this system will supplement the braking,
within the limits of the laws of physics.
This assistance will only be provided if the driver
presses the brake pedal.