2021 Peugeot 308 roof
[x] Cancel search: roofPage 114 of 244

11 2
Driving
Deactivation of the system is signalled by
the illumination of this warning lamp,
accompanied by the display of a message.
Operating conditions and
limits
Vehicle moving forward.
ESC system in working order.
DSC system activated.
Seat belts fastened for all passengers.
Stabilised speed on roads with few bends.
In the following cases, deactivating the system
via the vehicle's configuration menu is advised:
– Towing a trailer.
– Carrying long objects on roof bars or roof rack.
– Vehicle with snow chains fitted.
– Before using an automatic car wash, with the
engine running.
– Before placing the vehicle on a rolling road in
a workshop.
– Towed vehicle, engine running.
– If the brake lamps are not working.
– Damaged front bumper.
– Following an impact to the windscreen close to
the detection camera.
The system is automatically deactivated when the use of a "space-saver" type
spare wheel is detected, or if a fault with the
lateral brake lamps is detected.
It can be dangerous to drive if the brake
lamps are not in perfect working order.
The following situations may interfere with the operation of the system or
prevent it from working:
–
driving on a winding road,
–
poor visibility (inadequate street lighting,
falling snow
, heavy rain, thick fog, etc.),
–
dazzle (headlamps of an oncoming vehicle,
low sun, reflections on a damp road, leaving a
tunnel, alternating shade and light, etc.),
–
radar obstructed (mud, frost, snow
,
condensation, etc.).
In these situations, detection performance
may be reduced.
Malfunction
In the event of a cruise control
malfunction, dashes are displayed instead
of the cruise control speed setting.
This warning lamp comes on, accompanied by a warning message and
an audible signal, to indicate a system
malfunction.
Have the system checked by a PEUGEOT
dealer or a qualified workshop.
The adaptive cruise control deactivates automatically if the use of a “space-
saver” type spare wheel is detected or in the
event of a malfunction of the lateral brake
lamps or trailer brake lamps (for approved
trailers).
Active Safety Brake with Distance Alert and
Intelligent emergency
braking assistance
Refer to the General recommendations on the
use of driving and manoeuvring aids .
This system:
–
warns the driver that their vehicle is at risk of
collision with the vehicle in front.
–
reduces the vehicle's speed to avoid a
collision or limit its severity
.
This system is comprised of three functions:
–
Distance Alert.
–
Intelligent emergency braking assistance.
–
Active Safety Brake (automatic emergency
braking).
The vehicle has a multifunction camera located
at the top of the windscreen and, depending on
version, a radar located in the front bumper.
This system does not avoid the need for vigilance on the part of the driver.
This system is designed to assist the driver
and improve road safety.
It is the driver's responsibility to continuously
monitor traffic conditions in accordance with
applicable driving regulations.
As soon as the system detects a potential obstacle, it prepares the braking
circuit in case automatic braking is needed.
This may cause a slight noise and a slight
sensation of deceleration.
Deactivation / Activation
By default, the system is automatically activated
at every engine start.
Page 115 of 244

11 3
Driving
6Deactivation of the system is signalled by
the illumination of this warning lamp,
accompanied by the display of a message.
Operating conditions and
limits
Vehicle moving forward.
ESC system in working order.
DSC system activated.
Seat belts fastened for all passengers.
Stabilised speed on roads with few bends.
In the following cases, deactivating the system
via the vehicle's configuration menu is advised:
–
T
owing a trailer.
–
Carrying long objects on roof bars or roof rack.
–
V
ehicle with snow chains fitted.
–
Before using an automatic car wash, with the
engine running.
–
Before placing the vehicle on a rolling road in
a workshop.
–
T
owed vehicle, engine running.
–
If the brake lamps are not working.
–
Damaged front bumper
.
–
Following
an impact to the windscreen close to
the detection camera.
The system is automatically deactivated when the use of a "space-saver" type
spare wheel is detected, or if a fault with the
lateral brake lamps is detected.
It can be dangerous to drive if the brake
lamps are not in perfect working order.
It is possible that warnings are not given,
are given too late or seem unjustified.
The driver must always stay in control of the
vehicle and be prepared to react at any time
to avoid an accident.
After an impact, the function automatically stops operating. Contact a
PEUGEOT dealer or a qualified workshop to
have the system checked.
Distance Alert
This function warns the driver that their vehicle
is at risk of a collision with the vehicle in front or
with a pedestrian present in their traffic lane.
Modifying the alert trigger threshold
This trigger threshold determines the sensitivity
with which the function warns of the risk of
collision.
►
Select one of the three pre-defined
thresholds:
–
"Distant".
–
“Normal".
–
“Close".
The last threshold selected is memorised when
the ignition is switched off.
Operation
Depending on the degree of risk of collision
detected by the system and the alert trigger
threshold chosen by the driver, several different
levels of alert may be triggered and displayed in
the instrument panel.
The system takes account of the vehicle
dynamics, the speed of your vehicle and the one
in front, the environmental conditions and the
operation of the vehicle (actions on the pedals,
steering wheel, etc.) to trigger the alert at the
most relevant moment.
Level 1 (orange): visual alert only,
warning that the vehicle in front is very
close.
The message
"Vehicle close" is displayed.
Level 2 (red): visual and audible alert,
warning that a collision is imminent.
The message "Brake! " is displayed.
Where the speed of your vehicle is too
high approaching another vehicle, the
first level of alert may not be displayed: the
level 2 alert may be displayed directly.
Important: the level 1 alert is not displayed
when there is a stationary obstacle or
when the "Near " trigger threshold has been
selected.
Intelligent emergency
braking assistance
If the driver brakes, but not sufficiently to avoid a
collision, this system will supplement the braking,
within the limits of the laws of physics.
This assistance will only be provided if the driver
presses the brake pedal.
Page 142 of 244

140
Practical information
Load reduction mode
This system manages the use of certain
functions according to the level of charge
remaining in the battery.
When the vehicle is being driven, the load
reduction function temporarily deactivates certain
functions, such as the air conditioning and the
heated rear screen.
The deactivated functions are reactivated
automatically as soon as conditions permit.
Fitting roof bars
Fitting directly to the roof
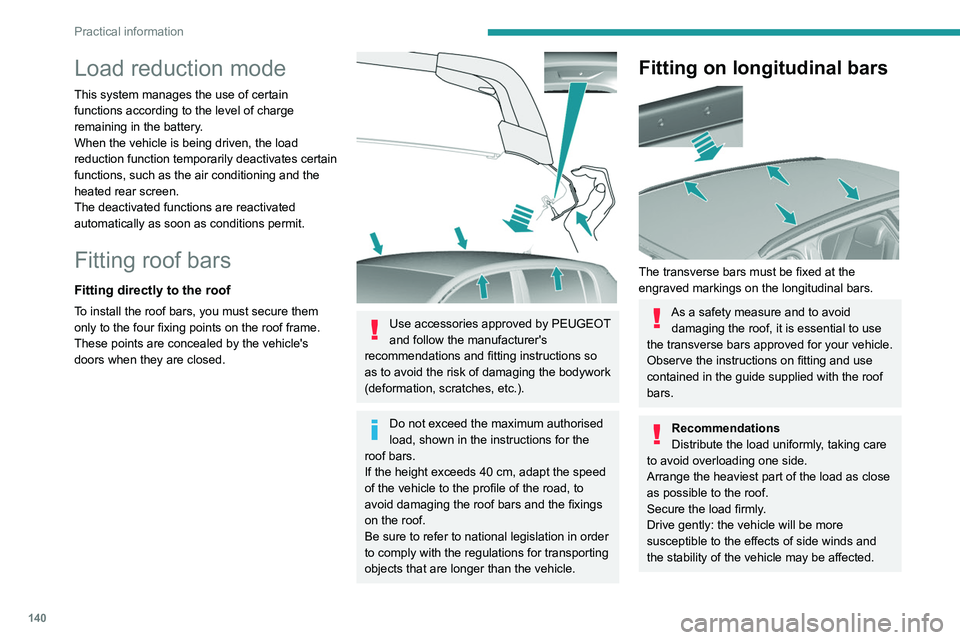
To install the roof bars, you must secure them
only to the four fixing points on the roof frame.
These points are concealed by the vehicle's
doors when they are closed.
Use accessories approved by PEUGEOT
and follow the manufacturer's
recommendations and fitting instructions so
as to avoid the risk of damaging the bodywork
(deformation, scratches, etc.).
Do not exceed the maximum authorised
load, shown in the instructions for the
roof bars.
If the height exceeds 40
cm, adapt the speed
of the vehicle to the profile of the road, to
avoid damaging the roof bars and the fixings
on the roof.
Be sure to refer to national legislation in order
to comply with the regulations for transporting
objects that are longer than the vehicle.
Fitting on longitudinal bars
The transverse bars must be fixed at the
engraved markings on the longitudinal bars.
As a safety measure and to avoid damaging the roof, it is essential to use
the transverse bars approved for your vehicle.
Observe the instructions on fitting and use
contained in the guide supplied with the roof
bars.
Recommendations
Distribute the load uniformly, taking care
to avoid overloading one side.
Arrange the heaviest part of the load as close
as possible to the roof.
Secure the load firmly.
Drive gently: the vehicle will be more
susceptible to the effects of side winds and
the stability of the vehicle may be affected.
On a long journey, check the security of the
load at every stop.
Remove the roof bars once they are no longer
needed.
Bonnet
Opening
► Open the left-hand front door.
► Pull the release lever, located at the bottom
of the door frame, towards you.
Page 143 of 244

141
Practical information
7On a long journey, check the security of the
load at every stop.
Remove the roof bars once they are no longer
needed.
Bonnet
Opening
► Open the left-hand front door.
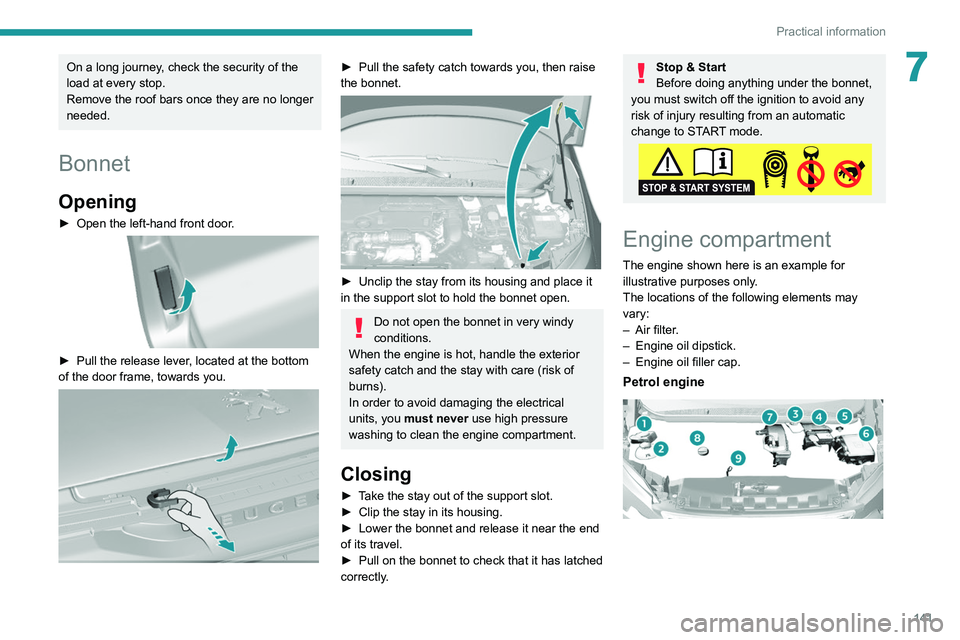
► Pull the release lever , located at the bottom
of the door frame, towards you.
► Pull the safety catch towards you, then raise
the bonnet.
► Unclip the stay from its housing and place it
in the support slot to hold the bonnet open.
Do not open the bonnet in very windy
conditions.
When the engine is hot, handle the exterior
safety catch and the stay with care (risk of
burns).
In order to avoid damaging the electrical
units, you must never use high pressure
washing to clean the engine compartment.
Closing
► Take the stay out of the support slot.
► Clip the stay in its housing.
►
Lower the bonnet and release it near the end
of its travel.
►
Pull on the bonnet to check that it has latched
correctly
.
Stop & Start
Before doing anything under the bonnet,
you must switch off the ignition to avoid any
risk of injury resulting from an automatic
change to START mode.
Engine compartment
The engine shown here is an example for
illustrative purposes only.
The locations of the following elements may
vary:
–
Air filter
.
–
Engine oil dipstick.
–
Engine oil filler cap.
Petrol engine
Page 173 of 244

171
In the event of a breakdown
8Follow the instructions provided by the
manufacturer of the charger.
Never reverse polarities.
It is not necessary to disconnect the
battery.
►
Switch the ignition off.
►
Switch off all electrical consumers (audio
system, lighting, wipers, etc.).
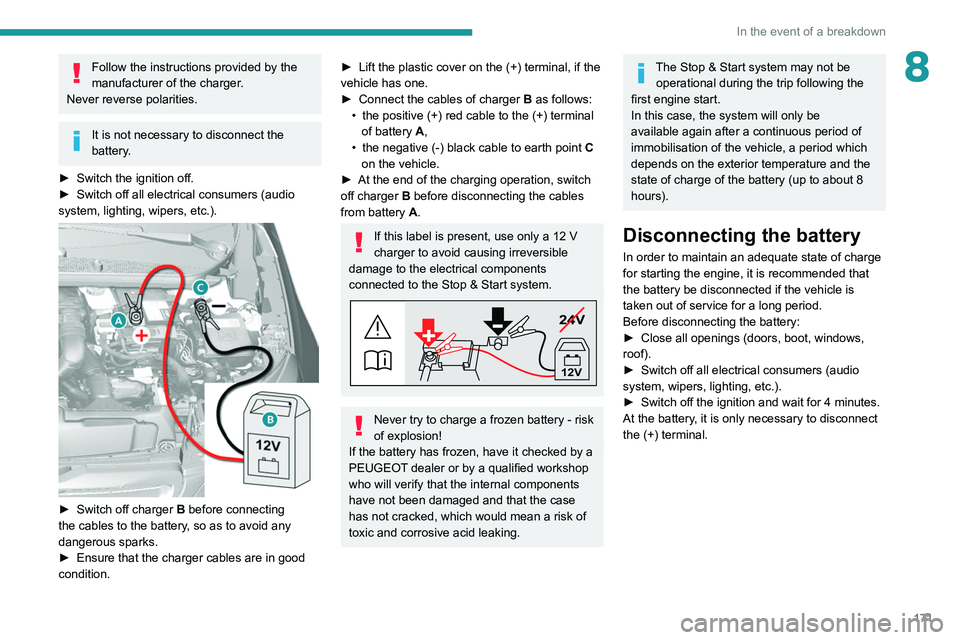
► Switch off charger B before connecting
the cables to the battery, so as to avoid any
dangerous sparks.
►
Ensure that the charger cables are in good
condition.
► Lift the plastic cover on the (+) terminal, if the
vehicle has one.
►
Connect the cables of charger B
as follows:
•
the positive (+) red cable to the (+) terminal
of battery
A,
•
the negative (-) black cable to earth point C
on the vehicle.
►
At the end of the charging operation, switch
off charger B
before disconnecting the cables
from battery A.
If this label is present, use only a 12 V
charger to avoid causing irreversible
damage to the electrical components
connected to the Stop & Start system.
24V
12V
Never try to charge a frozen battery - risk
of explosion!
If the battery has frozen, have it checked by a
PEUGEOT dealer or by a qualified workshop
who will verify that the internal components
have not been damaged and that the case
has not cracked, which would mean a risk of
toxic and corrosive acid leaking.
The Stop & Start system may not be operational during the trip following the
first engine start.
In this case, the system will only be
available again after a continuous period of
immobilisation of the vehicle, a period which
depends on the exterior temperature and the
state of charge of the battery (up to about 8
hours).
Disconnecting the battery
In order to maintain an adequate state of charge
for starting the engine, it is recommended that
the battery be disconnected if the vehicle is
taken out of service for a long period.
Before disconnecting the battery:
►
Close all openings (doors, boot, windows,
roof).
►
Switch off all electrical consumers (audio
system, wipers, lighting, etc.).
►
Switch off the ignition and wait for 4
minutes.
At the battery, it is only necessary to disconnect
the (+) terminal.
Page 184 of 244

182
Technical data
GTi hatchback
Commercial version
Number of seats: 2 people.
Effective boot volume: 1.31 m3
In metres (m)
Effective floor length 1.458
Effective
width at the
wheel arches 1.036
In metres (m)
Effective
width at the
centre 1.077
Effective height
–
at the centre 0.916
–
at the roof threshold 0.831
–
below the load space
cover 0.5
Identification markings
Various visible markings for vehicle identification
and vehicle search.
A. Vehicle Identification Number (VIN), under
the bonnet.
Stamped on the chassis, near the right-hand
front wheel arch.
B. Vehicle Identification Number (VIN), on the
dashboard.
Printed on an adhesive label visible through the
windscreen.
C. Manufacturer's label.
Affixed to the centre pillar, left-hand side or right-
hand side.
Bears the following information:
–
Manufacturer’s name.
Page 203 of 244

201
PEUGEOT Connect Nav
11Voice commands
Steering wheel-mounted
controls
Voice commands:
Voice commands can be issued from any
screen page after a short press on the "Voice
commands" button located on the steering
wheel or at the end of the lighting control stalk
(depending on equipment), as long as there is no
telephone call in progress.
To ensure that voice commands are always recognised by the system, please
follow these recommendations:
–
use natural language in a normal tone
without breaking up words or raising your
voice.
–
always wait for the "beep" (audible signal)
before speaking.
–
for best results, closing the windows and
sunroof is recommended, to avoid extraneous
interference (depending on version).
–
before issuing a voice command, ask any
other passengers to refrain from speaking.
First steps
Example of a "voice command" for
navigation:
"Navigate to address 11 regent street,
London"
Example of a "voice command" for the radio and
media:
"Play artist Madonna"
Example of a "voice command" for the
telephone:
"Call David Miller'' "
The voice commands, with a choice of 17 languages (Arabic, Brazilian, Czech,
Danish, Dutch, English, Farsi, French,
German, Italian, Norwegian, Polish,
Portuguese, Russian, Spanish, Swedish,
Turkish), are made using the language
previously chosen and set in the system.
For some voice commands, there are
alternative synonyms.
Example: Guide to / Navigate to / Go to / ...
The voice commands in Arabic for: "Navigate
to address" and "Display POI in the city", are
not available.
Information - Using the
system
When voice commands are activated, by
briefly pressing the button, help is
displayed on the touch screen, offering various
menus and enabling voice-based interaction with
the system.
A number of commands are available when a
menu is selected.
Press the Push To Talk button and tell me
what you'd like after the tone. Remember
you can interrupt me at any time by pressing this
button. If you press it again while I'm waiting for
you to speak, it'll end the conversation. If you
need to start over, say "cancel". If you want to
undo something, say "undo". And to get
information and tips at any time, just say "help".
If you ask to me do something and there's some
information missing that I need, I'll give you
some examples or take you through it step by
Page 224 of 244

222
Alphabetical index
3D digital instrument panel 7
A
ABS 62
Accessories
26, 58, 84
Active Safety Brake
112–114
AdBlue®
15, 146
AdBlue® tank
147
Additive, Diesel
144
Adjusting headlamps
54
Adjusting head restraints
30
Adjusting seat
30–31
Adjusting the air distribution
44–46
Adjusting the air flow
44–46
Adjusting the date
195, 218
Adjusting the height and reach of
the steering wheel
33
Adjusting the lumbar support
31
Adjusting the seat angle
31
Adjusting the temperature
44–46
Adjusting the time
195, 218
Advice on care and maintenance
148
Advice on driving
6, 81
Affaire version
182
Airbags
66, 68, 70
Airbags, curtain
67–68
Airbags, front
67–68, 70
Airbags, lateral
67–68
Air conditioning
43, 43–44
Air conditioning, automatic
44–46
Air conditioning, digital 47
Air conditioning, manual
43–44
Air intake
46
Air vents
42
Alarm
26–28
Android Auto connection
210
Anti-lock braking system (ABS)
62
Anti-pinch
28–29, 47–48
Antitheft / Immobiliser
23
Apple CarPlay connection
191, 209
Applications
210
Armrest
37
Armrest, front
38–39
Armrest, rear
39
Assistance call
59–60
Assistance, emergency braking
62, 113
Audible warning
61
Audio streaming (Bluetooth)
190, 214
B
Battery 139, 169
Battery, 12 V
144, 169–172
Battery, charging
170–171
Battery, remote control
23–25
Bicycle carrier
26
Blanking screen (snow shield)
133, 135
Blind, panoramic roof
47–48
Blind spot monitoring system, active
120
Blind spot sensors
119–120
BlueHDi
15, 174
Bluetooth (hands-free) 192–193, 214–215
Bluetooth (telephone)
192–193, 214–215
Bodywork
149
Bonnet
141
Boot
20, 25
Boot light
40
Brake discs
145–146
Brake lamps
164–166
Brakes
145–146
Braking assistance system
62
Braking, automatic emergency
112–114
Braking, dynamic emergency
86–88
Brightness
194
Bulbs (changing)
160–161, 164–166
C
Cable, audio 213
Cable, Jack
213
Capacity, fuel tank
131–132
Cap, fuel filler
131–132
Care of the bodywork
149
CD
190
CD, MP3
190
Central locking
20–22
Changing a bulb
160–161, 164–166
Changing a fuse
166–168
Changing a wheel
150, 157–158
Changing a wiper blade
55–56
Changing the remote control battery
24–25
CHECK
17