2021 Peugeot 308 light
[x] Cancel search: lightPage 21 of 244

19
Access
2Electronic key with
remote control function
and built-in key,
Remote control function
The remote control can be used for the following
remote functions, depending on version:
–
unlocking/locking/deadlocking the vehicle,
–
remote switching on of lighting,
–
activating/deactivating the alarm,
–
locating the vehicle,
–
immobilising the vehicle.
The remote control includes a conventional key
that allows the central locking/unlocking of the
vehicle using the door lock and the starting and
switching off of the engine.
Back-up procedures allow the vehicle to be
locked or unlocked in the event of a failure of the
remote control, central locking, battery
, etc. For
more information on the Back-up procedures,
refer to the corresponding section.
Built-in key
The key built into the remote control can be
used for the following operations, depending on
version:
–
unlocking/locking/deadlocking the vehicle.
–
activation/deactivation of the mechanical child
lock.
–
activation/deactivation of the front passenger
airbag.
–
back-up door locking.
–
switching on the ignition and starting/switching
off the engine.
W
ithout Keyless Entry and Starting
► To unfold or fold the key, press the button.
With Keyless Entry and Starting
► To eject the key or put it back in place, pull
and hold the button.
Unlocking/locking is confirmed by rapid
flashing of the direction indicators for
approximately two seconds.
At the same time, depending on your version,
the door mirrors unfold/fold.
If fitted to your vehicle, the alarm is
deactivated when the vehicle is unlocked.
Unlocking the vehicle
With the remote control
► Press one of these buttons to
unlock the vehicle.
With the key
► Turn the key in the driver's door lock towards
the front of the vehicle to unlock.
If your vehicle has an alarm, it will not be
deactivated. Opening a door will trigger the
Page 22 of 244

20
Access
Keyless Entry and
Starting
This system allows the unlocking, locking
and starting of the vehicle, while carrying the
electronic key in the recognition zone “A” around
the vehicle.
Unlocking/locking is confirmed by rapid
flashing of the direction indicators for
approximately two seconds.
At the same time, depending on your version,
the door mirrors unfold/fold.
If fitted to your vehicle, the alarm is
deactivated when the vehicle is unlocked.
alarm, but this will stop when the ignition is
switched on.
Selective unlocking of the
vehicle
Complete unlocking is activated by default.
This setting is done in the Vehicle / Driving
menu, then Driving functions and Vehicle
access .
Use this button for access to additional
information.
With the remote control
► To unlock the driver's door only,
press this button once.
–
T
o unlock the other doors and the boot,
press this button again.
Selective unlocking of the
boot
Complete unlocking is activated by default.
This setting is done in the Vehicle / Driving
menu, then Driving functions and Vehicle
access .
– Press this button to unlock the boot.
Use this button for access to additional
information.
Locking the vehicle
With the remote control
► Press this button to lock the vehicle
completely .
Maintaining the locking action (key or remote
control) automatically closes the windows.
With the key
► Turn the key towards the rear of the
vehicle to lock the vehicle completely.
If your vehicle has an alarm, this will not be
activated.
Locating your vehicle
This function allows you to identify your vehicle
from a distance, particularly in poor light. Your
vehicle must be locked.
► Press this button.
This will switch on the courtesy lamps and the
direction indicators will flash for around ten
seconds.
Remote operation of lighting
A short press on this button switches on the lighting remotely (sidelamps, dipped
beam headlamps and number plate lamps).
A second press before this time comes to an end
cancels lighting from a distance.
Deadlocking
Deadlocking renders the exterior and
interior door controls inoperative.
It also deactivates the manual central control
button.
For this reason, never leave anyone inside
the vehicle when it is deadlocked.
With the remote control
► Press this button to lock the vehicle
completely .
–
Within five seconds, press this button again to
deadlock the vehicle.
Deadlocking is confirmed by fixed
illumination of the direction indicators for
approximately two seconds.
Depending on your version, the door mirrors
fold at the same time.
With the key
► Turn the key in the driver's door lock towards
the rear to lock the vehicle completely.
►
T
urn the key towards the rear again within
five seconds to deadlock the vehicle.
Page 26 of 244

24
Access
With Keyless Entry and Starting
Following disconnection of the vehicle battery,
replacement of the remote control battery or in
the event of a remote control malfunction, you
can no longer unlock, lock or locate your vehicle.
► Place the mechanical key (integral with the
remote control) in the lock to unlock your vehicle.
► Remove the carpet underneath the 12 V
socket.
► Place the electronic key in the house
provided for this purpose.
► Switch on the ignition by pressing "START/
STOP".
The electronic key is now fully operational again.
If the problem persists, contact a PEUGEOT
dealer or a qualified workshop as soon as
possible.
If your vehicle is fitted with an alarm, it
will not be activated/deactivated when
the vehicle is locked/unlocked.
Opening a door will trigger the alarm, which
can be stopped by switching the ignition on.
Other doors
► For the other doors, check that the child lock
is not activated.
►
Insert the built-in key into the lock located on
the edge of the door and turn it an eighth of a
turn to the right for the right-hand side door
, and
to the left for the left-hand side door.
►
Close the doors and check from the outside
that the vehicle is locked.
Changing the battery
If the battery is flat, you are informed by
lighting of this warning lamp in the
instrument panel, an audible signal and a
message in the screen.
Without Keyless Entry and Starting
Battery ref.: CR1620 / 3 volts.
With Keyless Entry and Starting
Battery ref.: CR2032 / 3 volts.
► Unclip the cover using a small screwdriver at
the cut-out.
►
Remove the cover
.
►
Remove the discharged battery from its
housing.
►
Fit the new battery into its housing observing
the polarity
.
►
Clip the cover onto the casing.
Do not throw remote control batteries
away, as they contain metals that are
harmful to the environment. Take them to an
approved disposal point.
Reinitialising the remote
control
Following replacement of the battery or in
the event of a fault, it may be necessary to
reinitialise the remote control.
If the problem persists, contact a
PEUGEOT dealer or a qualified
workshop as soon as possible.
Without Keyless Entry and Starting
– Switch off the ignition.
– T urn the key to position 2 (Ignition) .
– Immediately press the closed padlock
button for a few seconds.
–
Switch off the ignition and remove the key
from the switch.
The remote control is now fully operational
again.
Page 36 of 244

34
Ease of use and comfort
They can also be folded for parking in narrow
spaces.
Demisting - Defrosting
Demisting-defrosting of the door mirrors
operates with the engine running, by
switching on the heated rear screen.
For more information on Demisting and
defrosting the rear screen, refer to the
associated section.
Adjustment
► Move control A to the right or to the left to
select the corresponding mirror.
►
Move control
B in any of the four directions
to adjust.
►
Return control A
to the central position.
As a safety measure, the mirrors should be adjusted to reduce "blind spots".
Objects that you see in the mirrors are in fact
closer than they appear.
Take this into account in order to correctly
judge the distance of vehicles approaching
from behind.
Folding
► From outside: lock the vehicle using the
electronic key or the " Keyless Entry and Starting"
system.
►
From inside: with the ignition on, pull the
control
A in the central position rearwards.
If the mirrors are folded using control A,
they will not unfold when the vehicle is
unlocked. Pull again on control A.
Unfolding
► From outside: unlock the vehicle using the
electronic key or the " Keyless Entry and Starting"
system.
►
From inside: with the ignition on, pull the
control
A in the central position rearwards.
The folding and unfolding of the door mirrors using the remote control can be
deactivated by a PEUGEOT dealer or a
qualified workshop.
If necessary, the mirrors can be folded
manually.
Rear view mirror
Equipped with an anti-dazzle system, which
darkens the mirror glass and reduces the
nuisance to the driver caused by the sun,
headlights of other vehicles, etc.
Manual model
Adjustment
► Adjust the mirror so that the mirror is directed
correctly in the "day" position.
Day / night position
► Pull the lever to change to the "night" anti-
dazzle position.
►
Push the lever to change to the normal "day"
position.
Automatic "electrochrome" model
This system automatically and progressively
changes between day and night use by means
of a sensor measuring the light coming from the
rear of the vehicle.
In order to ensure optimum visibility
during your manoeuvres, the mirror
Page 37 of 244

35
Ease of use and comfort
3lightens automatically when reverse gear is
engaged.
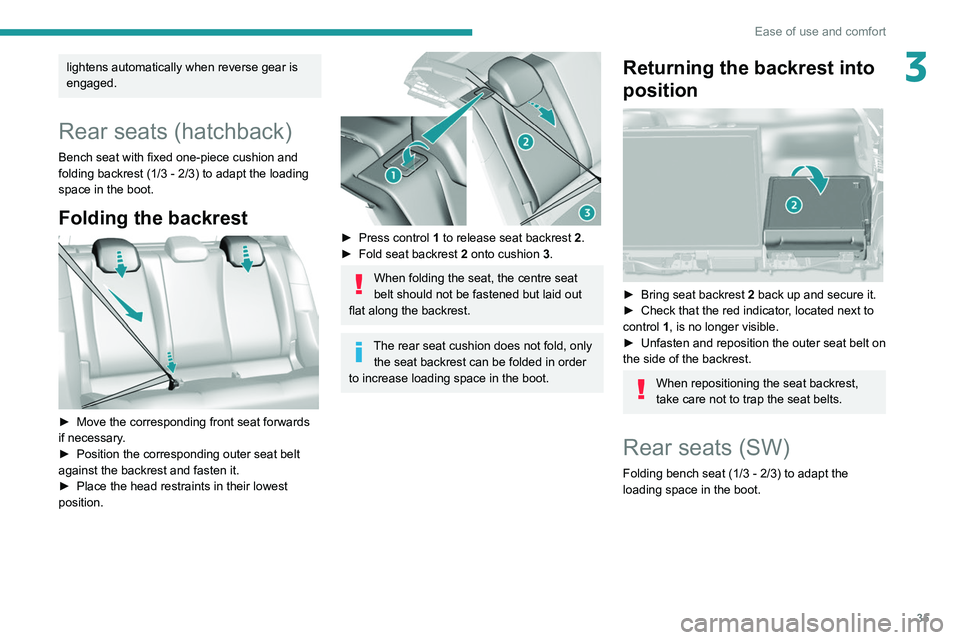
Rear seats (hatchback)
Bench seat with fixed one-piece cushion and
folding backrest (1/3 - 2/3) to adapt the loading
space in the boot.
Folding the backrest
► Move the corresponding front seat forwards
if necessary .
►
Position the corresponding outer seat belt
against the backrest and fasten it.
►
Place the head restraints in their lowest
position.
► Press control 1 to release seat backrest 2.
► Fold seat backrest 2 onto cushion 3.
When folding the seat, the centre seat
belt should not be fastened but laid out
flat along the backrest.
The rear seat cushion does not fold, only the seat backrest can be folded in order
to increase loading space in the boot.
Returning the backrest into
position
► Bring seat backrest 2 back up and secure it.
► Check that the red indicator , located next to
control 1, is no longer visible.
►
Unfasten and reposition the outer seat belt on
the side of the backrest.
When repositioning the seat backrest,
take care not to trap the seat belts.
Rear seats (SW)
Folding bench seat (1/3 - 2/3) to adapt the
loading space in the boot.
Page 40 of 244

38
Ease of use and comfort
2.12 V accessory socket (120 W)
Observe the maximum power rating to avoid
damaging the accessory.
3. USB socket
4. Cup holder (depending on version)
5. Storage (depending on version)
6. Storage - Removable cup/can holder
Move the
support to access the cup/can
holder.
7. Front armrest
8. 220
V socket (120 W) or USB
socket
(depending on version)
Observe the maximum power rating to avoid
damaging the accessory.
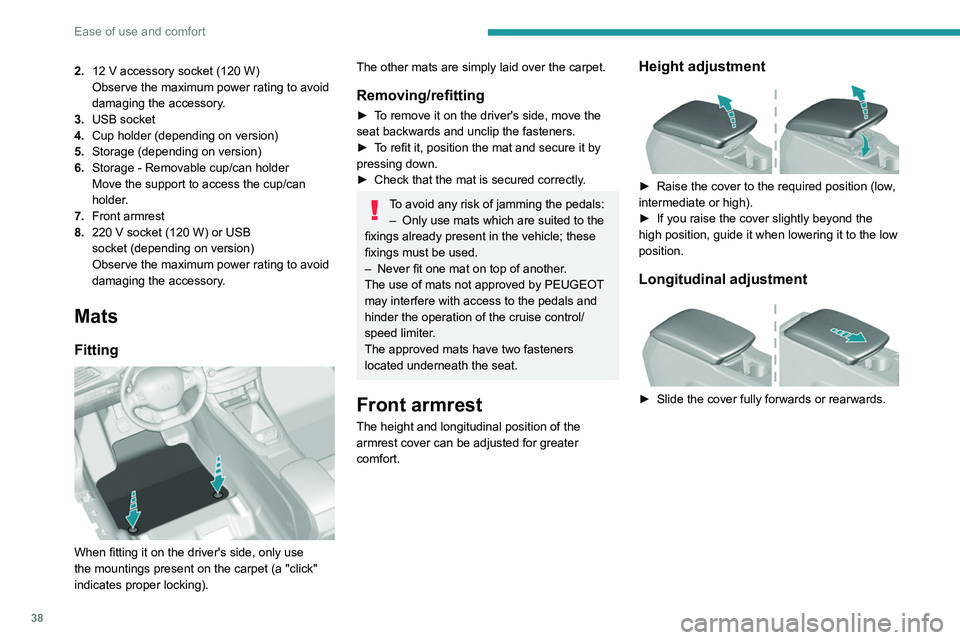
Mats
Fitting
When fitting it on the driver's side, only use
the mountings present on the carpet (a "click"
indicates proper locking).
The other mats are simply laid over the carpet.
Removing/refitting
► To remove it on the driver's side, move the
seat backwards and unclip the fasteners.
►
T
o refit it, position the mat and secure it by
pressing down.
►
Check that the mat is secured correctly
.
To avoid any risk of jamming the pedals:– Only use mats which are suited to the
fixings already present in the vehicle; these
fixings must be used.
–
Never fit one mat on top of another
.
The use of mats not approved by PEUGEOT
may interfere with access to the pedals and
hinder the operation of the cruise control/
speed limiter.
The approved mats have two fasteners
located underneath the seat.
Front armrest
The height and longitudinal position of the
armrest cover can be adjusted for greater
comfort.
Height adjustment
► Raise the cover to the required position (low ,
intermediate or high).
►
If you raise the cover slightly beyond the
high position, guide it when lowering it to the low
position.
Longitudinal adjustment
► Slide the cover fully forwards or rearwards.
Page 50 of 244

48
Ease of use and comfort
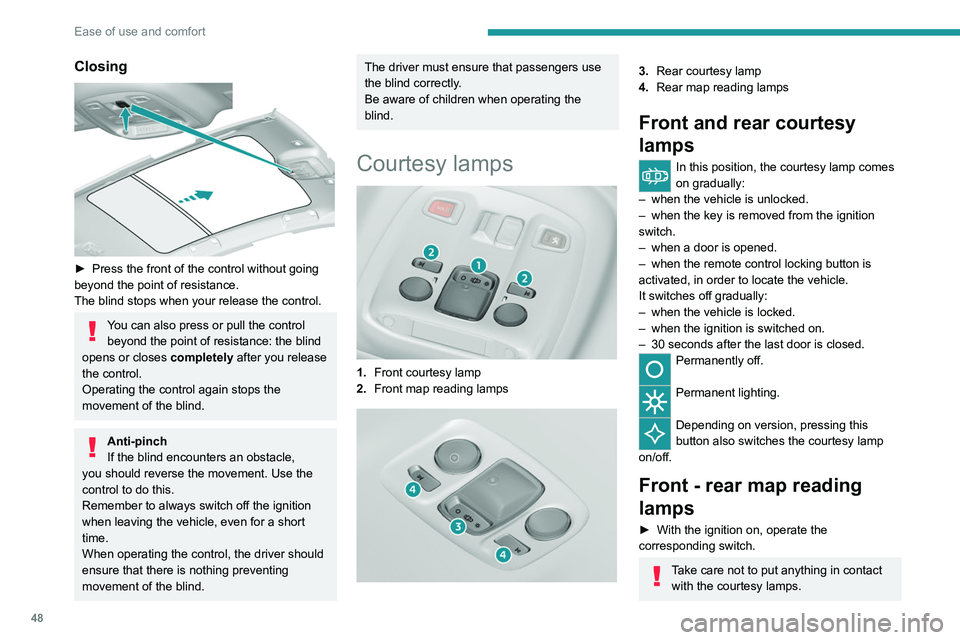
Closing
► Press the front of the control without going
beyond the point of resistance.
The blind stops when your release the control.
You can also press or pull the control beyond the point of resistance: the blind
opens or closes completely after you release
the control.
Operating the control again stops the
movement of the blind.
Anti-pinch
If the blind encounters an obstacle,
you should reverse the movement. Use the
control to do this.
Remember to always switch off the ignition
when leaving the vehicle, even for a short
time.
When operating the control, the driver should
ensure that there is nothing preventing
movement of the blind.
The driver must ensure that passengers use
the blind correctly.
Be aware of children when operating the
blind.
Courtesy lamps
1. Front courtesy lamp
2. Front map reading lamps
3.Rear courtesy lamp
4. Rear map reading lamps
Front and rear courtesy
lamps
In this position, the courtesy lamp comes
on gradually:
–
when the vehicle is unlocked.
–
when the key is removed from the ignition
switch.
–
when a door is opened.
–
when the remote control locking button is
activated, in order to locate the vehicle.
It switches off gradually:
–
when the vehicle is locked.
–
when the ignition is switched on.
–
30 seconds after the last door is closed.
Permanently off.
Permanent lighting.
Depending on version, pressing this
button also switches the courtesy lamp
on/off.
Front - rear map reading
lamps
► With the ignition on, operate the
corresponding switch.
Take care not to put anything in contact with the courtesy lamps.
In "permanent lighting" mode, the lighting
time varies according to the
circumstances:
– when the ignition is off, approximately ten
minutes,
– in energy saving mode, approximately thirty
seconds,
– with the engine running, unlimited.
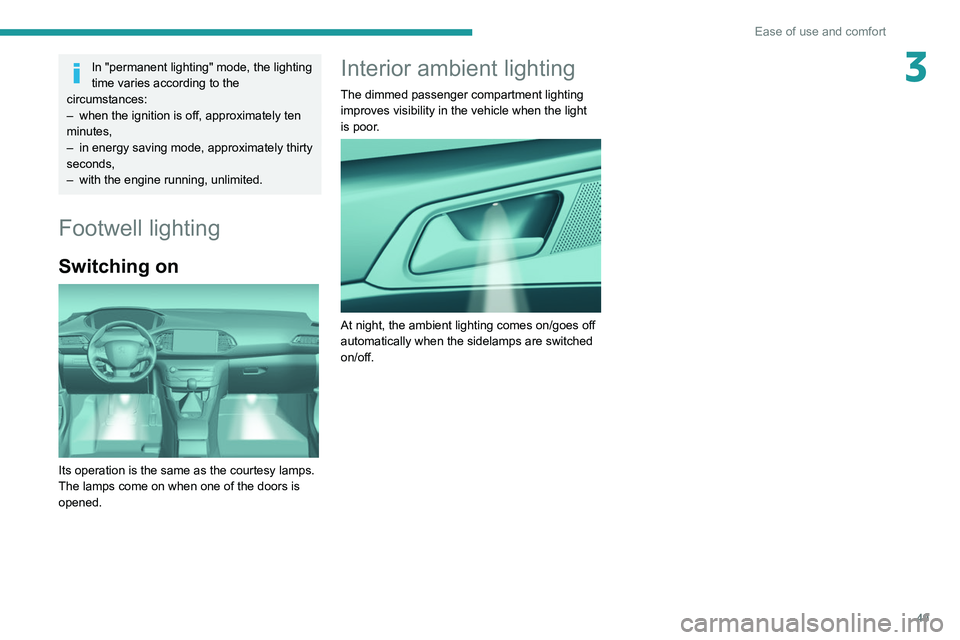
Footwell lighting
Switching on
Its operation is the same as the courtesy lamps.
The lamps come on when one of the doors is
opened.
Page 51 of 244

49
Ease of use and comfort
3In "permanent lighting" mode, the lighting
time varies according to the
circumstances:
–
when the ignition is off, approximately ten
minutes,
–
in energy saving mode, approximately thirty
seconds,
–
with the engine running, unlimited.
Footwell lighting
Switching on
Its operation is the same as the courtesy lamps.
The lamps come on when one of the doors is
opened.
Interior ambient lighting
The dimmed passenger compartment lighting
improves visibility in the vehicle when the light
is poor.
At night, the ambient lighting comes on/goes off
automatically when the sidelamps are switched
on/off.