2021 Peugeot 308 ad blue
[x] Cancel search: ad bluePage 19 of 244

17
Instruments
1To be able to restart the engine, contact a PEUGEOT dealer or a qualified
workshop.
Manual test
This function allows you to check certain
indicators and display the alerts log.
It can be accessed via the "Diagnostic"
button in the Driving/Vehicle touch
screen menu.
The following information is displayed on the
instrument panel:
–
Engine oil level.
–
Next service due.
–
T
yre pressures.
–
Driving range associated with the
AdBlue and
the SCR system (BlueHDi Diesel).
–
Current alerts.
This information is also displayed automatically every time the ignition is
switched on.
Total distance recorder
The total distance recorder measures the total
distance travelled by the vehicle since its initial
registration.
With the ignition on, the total distance is
displayed at all times. It remains displayed for
30
seconds after switching off the ignition. It is
displayed when the driver's door is opened, and
when the vehicle is locked or unlocked.
When travelling abroad, you may have to
change the distance units (km or miles):
the road speed must be displayed in the local
country’s official unit (km/h or mph).
The unit is changed via the screen
configuration menu, with the vehicle
stationary.
Lighting dimmer
This system allows the brightness of the central
screen (and the instrument panel, by night) to be
adjusted manually.
With PEUGEOT Connect
Radio
► Press this button to select the
Settings menu.
► Select " Brightness".
► Adjust the brightness by pressing the
arrows or moving the slider .
The settings are applied immediately.
►
Press outside the settings window to exit.
Y
ou can also switch off the screen:
► Press this button to select the
Settings menu.
► Select " Dark". The screen goes off completely.
►
Press the screen again (anywhere on its
surface) to turn it on.
WithPEUGEOT Connect Nav
► Press this button to select the
Settings menu.
►
Select "
OPTIONS".
► Select " Screen configuration".
►
Select the "
Brightness" tab.
► Adjust the brightness by pressing the
arrows or moving the slider .
► Press this button to save and exit.
You can also switch off the screen:
► Press this button to select the
Settings menu.
► Select " Turn off screen".
The screen goes off completely.
►
Press the screen again (anywhere on its
surface) to activate it.
Page 100 of 244
98
Driving
vehicle has reached a speed of 5 mph
(8 km/h).
During parking manoeuvres, STOP mode
is not available for a few seconds after
coming out of reverse gear or turning the
steering wheel.
Engine restarting (START mode)
The engine automatically restarts as soon as the
driver indicates the intention of moving off again.
► With a manual gearbox: with the clutch
pedal fully depressed.
► With an automatic gearbox:
• With the selector in position D or M: with the
brake pedal released.
• With the selector in position N and the brake
pedal released: with the selector at D or M.
• With the selector in position P and the brake
pedal depressed: with the selector at R, N,
D or M.
• Reverse gear engaged.
Special cases
The engine will restart automatically if all
conditions for operation are met again and in the
following cases.
– The electric parking brake is being applied.
– Vehicle speed exceeds 2 mph (3 km/h).
– Some specific conditions (braking assistance,
air conditioning setting, etc.).
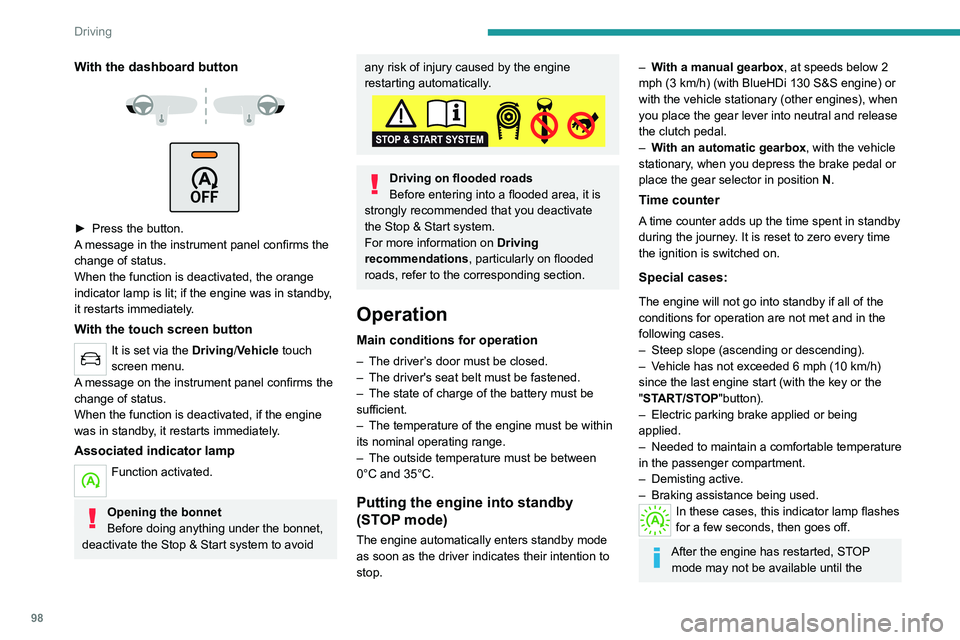
With the dashboard button
► Press the button.
A message in the instrument panel confirms the
change of status.
When the function is deactivated, the orange
indicator lamp is lit; if the engine was in standby,
it restarts immediately.
With the touch screen button
It is set via the Driving/Vehicle touch
screen menu.
A message on the instrument panel confirms the
change of status.
When the function is deactivated, if the engine
was in standby, it restarts immediately.
Associated indicator lamp
Function activated.
Opening the bonnet
Before doing anything under the bonnet,
deactivate the Stop & Start system to avoid
any risk of injury caused by the engine
restarting automatically.
Driving on flooded roads
Before entering into a flooded area, it is
strongly recommended that you deactivate
the Stop & Start system.
For more information on Driving
recommendations, particularly on flooded
roads, refer to the corresponding section.
Operation
Main conditions for operation
– The driver ’s door must be closed.
– The driver's seat belt must be fastened.
–
The state of charge of the battery must be
sufficient.
–
The temperature of the engine must be within
its nominal operating range.
–
The outside temperature must be between
0°C and 35°C.
Putting the engine into standby
(STOP mode)
The engine automatically enters standby mode
as soon as the driver indicates their intention to
stop.
– With a manual gearbox, at speeds below 2
mph (3 km/h) (with BlueHDi 130 S&S engine) or
with the vehicle stationary (other engines), when
you place the gear lever into neutral and release
the clutch pedal.
–
W
ith an automatic gearbox, with the vehicle
stationary, when you depress the brake pedal or
place the gear selector in position N.
Time counter
A time counter adds up the time spent in standby
during the journey. It is reset to zero every time
the ignition is switched on.
Special cases:
The engine will not go into standby if all of the
conditions for operation are not met and in the
following cases.
–
Steep slope (ascending or descending).
–
V
ehicle has not exceeded 6 mph (10 km/h)
since the last engine start (with the key or the
"START/STOP"button).
–
Electric parking brake applied or being
applied.
–
Needed
to maintain a comfortable temperature
in the passenger compartment.
–
Demisting active.
–
Braking assistance being used.
In these cases, this indicator lamp flashes
for a few seconds, then goes off.
After the engine has restarted, STOP mode may not be available until the
Page 125 of 244

123
Driving
6Rear view
To activate the camera located on the tailgate,
engage reverse gear and do not exceed a speed
of 6 mph (10 km/h).
The system is deactivated:
–
If a trailer is attached or a bicycle carrier
is fitted on a towing device (vehicle fitted
with a towing device installed in line with the
manufacturer's recommendations).
–
Automatically
, at speeds above approximately
6 mph (10
km/h),
–
Automatically
, if the tailgate is opened.
–
Upon changing out of reverse gear (the image
remains displayed for 7
seconds).
–
By pressing the white arrow in the upper-left
corner of the touch screen.
AUTO mode
This mode is activated by default.
Using sensors in the rear bumper, the automatic
view changes from the rear view (standard) to
the view from above (zoom) as an obstacle is
approached at the level of the red line (less than
30
cm) during a manoeuvre.
Standard view
The area behind the vehicle is displayed on the
screen. The blue lines
1 represent the width of your
vehicle, with the mirrors unfolded; their direction
changes according to the position of the steering
wheel.
The red line 2 represents a distance of 30 cm
from the rear bumper; the two blue lines 3 and 4
represent 1 m and 2 m, respectively.
This view is available with AUTO mode or in the
view selection menu.
Zoom view
The camera records the vehicle's surroundings
during the manoeuvre in order to create a
view from above the rear of the vehicle in its
near surroundings, allowing the vehicle to be
manoeuvred around nearby obstacles.
This view is available with AUTO mode or in the
view selection menu.
Page 148 of 244
146
Practical information
For your safety and driving comfort, it is
important to have them regularly checked by a
PEUGEOT dealer or a qualified workshop.
Only use products recommended by
PEUGEOT or products of equivalent
quality and specification.
In order to optimise the operation of
components as important as those in the
braking system, PEUGEOT selects and offers
very specific products.
After washing the vehicle, dampness, or in
wintry conditions, ice can form on the brake
discs and pads: braking efficiency may be
reduced. Make light brake applications to dry
and defrost the brakes.
AdBlue® (BlueHDi)
To respect the environment and ensure compliance with the Euro 6 standard, without
adversely affecting the performance or fuel
consumption of its Diesel engines, PEUGEOT
has taken the decision to equip its vehicles
with a system that associates SCR (Selective
Catalytic Reduction) with a Diesel Particle Filter
(DPF) for the treatment of exhaust gases.
SCR system
Using a liquid called AdBlue® that contains
urea, a catalytic converter turns up to 85% of
the nitrogen oxides (NOx) into nitrogen and
water, which are harmless to health and the
environment.
The AdBlue® is contained in a special
tank holding about 17 litres.
Its capacity allows a driving range of
approximately 4,000
miles (6,500 km),
which
may vary considerably depending on your
driving style.
An alert system is triggered once the reserve
level is reached: it is then possible to drive for a
further 1,500 miles (2,400
km) before the tank is
empty and the vehicle is immobilised.
For more information on the Warning
and indicator lamps and the associated
alerts, or the Indicators, please refer to the
corresponding sections.
Once the AdBlue® tank is empty, a device
required by law prevents the engine from
being restarted.
If the SCR system is faulty, the level of
emissions from the vehicle will no longer meet
the Euro 6 standard and the vehicle starts
polluting the environment.
In the event of a confirmed SCR system
malfunction, it is essential to visit a
PEUGEOT dealer or a qualified workshop.
After 685 miles (1,100 km), a device is
automatically activated to prevent the engine
from starting.
In both cases, a range indicator indicates
the distance that can be travelled before the
vehicle is stopped.
Freezing of the AdBlue®
AdBlue® freezes at temperatures below
around -11°C.
The SCR system includes a heater for the
AdBlue
® tank, allowing you to continue driving
in very cold conditions.
Supply of AdBlue®
It is recommended that the AdBlue® be topped
up as soon as the first alert is issued indicating
that the reserve level has been reached.
For the correct operation of the SCR
system:
–
Use
only AdBlue
® fluid that meets the ISO
22241 standard.
–
Never
transfer AdBlue
® to another container
as it would lose its purity.
–
Never
dilute AdBlue
® with water.
You can obtain AdBlue
® from a PEUGEOT
dealer or a qualified workshop.
You can also visit a service station equipped with AdBlue® pumps specially
designed for passenger vehicles (for versions
with access to the AdBlue
® tank via the fuel
filler flap).
Never top up from an AdBlue® dispenser
reserved for heavy goods vehicles.
Storage recommendations
AdBlue® freezes at about -11°C and deteriorates
above +25°C. Containers should be stored in a
cool area and protected from direct sunlight.
Under these conditions, the fluid can be kept for
at least a year.
If the fluid has frozen, it can be used once it has
completely thawed out in the ambient air.
Never store AdBlue® containers in your
vehicle.
Precautions for use
AdBlue® is a urea-based solution. This fluid is
non-flammable, colourless and odourless (when
kept in a cool place).
In the event of contact with the skin, wash the
affected area with soap and running water. In the
event of contact with the eyes, immediately rinse
the eyes with large amounts of water or with an
eye wash solution for at least 15 minutes. Seek
medical attention if you feel a persistent burning
sensation or irritation.
If swallowed, immediately wash out the mouth
with clean water and then drink plenty of water.
In certain conditions (high temperature, for
example), the risk of release of ammonia cannot
be excluded: do not inhale the fluid. Ammonia
Page 149 of 244
147
Practical information
7Never top up from an AdBlue® dispenser
reserved for heavy goods vehicles.
Storage recommendations
AdBlue® freezes at about -11°C and deteriorates
above +25°C. Containers should be stored in a
cool area and protected from direct sunlight.
Under these conditions, the fluid can be kept for
at least a year.
If the fluid has frozen, it can be used once it has
completely thawed out in the ambient air.
Never store AdBlue® containers in your
vehicle.
Precautions for use
AdBlue® is a urea-based solution. This fluid is
non-flammable, colourless and odourless (when
kept in a cool place).
In the event of contact with the skin, wash the
affected area with soap and running water. In the
event of contact with the eyes, immediately rinse
the eyes with large amounts of water or with an
eye wash solution for at least 15 minutes. Seek
medical attention if you feel a persistent burning
sensation or irritation.
If swallowed, immediately wash out the mouth
with clean water and then drink plenty of water.
In certain conditions (high temperature, for
example), the risk of release of ammonia cannot
be excluded: do not inhale the fluid. Ammonia
vapours have an irritant effect on mucous
membranes (eyes, nose and throat).
Store AdBlue® out of the reach of
children, in its original container.
Procedure
Before starting the top-up procedure, ensure that
the vehicle is parked on a flat and level surface.
In wintry conditions, ensure that the temperature
of the vehicle is above -11°C. Otherwise the
AdBlue
® may be frozen and so cannot be poured
into the tank. Park the vehicle in a warmer area
for a few hours to allow the top-up to be carried
out.
Never pour the AdBlue® into the Diesel
fuel tank.
For specific information about how to
access the AdBlue tank, refer to the
detailed descriptions below.
If any AdBlue® is splashed, or if there are
any spillages on the bodywork, rinse
immediately with cold water or wipe with a
damp cloth.
If the fluid has crystallised, clean it off using a
sponge and hot water.
Important: in the event of a top-up after
a breakdown because of a lack of
AdBlue, it is essential to wait around 5
minutes before switching on the ignition,
without opening the driver’s door,
unlocking the vehicle, introducing the key
into the ignition switch, or introducing the
key of the “
Keyless Entry and Starting
”
system into the passenger compartment
.
Switch on the ignition, then wait for 10
seconds before starting the engine.
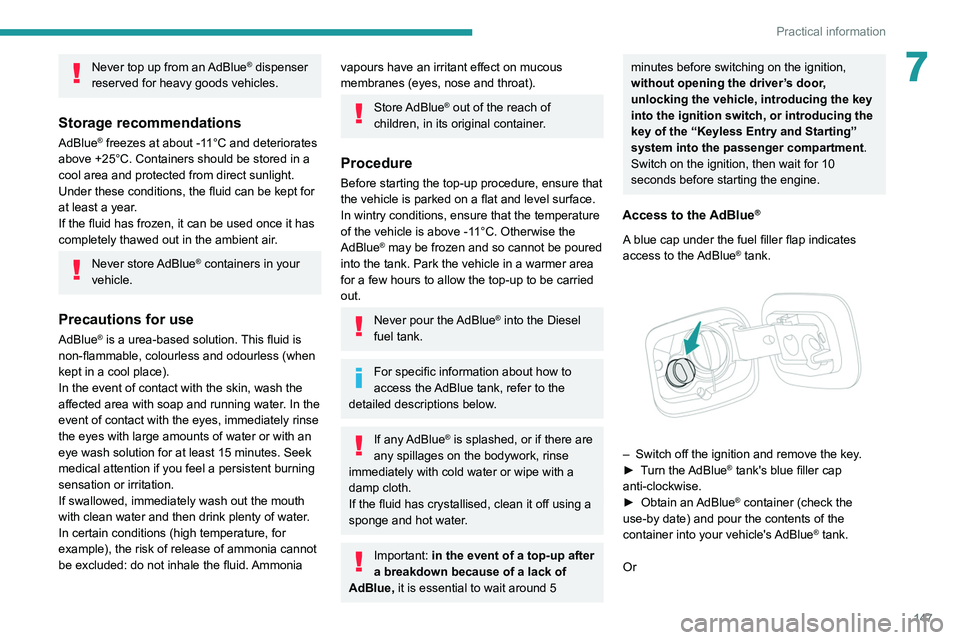
Access to the AdBlue®
A blue cap under the fuel filler flap indicates
access to the AdBlue® tank.
– Switch off the ignition and remove the key .
► T urn the AdBlue® tank's blue filler cap
anti-clockwise.
►
Obtain an
AdBlue
® container (check the
use-by date) and pour the contents of the
container into your vehicle's AdBlue
® tank.
Or
Page 150 of 244
148
Practical information
► Insert the AdBlue® pump nozzle and refill the
tank until the nozzle stops automatically.
Important:
To avoid overfilling the AdBlue® tank, it is
recommended:
►
T
o top up between 10 and 13 litres using
AdBlue
® containers.
Or
►
When filling at a service station, to stop
after the third automatic cut-off of the nozzle.
Free-wheeling
In certain situations, you must allow the vehicle
to free-wheel (while being towed, on a rolling
road, in an automatic car wash, or being
transported by rail or sea freight, etc.).
The procedure varies according to the type of
gearbox and parking brake.
With a manual gearbox and
electric parking brake
/
Release procedure
► With the engine running and while depressing
the brake pedal, move the gear selector to the
neutral position.
►
While depressing the brake pedal, switch off
the ignition. ►
Release the brake pedal, then switch on the
ignition again.
►
While depressing the brake pedal, press the
control lever to release the parking brake.
►
Release the brake pedal, then switch off the
ignition.
Reverting to normal operation
► While depressing the brake pedal, start the
engine.
With an automatic gearbox
and electric parking brake
/
Release procedure
► With the vehicle stationary and the engine
running, select mode N and switch off the
ignition.
Within 5
seconds:
►
Switch on the ignition again.
►
While depressing the brake pedal, move the
push selector forwards or backwards to confirm
mode
N.
►
While depressing the brake pedal, press the
control lever to release the parking brake.
►
Release the brake pedal, switch off the
ignition.
If the 5-second time limit is exceeded, the
gearbox engages mode P
; it is then necessary to
restart the procedure.
Reverting to normal operation
► While depressing the brake pedal, restart the
engine.
Keyless Entry and Starting
You must not depress the brake pedal
while switching the ignition on or off. If you do,
the engine will start, requiring you to restart
the procedure.
Advice on care and maintenance
General recommendations
Observe the following recommendations to avoid
damaging the vehicle.
Exterior
Never use a high-pressure jet wash in
the engine compartment - risk of
damaging the electrical components!
Do not wash the vehicle in bright sunshine or
extremely cold conditions.
When washing the vehicle in an
automatic roller-brush car wash, be sure
to lock the doors and, depending on version,
move the electronic key away and deactivate
Page 171 of 244

169
In the event of a breakdown
8FuseN° Rating
(A) Functions
F25 40Headlamp
washer relay
(retrofitting).
F27 25Built-in systems
interface.
F28 30Diesel
emissions
control system
(AdBlue
®).
F29 30Windscreen
wiper motor.
F30 80Pre-heat glow
plugs (Diesel),
additional
programmable
heating
(retrofitting),
headlamp wash
pump.
12 V battery
Procedure for starting the engine using another
battery or charging a discharged battery.
Lead-acid starter batteries
These batteries contain harmful
substances (sulphuric acid and lead).
They must be disposed of in accordance
with regulations and must never under any
circumstances be discarded with household
waste.
Take used remote control batteries and
vehicle batteries to a special collection point.
Protect your eyes and face before
handling the battery.
All operations on the battery must be carried
out in a well ventilated area and away from
naked flames and sources of sparks, to avoid
any risk of explosion or fire.
Wash your hands afterwards.
Versions equipped with Stop & Start are
fitted with a 12 V lead-acid battery with
special technology and specifications.
It should only be replaced by a PEUGEOT
dealer or a qualified workshop.
Before doing any work
Immobilise the vehicle: apply the parking
brake, put the gearbox in neutral, then switch
off the ignition.
Check that all electrical equipment is switched
off.
Access to the battery
The battery is located under the bonnet.
To access them:
►
Open the bonnet using the interior release
lever
, then the exterior safety catch.
Page 176 of 244
174
In the event of a breakdown
Accessing the tools
For more information on accessing the Tool kit,
refer to the corresponding section.
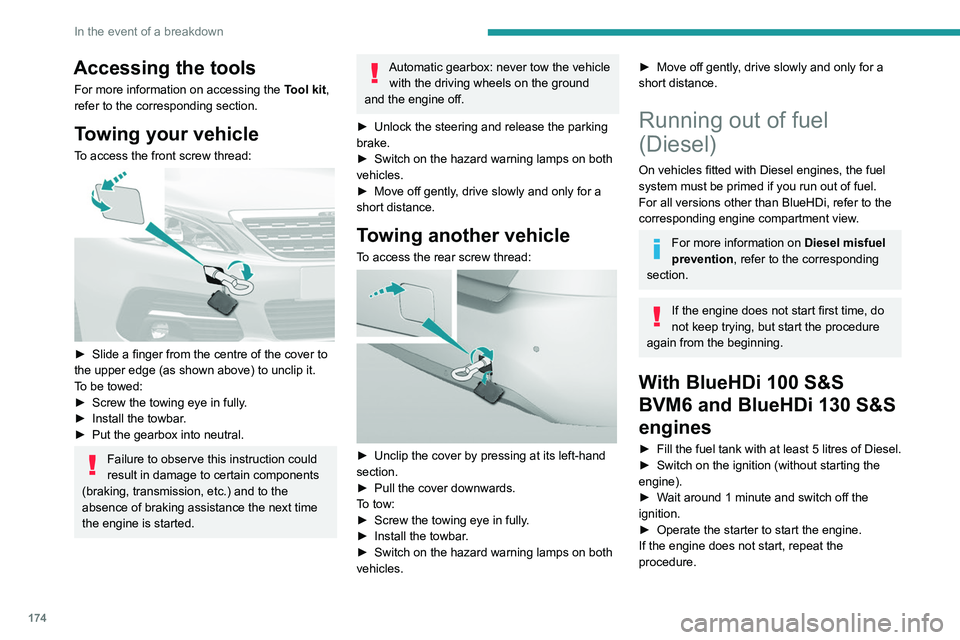
Towing your vehicle
To access the front screw thread:
► Slide a finger from the centre of the cover to
the upper edge (as shown above) to unclip it.
T
o be towed:
►
Screw the towing eye in fully
.
►
Install the towbar
.
►
Put the gearbox into neutral.
Failure to observe this instruction could
result in damage to certain components
(braking, transmission, etc.) and to the
absence of braking assistance the next time
the engine is started.
Automatic gearbox: never tow the vehicle with the driving wheels on the ground
and the engine off.
►
Unlock the steering and release the parking
brake.
►
Switch on the hazard warning lamps on both
vehicles.
►
Move off gently
, drive slowly and only for a
short distance.
Towing another vehicle
To access the rear screw thread:
► Unclip the cover by pressing at its left-hand
section.
►
Pull the cover downwards.
T
o tow:
►
Screw the towing eye in fully
.
►
Install the towbar
.
►
Switch on the hazard warning lamps on both
vehicles.
► Move off gently , drive slowly and only for a
short distance.
Running out of fuel
(Diesel)
On vehicles fitted with Diesel engines, the fuel
system must be primed if you run out of fuel.
For all versions other than BlueHDi, refer to the
corresponding engine compartment view.
For more information on Diesel misfuel
prevention, refer to the corresponding
section.
If the engine does not start first time, do
not keep trying, but start the procedure
again from the beginning.
With BlueHDi 100 S&S
BVM6 and BlueHDi 130 S&S
engines
► Fill the fuel tank with at least 5 litres of Diesel.
► Switch on the ignition (without starting the
engine).
►
W
ait around 1 minute and switch off the
ignition.
►
Operate the starter to start the engine.
If the engine does not start, repeat the
procedure.
Other enginesNon-
► Fill the fuel tank with at least 5 litres of Diesel.
► Open the bonnet.
► If necessary, unclip the cover to access the
priming pump.
► Operate the priming pump repeatedly until
resistance is felt (there may be resistance on the
first press).
► Operate the starter to start the engine (if the
engine does not start at the first attempt, wait
around 15 seconds before trying again).
► If the engine does not start after a few
attempts, operate the priming pump again then
start the engine.
► Put the cover back in place and clip it in.
► Close the bonnet.