2021 Peugeot 308 run flat
[x] Cancel search: run flatPage 12 of 244

10
Instruments
Until the fuel level is topped up, this alert will
be repeated every time the ignition is switched
on, with increasing frequency as the fuel level
decreases and approaches zero.
Refuel without delay to avoid running out of fuel.
Never drive until completely empty, as
this could damage the emissions control and
injection systems.
Orange warning/indicator lamps
Engine self-diagnosis system
Flashing.
The engine management system has a
fault.
There is a risk that the catalytic converter will be
destroyed.
Carry out (2) without fail .
Fixed.
The emission control system has a fault.
The warning lamp should go off when the engine
is started.
Carry out (3) quickly.
Service
Temporarily on. One or more minor faults, for which there
is/are no specific warning lamp(s), have been
detected.
Identify the cause of the problem with the help of
the message displayed on the instrument panel.
You can deal with some problems yourself, for
example an open door or when the particle filter
is becoming saturated. For other problems, such as a fault with the tyre
under-inflation detection system, carry out (3).
Fixed.
One or more major faults, for which there
is/are no specific warning lamp(s), have been
detected.
Identify the cause of the problem with the help of
the message displayed on the instrument panel,
then carry out (3).
Fixed, accompanied by the message
"Parking brake fault".
Automatic release of the electric parking brake is
unavailable.
Carry out (2).
Service warning lamp fixed and
service spanner flashing then
fixed.
The servicing interval has been exceeded.
The vehicle must be serviced as soon as
possible.
Only with BlueHDi Diesel engines.
Malfunction (with electric parking brake)Fixed.
The electric parking brake has a fault.
Carry out (3) quickly.
Fixed, accompanied by the
message "Parking brake fault".
The vehicle cannot be immobilised with the
engine running.
If manual application and release commands are
not working, the electric parking brake control
lever is faulty. The automatic functions must be used at all
times and are automatically re-enabled in the
event of a control lever fault.
Carry out (2).
Flashing, when the vehicle
is started.
The parking brake has not been properly
released.
Carry out (1) and try to fully release the parking
brake using the control lever, with your foot on
the brake pedal.
If the problem persists, carry out (2).
Fixed, accompanied
by the message
"Parking brake fault".
The parking brake no longer delivers optimum
performance for parking the vehicle safely in all
circumstances.
Make the vehicle safe:
►
Park on a level surface.
►
With a manual gearbox, engage a gear
.
►
With an automatic gearbox, with
P
selected,
place the supplied chocks against one of the
wheels.
Then carry out (2).
Under-inflationFixed, accompanied by an audible signal
and a message.
The pressure in one or more wheels is too low.
Check the pressure of the tyres as soon as
possible.
Reinitialise the detection system after adjusting
the pressure.
Page 141 of 244
139
Practical information
7► Lift the protective cover on the connection
socket and connect the trailer's electric plug.
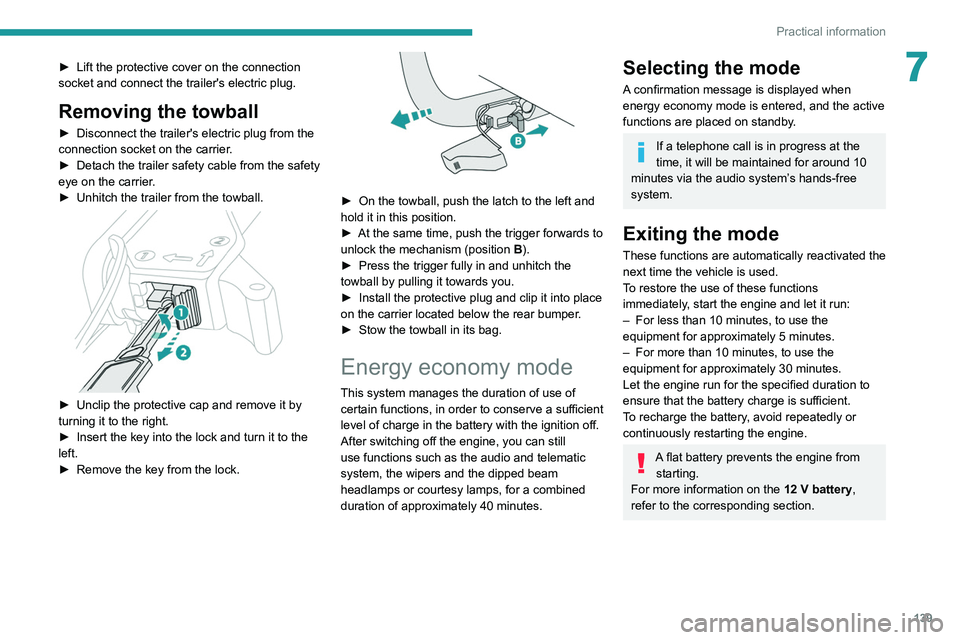
Removing the towball
► Disconnect the trailer's electric plug from the
connection socket on the carrier .
►
Detach the trailer safety cable from the safety
eye on the carrier
.
►
Unhitch the trailer from the towball.
► Unclip the protective cap and remove it by
turning it to the right.
►
Insert the key into the lock and turn it to the
left.
►
Remove the key from the lock.
► On the towball, push the latch to the left and
hold it in this position.
►
At the same time, push the trigger forwards to
unlock the mechanism (position B
).
►
Press the trigger fully in and unhitch the
towball by pulling it towards you.
►
Install the protective plug and clip it into place
on the carrier
located below the rear bumper.
►
Stow the towball in its bag.
Energy economy mode
This system manages the duration of use of
certain functions, in order to conserve a sufficient
level of charge in the battery with the ignition off.
After switching off the engine, you can still
use functions such as the audio and telematic
system, the wipers and the dipped beam
headlamps or courtesy lamps, for a combined
duration of approximately 40 minutes.
Selecting the mode
A confirmation message is displayed when
energy economy mode is entered, and the active
functions are placed on standby.
If a telephone call is in progress at the
time, it will be maintained for around 10
minutes via the audio system’s hands-free
system.
Exiting the mode
These functions are automatically reactivated the
next time the vehicle is used.
To restore the use of these functions
immediately, start the engine and let it run:
–
For less than 10 minutes, to use the
equipment for approximately 5 minutes.
–
For more than 10 minutes, to use the
equipment for approximately 30 minutes.
Let the engine run for the specified duration to
ensure that the battery charge is sufficient.
T
o recharge the battery, avoid repeatedly or
continuously restarting the engine.
A flat battery prevents the engine from starting.
For more information on the 12
V battery,
refer to the corresponding section.
Page 149 of 244
147
Practical information
7Never top up from an AdBlue® dispenser
reserved for heavy goods vehicles.
Storage recommendations
AdBlue® freezes at about -11°C and deteriorates
above +25°C. Containers should be stored in a
cool area and protected from direct sunlight.
Under these conditions, the fluid can be kept for
at least a year.
If the fluid has frozen, it can be used once it has
completely thawed out in the ambient air.
Never store AdBlue® containers in your
vehicle.
Precautions for use
AdBlue® is a urea-based solution. This fluid is
non-flammable, colourless and odourless (when
kept in a cool place).
In the event of contact with the skin, wash the
affected area with soap and running water. In the
event of contact with the eyes, immediately rinse
the eyes with large amounts of water or with an
eye wash solution for at least 15 minutes. Seek
medical attention if you feel a persistent burning
sensation or irritation.
If swallowed, immediately wash out the mouth
with clean water and then drink plenty of water.
In certain conditions (high temperature, for
example), the risk of release of ammonia cannot
be excluded: do not inhale the fluid. Ammonia
vapours have an irritant effect on mucous
membranes (eyes, nose and throat).
Store AdBlue® out of the reach of
children, in its original container.
Procedure
Before starting the top-up procedure, ensure that
the vehicle is parked on a flat and level surface.
In wintry conditions, ensure that the temperature
of the vehicle is above -11°C. Otherwise the
AdBlue
® may be frozen and so cannot be poured
into the tank. Park the vehicle in a warmer area
for a few hours to allow the top-up to be carried
out.
Never pour the AdBlue® into the Diesel
fuel tank.
For specific information about how to
access the AdBlue tank, refer to the
detailed descriptions below.
If any AdBlue® is splashed, or if there are
any spillages on the bodywork, rinse
immediately with cold water or wipe with a
damp cloth.
If the fluid has crystallised, clean it off using a
sponge and hot water.
Important: in the event of a top-up after
a breakdown because of a lack of
AdBlue, it is essential to wait around 5
minutes before switching on the ignition,
without opening the driver’s door,
unlocking the vehicle, introducing the key
into the ignition switch, or introducing the
key of the “
Keyless Entry and Starting
”
system into the passenger compartment
.
Switch on the ignition, then wait for 10
seconds before starting the engine.
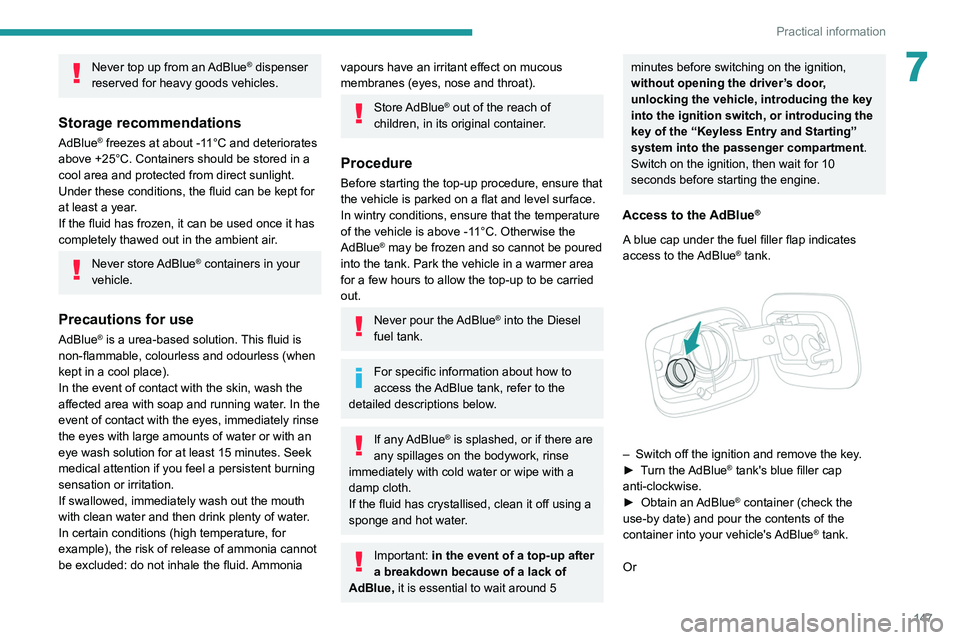
Access to the AdBlue®
A blue cap under the fuel filler flap indicates
access to the AdBlue® tank.
– Switch off the ignition and remove the key .
► T urn the AdBlue® tank's blue filler cap
anti-clockwise.
►
Obtain an
AdBlue
® container (check the
use-by date) and pour the contents of the
container into your vehicle's AdBlue
® tank.
Or
Page 157 of 244
155
In the event of a breakdown
8Tyre inflation pressures are indicated on this label.
► Start the vehicle and leave the engine
running.
Do not start the compressor before
connecting the white pipe to the tyre
valve: this would cause the sealant product to
be expelled through the pipe.
►
Switch on the compressor by moving switch
B
to position I and inflate the tyre until its
pressure reaches 2.0 bars. The sealant product
is injected under pressure into the tyre; do not
disconnect the pipe from the valve during this
operation (risk of blowback).
If, after approximately seven minutes,
this pressure is not reached, this
indicates that the tyre is irreparable; contact a
PEUGEOT dealer or a qualified workshop for
assistance.
►
Remove the kit and screw the cap back on to
the white pipe. Be careful not to leave traces of
fluid on your vehicle. Keep the kit within reach.
Please note, the sealant product is
harmful if swallowed and causes irritation
to the eyes.
Keep this product out of the reach of children.
► Drive immediately for approximately 3 miles
(5 kilometres) at reduced speed (between
12 and 37 mph (20 and 60
km/h)) to plug the
puncture.
►
Stop to check the repair
and the tyre
pressure using the kit.
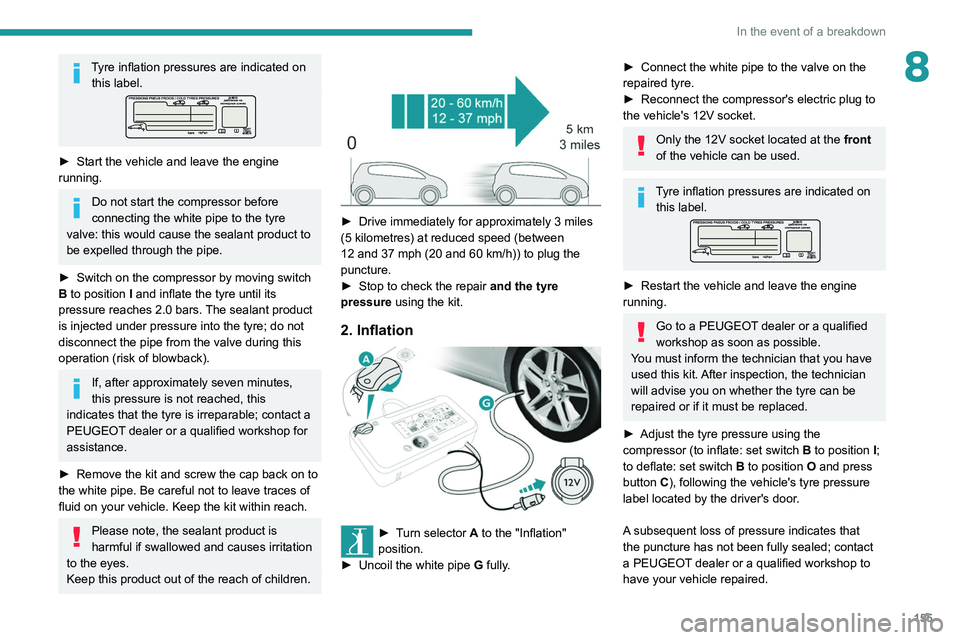
2. Inflation
► Turn selector A to the "Inflation"
position.
►
Uncoil the white pipe G
fully.
► Connect the white pipe to the valve on the
repaired tyre.
►
Reconnect the compressor's electric plug to
the vehicle's 12V socket.
Only the 12V socket located at the front
of the vehicle can be used.
Tyre inflation pressures are indicated on this label.
► Restart the vehicle and leave the engine
running.
Go to a PEUGEOT dealer or a qualified
workshop as soon as possible.
You must inform the technician that you have
used this kit. After inspection, the technician
will advise you on whether the tyre can be
repaired or if it must be replaced.
►
Adjust the tyre pressure using the
compressor (to inflate: set switch
B to position I;
to deflate: set switch B to position O and press
button C), following the vehicle's tyre pressure
label located by the driver's door.
A subsequent loss of pressure indicates that
the puncture has not been fully sealed; contact
a PEUGEOT dealer or a qualified workshop to
have your vehicle repaired.
Page 158 of 244

156
In the event of a breakdown
► Remove the kit and stow it.
Drive at reduced speed (50 mph
(80 km/h) max.), limiting the distance
travelled to approximately 125 miles
(200
km).
Removing the pipe and
cartridge
► Turn the pipe assembly 2 to the left until it
comes into contact with the unit.
►
Disconnect the connector 1
from the cartridge
by turning it a quarter turn anti-clockwise.
►
Pull the pipe assembly 2
out slightly, then
disconnect the connector 3 from the air intake
pipe by turning it a quarter turn anti-clockwise.
– Remove the pipe assembly 2 .
– Keep the compressor vertical.
–
Unscrew the cartridge 4
from the bottom.
To fit the new cartridge and new pipe, carry out
these operations in reverse order.
Be careful of fluid discharge.
The expiry date of the fluid is indicated
on the cartridge.
The sealant cartridge is designed for single
use; it must be replaced even if only partly
used.
After use, do not discard the cartridge into the
environment, take it to an authorised waste
disposal site or a PEUGEOT dealer.
Do not forget to obtain a new sealant
cartridge, available from PEUGEOT dealers
or from a qualified workshop.
Checking/adjusting tyre
pressures
Use the compressor, without injecting
any sealant, to check and, if necessary,
adjust the tyre pressures.
► Turn selector A to the "Inflation"
position.
►
Uncoil the white pipe G
fully.
►
Connect the pipe to the tyre valve.
►
Connect the compressor's electric plug to the
vehicle's 12V socket.
Only the 12V socket located at the front
of the vehicle can be used.
►
Restart the vehicle and leave the engine
running.
Tyre inflation pressures are indicated on this label.
► Adjust the pressure using the compressor
(to inflate: set switch B to position "I"; to deflate:
set switch B to position "O" and press button C),
following the vehicle's tyre pressure label.
If, after approximately seven minutes,
this pressure is not reached, this
indicates that the tyre is irreparable; contact a
PEUGEOT dealer or a qualified workshop for
assistance.
► Remove the kit and stow it.
Do not drive more than 125 miles
(200 km) with a repaired tyre; see a
PEUGEOT dealer or a qualified workshop to
have the tyre changed.
Should the pressure of one or more tyres
be adjusted, it is necessary to reinitialise
the under-inflation detection system.
For more information on Tyre under-inflation
detection, refer to the corresponding section.
Page 172 of 244

170
In the event of a breakdown
► Secure the bonnet stay.
► Remove the plastic cover on the (+) terminal.
The battery (-) terminal is not accessible.
A
remote earth point is located on the engine.
Starting using another
battery
If your vehicle's battery is flat, the engine can be
started using a backup battery (either external or
from another vehicle) and jump leads or using a
battery booster.
Never start the engine by connecting a
battery charger.
Never use a 24
V or higher battery booster.
Check beforehand that the backup battery
has a nominal voltage of 12
V and a capacity
at least equal to that of the discharged
battery.
The two vehicles must not be in contact with
each other.
Switch off all electricity-consuming equipment
on both vehicles (audio system, wipers,
lighting, etc.).
Make sure that the jump leads are well away
from the engine’s moving parts (fan, belt,
etc.).
Do not disconnect the (+) terminal while the
engine is running.
► Lift the plastic cover on the (+) terminal, if the
vehicle has one.
►
Connect the red cable to the (+) terminal of
flat battery
A (at the metal elbow), then to the
(+) terminal of the backup battery
B or of the
booster.
►
Connect one end of the green or black cable
to the (-) terminal of the backup battery
B or of
the booster (or to an earth point on the assisting
vehicle).
►
Connect the other end of the green or black
cable to the earth point
C
.
►
Start the engine on the assisting vehicle and
leave it running for a few minutes.
►
Operate the starter on the broken down
vehicle and let the engine run.
If the engine does not start immediately, switch
off the ignition and wait a few moments before
trying again.
►
W
ait for it to return to idle.
►
Disconnect the jump leads in reverse order.
►
Refit the plastic cover to the (+) terminal, if
the vehicle has one.
►
Allow the engine to run for at least
30
minutes, with the vehicle stationary, so that
the battery reaches an adequate state of charge.
Drive cautiously during the first 30
minutes after starting the engine.
With an automatic gearbox, never try to
start the engine by pushing the vehicle.
Charging the battery using a
battery charger
For optimum service life of the battery, it is
essential to maintain an adequate state of
charge.
In some circumstances, it may be necessary to
charge the battery:
–
When using the vehicle mainly for short
journeys.
–
If the vehicle is to be taken off the road for
several weeks.
Contact a PEUGEOT
dealer or a qualified
workshop.
Page 174 of 244
172
In the event of a breakdown
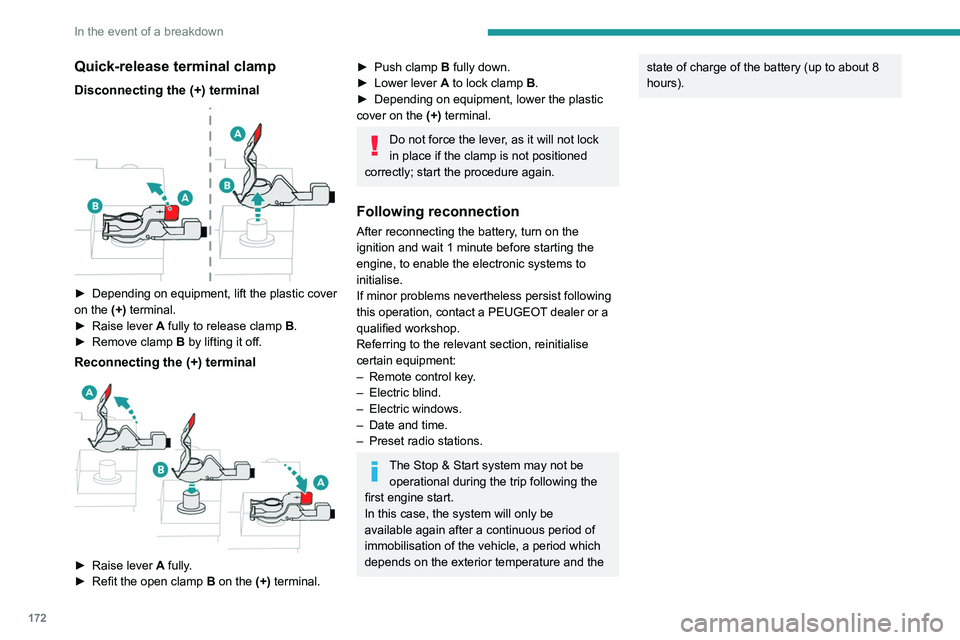
Quick-release terminal clamp
Disconnecting the (+) terminal
► Depending on equipment, lift the plastic cover
on the (+) terminal.
►
Raise lever
A
fully to release clamp
B
.
►
Remove clamp
B
by lifting it off.
Reconnecting the (+) terminal
► Raise lever A fully.
► Refit the open clamp B on the (+) terminal.
► Push clamp B fully down.
► Lower lever A to lock clamp B.
►
Depending on equipment, lower the plastic
cover on the
(+) terminal.
Do not force the lever, as it will not lock
in place if the clamp is not positioned
correctly; start the procedure again.
Following reconnection
After reconnecting the battery, turn on the
ignition and wait 1 minute before starting the
engine, to enable the electronic systems to
initialise.
If minor problems nevertheless persist following
this operation, contact a PEUGEOT dealer or a
qualified workshop.
Referring to the relevant section, reinitialise
certain equipment:
–
Remote control key
.
–
Electric blind.
–
Electric windows.
–
Date and time.
–
Preset radio stations.
The Stop & Start system may not be operational during the trip following the
first engine start.
In this case, the system will only be
available again after a continuous period of
immobilisation of the vehicle, a period which
depends on the exterior temperature and the
state of charge of the battery (up to about 8
hours).Towing the vehicle
General recommendations
Observe the legislation in force in the country where you are driving.
Ensure that the weight of the towing vehicle is higher than that of the \
towed vehicle.
The driver must remain at the wheel of the towed vehicle and must have a\
valid driving licence.
When towing a vehicle with all four wheels on the ground, always use an \
approved towbar; ropes and straps are prohibited.
The towing vehicle must move off gently.
When the vehicle is towed with its engine off, there is no longer braking and steering assistance.
A professional recovery service must be called if:
– broken down on a motorway or main road;
– not possible to put the gearbox into neutral, unlock the steering, or re\
lease the parking brake;
– not possible to tow a vehicle with an automatic gearbox, with the engine\
running;
– towing with only two wheels on the ground;
– four-wheel drive vehicle;
– no approved towbar available.
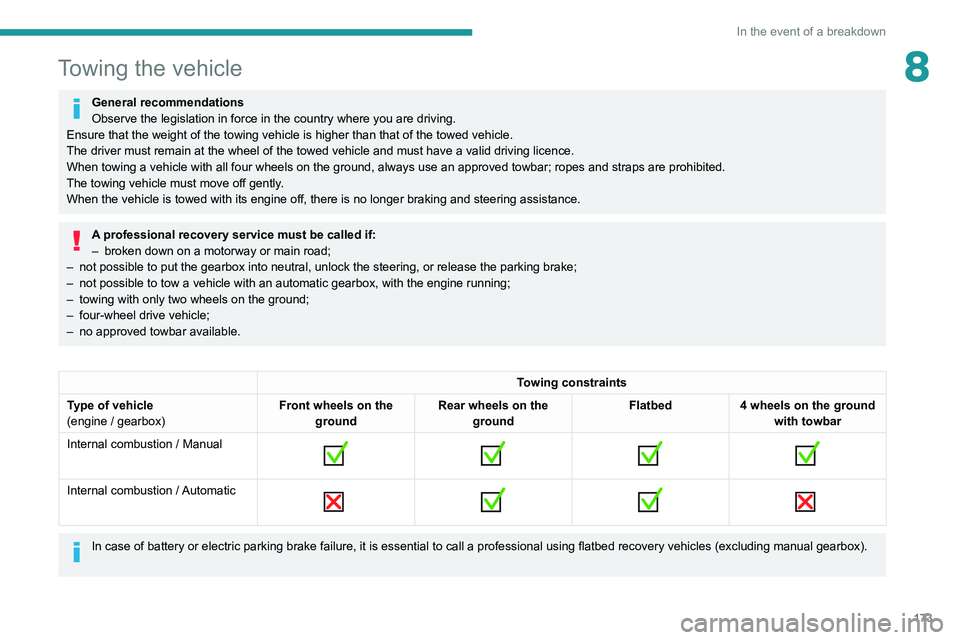
Towing constraints
Type of vehicle
(engine / gearbox) Front wheels on the
ground Rear wheels on the
ground Flatbed
4 wheels on the ground
with towbar
Internal combustion / Manual
Internal combustion / Automatic
In case of battery or electric parking brake failure, it is essential to call a p
rofessional using flatbed recovery vehicles (excluding manual gearbox).
Page 175 of 244
173
In the event of a breakdown
8Towing the vehicle
General recommendations
Observe the legislation in force in the country where you are driving.
Ensure that the weight of the towing vehicle is higher than that of the \
towed vehicle.
The driver must remain at the wheel of the towed vehicle and must have a\
valid driving licence.
When towing a vehicle with all four wheels on the ground, always use an \
approved towbar; ropes and straps are prohibited.
The towing vehicle must move off gently.
When the vehicle is towed with its engine off, there is no longer braking and steering assistance.
A professional recovery service must be called if:
– broken down on a motorway or main road;
–
not possible to put the gearbox into neutral, unlock the steering, or re\
lease the parking brake;
–
not possible to tow a vehicle with an automatic gearbox, with the engine\
running;
–
towing with only two wheels on the ground;
–
four-wheel drive vehicle;
–
no approved towbar available.
Towing constraints
Type of vehicle
(engine / gearbox) Front wheels on the
ground Rear wheels on the
ground Flatbed
4 wheels on the ground
with towbar
Internal combustion / Manual
Internal combustion / Automatic
In case of battery or electric parking brake failure, it is essential to call a p
rofessional using flatbed recovery vehicles (excluding manual gearbox).