2021 PEUGEOT 3008 fold seats
[x] Cancel search: fold seatsPage 34 of 292
32
Access
Reinitialising the remote
control
Following replacement of the battery or in
the event of a fault, it may be necessary to
reinitialise the remote control.
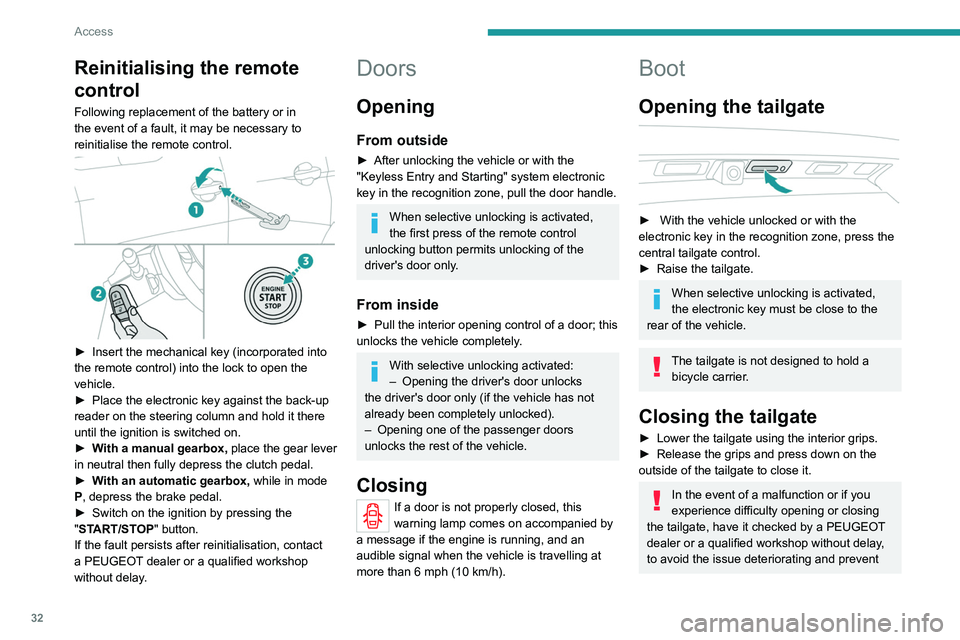
► Insert the mechanical key (incorporated into
the remote control) into the lock to open the
vehicle.
►
Place the electronic key against the back-up
reader on the steering column and hold it there
until the ignition is switched on.
►
W
ith a manual gearbox, place the gear lever
in neutral then fully depress the clutch pedal.
►
W
ith an automatic gearbox, while in mode
P, depress the brake pedal.
►
Switch on the ignition by pressing the
"
START/STOP" button.
If the fault persists after reinitialisation, contact
a PEUGEOT dealer or a qualified workshop
without delay.
Doors
Opening
From outside
► After unlocking the vehicle or with the
"Keyless Entry and Starting" system electronic
key in the recognition zone, pull the door handle.
When selective unlocking is activated,
the first press of the remote control
unlocking button permits unlocking of the
driver's door only.
From inside
► Pull the interior opening control of a door; this
unlocks the vehicle completely .
With selective unlocking activated:
– Opening the driver's door unlocks
the driver's door only (if the vehicle has not
already been completely unlocked).
–
Opening one of the passenger doors
unlocks the rest of the vehicle.
Closing
If a door is not properly closed, this
warning lamp comes on accompanied by
a message if the engine is running, and an
audible signal when the vehicle is travelling at
more than 6
mph (10 km/h).
Boot
Opening the tailgate
► With the vehicle unlocked or with the
electronic key in the recognition zone, press the
central tailgate control.
►
Raise the tailgate.
When selective unlocking is activated,
the electronic key must be close to the
rear of the vehicle.
The tailgate is not designed to hold a bicycle carrier.
Closing the tailgate
► Lower the tailgate using the interior grips.
► Release the grips and press down on the
outside of the tailgate to close it.
In the event of a malfunction or if you
experience difficulty opening or closing
the tailgate, have it checked by a PEUGEOT
dealer or a qualified workshop without delay,
to avoid the issue deteriorating and prevent
any risk of the tailgate dropping, potentially
causing serious injury.
Back-up release
To manually unlock the boot in the event of a
battery or central locking failure.
Unlocking
► Fold the rear seats to gain access to the lock
from inside the boot.
► Insert a small screwdriver into hole A of the
lock to unlock the boot.
► Move the latch to the left.
Locking after closing
If the fault persists after closing again, the boot
will remain locked.
In the event of a fault with the central
locking system, it is essential to
disconnect the battery to lock the boot and so
ensure complete locking of the vehicle.
Page 35 of 292
33
Access
2any risk of the tailgate dropping, potentially
causing serious injury.
Back-up release
To manually unlock the boot in the event of a
battery or central locking failure.
Unlocking
► Fold the rear seats to gain access to the lock
from inside the boot.
► Insert a small screwdriver into hole A of the
lock to unlock the boot.
►
Move the latch to the left.
Locking after closing
If the fault persists after closing again, the boot
will remain locked.
In the event of a fault with the central
locking system, it is essential to
disconnect the battery to lock the boot and so
ensure complete locking of the vehicle.
Hands-free tailgate
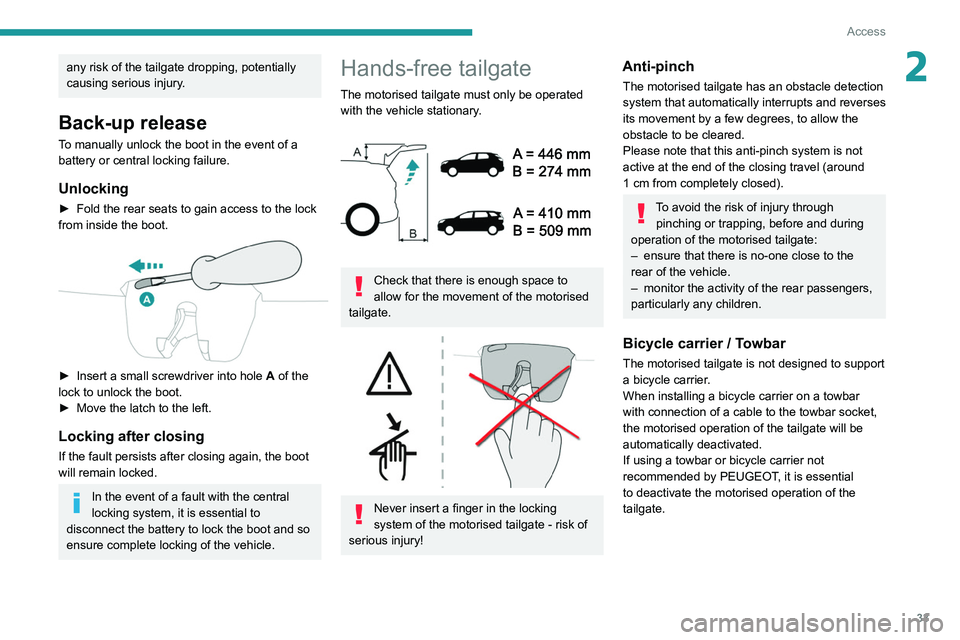
The motorised tailgate must only be operated with the vehicle stationary.
Check that there is enough space to
allow for the movement of the motorised
tailgate.
Never insert a finger in the locking
system of the motorised tailgate - risk of
serious injury!
Anti-pinch
The motorised tailgate has an obstacle detection
system that automatically interrupts and reverses
its movement by a few degrees, to allow the
obstacle to be cleared.
Please note that this anti-pinch system is not
active at the end of the closing travel (around
1
cm from completely closed).
To avoid the risk of injury through pinching or trapping, before and during
operation of the motorised tailgate:
–
ensure that there is no-one close to the
rear of the vehicle.
–
monitor the activity of the rear passengers,
particularly any children.
Bicycle carrier / Towbar
The motorised tailgate is not designed to support
a bicycle carrier.
When installing a bicycle carrier on a towbar
with connection of a cable to the towbar socket,
the motorised operation of the tailgate will be
automatically deactivated.
If using a towbar or bicycle carrier not
recommended by PEUGEOT, it is essential
to deactivate the motorised operation of the
tailgate.
Page 46 of 292

44
Ease of use and comfort
3.Lumbar support electric adjustment
The control allows independent adjustment of
the depth and vertical position of the lumbar
support.
►
Press and hold the front or rear of the
control to increase or reduce the lumbar
support.
►
Press and hold the top or bottom of the
control to raise or lower the lumbar support
area.
Placing the passenger seat
in the table position
The backrest of the passenger seat can be fully
folded forwards and secured in this position.
This function, when associated with folding
of the backrest of the rear seats, helps with
transporting long and bulky objects.
First steps:
►
Lower the head restraint.
►
Fold up the “aircraft” type table (depending
on version).
►
Move the seat backwards to allow space for
the head restraint.
►
Adjust the seat to the lowest position.
►
Check that there is nothing that might
interfere with folding of the backrest (seat belt,
child seat, items of clothing, bags, etc.).
Deactivation of the front passenger
airbag is recommended.
Folding the backrest
► Pull the control fully upwards to release the
backrest.
►
T
ip the backrest fully forwards.
In this position, the backrest can support
a maximum load of 30
kg.
When sharp deceleration occurs, objects
placed on the folded backrest can turn into
projectiles.
Returning the backrest into position
► Pull the control fully upwards to release the
backrest.
►
Raise the backrest and guide it backwards
until it latches into place.
►
Check that the backrest is correctly latched
into place.
Front head restraints
Adjusting the height
Upwards:
► Pull the head restraint up to the desired
position; you can feel the head restraint clicking
into position.
Downwards:
►
Press lug
A to lower the head restraint.
The head restraint is correctly adjusted when its upper edge is level with the top
of the head.
Removing a head restraint
► Pull the head restraint fully up.
► Press lug A to release the head restraint and
raise it fully.
►
Stow the head restraint securely
.
Refitting a head restraint
► Insert the head restraint rods into the guides
in the corresponding seat backrest.
► Push the head restraint fully down.
► Press the lug A to release the head restraint
and push it down.
► Adjust the height of the head restraint.
Never drive with the head restraints
removed; they should be in place and
adjusted for the occupant of the seat.
Electrically-adjusted driver's
seat
To carry out these electric adjustments, switch on the ignition or start the engine
if the vehicle has gone into energy economy
mode.
These electric adjustments are accessible
about 1 minute after opening the driver's door.
They are deactivated about 1 minute after
switching the ignition off.
Page 50 of 292
48
Ease of use and comfort
If the mirrors are folded using control A,
they will not unfold when the vehicle is
unlocked.
Electric unfolding
► From outside: unlock the vehicle.
► From inside: with the ignition on, place
control
A in the central position and then pull it
rearwards.
Depending on version, the automatic
door mirror folding/unfolding function is
configured via the Driving
/ Vehicle touch
screen menu.
Otherwise, this setting can be carried out at a
PEUGEOT dealer or a qualified workshop.
Automatic tilting in reverse gear
Depending on version, this function allows to
automatically tilt the mirrors downwards to assist
with parking manoeuvres in reverse gear.
With the engine running, on engaging reverse
gear, the mirror glasses tilt downwards.
They return to their initial position:
–
A
few seconds after coming out of reverse
gear.
–
Once the vehicle speed exceeds 6 mph
(10
km/h).
–
When the engine is switched off.
This function is set via the Driving/Vehicle touch screen menu.
Interior rear view mirror
The electrochrome system uses a sensor that
detects the level of exterior brightness and that
coming from the rear of the vehicle, in order to
automatically and gradually switch between day
and night usage.
To ensure optimum visibility while manoeuvring, the mirror automatically
brightens when reverse gear is engaged.
The system is deactivated if the load in the
boot exceeds the height of the load space
cover or if the load space cover has items
placed on it.
Rear head restraints
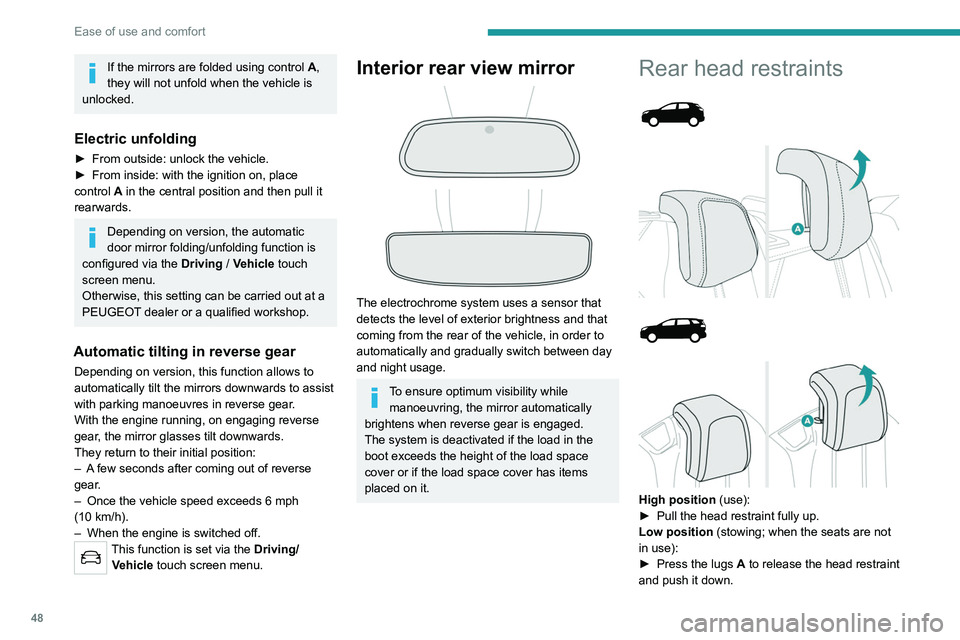
High position (use):
► Pull the head restraint fully up.
Low position (stowing; when the seats are not
in use):
►
Press the lugs
A to release the head restraint
and push it down.
The rear head restraints can be removed.
Removing a head restraint
► Pull the head restraint fully up.
► Press the lugs A to release the head restraint
and remove it completely.
► Store the head restraint.
Refitting a head restraint
► Insert the head restraint rods into the guides
in the corresponding seat backrest.
► Push the head restraint down as far as it will
go.
► Press the lugs A to release the head restraint
and push it down.
Never drive with passengers seated at
the rear when the head restraints are
removed; the head restraints should be in
place and in the high position.
The head restraint for the central seat and those for the side seats
are not interchangeable.
Rear bench seat
Bench seat with fixed cushions and split folding
backrests (2/3-1/3) to adapt the boot load space.
Page 51 of 292
49
Ease of use and comfort
3The rear head restraints can be removed.
Removing a head restraint
► Pull the head restraint fully up.
► Press the lugs A to release the head restraint
and remove it completely.
►
Store the head restraint.
Refitting a head restraint
► Insert the head restraint rods into the guides
in the corresponding seat backrest.
►
Push the head restraint down as far as it will
go.
►
Press the lugs
A to release the head restraint
and push it down.
Never drive with passengers seated at
the rear when the head restraints are
removed; the head restraints should be in
place and in the high position.
The head restraint for the central seat and those for the side seats
are not interchangeable.
Rear bench seat
Bench seat with fixed cushions and split folding
backrests (2/3-1/3) to adapt the boot load space.
Folding the backrests
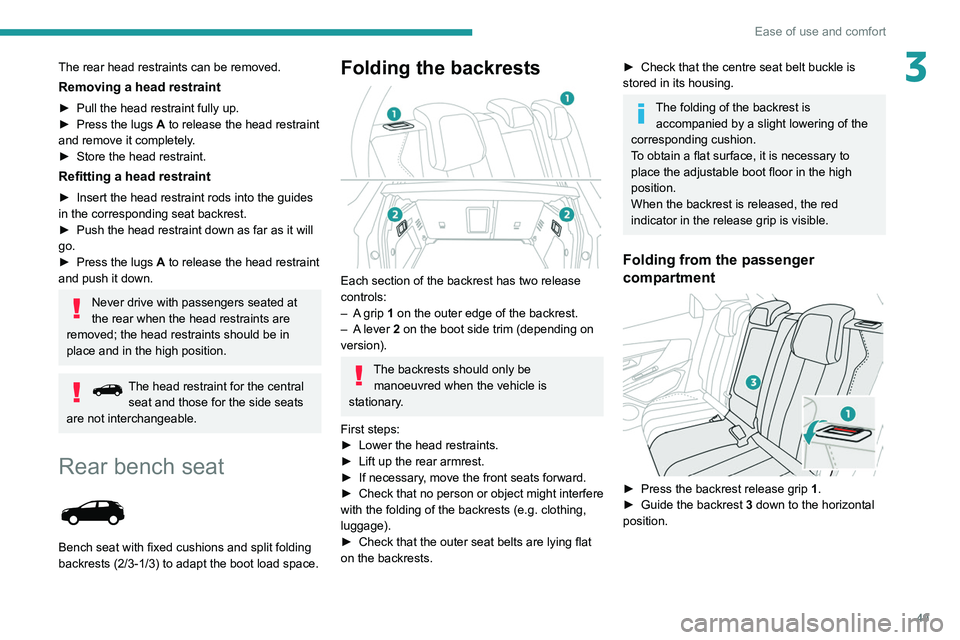
Each section of the backrest has two release
controls:
–
A
grip 1 on the outer edge of the backrest.
–
A
lever 2 on the boot side trim (depending on
version).
The backrests should only be manoeuvred when the vehicle is
stationary.
First steps:
►
Lower the head restraints.
►
Lift up the rear armrest.
►
If necessary
, move the front seats forward.
►
Check
that no person or object might interfere
with the folding of the backrests (e.g.
clothing,
luggage).
►
Check that the outer seat belts are lying flat
on the backrests.
► Check that the centre seat belt buckle is
stored in its housing.
The folding of the backrest is accompanied by a slight lowering of the
corresponding cushion.
To obtain a flat surface, it is necessary to
place the adjustable boot floor in the high
position.
When the backrest is released, the red
indicator in the release grip is visible.
Folding from the passenger
compartment
► Press the backrest release grip 1 .
► Guide the backrest 3 down to the horizontal
position.
Page 52 of 292
50
Ease of use and comfort
Folding from the boot
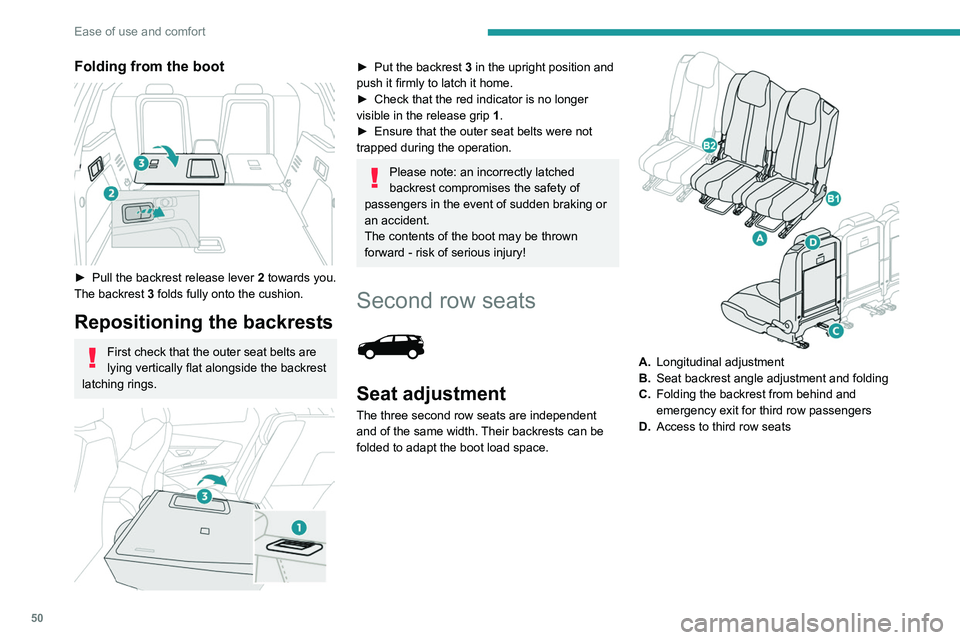
► Pull the backrest release lever 2 towards you.
The backrest 3 folds fully onto the cushion.
Repositioning the backrests
First check that the outer seat belts are
lying vertically flat alongside the backrest
latching rings.
► Put the backrest 3 in the upright position and
push it firmly to latch it home.
►
Check that the red indicator is no longer
visible in the release grip 1
.
►
Ensure that the outer seat belts were not
trapped during the operation.
Please note: an incorrectly latched
backrest compromises the safety of
passengers in the event of sudden braking or
an accident.
The contents of the boot may be thrown
forward - risk of serious injury!
Second row seats
Seat adjustment
The three second row seats are independent
and of the same width. Their backrests can be
folded to adapt the boot load space.
A. Longitudinal adjustment
B. Seat backrest angle adjustment and folding
C. Folding the backrest from behind and
emergency exit for third row passengers
D. Access to third row seats
Page 53 of 292
51
Ease of use and comfort
3Longitudinal adjustment
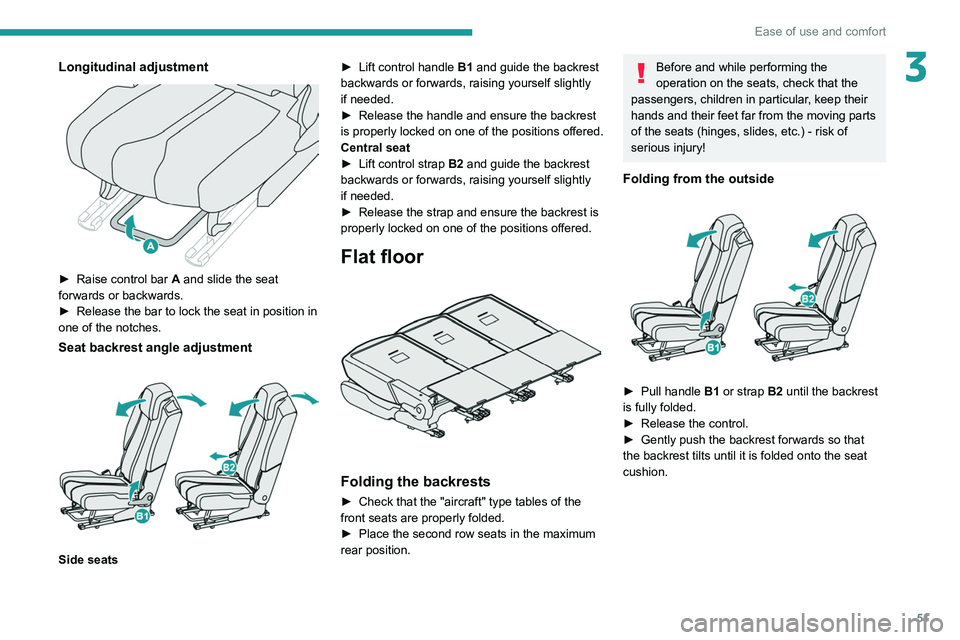
► Raise control bar A and slide the seat
forwards or backwards.
►
Release the bar to lock the seat in position in
one of the notches.
Seat backrest angle adjustment
Side seats ►
Lift control handle
B1
and guide the backrest
backwards or forwards, raising yourself slightly
if needed.
►
Release the handle and ensure the backrest
is
properly locked on one of the positions offered.
Central seat
►
Lift control strap
B2 and guide the backrest
backwards or forwards, raising yourself slightly
if needed.
►
Release the strap and ensure the backrest is
properly locked on one of the positions offered.
Flat floor
Folding the backrests
► Check that the "aircraft" type tables of the
front seats are properly folded.
►
Place the second row seats in the maximum
rear position.
Before and while performing the
operation on the seats, check that the
passengers, children in particular, keep their
hands and their feet far from the moving parts
of the seats (hinges, slides, etc.) - risk of
serious injury!
Folding from the outside
► Pull handle B1 or strap B2 until the backrest
is fully folded.
►
Release the control.
►
Gently push the backrest forwards so that
the backrest tilts until it is folded onto the seat
cushion.
Page 54 of 292
52
Ease of use and comfort
Folding from the boot
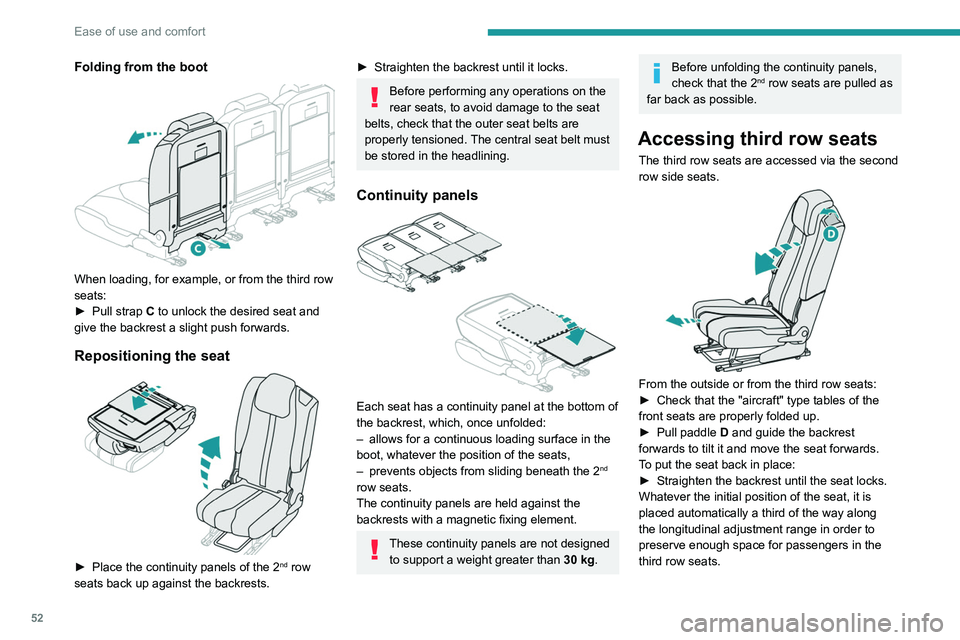
When loading, for example, or from the third row
seats:
►
Pull strap
C to unlock the desired seat and
give the backrest a slight push forwards.
Repositioning the seat
► Place the continuity panels of the 2nd row
seats back up against the backrests.
► Straighten the backrest until it locks.
Before performing any operations on the
rear seats, to avoid damage to the seat
belts, check that the outer seat belts are
properly tensioned. The central seat belt must
be stored in the headlining.
Continuity panels
Each seat has a continuity panel at the bottom of
the backrest, which, once unfolded:
–
allows for a continuous loading surface in the
boot, whatever the position of the seats,
–
prevents objects from sliding beneath the 2nd
row seats.
The continuity panels are held against the
backrests with a magnetic fixing element.
These continuity panels are not designed to support a weight greater than 30
kg.
Before unfolding the continuity panels,
check that the 2nd row seats are pulled as
far back as possible.
Accessing third row seats
The third row seats are accessed via the second
row side seats.
From the outside or from the third row seats:
► Check that the "aircraft" type tables of the
front seats are properly folded up.
►
Pull paddle D
and guide the backrest
forwards to tilt it and move the seat forwards.
To put the seat back in place:
►
Straighten the backrest until the seat locks.
Whatever the initial position of the seat, it is
placed automatically a third of the way along
the longitudinal adjustment range in order to
preserve enough space for passengers in the
third row seats.
If this system fails (paddle D), the third
row passengers can also get out after
having folded the backrest of the second row
seats using strap C.
Do not let children operate the seats
unsupervised.
Third row seats
The two third row seats are stored in a retracted
position in the bottom of the boot. Each one is
covered with rigid concertina panels, secured to
the vehicle.
Do not let children operate the seats
unsupervised.
Each concertina panel can support a
maximum load of 100 kg with the third
row seats folded away.
With the third row seats removed and the
removable concertina panels supports
installed, the maximum load is limited to
50 kg.