2021 PEUGEOT 3008 sport mode
[x] Cancel search: sport modePage 6 of 292

4
Overview
Presentation
These illustrations and descriptions are intended
as a guide. The presence and location of some
elements vary depending on the version or trim
level.
Instruments and controls
1.Sunroof and blind controls
Front courtesy/map reading lamps
Warning lamp display for seat belts and front
passenger airbag
Emergency call/Assistance call
2. Interior rear view mirror/Driving in Electric
mode indicator LED
3. Head-up digital display
4. Fusebox
5. Bonnet release
6. Door mirror and electric window control panel
7. Front passenger airbag
8. Glove box
Deactivation of the front passenger airbag
1.8" PEUGEOT Connect Radio (or 10" HD
PEUGEOT Connect Nav) touch screen
2. 12 V socket/USB socket
Wireless smartphone charger
3. "START/STOP" button
4. Gearbox control 5.
Electric parking brake
6. Hill Assist Descent Control
7. "SPORT" or “ECO” programme
or
Driving mode selector and/or Advanced Grip
Control
8. Advanced Grip Control
Steering-mounted controls
1.External lighting controls/Direction indicators
2. Wiper controls/Screenwash/Trip computer
3. Automatic gearbox control paddles
4. Horn/Driver front airbag
5. Controls for Cruise control/Speed limiter/
Adaptive Cruise Control
6. Instrument panel and audio system
adjustment controls
Page 46 of 292

44
Ease of use and comfort
3.Lumbar support electric adjustment
The control allows independent adjustment of
the depth and vertical position of the lumbar
support.
►
Press and hold the front or rear of the
control to increase or reduce the lumbar
support.
►
Press and hold the top or bottom of the
control to raise or lower the lumbar support
area.
Placing the passenger seat
in the table position
The backrest of the passenger seat can be fully
folded forwards and secured in this position.
This function, when associated with folding
of the backrest of the rear seats, helps with
transporting long and bulky objects.
First steps:
►
Lower the head restraint.
►
Fold up the “aircraft” type table (depending
on version).
►
Move the seat backwards to allow space for
the head restraint.
►
Adjust the seat to the lowest position.
►
Check that there is nothing that might
interfere with folding of the backrest (seat belt,
child seat, items of clothing, bags, etc.).
Deactivation of the front passenger
airbag is recommended.
Folding the backrest
► Pull the control fully upwards to release the
backrest.
►
T
ip the backrest fully forwards.
In this position, the backrest can support
a maximum load of 30
kg.
When sharp deceleration occurs, objects
placed on the folded backrest can turn into
projectiles.
Returning the backrest into position
► Pull the control fully upwards to release the
backrest.
►
Raise the backrest and guide it backwards
until it latches into place.
►
Check that the backrest is correctly latched
into place.
Front head restraints
Adjusting the height
Upwards:
► Pull the head restraint up to the desired
position; you can feel the head restraint clicking
into position.
Downwards:
►
Press lug
A to lower the head restraint.
The head restraint is correctly adjusted when its upper edge is level with the top
of the head.
Removing a head restraint
► Pull the head restraint fully up.
► Press lug A to release the head restraint and
raise it fully.
►
Stow the head restraint securely
.
Refitting a head restraint
► Insert the head restraint rods into the guides
in the corresponding seat backrest.
► Push the head restraint fully down.
► Press the lug A to release the head restraint
and push it down.
► Adjust the height of the head restraint.
Never drive with the head restraints
removed; they should be in place and
adjusted for the occupant of the seat.
Electrically-adjusted driver's
seat
To carry out these electric adjustments, switch on the ignition or start the engine
if the vehicle has gone into energy economy
mode.
These electric adjustments are accessible
about 1 minute after opening the driver's door.
They are deactivated about 1 minute after
switching the ignition off.
Page 119 of 292
11 7
Driving
6Push selector
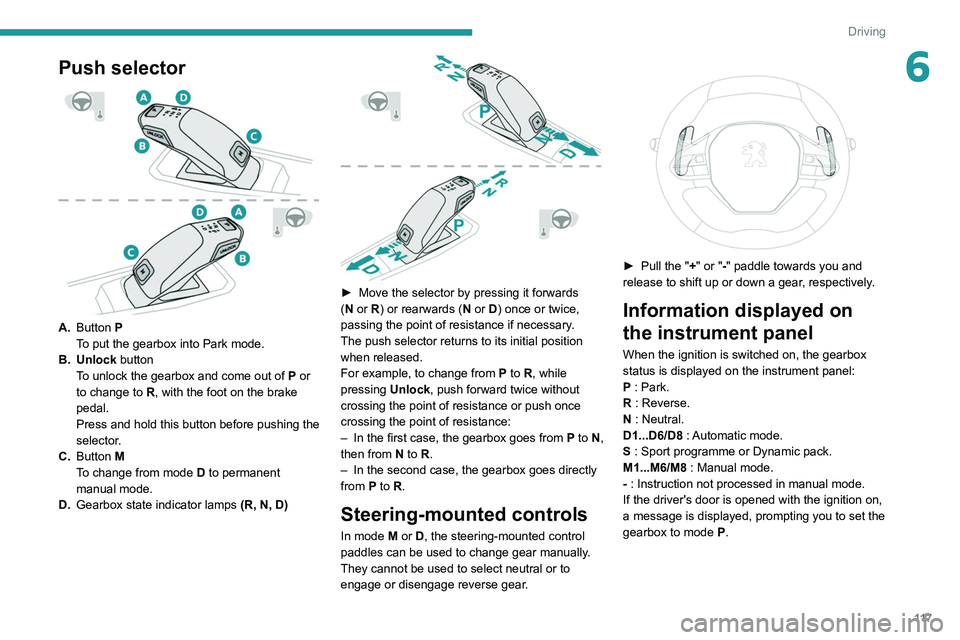
A.Button P
To put the gearbox into Park mode.
B. Unlock button To unlock the gearbox and come out of
P
or
to change to
R, with the foot on the brake
pedal.
Press and hold this button before pushing the
selector.
C. Button M
To change from mode
D
to permanent
manual mode.
D. Gearbox state indicator lamps (R, N, D)
► Move the selector by pressing it forwards
( N or R) or rearwards (N or D) once or twice,
passing the point of resistance if necessary.
The push selector returns to its initial position
when released.
For example, to change from
P to R, while
pressing Unlock, push forward twice without
crossing the point of resistance or push once
crossing the point of resistance:
–
In the first case, the gearbox goes from
P to N,
then from
N to R.
–
In the second case, the gearbox goes directly
from
P to R.
Steering-mounted controls
In mode M or D, the steering-mounted control
paddles can be used to change gear manually .
They cannot be used to select neutral or to
engage or disengage reverse gear.
► Pull the " +" or "-" paddle towards you and
release to shift up or down a gear, respectively.
Information displayed on
the instrument panel
When the ignition is switched on, the gearbox
status is displayed on the instrument panel:
P : Park.
R : Reverse.
N : Neutral.
D1...D6/D8 : Automatic mode.
S : Sport programme or Dynamic pack.
M1...M6/M8 : Manual mode.
- : Instruction not processed in manual mode.
If the driver's door is opened with the ignition on,
a message is displayed, prompting you to set the
gearbox to mode P.
Page 121 of 292
11 9
Driving
6► Accelerate gradually to automatically release
the electric parking brake.
The vehicle moves off immediately
.
Automatic gearbox
Never try to start the engine by pushing
the vehicle.
Switching the vehicle off
Regardless of the current gearbox mode, mode
P is immediately engaged automatically when
the ignition is switched off.
However, in mode N, mode P will be engaged
after a delay of 5 seconds (time to enable free-
wheeling mode).
Check that mode
P has been engaged and
that the electric parking brake was applied
automatically; if not, apply it manually.
The corresponding indicator lamps on the gear selector and the electric parking
brake control must be on, as well as the
indicator
lamps on the instrument panel.
Gearbox malfunction
This warning lamp comes on, accompanied by an audible signal and the
display of a message.
Go to a PEUGEOT dealer or a qualified
workshop.
Do not drive faster than 62
mph (100 km/h),
keeping to the speed limit.
Switching of the gearbox to back-up mode
Mode D locks in third gear.
The paddles on the steering wheel do not work
and mode M is no longer accessible.
You may feel a significant jolt on engaging
reverse gear. This will not damage the gearbox.
Selector malfunction
Minor malfunction
This warning lamp comes on, accompanied by the display of a message
and an audible signal.
Drive carefully.
Go to a PEUGEOT dealer or a qualified
workshop.
In some cases, the selector indicator lamps may
no longer come on, but the gearbox state is still
displayed on the instrument panel.
Major malfunction
This warning lamp comes on, accompanied by the display of a
message.
You must stop the vehicle.
Stop as soon as it is safe to do so and
switch off the ignition.
Contact a PEUGEOT dealer or a qualified
workshop.
e-EAT8 electric automatic
gearbox (Rechargeable
hybrid)
Automatic 8-speed gearbox with a push selector and regenerative braking function.
With the exception of manual mode, the
“Sport” button and the regenerative braking,
the operation is identical to that of other EAT8
gearboxes.
For more information on the Operation or the
Malfunctions of the EAT8 gearbox, refer to the
corresponding sections.
Gearbox selector positions
P. Car park
For parking the vehicle: the front wheels
are blocked.
R. Reverse gear
N. Neutral
For moving the vehicle with the ignition
off: in certain car washing machines,
when towing the vehicle, etc.
Page 123 of 292
121
Driving
6Hill start assist
This system keeps the vehicle briefly stationary
(for approximately 2 seconds) when making a hill
start, while you transfer your foot from the brake
pedal to the accelerator pedal.
The system is only active when:
–
The vehicle is completely stationary
, with your
foot on the brake pedal.
–
Certain slope conditions are met.
–
The driver
’s door is closed.
Do not leave the vehicle while it is being
held temporarily by hill start assist.
If someone needs to get out of the vehicle
with the engine running, apply the parking
brake manually. Then check that the parking
brake indicator lamp and the P indicator lamp
in the electric parking brake control are on
fixed.
The hill start assist function cannot be deactivated. However, using the parking
brake to immobilise the vehicle interrupts its
operation.
Operation
Facing uphill, with the vehicle stationary,
the vehicle is held for a short time when the
driver releases the brake pedal:
–
If first gear or neutral is engaged on a manual
gearbox.
–
If mode
D or M is selected on an automatic
gearbox.
Facing downhill, with the vehicle stationary
and reverse gear engaged, the vehicle is held
for a short time when the driver releases the
brake pedal.
Malfunction
If the event of a malfunction, these
warning lamps light up on the
instrument panel, accompanied by the display of
a message.
Have it checked by a PEUGEOT dealer or a
qualified workshop.
Driving modes
The driving modes available depend on the engine and equipment of the vehicle.
Driving modes are selected using one of the
following controls, depending on version:
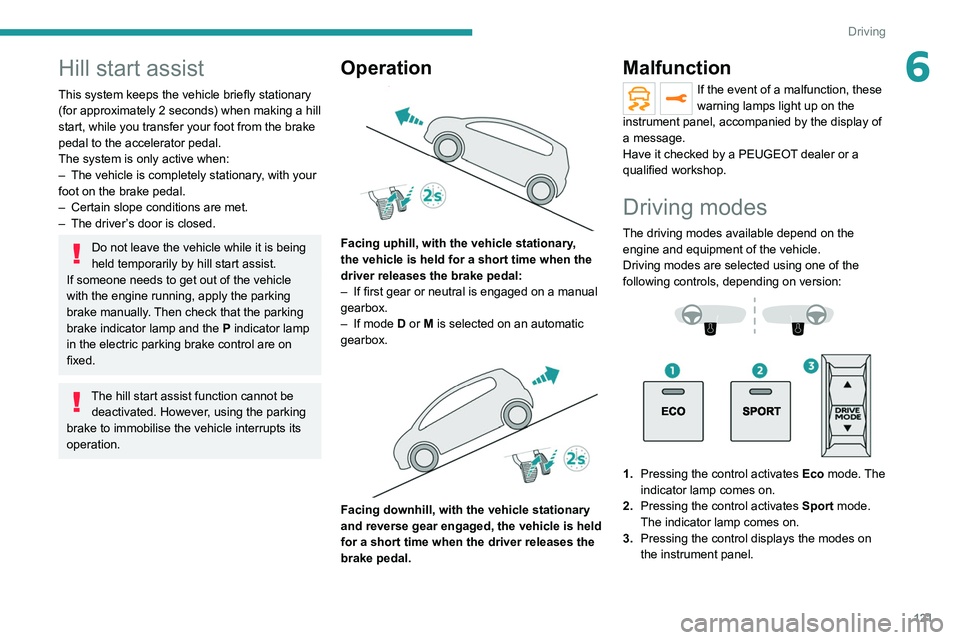
1. Pressing the control activates Eco mode. The
indicator lamp comes on.
2. Pressing the control activates Sport mode.
The indicator lamp comes on.
3. Pressing the control displays the modes on
the instrument panel.
Page 124 of 292
122
Driving
When the message disappears, the selected
mode is activated and remains indicated on the
instrument panel (except Normal
mode).
With petrol / Diesel engines
Whenever the ignition is switched on,
Normal driving mode is selected by default.
Normal
To restore the default settings.
Eco
To reduce energy consumption by reducing the
performance of the heating and air conditioning,
without deactivating them.
Sport
With a manual gearbox: to obtain more dynamic
driving with action on the power steering,
accelerator and the possibility of displaying the
vehicle’s dynamic settings on the instrument
panel.
With an automatic gearbox: to obtain more
dynamic driving with action on the power
steering, accelerator, gear changes and
possibility of displaying the vehicle’s dynamic
settings on the instrument panel.
Depending on version, with an EAT8
gearbox and the gear selector in mode
D, except in
Sport mode, fully releasing the
accelerator pedal allows free-wheeling which
can save fuel.
A drop in engine speed is normal (rev counter
at idle, drop in engine noise).
With rechargeable hybrid
engine
Whenever the ignition is switched on, Electric
driving mode is selected by default.
Electric
Allows driving using 100% electrical energy.
The maximum speed is approximately 84 mph
(135
km/h).
When starting the vehicle, if the conditions do
not allow the activation or retention of Electric
mode, the message "Electric mode currently
unavailable" is displayed on the instrument
panel. The vehicle automatically changes to
Hybrid mode.
If a blue LED comes on under the interior rear
view mirror, visible from outside the vehicle, this
confirms that you are driving in Electric mode.
The LED can be turned off by inserting
the tip of a paper clip or other accessory
into the hole under the mirror.
Conditions of activation
–
Adequate battery charge level. Charging
the vehicle after each drive is therefore
recommended. Electric
mode is available as
long as there is power left in the battery.
–
Outside temperature between approximately
-5°C and 45°C.
Manually exiting the mode
►
Fully depress the accelerator pedal, or
►
Select another mode.
In case of non-use of the vehicle for a
long period (several months), a restart of
the petrol engine may occur even if the
battery is charged.
In the event of multiple starts of the
internal combustion engine without a
sufficient rise in
temperature,
Electric mode may be
temporarily unavailable (natural phenomenon
of dilution of fuel in oil). A message is then
displayed on the instrument panel (" ZEV
mode unavailable: automatic operation in
progress").
To regain normal electrical operation, drive
approximately 50 miles (80 km) in "motorway"
conditions or approximately 125 miles (200
km) in urban conditions.
This phenomenon does not cause any
mechanical or electrical damage. It can occur
several times in the life of the vehicle.
Hybrid
To optimise the vehicle's fuel consumption by
managing the alternating or simultaneous
operation of the two types of engine ,
depending on driving conditions and driving
style.
In Hybrid mode, it is possible to drive in 100%
electric mode if the battery charge level is
sufficient and acceleration requirements are
moderate.
Sport
To obtain more dynamic driving in order to
benefit from the maximum performance of the
vehicle.
Electric power is used to supplement the petrol
engine as long as there is energy left in the
battery.
4WD (4-wheel drive)
(Depending on version)
Improves the vehicle's grip at low and moderate
speeds by driving all 4 wheels continuously.
4WD mode (4-wheel drive) is especially
suited to driving on snow-covered roads and
difficult terrain (e.g. mud, sand) as well as ford
crossings, at moderate speed.
Depending on the driving conditions and the
battery charge level, 4WD mode may be 100%
electric.
If the system does not detect a situation of wheel
slipping or poor grip after 300 metres of driving, it
switches to Hybrid mode.
This mode will be even more effective if the vehicle is fitted with suitable tyres,
such as winter tyres.
The grip can be improved up to 84 mph
(135 km/h) using the electric motors; above this
speed, the vehicle is driven by the front wheels
only.
Page 125 of 292
123
Driving
6Sport
To obtain more dynamic driving in order to
benefit from the maximum performance of the
vehicle.
Electric power is used to supplement the petrol
engine as long as there is energy left in the
battery.
4WD (4-wheel drive)
(Depending on version)
Improves the vehicle's grip at low and moderate
speeds by driving all 4 wheels continuously.
4WD mode (4-wheel drive) is especially
suited to driving on snow-covered roads and
difficult terrain (e.g. mud, sand) as well as ford
crossings, at moderate speed.
Depending on the driving conditions and the
battery charge level, 4WD mode may be 100%
electric.
If the system does not detect a situation of wheel
slipping or poor grip after 300 metres of driving, it
switches to Hybrid mode.
This mode will be even more effective if the vehicle is fitted with suitable tyres,
such as winter tyres.
The grip can be improved up to 84 mph
(135
km/h) using the electric motors; above this
speed, the vehicle is driven by the front wheels
only.
Gear shift indicator
(Depending on engine)
This system is designed to reduce fuel
consumption by recommending the most suitable
gear.
Operation
Depending on the driving situation and
the vehicle's equipment, the system may
recommend skipping one or more gears.
Gear engagement recommendations are
not to be considered mandatory. Indeed, the
configuration of the road, the traffic density and
safety remain determining factors when choosing
the best gear. Therefore, the driver remains
responsible for deciding whether or not to follow
the system’s advice.
The system cannot be deactivated.
With an automatic gearbox, the system is
only active in manual operation.
The information appears on the instrument panel, in the form of an arrow
and the recommended gear.
The system adapts the gear change instructions according to the driving
conditions (e.g.
slope, load) and driving style
(e.g.
power demand, acceleration, braking).
The system never suggests:
–
engaging first gear;
–
engaging reverse gear
.
Stop & Start
The Stop & Start function puts the engine temporarily into standby - STOP mode - during
phases when the vehicle is stationary (e.g.
red
lights, traffic jams). The engine automatically
restarts - START mode - as soon as the driver
indicates the intention of moving off again.
Primarily designed for urban use, the function
is intended to reduce fuel consumption and
exhaust emissions as well as the noise level
when stationary.
The function does not affect the functionalities of
the vehicle, in particular the braking.
Deactivation/Reactivation
The function is activated by default when the
ignition is switched on.
The settings are changed via the Driving/Vehicle touch screen menu.
A message on the instrument panel confirms the
change of status.
When the function is deactivated, if the engine
was in standby, it restarts immediately.
Associated indicator lamps
Function activated.
Function deactivated or malfunction.
Opening the bonnet
Before doing anything under the bonnet,
deactivate the Stop & Start system to avoid
Page 128 of 292

126
Driving
► In the event of a puncture, use the
temporary puncture repair kit or the spare wheel
(depending on equipment).
Driving too slowly may not ensure
optimum monitoring.
The alert is not immediately triggered in the
event of a sudden loss of pressure or tyre
blow-out. This is because analysis of the
values read by the wheel's speed sensors
can take several minutes.
The alert may be delayed at speeds below
25 mph (40 km/h), or when adopting a sporty
driving mode.
The alert is kept active until the system is reinitialised.
Reinitialisation
► The system must be reinitialised after any
adjustment to the pressure of one or more tyres,
and after changing one or more wheels.
Before reinitialising the system, make
sure that the pressures of the four tyres
are correct for the conditions of use of the
vehicle and conform to the values written on
the tyre pressure label.
Check the pressures of the four tyres before
performing the reinitialisation.
The system does not advise if a pressure is
incorrect at the time of reinitialisation.
With the vehicle stationary, the system is
reinitialised via the Driving/V ehicle touch
screen menu.
►
In this menu, select the “
Vehicle settings”
tab.
►
On this page, select the "
Under-inflation
initialisation " function.
►
Select "
Ye s" to confirm.
The reinitialisation is confirmed by the display of
a message and an audible signal.
Malfunction
In the event of a malfunction, these
warning lamps light up on the
instrument panel.
A message appears, accompanied by an audible
signal.
In this case, the tyre under-inflation monitoring
function is no longer performed.
Have it checked by a PEUGEOT dealer or a
qualified workshop.
"Space-saver" type spare wheel
The use of this type of spare wheel may
suspend tyre pressure monitoring.
In this case, the fault warning lamp comes on
and goes off again once the wheel has been
replaced with one of the same size as the
others, tyre pressures have been adjusted
and the system reinitialised.
Driving and manoeuvring
aids - General
recommendations
Driving and manoeuvring aids cannot, in
any circumstances, replace the need for
vigilance on the part of the driver.
The driver must comply with the Highway
Code, must remain in control of the vehicle in
all circumstances and must be able to retake
control of it at all times. The driver must adapt
the speed to climatic conditions, traffic and
the state of the road.
It is the driver's responsibility to constantly
monitor traffic conditions, assess the distance
and relative speed of other vehicles, and
anticipate their manoeuvres before using the
direction indicator and changing lanes.
These systems do not make it possible to
exceed the laws of physics.
Driving aids
You should hold the steering wheel with
both hands, always use the door and interior
mirrors, always leave your feet close to the
pedals and take a break every 2 hours.
Manoeuvring aids
The driver must always check the
surroundings of the vehicle before and during
the whole manoeuvre, in particular using the
mirrors.
Radar(s)
The operation of the radar(s), along with
any associated functions, may be affected
by the accumulation of dirt (e.g. mud, ice),
in poor weather conditions (e.g. heavy rain,
snow), or if the bumpers are damaged.
If the front bumper is to be repainted, contact
a PEUGEOT dealer or a qualified workshop;
certain types of paint could interfere with the
operation of the radar(s).
Driving aids camera
This camera and its associated functions
may be impaired or not work if the windscreen
area in front of the camera is dirty, misty,
frosty, covered with snow, damaged or
masked by a sticker.
In humid and cold weather, demist the
windscreen regularly.
Poor visibility (inadequate street lighting,
heavy rain, thick fog, snowfall), dazzle
(headlamps of an oncoming vehicle, low sun,