2021 PEUGEOT 3008 mirror
[x] Cancel search: mirrorPage 84 of 292
82
Lighting and visibility
The rainfall detection function uses a rain/
sunshine sensor located at the top centre of the
windscreen, behind the rear view mirror.
Do not cover the rain/sunshine sensor.
When using an automatic car wash,
switch off the automatic wipers and the
ignition.
In winter, wait until the windscreen is
completely clear of ice before activating the
automatic wipers.
Switching on
► Give a short downwards push to the control
stalk.
A
wiping cycle confirms that the instruction has
been accepted.
This indicator lamp lights up on the instrument panel, accompanied by a
message.
Switching off
► Give the control stalk another brief push
downwards or place the control stalk in another
position ( Int
, 1 or 2).
This indicator lamp goes off in the
instrument panel, accompanied by a
message.
If the ignition has been off for more than
one minute, the automatic wipers must
be reactivated by pushing the control stalk
downwards.
Malfunction
If a fault occurs with the automatic wipers, the
wipers operate in intermittent mode.
Have it checked by a PEUGEOT dealer or a
qualified workshop.
Special position of the
windscreen wipers
This maintenance position is used while cleaning
or replacing the wiper blades. It can also be
useful, in wintry weather (ice, snow), to release
the wiper blades from the windscreen.
To maintain the effectiveness of the flat wiper blades, it is advisable to:
–
handle them with care.
–
clean them regularly using soapy water
.
–
avoid using them to hold cardboard on the
windscreen.
–
replace them at the first signs of wear
.
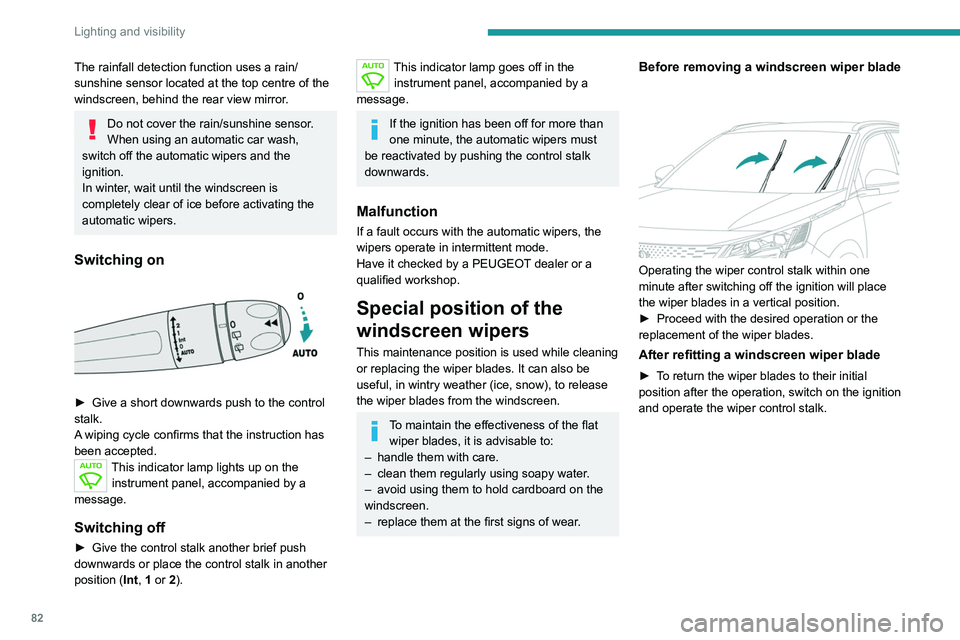
Before removing a windscreen wiper blade
Operating the wiper control stalk within one
minute after switching off the ignition will place
the wiper blades in a vertical position.
►
Proceed with the desired operation or the
replacement of the wiper blades.
After refitting a windscreen wiper blade
► To return the wiper blades to their initial
position after the operation, switch on the ignition
and operate the wiper control stalk.
Changing a wiper blade
Removing/Refitting at the front
► Carry out these wiper blade replacement
operations from the driver's side.
► Starting with the wiper blade farthest from
you, hold each arm by the rigid section and raise
it as far as possible.
Take care not to hold the arms at the jet locations.
Do not touch the wiper blades - risk of
irreparable deformation.
Do not release them while moving them. Risk
of damaging the windscreen!
► Clean the windscreen using screenwash
fluid.
Do not apply "Rain X" type water-
repellent products.
Page 124 of 292
122
Driving
When the message disappears, the selected
mode is activated and remains indicated on the
instrument panel (except Normal
mode).
With petrol / Diesel engines
Whenever the ignition is switched on,
Normal driving mode is selected by default.
Normal
To restore the default settings.
Eco
To reduce energy consumption by reducing the
performance of the heating and air conditioning,
without deactivating them.
Sport
With a manual gearbox: to obtain more dynamic
driving with action on the power steering,
accelerator and the possibility of displaying the
vehicle’s dynamic settings on the instrument
panel.
With an automatic gearbox: to obtain more
dynamic driving with action on the power
steering, accelerator, gear changes and
possibility of displaying the vehicle’s dynamic
settings on the instrument panel.
Depending on version, with an EAT8
gearbox and the gear selector in mode
D, except in
Sport mode, fully releasing the
accelerator pedal allows free-wheeling which
can save fuel.
A drop in engine speed is normal (rev counter
at idle, drop in engine noise).
With rechargeable hybrid
engine
Whenever the ignition is switched on, Electric
driving mode is selected by default.
Electric
Allows driving using 100% electrical energy.
The maximum speed is approximately 84 mph
(135
km/h).
When starting the vehicle, if the conditions do
not allow the activation or retention of Electric
mode, the message "Electric mode currently
unavailable" is displayed on the instrument
panel. The vehicle automatically changes to
Hybrid mode.
If a blue LED comes on under the interior rear
view mirror, visible from outside the vehicle, this
confirms that you are driving in Electric mode.
The LED can be turned off by inserting
the tip of a paper clip or other accessory
into the hole under the mirror.
Conditions of activation
–
Adequate battery charge level. Charging
the vehicle after each drive is therefore
recommended. Electric
mode is available as
long as there is power left in the battery.
–
Outside temperature between approximately
-5°C and 45°C.
Manually exiting the mode
►
Fully depress the accelerator pedal, or
►
Select another mode.
In case of non-use of the vehicle for a
long period (several months), a restart of
the petrol engine may occur even if the
battery is charged.
In the event of multiple starts of the
internal combustion engine without a
sufficient rise in
temperature,
Electric mode may be
temporarily unavailable (natural phenomenon
of dilution of fuel in oil). A message is then
displayed on the instrument panel (" ZEV
mode unavailable: automatic operation in
progress").
To regain normal electrical operation, drive
approximately 50 miles (80 km) in "motorway"
conditions or approximately 125 miles (200
km) in urban conditions.
This phenomenon does not cause any
mechanical or electrical damage. It can occur
several times in the life of the vehicle.
Hybrid
To optimise the vehicle's fuel consumption by
managing the alternating or simultaneous
operation of the two types of engine ,
depending on driving conditions and driving
style.
In Hybrid mode, it is possible to drive in 100%
electric mode if the battery charge level is
sufficient and acceleration requirements are
moderate.
Sport
To obtain more dynamic driving in order to
benefit from the maximum performance of the
vehicle.
Electric power is used to supplement the petrol
engine as long as there is energy left in the
battery.
4WD (4-wheel drive)
(Depending on version)
Improves the vehicle's grip at low and moderate
speeds by driving all 4 wheels continuously.
4WD mode (4-wheel drive) is especially
suited to driving on snow-covered roads and
difficult terrain (e.g. mud, sand) as well as ford
crossings, at moderate speed.
Depending on the driving conditions and the
battery charge level, 4WD mode may be 100%
electric.
If the system does not detect a situation of wheel
slipping or poor grip after 300 metres of driving, it
switches to Hybrid mode.
This mode will be even more effective if the vehicle is fitted with suitable tyres,
such as winter tyres.
The grip can be improved up to 84 mph
(135 km/h) using the electric motors; above this
speed, the vehicle is driven by the front wheels
only.
Page 128 of 292

126
Driving
► In the event of a puncture, use the
temporary puncture repair kit or the spare wheel
(depending on equipment).
Driving too slowly may not ensure
optimum monitoring.
The alert is not immediately triggered in the
event of a sudden loss of pressure or tyre
blow-out. This is because analysis of the
values read by the wheel's speed sensors
can take several minutes.
The alert may be delayed at speeds below
25 mph (40 km/h), or when adopting a sporty
driving mode.
The alert is kept active until the system is reinitialised.
Reinitialisation
► The system must be reinitialised after any
adjustment to the pressure of one or more tyres,
and after changing one or more wheels.
Before reinitialising the system, make
sure that the pressures of the four tyres
are correct for the conditions of use of the
vehicle and conform to the values written on
the tyre pressure label.
Check the pressures of the four tyres before
performing the reinitialisation.
The system does not advise if a pressure is
incorrect at the time of reinitialisation.
With the vehicle stationary, the system is
reinitialised via the Driving/V ehicle touch
screen menu.
►
In this menu, select the “
Vehicle settings”
tab.
►
On this page, select the "
Under-inflation
initialisation " function.
►
Select "
Ye s" to confirm.
The reinitialisation is confirmed by the display of
a message and an audible signal.
Malfunction
In the event of a malfunction, these
warning lamps light up on the
instrument panel.
A message appears, accompanied by an audible
signal.
In this case, the tyre under-inflation monitoring
function is no longer performed.
Have it checked by a PEUGEOT dealer or a
qualified workshop.
"Space-saver" type spare wheel
The use of this type of spare wheel may
suspend tyre pressure monitoring.
In this case, the fault warning lamp comes on
and goes off again once the wheel has been
replaced with one of the same size as the
others, tyre pressures have been adjusted
and the system reinitialised.
Driving and manoeuvring
aids - General
recommendations
Driving and manoeuvring aids cannot, in
any circumstances, replace the need for
vigilance on the part of the driver.
The driver must comply with the Highway
Code, must remain in control of the vehicle in
all circumstances and must be able to retake
control of it at all times. The driver must adapt
the speed to climatic conditions, traffic and
the state of the road.
It is the driver's responsibility to constantly
monitor traffic conditions, assess the distance
and relative speed of other vehicles, and
anticipate their manoeuvres before using the
direction indicator and changing lanes.
These systems do not make it possible to
exceed the laws of physics.
Driving aids
You should hold the steering wheel with
both hands, always use the door and interior
mirrors, always leave your feet close to the
pedals and take a break every 2 hours.
Manoeuvring aids
The driver must always check the
surroundings of the vehicle before and during
the whole manoeuvre, in particular using the
mirrors.
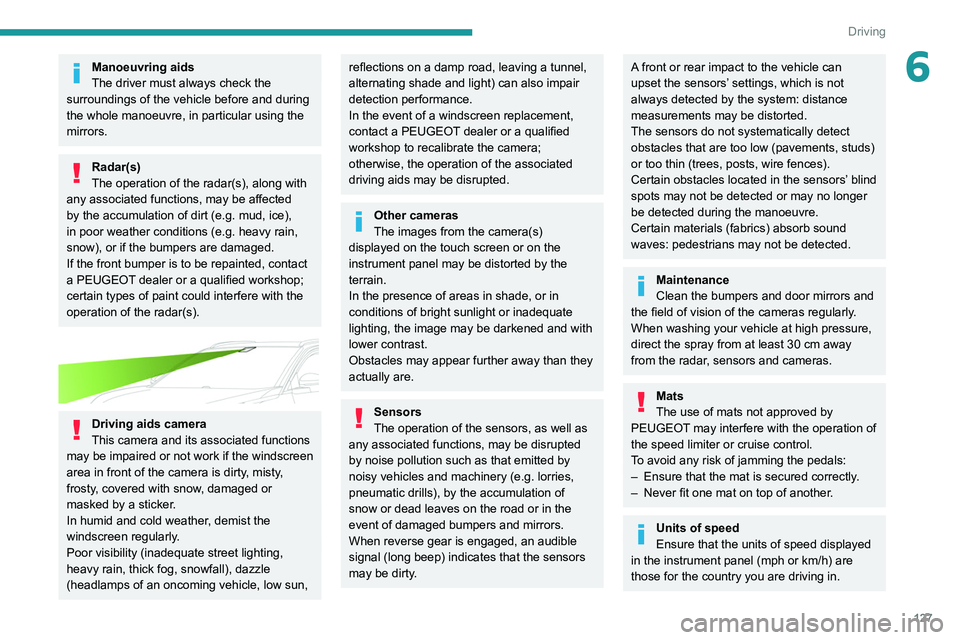
Radar(s)
The operation of the radar(s), along with
any associated functions, may be affected
by the accumulation of dirt (e.g. mud, ice),
in poor weather conditions (e.g. heavy rain,
snow), or if the bumpers are damaged.
If the front bumper is to be repainted, contact
a PEUGEOT dealer or a qualified workshop;
certain types of paint could interfere with the
operation of the radar(s).
Driving aids camera
This camera and its associated functions
may be impaired or not work if the windscreen
area in front of the camera is dirty, misty,
frosty, covered with snow, damaged or
masked by a sticker.
In humid and cold weather, demist the
windscreen regularly.
Poor visibility (inadequate street lighting,
heavy rain, thick fog, snowfall), dazzle
(headlamps of an oncoming vehicle, low sun,
Page 129 of 292
127
Driving
6Manoeuvring aids
The driver must always check the
surroundings of the vehicle before and during
the whole manoeuvre, in particular using the
mirrors.
Radar(s)
The operation of the radar(s), along with
any associated functions, may be affected
by the accumulation of dirt (e.g.
mud, ice),
in poor weather conditions (e.g.
heavy rain,
snow), or if the bumpers are damaged.
If the front bumper is to be repainted, contact
a PEUGEOT dealer or a qualified workshop;
certain types of paint could interfere with the
operation of the radar(s).
Driving aids camera
This camera and its associated functions
may be impaired or not work if the windscreen
area in front of the camera is dirty, misty,
frosty, covered with snow, damaged or
masked by a sticker.
In humid and cold weather, demist the
windscreen regularly.
Poor visibility (inadequate street lighting,
heavy rain, thick fog, snowfall), dazzle
(headlamps of an oncoming vehicle, low sun,
reflections on a damp road, leaving a tunnel,
alternating shade and light) can also impair
detection performance.
In the event of a windscreen replacement,
contact a PEUGEOT dealer or a qualified
workshop to recalibrate the camera;
otherwise, the operation of the associated
driving aids may be disrupted.
Other cameras
The images from the camera(s)
displayed on the touch screen or on the
instrument panel may be distorted by the
terrain.
In the presence of areas in shade, or in
conditions of bright sunlight or inadequate
lighting, the image may be darkened and with
lower contrast.
Obstacles may appear further away than they
actually are.
Sensors
The operation of the sensors, as well as
any associated functions, may be disrupted
by noise pollution such as that emitted by
noisy vehicles and machinery (e.g. lorries,
pneumatic drills), by the accumulation of
snow or dead leaves on the road or in the
event of damaged bumpers and mirrors.
When reverse gear is engaged, an audible
signal (long beep) indicates that the sensors
may be dirty.
A front or rear impact to the vehicle can
upset the sensors’ settings, which is not
always detected by the system: distance
measurements may be distorted.
The sensors do not systematically detect
obstacles that are too low (pavements, studs)
or too thin (trees, posts, wire fences).
Certain obstacles located in the sensors’ blind
spots may not be detected or may no longer
be detected during the manoeuvre.
Certain materials (fabrics) absorb sound
waves: pedestrians may not be detected.
Maintenance
Clean the bumpers and door mirrors and
the field of vision of the cameras regularly.
When washing your vehicle at high pressure,
direct the spray from at least 30
cm away
from the radar, sensors and cameras.
Mats
The use of mats not approved by
PEUGEOT may interfere with the operation of
the speed limiter or cruise control.
To avoid any risk of jamming the pedals:
–
Ensure that the mat is secured correctly
.
–
Never fit one mat on top of another
.
Units of speed
Ensure that the units of speed displayed
in the instrument panel (mph or km/h) are
those for the country you are driving in.
Page 153 of 292
151
Driving
6In certain driving conditions (poor road
surface or strong winds), the system may
give alerts independent of the driver's level of
vigilance.
The following situations may interfere with the operation of the system or
prevent it from working:
–
lane markings absent, worn, hidden (snow
,
mud) or multiple (roadworks);
–
close to the vehicle ahead (lane markings
not detected);
–
roads that are narrow
, winding, etc.
Blind Spot Monitoring
For more information, refer to the
General recommendations on the use
of driving and manoeuvring aids .
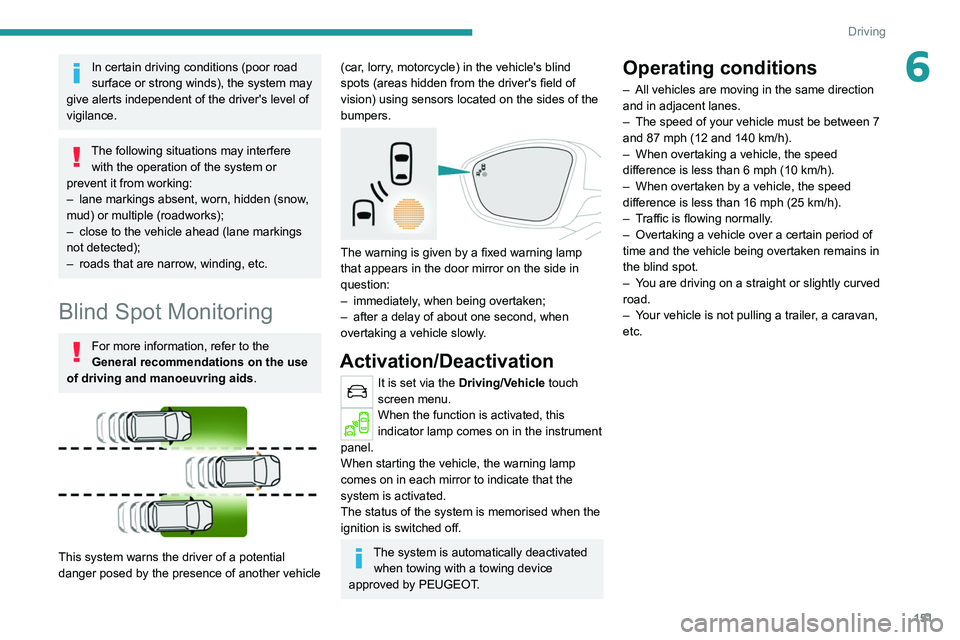
This system warns the driver of a potential
danger posed by the presence of another vehicle
(car, lorry, motorcycle) in the vehicle's blind
spots (areas hidden from the driver's field of
vision) using sensors located on the sides of the
bumpers.
The warning is given by a fixed warning lamp
that appears in the door mirror on the side in
question:
–
immediately
, when being overtaken;
–
after a delay of about one second, when
overtaking a vehicle slowly
.
Activation/Deactivation
It is set via the Driving/Vehicle touch
screen menu.
When the function is activated, this
indicator lamp comes on in the instrument
panel.
When starting the vehicle, the
warning lamp
comes on in each mirror to indicate that the
system is activated.
The status of the system is memorised when the
ignition is switched off.
The system is automatically deactivated when towing with a towing device
approved by PEUGEOT.
Operating conditions
– All vehicles are moving in the same direction
and in adjacent lanes.
–
The speed of your vehicle must be between 7
and 87 mph (12 and 140
km/h).
–
When overtaking a vehicle, the speed
difference is less than 6
mph (10 km/h).
–
When overtaken by a vehicle, the speed
difference is less than 16
mph (25 km/h).
–
T
raffic is flowing normally.
–
Overtaking a vehicle over a certain period of
time and the vehicle being overtaken remains in
the blind spot.
–
Y
ou are driving on a straight or slightly curved
road.
–
Y
our vehicle is not pulling a trailer, a caravan,
etc.
Page 154 of 292
152
Driving
Operating limits
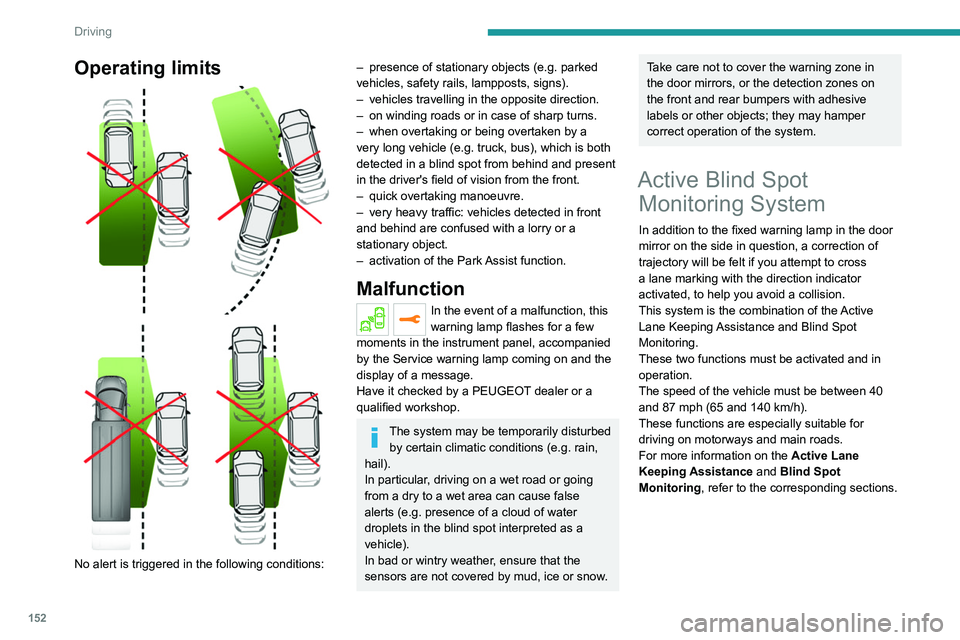
No alert is triggered in the following conditions:
– presence of stationary objects (e.g. parked
vehicles, safety rails, lampposts, signs).
–
vehicles travelling in the opposite direction.
–
on winding roads or in case of sharp turns.
–
when overtaking or being overtaken by a
very long vehicle (e.g.
truck, bus), which is both
detected in a blind spot from behind and present
in the driver's field of vision from the front.
–
quick overtaking manoeuvre.
–
very heavy traffic: vehicles detected in front
and behind are confused with a lorry or a
stationary object.
–
activation of
the Park Assist function.
Malfunction
In the event of a malfunction, this
warning lamp flashes for a few
moments in the instrument panel, accompanied
by the Service warning lamp coming on and the
display of a message.
Have it checked by a PEUGEOT dealer or a
qualified workshop.
The system may be temporarily disturbed by certain climatic conditions (e.g. rain,
hail).
In particular, driving on a wet road or going
from a dry to a wet area can cause false
alerts (e.g.
presence of a cloud of water
droplets in the blind spot interpreted as a
vehicle).
In bad or wintry weather, ensure that the
sensors are not covered by mud, ice or snow.
Take care not to cover the warning zone in
the door mirrors, or the detection zones on
the front and rear bumpers with adhesive
labels or other objects; they may hamper
correct operation of the system.
Active Blind Spot Monitoring System
In addition to the fixed warning lamp in the door
mirror on the side in question, a correction of
trajectory will be felt if you attempt to cross
a lane marking with the direction indicator
activated, to help you avoid a collision.
This system is the combination of the Active
Lane Keeping Assistance and Blind Spot
Monitoring.
These two functions must be activated and in
operation.
The speed of the vehicle must be between 40
and 87
mph (65 and 140 km/h).
These functions are especially suitable for
driving on motorways and main roads.
For more information on the Active Lane
Keeping Assistance and Blind Spot
Monitoring , refer to the corresponding sections.
Parking sensors
For more information, refer to the
General recommendations on the use
of driving and manoeuvring aids .
This system detects and signals the proximity of
obstacles (e.g. pedestrian, vehicle, tree, barrier)
using sensors located in the bumper.
Rear parking sensors
► Engage reverse gear to start the system
(confirmed by an audible signal).
The system is switched off when reverse gear is
disengaged.
Audible assistance
Page 158 of 292
156
Driving
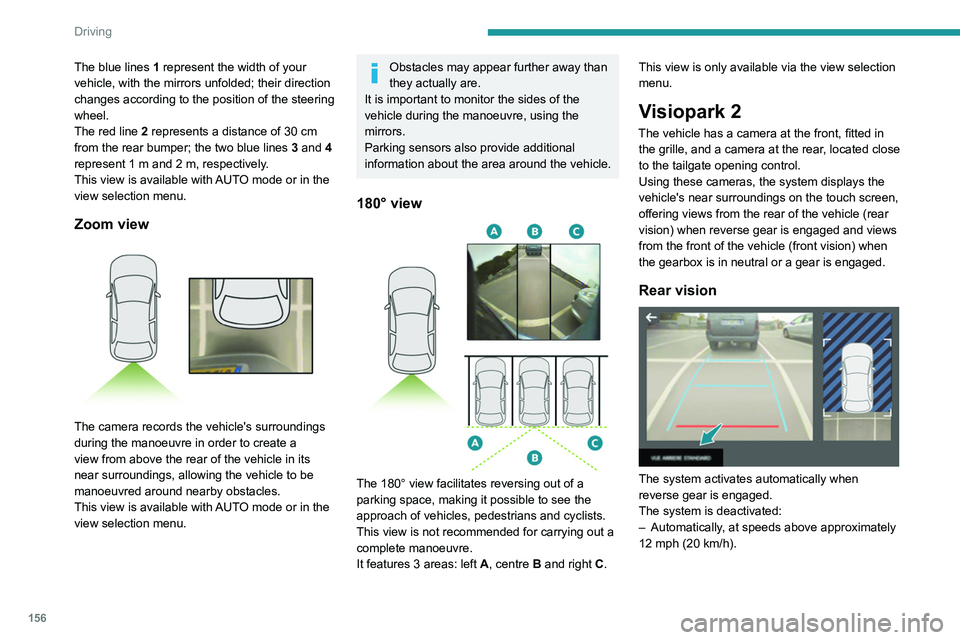
The blue lines 1 represent the width of your
vehicle, with the mirrors unfolded; their direction
changes according to the position of the steering
wheel.
The red line 2 represents a distance of 30
cm
from the rear bumper; the two blue lines 3 and 4
represent 1
m and 2 m, respectively.
This view is available with AUTO mode or in the
view selection menu.
Zoom view
The camera records the vehicle's surroundings
during the manoeuvre in order to create a
view from above the rear of the vehicle in its
near surroundings, allowing the vehicle to be
manoeuvred around nearby obstacles.
This view is available with AUTO mode or in the
view selection menu.
Obstacles may appear further away than
they actually are.
It is important to monitor the sides of the
vehicle during the manoeuvre, using the
mirrors.
Parking sensors also provide additional
information about the area around the vehicle.
180° view
The 180° view facilitates reversing out of a
parking space, making it possible to see the
approach of vehicles, pedestrians and cyclists.
This view is not recommended for carrying out a
complete manoeuvre.
It features 3 areas: left A, centre B and right C. This view is only available via the view selection
menu.
Visiopark 2
The vehicle has a camera at the front, fitted in
the grille, and a camera at the rear, located close
to the tailgate opening control.
Using these cameras, the system displays the
vehicle's near surroundings on the touch screen,
offering views from the rear of the vehicle (rear
vision) when reverse gear is engaged and views
from the front of the vehicle (front vision) when
the gearbox is in neutral or a gear is engaged.
Rear vision
The system activates automatically when
reverse gear is engaged.
The system is deactivated:
–
Automatically
, at speeds above approximately
12 mph (20
km/h).
– When shifting out of reverse (the front vision
image replaces the rear vision image for 7
seconds).
– By pressing the white arrow in the upper-left
corner of the touch screen.
If a trailer or a bicycle carrier is fitted to
the towball, the area behind the vehicle
on the view from above goes dark.
The surroundings are reconstructed by the
front camera only.
The rear vision views are similar to those for the
Visiopark 1 function.
For more information on the Visiopark
1 function, refer to the corresponding section.
Front and rear vision
With the engine running and the speed
below 12 mph (20 km/h), the system is
activated via the Driving/Vehicle touch screen
menu:
► Select "Visual parking assistance".
Page 159 of 292
157
Driving
6– When shifting out of reverse (the front vision
image replaces the rear vision image for 7
seconds).
–
By pressing the white arrow in the upper-left
corner of the touch screen.
If a trailer or a bicycle carrier is fitted to
the towball, the area behind the vehicle
on the view from above goes dark.
The surroundings are reconstructed by the
front camera only.
The rear vision views are similar to those for the
Visiopark 1 function.
For more information on the Visiopark
1
function, refer to the corresponding section.
Front and rear vision
With the engine running and the speed
below 12 mph (20 km/h), the system is
activated via the Driving/Vehicle touch screen
menu:
►
Select "
Visual parking assistance". AUTO mode is displayed by default, with front
vision, if the gearbox is in neutral or with a
gear engaged, or with rear vision, if reverse is
engaged.
The system is deactivated:
–
Automatically above about 19 mph (30
km/h)
(the image disappears temporarily from 12 mph
(20 km/h)).
–
By pressing the white arrow in the upper-left
corner of the touch screen.
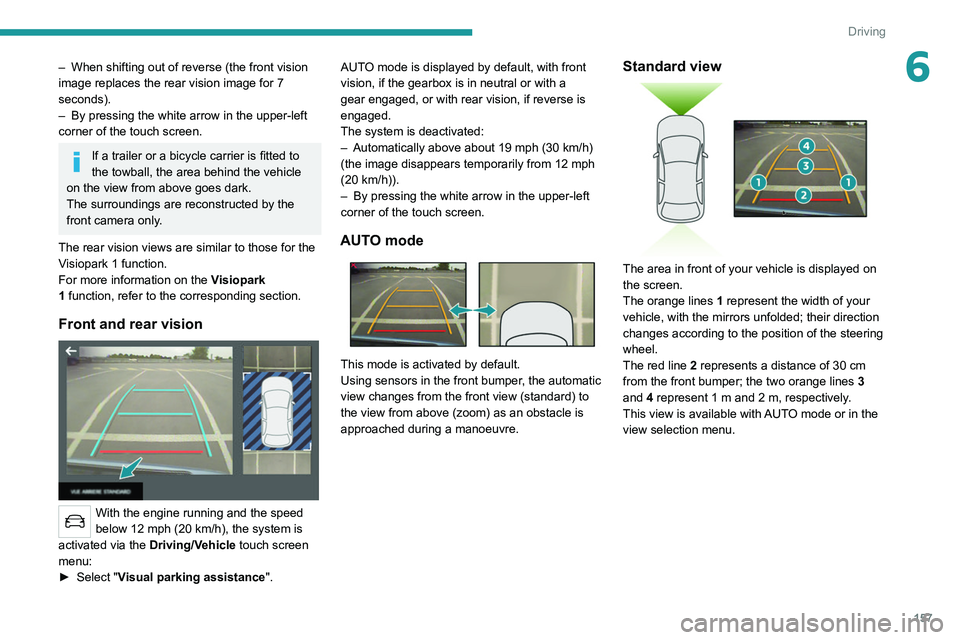
AUTO mode
This mode is activated by default.
Using sensors in the front bumper, the automatic
view changes from the front view (standard) to
the view from above (zoom) as an obstacle is
approached during a manoeuvre.
Standard view
The area in front of your vehicle is displayed on
the screen.
The orange lines 1 represent the width of your
vehicle, with the mirrors unfolded; their direction
changes according to the position of the steering
wheel.
The red line 2 represents a distance of 30 cm
from the front bumper; the two orange lines 3
and 4 represent 1 m and 2 m, respectively.
This view is available with AUTO mode or in the
view selection menu.