2021 NISSAN TITAN open hood
[x] Cancel search: open hoodPage 125 of 638

the vehicle must be driven at speeds
above 16 mph (25 km/h) to activate the
TPMS and turn off the low tire pressure
warning light. Use a tire pressure gauge
to check the tire pressure.
The “Tire Pressure Low - Add Air” warning
appears each time the ignition switch is
placed in the ON position as long as the low
tire pressure warning light remains illumi-
nated.
For additional information, see “Vehicle in-
formation display” (P. 2-22), “Tire Pressure
Monitoring System (TPMS)” (P. 5-5) and “In
case of emergency” (P. 6-3).
TPMS malfunction
If the TPMS is not functioning properly, the
low tire pressure warning light will flash for
approximately 1 minute when the ignition
switch is placed in the ON position. The
light will remain on af ter 1 minute. Have the
system checked. It is recommended that
you visit a NISSAN dealer for this service.
The "Tire Pressure Low — Add Air" warning
does not appear if the low tire pressure
warning light illuminates to indicate a
TPMS malfunction.
For additional information, see “Tire Pres-
sure Monitoring System (TPMS)” (P. 5-5) and
“Tire pressure” (P. 8-35).
WARNING
• Radio waves could adversely affect
electric medical equipment. Those
who use a pacemaker should contact
the electric medical equipment
manufacturer for the possible influ-
ences before use.
• If the light does not illuminate with
the ignition switch placed in the ON
position, have the vehicle checked as
soon as possible. It is recommended
that you visit a NISSAN dealer for this
service.
• If the light illuminates while driving,
avoid sudden steering maneuvers
or abrupt braking, reduce vehicle
speed, pull off the road to a safe loca-
tion and stop the vehicle as soon as
possible. Driving with under-inflated
tires may permanently damage the
tires and increase the likelihood of
tire failure. Serious vehicle damage
could occur and may lead to an acci-
dent and could result in serious per-
sonal injury or death. Check the tire
pressure for all four tires. Adjust the
tire pressure to the recommended
COLD tire pressure show on the Tire
and Loading Information label lo-
cated in the driver’s door opening to turn the low tire pressure warning
light off. If the light still illuminates
while driving af ter adjusting the tire
pressure, a tire may be flat or the
TPMS may be malfunctioning. If you
have a flat tire, replace it with a spare
tire as soon as possible. If no tire is
flat and all tires are properly inflated,
have the vehicle checked. It is recom-
mended that you visit a NISSAN
dealer for this service.
• When using a wheel without the
TPMS such as the spare tire, the TPMS
will not function and the low tire
pressure warning light will flash for
approximately 1 minute. The light will
remain on af ter 1 minute. Have your
tires replaced and/or TPMS system
reset as soon as possible. It is recom-
mended that you visit a NISSAN
dealer for these services.
• Replacing tires with those not origi-
nally specified by NISSAN could af-
fect the proper operation of the
TPMS.
Instruments and controls2-19
Page 143 of 638

Rear Automatic Braking
(RAB) indicator
This indicator appears to indicate the sta-
tus of the Rear Automatic Braking (RAB)
system. For additional information, see
“Rear Automatic Braking (RAB)” (P. 5-75).
Speed Limit Sign indicator
This message may appear when the Traffic
Sign Recognition system is engaged.
For additional information, see “Traffic Sign
Recognition” (P. 5-24).
System fault See Owner’s Manual
This warning appears if there is a malfunc-
tion in one of the following systems:
• Automatic Emergency Braking (AEB) withPedestrian Detection
• Intelligent Forward Collision Warning (I-FCW)
• Rear Automatic Braking (RAB)
For additional information, see “Automatic
Emergency Braking (AEB) with Pedestrian
Detection” (P. 5-80), “Intelligent Forward Col-
lision Warning (I-FCW)” (P. 5-89) and “Rear
Automatic Braking (RAB)” (P. 5-75).
Unavailable Side Radar Obstruction
This message appears when the Blind
Spot Warning (BSW) or Rear Cross Traffic
Alert (RCTA) systems become unavailable
because a radar blockage is detected. For
additional information, see “Blind Spot
Warning (BSW)” (P. 5-32) and “Rear Cross
Traffic Alert (RCTA)” (P. 5-41).
Vehicle ahead detection
indicator
This indicator appears when the Auto-
matic Emergency Braking (AEB) system is
engaged and has detected a vehicle.
For additional information, see “Automatic
Emergency Braking (AEB) with Pedestrian
Detection” (P. 5-80). Your vehicle has two types of security sys-
tems:
• Vehicle security system
• NISSAN Vehicle Immobilizer System
VEHICLE SECURITY SYSTEM
The vehicle security system provides visual
and audible alarm signals if someone
opens the doors or hood when the system
is armed. It is not, however, a motion detec-
tion type system that activates when a ve-
hicle is moved or when a vibration occurs.
LIC0359
SECURITY SYSTEMS
Instruments and controls2-37
Page 144 of 638

The system helps deter vehicle thef t but
cannot prevent it, nor can it prevent the
thef t of interior or exterior vehicle compo-
nents in all situations. Always secure your
vehicle even if parking for a brief period.
Never leave your keys in the vehicle, and
always lock the vehicle when unattended.
Be aware of your surroundings, and park in
secure, well-lit areas whenever possible.
Many devices offering additional protec-
tion, such as component locks, identifica-
tion markers, and tracking systems, are
available at auto supply stores and spe-
cialty shops. A NISSAN dealer may also offer
such equipment. Check with your insur-
ance company to see if you may be eligible
for discounts for various thef t protection
features.
How to arm the vehicle security
system
1. Close all windows.(The system can be
armed even if the windows are open.)
2. Remove the Intelligent Key from the vehicle.
3. Close all doors. Lock all doors. The doors can be locked with the Intelligent Key or
door handle request switch. 4. Confirm that the
security indicator
light stays on for about 30 seconds. The
vehicle security system is now pre-
armed. The vehicle security system will
automatically shif t into the armed
phase. The
security light begins to
flash once every three seconds. If during
the pre-armed phase one of the follow-
ing occurs, the system will not arm:
• Any door is unlocked with the Intelligent Key or door request switch.
• Ignition switch is placed in ACC or ON position.
• Even when the driver and/or passen-
gers are in the vehicle, the system will
activate with all the doors, hood and
locked with the ignition switch placed
in the LOCK position. When placing the
ignition switch in the ACC or ON posi-
tion, the system will be released.
• The lockable bedside storage com-
partment (if so equipped) is not pro-
tected by the vehicle security system.
Vehicle security system activation
The vehicle security system will give the
following alarm:
• The headlights blink and the horn sounds intermittently but synchronously. • The alarm automatically turns off af ter a
period of time. However, the alarm reacti-
vates if the vehicle is tampered with
again.
The alarm is activated by:
• opening any door or hood without using the Intelligent Key (even if the door is un-
locked by releasing the door inside lock
knob).
How to stop an activated alarm
The alarm stops only by pressing thebutton on the Intelligent Key.
NISSAN VEHICLE IMMOBILIZER
SYSTEM
The NISSAN Vehicle Immobilizer System
will not allow the engine to start without
the use of a registered key.
If the engine fails to start using a registered
key (for example, when interference is
caused by another registered key, an auto-
mated toll road device or automatic pay-
ment device on the key ring), restart the
engine using the following procedures:
1.
Leave the ignition switch placed in the ON
position for approximately 5 seconds.
2-38Instruments and controls
Page 223 of 638

REMOTE STARTING THE VEHICLE
To use the Remote Engine Start feature to
start the engine perform the following:
1. Aim the Intelligent Key at the vehicle.
2. Press the
button to lock all doors.
3. Within 5 seconds press and hold the
button until the turn signal lights
flash and the tail lamps turn on. If the
vehicle is not within view press and hold
the
button for at least 2 seconds.
The following events will occur when the
engine starts:
• The parking lights will turn on and remain on as long as the engine is running.
• The doors will be locked and the climate control system may come on.
• The engine will continue to run for 10 min- utes. Repeat the steps to extend the time
for an additional 10 minutes. For addi-
tional information, see “Extending engine
run time” (P. 3-23).
Press and hold the brake then push the
push-button ignition switch to the ON po-
sition before driving. For additional infor-
mation, see “Driving the vehicle” (P. 5-18)).
EXTENDING ENGINE RUN TIME
The Remote Engine Start feature can be
extended one time by performing the
steps listed in “Remote starting the vehicle”
in this section. Run time will be calculated
as follows:
• The first 10 minute run time will start when the Remote Engine Start function is
performed.
• The second 10 minutes will start immedi- ately when the Remote Engine Start
function is performed again. For example,
if the engine has been running for 5 min-
utes, and 10 minutes are added, the en-
gine will run for a total of 15 minutes.
• Extending engine run time will count to- wards the two Remote Engine Start limit.
A maximum of two Remote Engine Starts,
or a single Remote Engine Start with an
extension, are allowed between ignition
cycles. The ignition switch must be cycled
to the ON position and then back to the
OFF position before the Remote Engine
Start procedure can be used again.
CANCELING A REMOTE ENGINE
START
To cancel a Remote Engine Start, perform
one of the following:
• Aim the Intelligent Key at the vehicle and press
until the parking lights turn off.
• Turn on the hazard warning flashers.
• Cycle the ignition switch on and then off.
• The extended engine run time has ex- pired.
• The first 10 minute timer has expired.
• The engine hood has been opened.
• The shif t lever is moved out of park.
• The alarm sounds due to illegal entry into the vehicle.
• The ignition switch is pushed without an Intelligent Key in the vehicle.
• The ignition switch is pushed with an In- telligent Key in the vehicle but the brake
pedal is not depressed.
Pre-driving checks and adjustments3-23
Page 225 of 638

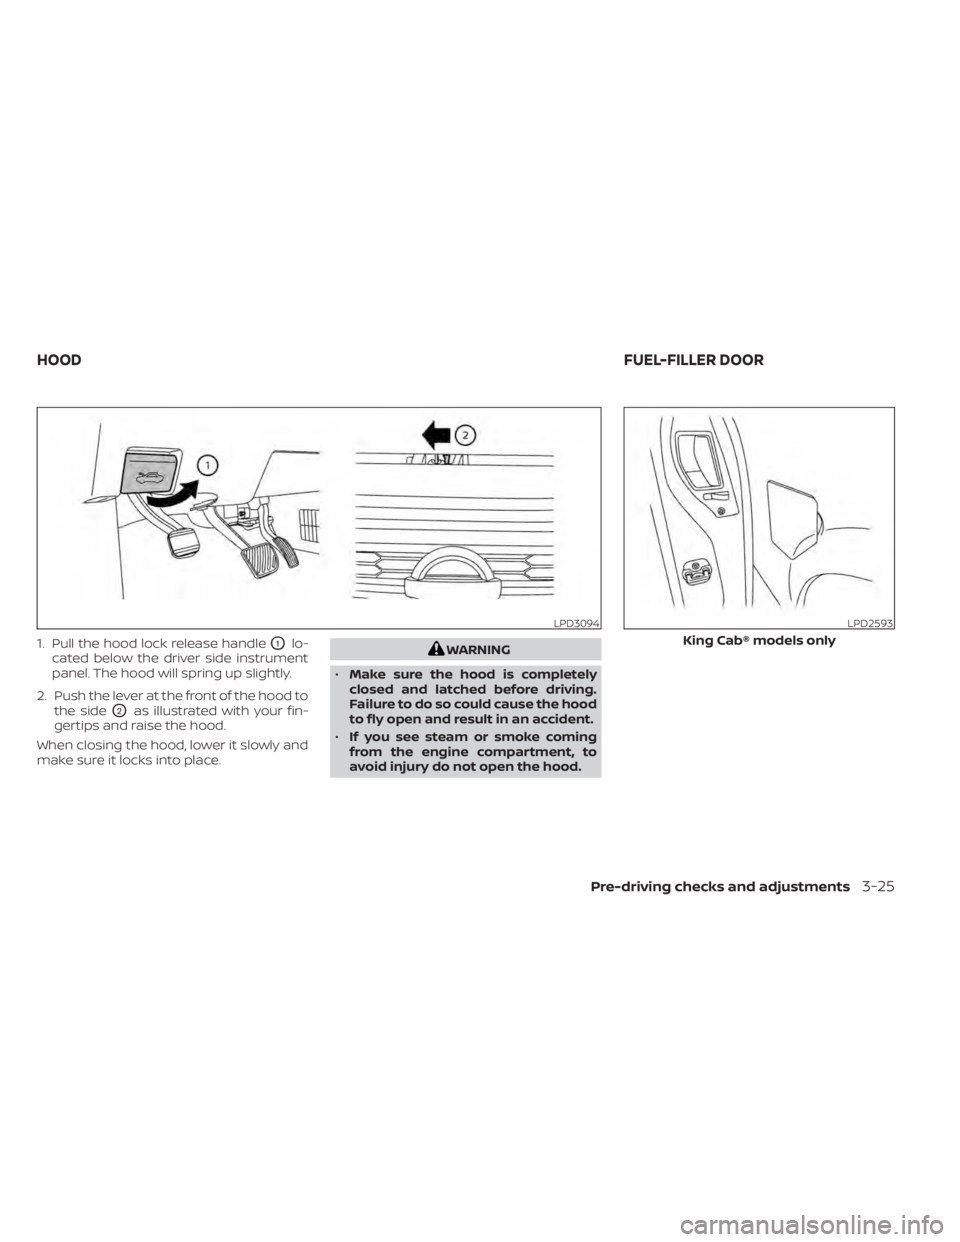
1. Pull the hood lock release handleO1lo-
cated below the driver side instrument
panel. The hood will spring up slightly.
2. Push the lever at the front of the hood to the side
O2as illustrated with your fin-
gertips and raise the hood.
When closing the hood, lower it slowly and
make sure it locks into place.
WARNING
• Make sure the hood is completely
closed and latched before driving.
Failure to do so could cause the hood
to fly open and result in an accident.
• If you see steam or smoke coming
from the engine compartment, to
avoid injury do not open the hood.
LPD3094LPD2593
King Cab® models only
HOOD FUEL-FILLER DOOR
Pre-driving checks and adjustments3-25
Page 338 of 638

prevent the TPMS from functioning prop-
erly. Always check the TPMS malfunction
telltale af ter replacing one or more tires or
wheels on your vehicle to ensure that the
replacement or alternate tires and wheels
allow the TPMS to continue to function
properly.
Additional information:
• When using a wheel without the TPMSsuch as the spare tire, the TPMS does not
monitor the tire pressure of the spare tire.
• The TPMS will activate only when the ve- hicle is driven at speeds above 16 mph (25
km/h). Also, this system may not detect a
sudden drop in tire pressure (for example,
a flat tire while driving).
• The low tire pressure warning light does not automatically turn off when the tire
pressure is adjusted. Af ter your tires are
inflated to the recommended pressure,
the vehicle must be driven at speeds
above 16 mph (25 km/h) to activate the
TPMS and turn off the low tire pressure
warning light. Use a tire pressure gauge
to check the tire pressure. • The “Tire Pressure Low – Add Air” warning
appears in the vehicle information dis-
play when the low tire pressure warning
light is illuminated and low tire pressure is
detected. The “Tire Pressure Low – Add
Air” warning turns off when the low tire
pressure warning light turns off.
• The “Tire Pressure Low – Add Air” warning does not appear if the low tire pressure
warning light illuminates to indicate a
TPMS malfunction.
• Tire pressure rises and falls depending on the heat caused by the vehicle’s opera-
tion and the outside temperature. Do not
reduce the tire pressure af ter driving be-
cause the tire pressure rises af ter driving.
Low outside temperature can lower the
temperature of the air inside the tire
which can cause a lower tire inflation
pressure. This may cause the low tire
pressure warning light to illuminate. If the
warning light illuminates, check the tire
pressure for all four tires.
• The Tire and Loading Information label is located in the driver's door opening.
For additional information, see “Low tire
pressure warning light” (P. 2-18) and “Tire
Pressure Monitoring System (TPMS)” (P. 6-3).WARNING
• Radio waves could adversely affect
electric medical equipment. Those
who use a pacemaker should contact
the electric medical equipment
manufacturer for the possible influ-
ences before use.
• If the low tire pressure warning light
illuminates while driving, avoid sud-
den steering maneuvers or abrupt
braking, reduce vehicle speed, pull
off the road to a safe location and
stop the vehicle as soon as possible.
Driving with under-inflated tires may
permanently damage the tires and
increase the likelihood of tire failure.
Serious vehicle damage could occur
and may lead to an accident and
could result in serious personal in-
jury. Check the tire pressure for all
four tires. Adjust the tire pressure to
the recommended COLD tire pres-
sure shown on the Tire and Loading
Information label to turn the low tire
pressure warning light off. If you have
a flat tire, replace it with a spare tire
as soon as possible. (For additional
information, see “Flat tire” (P. 6-3) for
changing a flat tire.)
5-6Starting and driving
Page 461 of 638

To use the engine block heater:
1. Turn the engine off.
2. Open the hood and unwrap the engineblock heater cord.
3. Plug the engine block heater cord into a grounded 3-wire, 3-pronged extension
cord.
4. Plug the extension cord into a Ground Fault Interrupt (GFI) protected, grounded
110-volt AC (VAC) outlet.
5. The engine block heater must be plugged in for at least 2–4 hours, de-
pending on outside temperatures, to
properly warm the engine coolant. Use
an appropriate timer to turn the engine
block heater on.
6. Before starting the engine, unplug and properly store the cord to keep it away
from moving parts.NOTE:
When using the engine block heater
(if so equipped) on an Applied Vehicle
(engine block heater is plugged in):
• Vehicle should be parked on a levelsurface.
Or
• If a level surface is not available, thevehicle should be parked with the front
of the truck lower than the rear (nose
down).
CAUTION
Use of the engine block heater when
parked with the front of the vehicle
higher than the rear (5 degrees or
more) may cause the engine block
heater to become damaged and/or
inoperative.
Starting and driving5-129
Page 474 of 638

Do not attempt to start the engine by
pushing.
CAUTION
• Automatic transmission models can-
not be push-started or tow-started.
Attempting to do so may cause
transmission damage.
• Three way catalyst equipped models
should not be started by pushing
since the three way catalyst may be
damaged.
• Never try to start the vehicle by tow-
ing it; when the engine starts, the for-
ward surge could cause the vehicle to
collide with the tow vehicle.
WARNING
• Do not continue to drive if your ve-
hicle overheats. Doing so could cause
engine damage or a vehicle fire.
• To avoid the danger of being scalded,
never remove the radiator or coolant
reservoir cap while the engine is still
hot. When the radiator or coolant res-
ervoir cap is removed, pressurized
hot water will spurt out, possibly
causing serious injury.
• Do not open the hood if steam is
coming out.
If your vehicle is overheating (indicated by
an extremely high temperature gauge
reading), or if you feel a lack of engine
power, detect abnormal noise, etc. take the
following steps:
1. Move the vehicle safely off the road, ap- ply the parking brake and move the shif t
lever to P (Park).
Do not stop the engine.
2. Turn off the air conditioner. Open all the windows, move the heater or air condi-
tioner temperature control to maximum
hot and fan control to high speed. 3. If engine overheating is caused by
climbing a long hill on a hot day, run the
engine at a fast idle (approximately 1,500
rpm) until the temperature gauge indi-
cation returns to normal.
4. Get out of the vehicle. Look and listen for steam or coolant escaping from the ra-
diator before opening the hood. If steam
or coolant is escaping, turn off the en-
gine. Do not open the hood further until
no steam or coolant can be seen.
5. Open the engine hood.
WARNING
If steam or water is coming from the
engine, stand clear to prevent getting
burned.
6. Visually check drive belts for damage or looseness. Also check if the cooling fan
is running. The radiator hoses and radia-
tor should not leak water. If coolant is
leaking, the water pump belt is missing
or loose, or the cooling fan does not run,
stop the engine.
PUSH STARTING IF YOUR VEHICLE OVERHEATS
6-12In case of emergency