2021 NISSAN TITAN weight
[x] Cancel search: weightPage 606 of 638

Bumper towing
The Genuine NISSAN step bumper has pro-
visions to install a trailer hitch ball and is
designed to tow trailers of a maximum
weight of 5,000 lbs. (2,268 kg).
NOTE:
The trailer hitch ball cannot be installed
on the step bumper if the receiver-type
frame mounted hitch is installed on the
vehicle.
To install a trailer hitch ball cut out the circle
in the center of the step bumper
OA, then
remove it to install the trailer hitch ball.
Weight carrying hitches
A weight carrying or “dead weight” ball
mount is one that is designed to carry the
whole amount of tongue weight and gross
weight directly on the ball mount and on
the receiver.
Weight distribution hitch
This type of hitch is also called a “load-
leveling” or “equalizing” hitch. A set of bars
attach to the ball mount and to the trailer
to distribute the tongue weight (hitch
weight) of your trailer. Many vehicles can't
carry the full tongue weight of a given
trailer, and need some of the tongue
weight transferred through the frame and
pushing down on the front wheels. This
gives stability to the tow vehicle.
A weight-distributing hitch system (Class
IV) is recommended if you plan to tow trail-
ers with a maximum weight over 5,000 lbs.
(2,268 kg). Check with the trailer and towing
equipment manufacturers to determine if
they recommend the use of a weight-
distributing hitch system.
NOTE:
A weight-distributing hitch system may
affect the operation of trailer surge
brakes. If you are considering use of a
weight-distributing hitch system with a
surge brake-equipped trailer, check with
the surge brake, hitch or trailer manufac-
turer to determine if and how this can be
done.
Follow the instructions provided by the
manufacturer for installing and using the
weight-distributing hitch system.
General set-up instructions are as follows:
1. Park unloaded vehicle on a level surface. With the ignition switch in the ON posi-
tion and the doors closed, allow the ve-
hicle to stand for several minutes so that
it can level.
2. Measure the height of a reference point on the front and rear bumpers at the
center of the vehicle.
3. Attach the trailer to the vehicle and ad- just the hitch equalizers so that the front
bumper height is within0-.5inches (0 –
13 mm) of the reference height mea-
sured in step 2. The rear bumper should
be no higher than the reference height
measured in step 2.
LTI2227
10-40Technical and consumer information
Page 607 of 638

WARNING
Properly adjust the weight distributing
hitch so the rear of the bumper is no
higher than the measured reference
height when the trailer is attached. If
the rear bumper is higher than the
measured reference height when
loaded, the vehicle may handle unpre-
dictably which could cause a loss of ve-
hicle control and cause serious per-
sonal injury or property damage.
Sway control device
Sudden maneuvers, wind gusts, and buf-
feting caused by other vehicles can affect
trailer handling. Sway control devices may
be used to help control these affects. If you
choose to use one, contact a reputable
trailer hitch supplier to make sure the sway
control device will work with the vehicle,
hitch, trailer and the trailer's brake system.
Follow the instructions provided by the
manufacturer for installing and using the
sway control device.
Class I hitch
Class I trailer hitch equipment (receiver, ball
mount and hitch ball) can be used to tow
trailers of a maximum weight of 2,000 lbs.
(907 kg).
Class II hitch
Class II trailer hitch equipment (receiver,
ball mount and hitch ball) can be used to
tow trailers of a maximum weight of 3,500
lbs. (1,587 kg).
Class III hitch
Class III trailer hitch equipment (receiver,
ball mount and hitch ball) can be used to
tow trailers of a maximum weight of 5,000
lbs. (2,268 kg).
Class IV hitch
Class IV hitches are weight carrying (WC)
and weight distributing (WD) hitches de-
pending on the vehicle and hitch specifica-
tions. Not all Class IV hitches are rated to be
both. See the specific hitch for that infor-
mation. Class IV trailer hitch equipment (re-
ceiver, ball mount and hitch ball) used as
weight carrying are rated up to 10,000 lbs.
(4,535 kg) gross trailer weight (GTW) with a
maximum trailer tongue weight (TW) of 1,000 lbs. (453 kg). Class IV hitches used for
weight distributing are rated up to 14,000
lbs. (6,350 kg) gross trailer weight (GTW)
with a maximum trailer tongue weight (TW)
of 1,400 lbs. (635 kg). A Class IV hitch usually
has a 2" square receiver opening. A higher
class drawbar does not increase the tow-
ing capacity of the hitch. To use this class of
hitch for weight distribution requires a
weight distribution system. Class IV hitches
attach to the vehicle frame only. A weight
distributing hitch should be used to tow
trailers that weigh over 5,000 lbs. (2,268 kg).
Your vehicle may be equipped with Class IV
weigh distributing trailer hitch that has a
14,000 lbs. (6,350 kg) maximum weight rat-
ing, but your vehicle is only capable of tow-
ing the maximum trailer weights shown in
the “Towing load/specification” chart in this
section.5th wheel/gooseneck
A 5th wheel or gooseneck trailer can be
towed by installing a 5th wheel or goose-
neck trailer hitch. These types of hitches
are mounted in the bed of the pick-up. A
professional trailer equipment supplier
Technical and consumer information10-41
Page 608 of 638

should install these hitches as it is very im-
portant to mount the hitch correctly to dis-
tribute the king pin weight for the proper
load carrying and sway control perfor-
mance.
The king pin weight should be 15% of the
fully loaded trailer. Make sure the king pin
weight does not cause the gross vehicle
weight to exceed the Gross Maximum
Weight Rating or the rear axle weight to
exceed the Rear Gross Axle Weight rating.
For additional information, see “Maximum
load limits” (P. 10-34).
The weight of the trailer should not exceed
the maximum towing capacity for the ve-
hicle. For additional information, see “Tow-
ing load/specification” chart (P. 10-37).
Make sure the trailer design allows for the
correct vehicle to trailer clearances before
purchasing a 5th wheel trailer.WARNING
• The hitch should not be attached to
or affect the operation of the impact-
absorbing bumper.
• Do not use axle-mounted hitches.
• Do not modif y the vehicle exhaust
system, brake system, etc. to install a
trailer hitch.
• To reduce the possibility of addi-
tional damage if your vehicle is
struck from the rear, where practical,
remove the receiver when not in use.
• Regularly check that all trailer hitch
mounting bolts are securely
mounted.
• When towing with the hitch ball
mounted to the rear bumper, do not
make sharp turns. The trailer may
contact the bumper and cause dam-
age to the bumper or trailer.
• When towing a 5th wheel trailer, do
not make sharp turns while driving or
backing. The trailer may contact the
vehicle and cause damage to both
the trailer and vehicle.
CAUTION
• A 5th wheel hitch adapter is neces-
sary to use an af termarket 5th wheel
hitch. A Genuine NISSAN 5th wheel
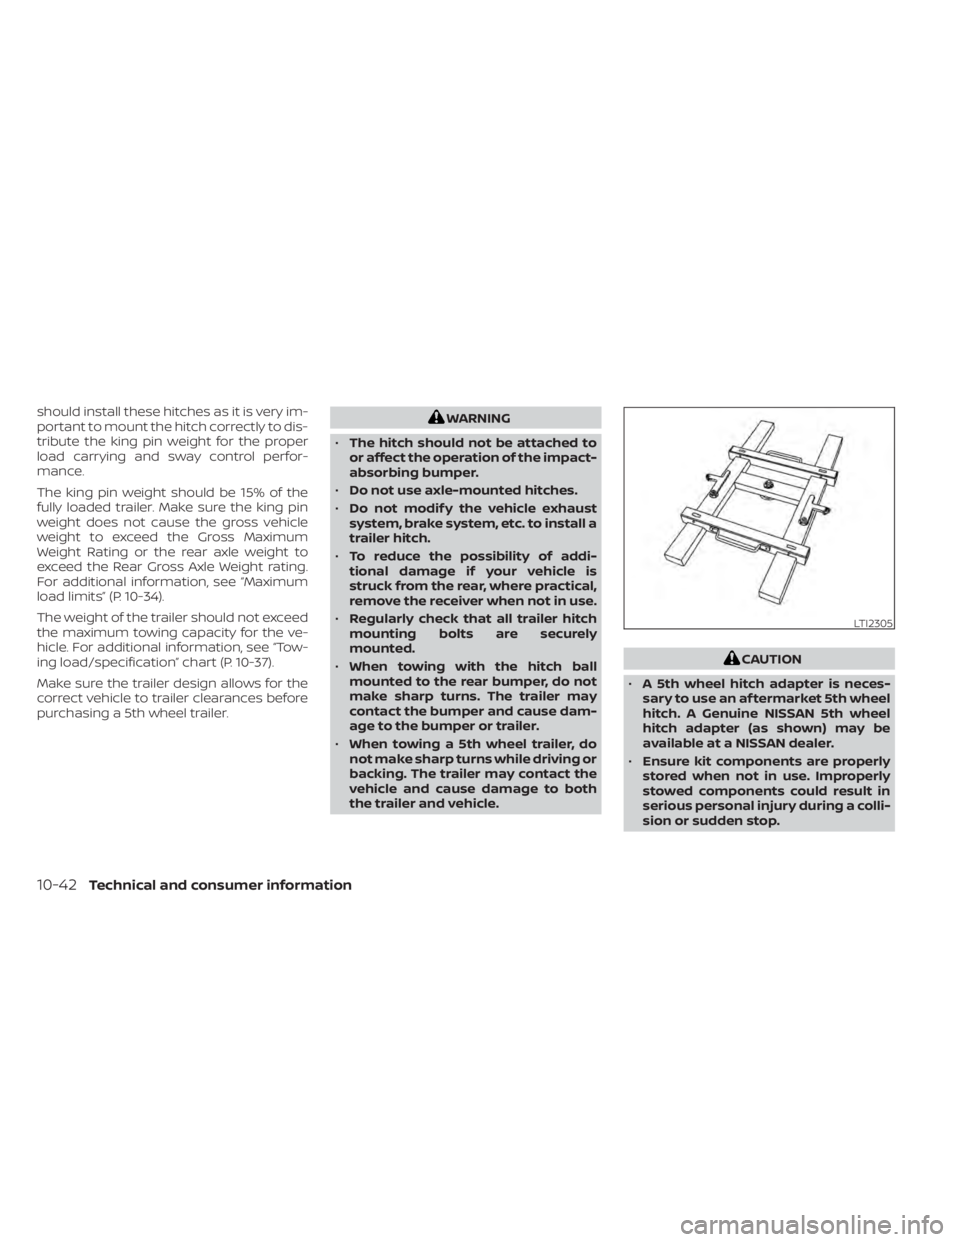
hitch adapter (as shown) may be
available at a NISSAN dealer.
• Ensure kit components are properly
stored when not in use. Improperly
stowed components could result in
serious personal injury during a colli-
sion or sudden stop.
LTI2305
10-42Technical and consumer information
Page 612 of 638

Trailer lights
CAUTION
When splicing into the vehicle electrical
system, a commercially available
power-type module/converter must
be used to provide power for all trailer
lighting. This unit uses the vehicle bat-
tery as a direct power source for all
trailer lights while using the vehicle tail
light, stop light and turn signal circuits
as a signal source. The module/
converter must draw no more than 15
milliamps from the stop and tail lamp
circuits. Using a module/converter that
exceeds these power requirements
may damage the vehicle's electrical
system. See a reputable trailer retailer
to obtain the proper equipment and to
have it installed.
Trailer lights should comply with federal
and/or local regulations. For assistance in
hooking up trailer lights, it is recommended
that you contact a NISSAN dealer or repu-
table trailer retailer. Vehicles equipped with
the optional trailer tow package are
equipped with a 7-pin trailer harness con-
nector. If your trailer is equipped with a flat
4-pin connector, an adapter will be needed
to connect the trailer lights to the vehicle. Adapters are available at auto parts stores
and hitch retailers.Trailer brakes (if so equipped)
If your trailer is equipped with a braking
system, make sure it conforms to federal
and/or local regulations and that it is prop-
erly installed.
Vehicles equipped with a 7–pin trailer har-
ness connector are pre-wired for a trailer
brake controller. It is recommended that
you visit a NISSAN dealer for a trailer brake
adapter harness.
When towing a trailer load of 3,500 lbs.
(1587 kg) or more, trailers with a brake
system MUST be used.
However, most
states require a separate braking system
on trailers with a loaded weight above a
specific amount. Make sure the trailer
meets the local regulations and the regu-
lations where you plan to tow.
WARNING
The Gross Combined Weight Rating
(GCWR) must never exceed the vehicle
manufacturers recommendation.
Several types of braking systems are avail-
able. Surge Brakes -
The surge brake actuator is
mounted on the trailer tongue with a hy-
draulic line running to each trailer wheel.
Surge brakes are activated by the trailer
pushing against the hitch ball when the
tow vehicle is braking. Hydraulic surge
brakes are common on rental trailers and
some boat trailers. In this type of system,
there is no hydraulic or electric connection
for brake operation between the tow ve-
hicle and the trailer.
CAUTION
Your factory trailer brake control unit
will not activate surge-style trailer
brakes
Electric Trailer Brakes - Electric braking
systems are activated by an electronic sig-
nal sent from a trailer brake controller (spe-
cial brake-sensing module). If electric trailer
brakes are used, see “Electric trailer brake
controller" (P. 10-49).
Have a professional supplier of towing
equipment make sure the trailer brakes are
properly installed and demonstrate proper
brake function testing.
10-46Technical and consumer information
Page 617 of 638

WARNING
Do not exceed Gross Combined Weight
Rating (GVWR). For additional informa-
tion about GVWR, see “Towing load/
specification” (P. 10-37).
Pre-towing tips
• Be certain your vehicle maintains a level position when a loaded and/or unloaded
trailer is hitched. Do not drive the vehicle if
it has an abnormal nose-up or nose-
down condition; check for improper
tongue load, overload, worn suspension
or other possible causes of either condi-
tion.
• Always secure items in the trailer to pre- vent load shif t while driving.
• Keep the cargo load as low as possible in the trailer to keep the trailer center of
gravity low.
• Load the trailer so approximately 60% of the trailer load is in the front half and 40%
is in the back half. Also make sure the load
is balanced side to side.
• Check your hitch, trailer tire pressure, ve- hicle tire pressure, trailer light operation,
and trailer wheel lug nuts every time you
attach a trailer to the vehicle.
LTI2156
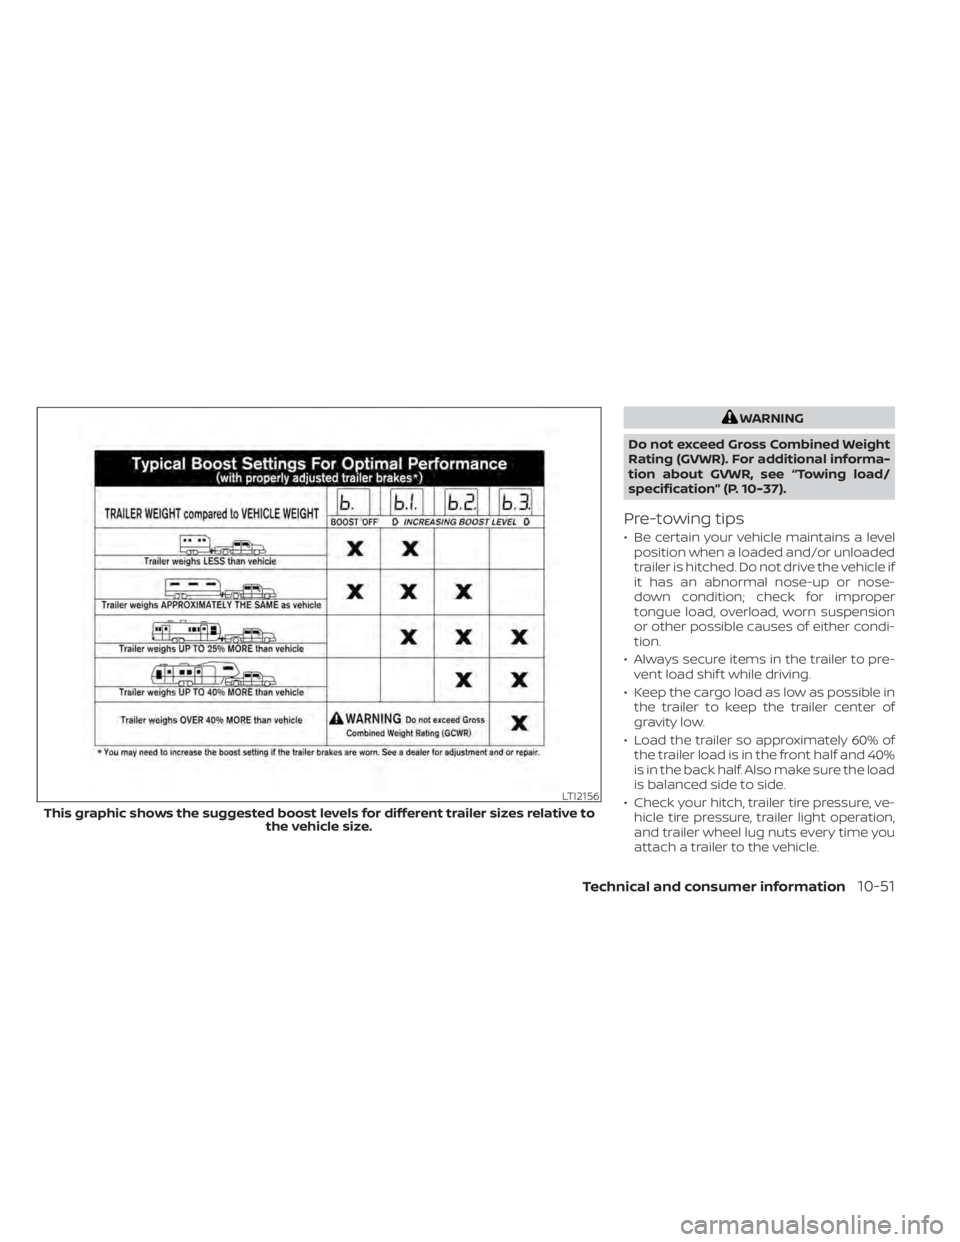
This graphic shows the suggested boost levels for different trailer sizes relative to the vehicle size.
Technical and consumer information10-51
Page 619 of 638

• While going downhill, the weight of thetrailer pushing on the tow vehicle may
decrease overall stability. Therefore, to
maintain adequate control, reduce your
speed and shif t to a lower gear. Avoid
long or repeated use of the brakes when
descending a hill, as this reduces their
effectiveness and could cause overheat-
ing. Shif ting to a lower gear instead pro-
vides “engine braking” and reduces the
need to brake as frequently.
• If the engine coolant temperature rises to a high temperature, see “If your vehicle
overheats” (P. 6-12).
• Trailer towing requires more fuel than normal circumstances.
• Avoid towing a trailer for your vehicle's first 500 miles (805 km).
•
For the first 500 miles (805 km) that you do
tow, do not drive over 50 mph (80 km/h).
• Have your vehicle serviced more of ten than at intervals specified. For additional
information, see the “Maintenance and
schedules” section of this manual.
• When making a turn, your trailer wheels will be closer to the inside of the turn than
your vehicle wheels. To compensate for
this, make a larger than normal turning
radius during the turn. • Crosswinds and rough roads will ad-
versely affect vehicle/trailer handling,
possibly causing vehicle sway. When be-
ing passed by larger vehicles, be pre-
pared for possible changes in crosswinds
that could affect vehicle handling.
Trailer Sway Assist :
To minimize trailer sway, your vehicle may
apply braking to individual wheels based
on input from your vehicle sensors and ve-
hicle speed. Trailer sway control is a func-
tion of the Vehicle Dynamic Control (VDC)
system and is active when the VDC func-
tion is enabled.
CAUTION
If the VDC-OFF switch is on (meaning
VDC system OFF), the Trailer Sway As-
sist is also disabled
When Trailer Sway Assist is in operation, the
VDC warning light blinks. When vehicle con-
trol is regained, VDC warning light will turn
OFF.
For additional information about the VDC
system, see “Vehicle Dynamic Control (VDC)
OFF switch” (P. 2-57) and “Vehicle Dynamic
Control (VDC) system” (P. 5-118). If Trailer Sway Assist activates, do the fol-
lowing:
1. Take your foot off the accelerator pedal
to allow the vehicle to coast and steer as
straight ahead as the road conditions
allow. This combination will help stabilize
the vehicle
CAUTION
Do not try to correct trailer sway by
steering or applying the brakes.
2. When the trailer sway stops, gently apply the brakes and pull to the side of the
road in a safe area.
3. Try to rearrange the trailer load so it is balanced. For additional information,
see “Pre-towing tips” (P. 10-51).
NOTE:
Trailer Sway Assist cannot reduce trailer
sway in all situations.
• Be careful when passing other vehicles.Passing while towing a trailer requires
considerably more distance than normal
passing. Remember, the length of the
trailer must also pass the other vehicle
before you can safely change lanes.
Technical and consumer information10-53
Page 628 of 638

Cargo light switch...............2-52Check tire pressure..........2-32, 2-34Child restraints.......1-25,1-26,1-28,1-30LATCH (Lower Anchors and Tethers for
CHildren) System..............1-30Precautions on child
restraints........1-34, 1-40, 1-45, 1-49Top tether strap anchor point
locations.................. .1-32Child safety rear door lock..........3-9Cleaning exterior and interior......7-2,7-4Climate control seat switch.........2-52Cold weather driving............5-127Console light..................2-88Controls
Heater and air conditioner controls. .4-38Heater and air conditioner controls
(manual)...................4-29CoolantCapacities and recommended
fuel/lubricants
...............10-2Changing engine coolant.........8-6Checking engine coolant level......8-6Engine coolant temperature gauge. . .2-8Corrosion protection..............7-7Cruise control.............5-49, 5-50Cup holders..................2-76Curtain side-impact and rollover air
bag........................1-78
D
Daytime Running Light System. . .2-49, 8-30
Digital video disc DVD............4-43Dimensions and weights..........10-11Dimmer switch for instrument panel. . .2-50DisplayInformation display............2-22Door locks................... .3-4Drive belt....................8-19Driving
Cold weather driving...........5-127Driving with automatic
transmission................5-18Precautions when starting and
driving................. .5-4, 5-10Driving the vehicle...............5-18Dual power moonroof............2-85
E
Eco Drive Report...............5-113Economy - fuel................5-105Electronic locking rear differential (E-Lock)
system.....................5-112Electronic locking rear differential (E-Lock)
system switch.................2-59Emergency engine shutoff.......5-15,6-2Emission control information label. . . .10-19Emission control system warranty. . . .10-57Engine
Before starting the engine........5-16Block heater................5-128Capacities and recommended
fuel/lubricants...............10-2Changing engine coolant.........8-6
Changing engine oil.............8-7Changing engine oil filter.........8-7Checking engine coolant level......8-6Checking engine oil level..........8-7Engine compartment check
locations.................. .8-3Engine coolant temperature gauge. . .2-8Engine cooling system...........8-5Engine oil...................8-7Engine oil and oil filter
recommendation.............10-7Engine oil pressure gauge........2-10Engine oil pressure warning light. . . .2-15Engine oil viscosity.............10-7Engine serial number..........10-18Engine specifications...........10-9Starting the engine............5-16Engine coolant temperature gauge. . . .2-8Engine oil pressure gauge..........2-10Event Data recorders............10-60Exhaust gas (Carbon monoxide)......5-4Explanation of maintenance items.....9-2Explanation of scheduled maintenance
items...................... .9-5Extended storage switch..........2-68Eyeglass case.................2-75
F
Flashers (See hazard warning flasher
switch)......................6-2Flat tire......................6-3Floor mat positioning aid...........7-6
11-2
Page 633 of 638

Headlight control switch.........2-43Hill descent control switch........2-58Instrument brightness control.....2-50Power door lock switch..........3-6Power inverter switch...........2-61Rear sonar system OFF switch.....2-61Tow mode switch.............2-62Turn signal switch.............2-50
T
Tachometer...................2-8Tailgate.................... .3-36Temperature gauge
Engine coolant temperature gauge. . .2-8Thef t (NISSAN Vehicle Immobilizer System),
engine start...............2-38, 5-16Three-way catalyst...............5-4Tie down hooks................3-40TireFlat tire................... .6-3Spare tire...............6-4, 8-46Tire and Loading Information label. .10-19Tire chains.................8-42Tire pressure................8-35Tire rotation.................8-43Tires of 4-wheel drive...........8-46Types of tires................8-41Uniform tire quality grading......10-56Wheel/tire size...............10-10Wheels and tires..........8-35, 10-10Tire pressure................. .8-35Low tire pressure warning light.....2-18
Tire Pressure Monitoring System
(TPMS)................... .5-5, 6-3Tow mode switch...............2-62Towing
2-wheel drive models...........6-15Flat towing................ .10-55Towing load/specification.......10-37Trailer towing...............10-33Towing a trailer................10-33Towing your vehicle..............6-13Traffic Sign Recognition (TSR)........5-24Trailer Brake Controller Unit (TBCU). . . .2-63Transceiver
HomeLink® Universal
Transceiver
......2-89, 2-90, 2-92, 2-93Transfer case shif ting procedures. . . .5-106TransmissionDriving with automatic
transmission
................5-18Travel (See registering a vehicle in another
country).................... .10-17Trip odometer..................2-7Truck - camper loading...........10-31Truck box....................3-36Turn signal switch...............2-50
U
Under seat storage bin.....2-70,2-74,2-75Uniform tire quality grading........10-56USB/iPod® Charging Ports.........4-42Using 4-wheel drive.............5-105
V
Vanity mirror..................3-30Variable voltage control system......8-19Vehicle dimensions and weights.....10-11Vehicle Dynamic Control (VDC) OFF
switch..................... .2-57Vehicle Dynamic Control (VDC)
system.....................5-118Vehicle identification.............10-17Vehicle identification number (VIN). . . .10-17Vehicle identification number (VIN)
(Chassis number)...............10-17Vehicle identification number (VIN)
plate...................... .10-17Vehicle immobilizer system.....2-38, 5-16Vehicle information display.........2-22Vehicle loading information........10-22Vehicle recovery.............6-15,6-16Vehicle security system...........2-37Vehicle security system
(NISSAN Vehicle Immobilizer System),
engine start
...............2-38, 5-16Vents......................4-28Visors......................3-30Voltmeter....................2-10
W
Warning
Air bag warning light........1-82, 2-16Anti-lock brake warning light......2-13Battery charge warning light......2-14
11-7