2021 NISSAN TITAN flat tire
[x] Cancel search: flat tirePage 529 of 638

to the fenders or underbody. If possible,
avoid fully loading your vehicle when using
tire chains. In addition, drive at a reduced
speed. Otherwise, your vehicle may be
damaged and/or vehicle handling and
performance may be adversely affected.
Tire chains must be installed only on the
rear wheels and not on the front wheels.
Do not use tire chains on dry roads. Driving
with chains in such conditions can cause
damage to the various mechanisms of the
vehicle due to some overstress.
Use only the 2WD range when driving on
clear paved roads.
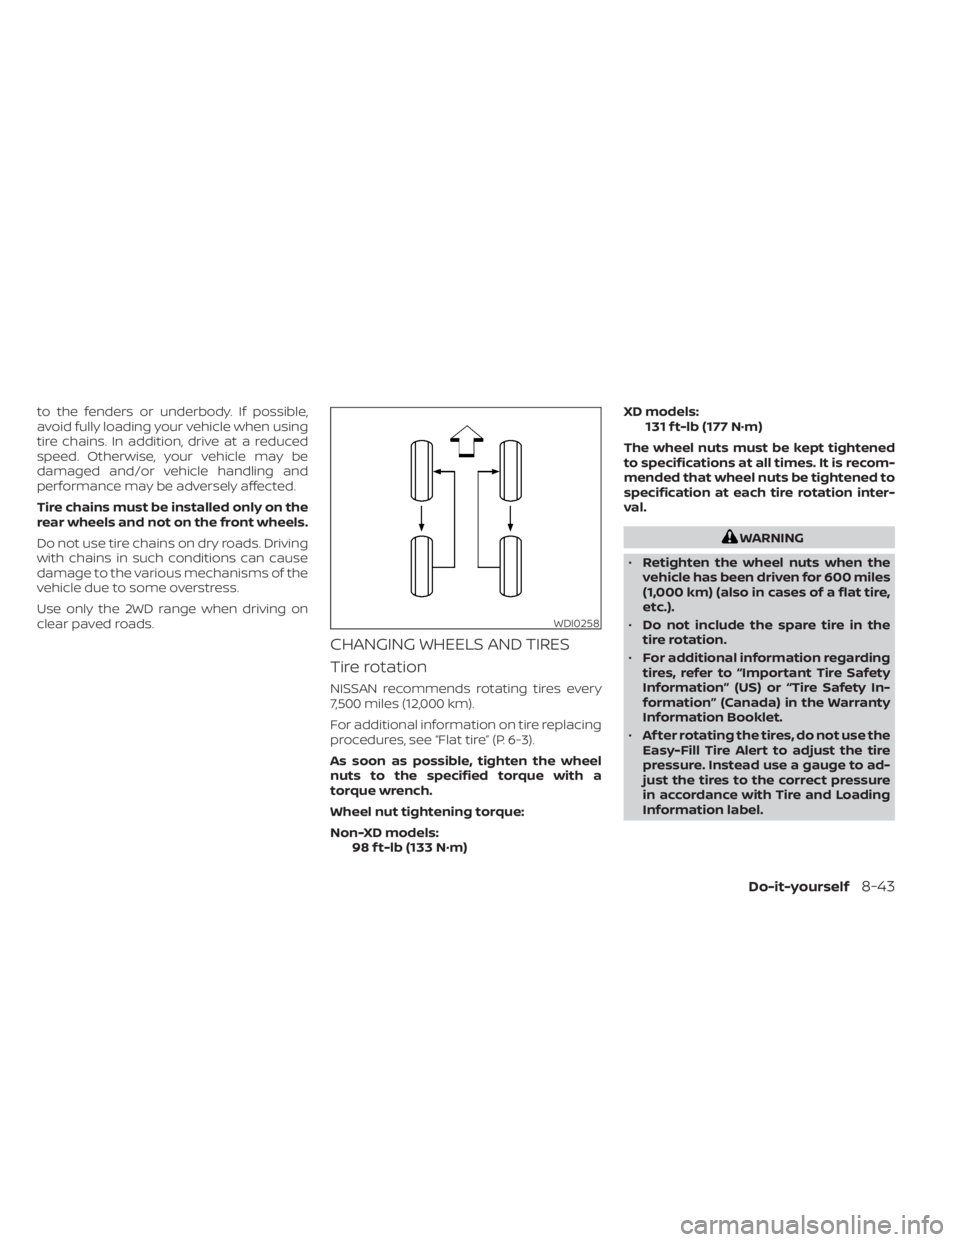
CHANGING WHEELS AND TIRES
Tire rotation
NISSAN recommends rotating tires every
7,500 miles (12,000 km).
For additional information on tire replacing
procedures, see “Flat tire” (P. 6-3).
As soon as possible, tighten the wheel
nuts to the specified torque with a
torque wrench.
Wheel nut tightening torque:
Non-XD models:98 f t-lb (133 N·m) XD models:
131 f t-lb (177 N·m)
The wheel nuts must be kept tightened
to specifications at all times. It is recom-
mended that wheel nuts be tightened to
specification at each tire rotation inter-
val.
WARNING
• Retighten the wheel nuts when the
vehicle has been driven for 600 miles
(1,000 km) (also in cases of a flat tire,
etc.).
• Do not include the spare tire in the
tire rotation.
• For additional information regarding
tires, refer to “Important Tire Safety
Information” (US) or “Tire Safety In-
formation” (Canada) in the Warranty
Information Booklet.
• Af ter rotating the tires, do not use the
Easy-Fill Tire Alert to adjust the tire
pressure. Instead use a gauge to ad-
just the tires to the correct pressure
in accordance with Tire and Loading
Information label.
WDI0258
Do-it-yourself8-43
Page 533 of 638

Your vehicle may be equipped with a full
size spare that is a different size or brand
than the tires originally installed on the ve-
hicle. This full size spare tire is intended for
temporary use only and should be re-
placed at the first opportunity.
Observe the following precautions if the
FULL SIZE TEMPORARY USE ONLY spare tire
must be used. Otherwise, your vehicle
could be damaged or involved in an acci-
dent:
WARNING
To help reduce the risk of a crash which
may result in personal injury or death:
• The TEMPORARY FULL SIZE spare tire
should be used for emergency use
only. It should be replaced with the
standard tire at the first opportunity
to avoid possible tire or differential
damage.
• Drive carefully while the TEMPORARY
FULL SIZE spare tire is installed. Avoid
sharp turns and abrupt braking while
driving. The vehicle driving perfor-
mance may be affected when driving
on wet or snow covered roads. •
When the TEMPORARY FULL SIZE
spare is installed, the following sys-
tems may not work correctly:
– Tire Pressure Monitoring System
(TPMS)
– Vehicle Dynamic Control (VDC)
System
• Periodically check the TEMPORARY
FULL SIZE spare tire inflation pres-
sure. Always keep the TEMPORARY
FULL SIZE inflated to the pressure
specification shown on the Tire and
Loading Information label.
• With the TEMPORARY FULL SIZE spare
tire installed do not drive the vehicle
at speeds faster than 50 mph (80
km/h).
• When driving on roads covered with
snow or ice, the TEMPORARY FULL
SIZE spare tire should be used on the
front wheels and the original tire
used on the rear wheels. Use tire
chains only on the drive wheels.
• Do not use the TEMPORARY FULL SIZE
spare tire on other vehicles.
• Do not use more than one TEMPO-
RARY FULL SIZE spare tire at the same
time. •
TEMPORARY FULL SIZE spare tire
Limitations (except for Pro 4X)
– 50mph MAX
– Towing allowed
• Customer can identif y TEMPORARY
FULL SIZE spare tire condition by
checking the Tire and loading infor-
mation label located on the B-pillar.
CAUTION
• Do not use tire chains on a TEMPO-
RARY FULL SIZE spare tire. Tire chains
will not fit properly and may cause
damage to the vehicle.
• Use of the TEMPORARY FULL SIZE
spare tire on a vehicle that has tires
larger than were originally equipped
can affect the 4WD system. This may
result in a circumference difference
between tires on front and rear axles
which can cause the 4WD system to
automatically place the vehicle in
2WD and flash the 4WD light. When
the TEMPORARY FULL SIZE spare tire
is replaces with a tire that matches all
other tires on the vehicle, and all tires
are properly inflated the 4WD system
will operate normally
Do-it-yourself8-47
Page 566 of 638

10 Technical and consumer information
Recommended fluids/lubricants and
capacities...................................... 10-2
Fuel recommendation ......................10-4
Engine oil and oil filter
recommendations .......................... 10-7
Air conditioner system refrigerant and
oil recommendations .......................10-8
Specifications .................................. 10-9
Engine ...................................... 10-9
Wheels and tires ............................ 10-9
Dimensions and weights ....................10-11
When traveling or registering in another
country ....................................... 10-17
Vehicle identification .......................... 10-17
Vehicle Identification Number (VIN)
plate ....................................... 10-17
Vehicle identification number
(chassis number) ........................... 10-17
Engine serial number ......................10-18
F.M.V.S.S./C.M.V.S.S. certification label ........10-18
Emission control information label .........10-19
Tire and Loading Information label .........10-19
Air conditioner specification label ..........10-20
Installing front license plate ...................10-21
Vehicle loading information ...................10-22Terms
...................................... 10-23
Vehicle load capacity ....................... 10-23
Securing the load .......................... 10-25
Utili-track® channel system
(if so equipped) ............................. 10-26
Rear assist step (if so equipped) ............10-30
Loading tips ................................ 10-31
Truck-camper loading information ............10-31
Crew cab models .......................... 10-31
King Cab® models .......................... 10-31
Special Body vehicles ......................10-31
Location for center of gravity ...............10-32
Vehicle load weight capacity ...............10-33
Measurement of weights ...................10-33
Towing a trailer ................................ 10-33
Maximum load limits ....................... 10-34
T
owing load/specification ..................10-37
Towing safety .............................. 10-39
Flat towing for 2-Wheel Drive (2WD)
vehicle (if so equipped) .....................10-55
Flat towing for 4-Wheel Drive (4WD)
vehicle (if so equipped) .....................10-55
Snowplow .................................... 10-56
Uniform tire quality grading ...................10-56
Emission control system warranty ............10-57
Page 591 of 638

5. Determine the combined weightof luggage and cargo being
loaded on the vehicle. That weight
may not safely exceed the avail-
able cargo and luggage load ca-
pacity calculated in step 4.
6. If your vehicle will be towing a trailer, load from your trailer will be
transferred to your vehicle. Con-
sult this manual to determine
how this reduces the available
cargo and luggage load capacity
of your vehicle.
Before driving a loaded vehicle, con-
firm that you do not exceed the
GVWR or the GAWR for your vehicle.
For additional information, see “Mea-
surement of weights” (P. 10-33).
Also check tires for proper inflation
pressures. For additional informa-
tion, see “Tire and Loading Informa-
tion label” (P. 8-37).
SECURING THE LOAD
For your convenience, tie down hooks are
placed at each corner of the truck box.
These may be used to help secure cargo
loaded into the truck box.
WARNING
• Properly secure all cargo with ropes
or straps to help prevent it from slid-
ing or shif ting. Do not place cargo
higher than the seatbacks. In a sud-
den stop or collision, unsecured
cargo could cause personal injury.
• Do not load your vehicle any heavier
than the GVWR or the maximum front
and rear GAWRs. If you do, parts of
your vehicle can break, tire damage
could occur, or it can change the way
your vehicle handles. This could re-
sult in loss of control and cause per-
sonal injury.
LTI2481
Technical and consumer information10-25
Page 599 of 638

The total cargo load should not exceed the
truck's cargo weight rating and the camp-
er's center of gravity should fall within the
truck's recommended center of gravity
zone when installed.
WARNING
Overloading or improper loading can
adversely affect vehicle handling, brak-
ing and performance and may lead to
accidents.
VEHICLE LOAD WEIGHT CAPACITY
The vehicle payload weight capacity
shown on the Tire and Loading Information
label indicates the maximum total weight
of passengers, optional equipment (air
conditioning, trailer hitch, etc.) and cargo
that your vehicle is designed to carry.
For additional information, see “Tire and
Loading Information label” (P. 8-37).
Before driving a loaded vehicle, confirm
that you do not exceed the GVWR or the
GAWR for your vehicle. For additional infor-
mation, see “Vehicle loading information”
(P. 10-22).
Also check tires for proper inflation pres-
sures. For additional information, see “Tire
and Loading Information label” (P. 8-37).
MEASUREMENT OF WEIGHTS
Secure loose items to prevent
weight shif ts that could affect the
balance of your vehicle. When the
truck camper is loaded, drive to a
scale and weigh on the front and on
the rear wheels separately to deter-
mine axle loads. Individual axle loads
should not exceed either of the
gross axle weight ratings (GAWR).
The total of the axle loads should not
exceed the gross vehicle weight rat-
ing (GVWR). These ratings are given
on the vehicle certification label that
is located on the lef t side of the ve-
hicle, normally the dash, hinge pillar,
door latch post, or door edge next to
the driver. If weight ratings are ex-
ceeded, move or remove items to
bring all weights below the ratings.
WARNING
Overloading or improper loading of a
trailer and its cargo can adversely af-
fect vehicle handling, braking and per-
formance and may lead to accidents.
CAUTION
• Do not tow a trailer or haul a heavy
load for the first 500 miles (805 km).
Your engine, axle or other parts could
be damaged.
• For the first 500 miles (805 km) that
you tow a trailer, do not drive over 50
mph (80 km/h) and do not make
starts at full throttle. This helps the
engine and other parts of your ve-
hicle wear in at the heavier load.
Your new vehicle was designed to be used
primarily to carry passengers and cargo.
Remember that towing a trailer places ad-
ditional loads on your vehicle's engine,
drive train, steering, braking and other sys-
tems.
TOWING A TRAILER
Technical and consumer information10-33
Page 611 of 638

8. Rotate the safety chain anchor attach-ments 90° until the center of the anchor
seats into place.NOTE:
Removal of the gooseneck hitch ball and
safety chain anchor attachments are in
the reverse order of installation. To re-
move safety chain anchor attachment,
lif t the center
O1, rotate 90°, and lif t
safety chain anchor attachment away.
Tire pressures
• When towing a trailer, inflate the
vehicle tires to the recommended
cold tire pressure indicated on the
Tire and Loading Information label.
• Trailer tire condition, size, load rat- ing and proper inflation pressure
should be in accordance with the
trailer and tire manufacturer's
specifications.
Safety chains
Always use suitable safety chains between
your vehicle and the trailer. The safety
chains should be crossed and should be
attached to the hitch, not to the vehicle
bumper or axle. The safety chains can be
attached to the bumper if the hitch ball is
mounted to the bumper. Be sure to leave
enough slack in the chains to permit turn-
ing corners.
LTI2212LTI2192
Technical and consumer information10-45
Page 623 of 638

Traction AA, A, B and C
The traction grades, from highest to low-
est, are AA, A, B, and C. Those grades repre-
sent the tire's ability to stop on wet pave-
ment as measured under controlled
conditions on specified government test
surfaces of asphalt and concrete. A tire
marked C may have poor traction perfor-
mance.
WARNING
The traction grade assigned to this tire
is based on straight-ahead braking
traction tests, and does not include ac-
celeration, cornering, hydroplaning, or
peak traction characteristics.
Temperature A, B and C
The temperature grades are A (the high-
est), B, and C, representing the tire’s resis-
tance to the generation of heat, and its
ability to dissipate heat when tested under
controlled conditions on a specified indoor
laboratory test wheel. Sustained high tem-
perature can cause the material of the tire
to degenerate and reduce tire life, and ex-
cessive temperature can lead to sudden
tire failure. The grade C corresponds to a
level of performance which all passenger
car tires must meet under the Federal Mo- tor Vehicle Safety Standard No. 109. Grades
B and A represent higher levels of perfor-
mance on the laboratory test wheel than
the minimum required by law.
WARNING
The temperature grade for this tire is
established for a tire that is properly
inflated and not overloaded. Excessive
speed, under-inflation, or excessive
loading, either separately or in combi-
nation, can cause heat build-up and
possible tire failure. Your NISSAN vehicle is covered by the fol-
lowing emission warranties:
For USA
1. Emission Defects Warranty
2. Emissions Performance Warranty
Details of this warranty may be found with
other vehicle warranties in your Warranty
Information Booklet which comes with
your NISSAN vehicle. If you did not receive a
Warranty Information Booklet, or it is lost,
you may obtain a replacement by writing
to:
• Nissan North America, Inc.
Consumer Affairs Department
P.O. Box 685003
Franklin, TN 37068-5003
For Canada
Emission Control System Warranty
Details of this warranty may be found with
other vehicle warranties in your Warranty
Information Booklet which comes with
your NISSAN vehicle. If you did not receive a
Warranty Information Booklet, or it is lost,
you may obtain a replacement by writing
to:
• Nissan Canada Inc. 5290 Orbitor Drive
Mississauga, Ontario, L4W 4Z5
EMISSION CONTROL SYSTEM
WARRANTY
Technical and consumer information10-57
Page 628 of 638

Cargo light switch...............2-52Check tire pressure..........2-32, 2-34Child restraints.......1-25,1-26,1-28,1-30LATCH (Lower Anchors and Tethers for
CHildren) System..............1-30Precautions on child
restraints........1-34, 1-40, 1-45, 1-49Top tether strap anchor point
locations.................. .1-32Child safety rear door lock..........3-9Cleaning exterior and interior......7-2,7-4Climate control seat switch.........2-52Cold weather driving............5-127Console light..................2-88Controls
Heater and air conditioner controls. .4-38Heater and air conditioner controls
(manual)...................4-29CoolantCapacities and recommended
fuel/lubricants
...............10-2Changing engine coolant.........8-6Checking engine coolant level......8-6Engine coolant temperature gauge. . .2-8Corrosion protection..............7-7Cruise control.............5-49, 5-50Cup holders..................2-76Curtain side-impact and rollover air
bag........................1-78
D
Daytime Running Light System. . .2-49, 8-30
Digital video disc DVD............4-43Dimensions and weights..........10-11Dimmer switch for instrument panel. . .2-50DisplayInformation display............2-22Door locks................... .3-4Drive belt....................8-19Driving
Cold weather driving...........5-127Driving with automatic
transmission................5-18Precautions when starting and
driving................. .5-4, 5-10Driving the vehicle...............5-18Dual power moonroof............2-85
E
Eco Drive Report...............5-113Economy - fuel................5-105Electronic locking rear differential (E-Lock)
system.....................5-112Electronic locking rear differential (E-Lock)
system switch.................2-59Emergency engine shutoff.......5-15,6-2Emission control information label. . . .10-19Emission control system warranty. . . .10-57Engine
Before starting the engine........5-16Block heater................5-128Capacities and recommended
fuel/lubricants...............10-2Changing engine coolant.........8-6
Changing engine oil.............8-7Changing engine oil filter.........8-7Checking engine coolant level......8-6Checking engine oil level..........8-7Engine compartment check
locations.................. .8-3Engine coolant temperature gauge. . .2-8Engine cooling system...........8-5Engine oil...................8-7Engine oil and oil filter
recommendation.............10-7Engine oil pressure gauge........2-10Engine oil pressure warning light. . . .2-15Engine oil viscosity.............10-7Engine serial number..........10-18Engine specifications...........10-9Starting the engine............5-16Engine coolant temperature gauge. . . .2-8Engine oil pressure gauge..........2-10Event Data recorders............10-60Exhaust gas (Carbon monoxide)......5-4Explanation of maintenance items.....9-2Explanation of scheduled maintenance
items...................... .9-5Extended storage switch..........2-68Eyeglass case.................2-75
F
Flashers (See hazard warning flasher
switch)......................6-2Flat tire......................6-3Floor mat positioning aid...........7-6
11-2