2021 NISSAN TITAN remote control
[x] Cancel search: remote controlPage 283 of 638

2. Turn the temperature dial to the lef t orright to set the desired temperature.
• To quickly remove ice from the outside of the windows, press the
fan speed
control button to the maximum position.
• As soon as possible af ter the windshield is clean, press the AUTO button to return
to the auto mode.
• When the
control is activated, the air
conditioner will automatically be turned
on at outside temperatures above 36°F
(2°C). This dehumidifies the air which
helps defog the windshield. Under this
condition, the indicator light on the A/C
button indicator will not turn on if the user
had selected A/C off prior to entering this
mode. Turning off the air condition via the
A/C button is not allowed in this mode. If
the A/C button indicator was on when
entering this mode, and the A/C button is
selected in this mode, the A/C compres-
sor will still be automatically enabled. The
air recirculation mode automatically
turns off, allowing outside air to be drawn
into the passenger compartment to
further improve the defogging perfor-
mance.
Remote Engine Start with
Intelligent Climate Control (if so
equipped)
Vehicles equipped with automatic climate
controls and Remote Engine Start function
may go into automatic heating or cooling
mode when Remote Engine Start is acti-
vated depending on outside and cabin
temperatures. During this period, the cli-
mate control display and buttons will be
inoperable until the ignition switch is
turned on. In Remote Engine Start defrost-
ing mode, the rear window defroster,
heated seat (if so equipped) and heated
steering wheel (if so equipped) may be ac-
tivated automatically.
Voice Recognition logic (if so
equipped)
When the climate control system is on, the
front and rear (if so equipped) fan speeds
may be automatically lowered so that
commands are more easily recognized.
Fan speed can be adjusted using the fan
speed
decrease andincrease
buttons, if desired.
MANUAL OPERATION
Fan speed control
Press thefan speed control buttons
to manually control the fan speed.
Press the AUTO button to return to auto-
matic control of the fan speed.
When adjusting the manual fan from auto
mode, the outlet direction (floor, floor/
defrost, vent, bi-level) will still automatically
change. To fix the outlet to a manual mode,
select the desired air flow location using
the MODE button.
Temperature control dial
The temperature control dial allows you to
adjust the temperature of the outlet air. To
lower the temperature, turn the dial to the
lef t. To increase the temperature, turn the
dial to the right. Temperature can be ad-
justed on the driver’s and passenger’s side.
Air recirculation
Press theair recirculation button to
recirculate interior air inside the vehicle when:
• driving on a dusty road
• to prevent traffic fumes from entering passenger compartment.
Monitor, climate, audio, phone and voice recognition systems4-39
Page 287 of 638

The antenna cannot be shortened, but can
be removed. When you need to remove the
antenna, turn the antenna rod counter-
clockwise.
To install the antenna rod, turn the antenna
rod clockwise and hand tighten.
CAUTION
• Always properly tighten the antenna
rod during installation or the an-
tenna rod may break during vehicle
operation.
• Be sure that the antenna is removed
before the vehicle enters an auto-
matic car wash.
WARNING
• It is unlawful in most jurisdictions for
a person to drive a motor vehicle
which is equipped with a television
monitor or screen that is visible, di-
rectly or indirectly, to the driver while
operating the vehicle. In the interest
of safety, the unit should never be
installed where it will be directly or
indirectly visible, by the operator of
the motor vehicle.
• If your vehicle is equipped with a
wireless rear seat audio system or
any other wireless infrared device,
make sure it is powered off when op-
erating the RSI system. If both sys-
tems are powered on at the same
time, the two systems may obstruct
each other, possibly creating unde-
sirable audio interference through
the wireless headphones.
• For safety reasons when changing
discs, it is recommended that the ve-
hicle is not in motion, and that you do
not allow children to unfasten safety
belts to change discs or make any
adjustments to the system. System
adjustments can be accomplished
using the remote control, while
safety belts remain fastened. •
Enjoy your RSI system but remember
that safety of all passengers remains
the number one priority. Devices in-
stalled in the USB, HDMI, or head-
phone jack may protrude and create
a potential eye impact hazard for un-
belted passengers during a vehicle
accident. To reduce the risk of injury,
use only SD cards (hidden on lef t side
of driver side monitor) or low-profile
USB storage devices.
CAUTION
• Do not touch the inner pins of the
jacks on the front panel. Electrostatic
discharge may cause permanent
damage to the device.
• The LCD display screen is not touch-
screen. Do not put pressure or add
suction cups on the screen.
• Caution children to avoid touching or
scratching the screen, as it may be-
come dirty or damaged.
ANTENNA REAR SEAT INFOTAINMENT (RSI) (if
so equipped)
Monitor, climate, audio, phone and voice recognition systems4-43
Page 288 of 638

•Be sure to run the vehicle engine
while using the system. Using this
system without running the engine
can result in battery drain. To avoid
the risk of battery drain, please re-
member to turn off the system when
the vehicle is not in use.
WELCOME
Thank you for purchasing this advanced
Rear Seat Infotainment (RSI) system with
built-in Wi-Fi and DVD player. Before oper-
ating this system, read this section thor-
oughly and retain it for future reference.
System features
• Twin 8-inch Color TFT-LCD Panels with 1024x600 Resolution
• Top-load DVD Player (Driver Side Only)
• Internal Wi-Fi Network
• Bluetooth® 4.1 Audio Streaming
• Miracast®/Smart View Capability
• SmartStream Content Sharing
• USB 2.0 Port, SDXC Card Input
• HDMI 1.4 Input with MHL 2.0 Support
• Exclusive Slingplayer® Application
• 3.5mm Stereo Headphone Output
• Front Panel Capacitive Touch Controls • Infrared Wireless Headphones
• Full-Function Slimline Remote Control
• Monitor Screen SharingGETTING STARTED
Turning the monitor on or off
1. Press thebutton on the top of the
monitor or the remote control to turn
the monitor on or off. When in use, the
front panel controls will illuminate.
2. Af ter the monitor has been turned on and is displaying a picture, the up/down
viewing angle can be adjusted to opti-
mize the picture quality. Press the push-
button latch located on the top of the
monitor to pivot the screen.
LHA4871
4-44Monitor, climate, audio, phone and voice recognition systems
Page 289 of 638

Power up tips
1. Af ter the ignition is turned on, there is a12 second delay before the monitor
(power) button is operable.
2. On some vehicles af ter the ignition is turned off, the system will continue to
work for 10 minutes, or until the driver's
door is opened.
3. Remember to turn the monitor off and pivot the screen to the locked (latched)
position when not in use.
Audio options
Wireless headphones
Each monitor includes a built-in dual chan-
nel infrared transmitter for use with wire-
less headphones. The wireless head-
phones must be used within a line of sight
from the transmitter as infrared signals, like
visible light, travel only in a straight line. How to use the wireless headphones
When placing the headphones on your
head, make sure to observe the lef t and
right orientation. The headphones must be
oriented correctly (facing forward) to re-
ceive the audio signal. Press the
(power) button on the headphones,
then select channel “A” to listen to monitor
A, or channel “B” to listen to monitor B.
Adjust the audio level using the volume
control on each headphone.
Wired headphones
There is a 3.5mm stereo headphone out-
put on each monitor which can be used
with most standard stereo headphones
(wired headphones sold separately).
Bluetooth® streaming audio
To listen to audio throughout the entire ve-
hicle, the system includes the ability to
stream audio over a Bluetooth® connec-
tion to the vehicle’s stereo system. When monitor A is selected as the source
to stream from, the audio output to the
wireless and wired headphones will be dis-
abled (only on monitor A). To use the wire-
less or wired headphones with monitor A,
you must turn off the Bluetooth® stream-
ing feature. To enable/disable Bluetooth®
streaming, navigate to the “SETTINGS”
menu, or press
on the remote control
during content playback. For additional in-
formation, see “Settings” (P. 4-73).
Monitor, climate, audio, phone and voice recognition systems4-45
Page 295 of 638

REMOTE CONTROL OPERATION
Before use
Before attempting to operate your remote
control, turn the remote control face down
and remove the battery insulator by pulling
the clear plastic tab away from the remote
control.
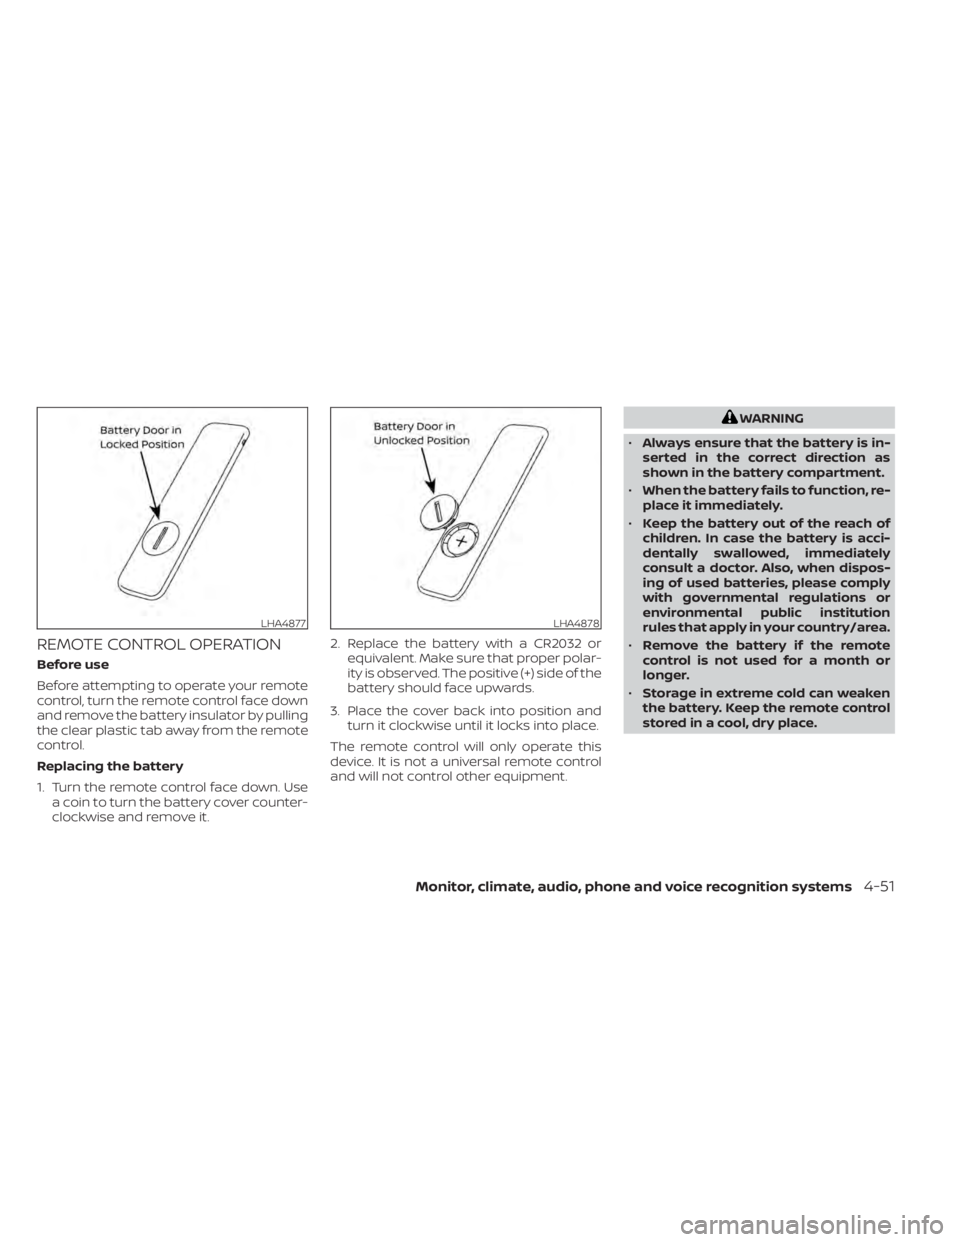
Replacing the battery
1. Turn the remote control face down. Usea coin to turn the battery cover counter-
clockwise and remove it. 2. Replace the battery with a CR2032 or
equivalent. Make sure that proper polar-
ity is observed. The positive (+) side of the
battery should face upwards.
3. Place the cover back into position and turn it clockwise until it locks into place.
The remote control will only operate this
device. It is not a universal remote control
and will not control other equipment.
WARNING
• Always ensure that the battery is in-
serted in the correct direction as
shown in the battery compartment.
• When the battery fails to function, re-
place it immediately.
• Keep the battery out of the reach of
children. In case the battery is acci-
dentally swallowed, immediately
consult a doctor. Also, when dispos-
ing of used batteries, please comply
with governmental regulations or
environmental public institution
rules that apply in your country/area.
• Remove the battery if the remote
control is not used for a month or
longer.
• Storage in extreme cold can weaken
the battery. Keep the remote control
stored in a cool, dry place.
LHA4877LHA4878
Monitor, climate, audio, phone and voice recognition systems4-51
Page 296 of 638

REMOTE CONTROL BUTTONS
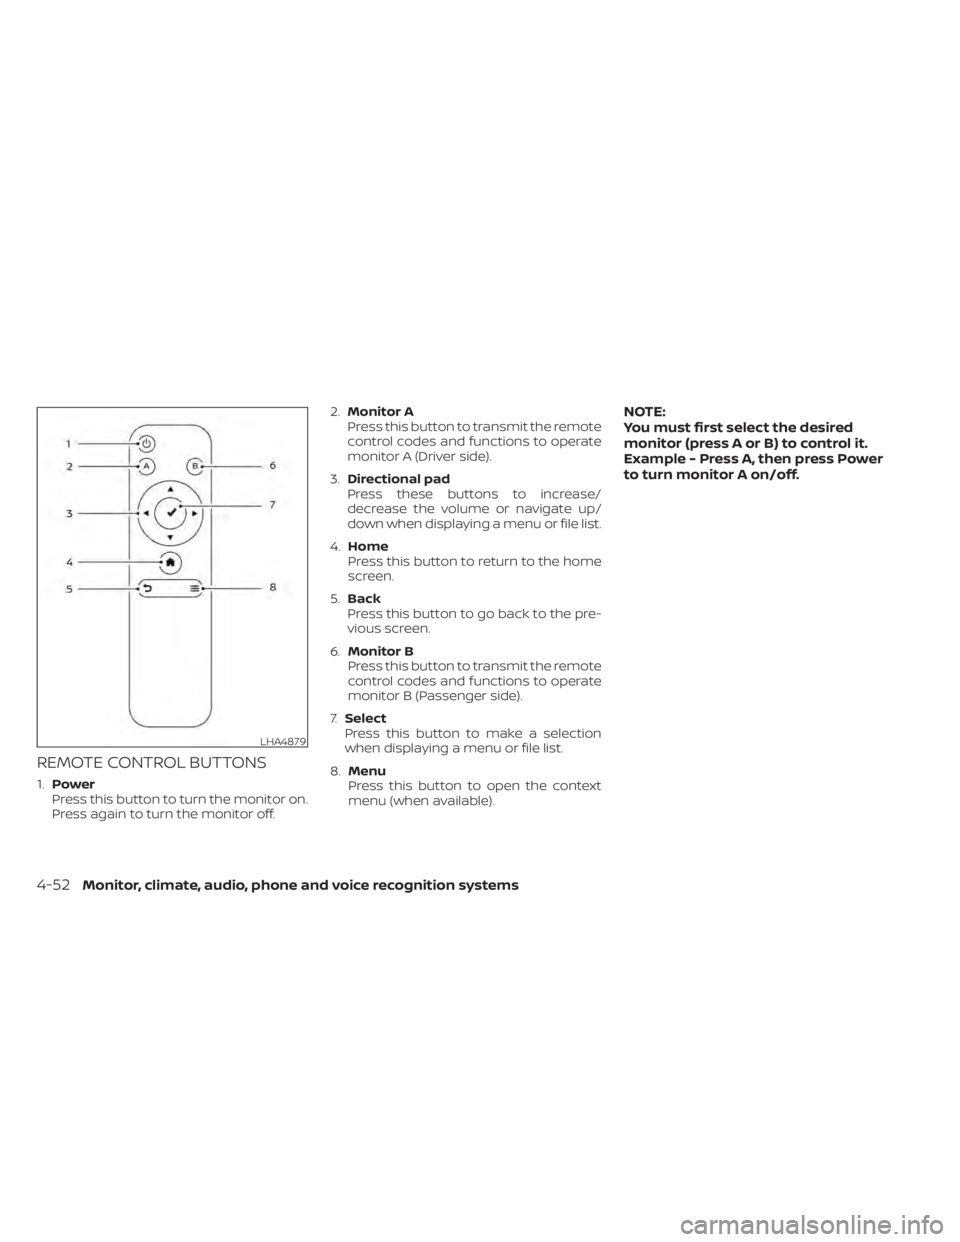
1.Power
Press this button to turn the monitor on.
Press again to turn the monitor off. 2.
Monitor A
Press this button to transmit the remote
control codes and functions to operate
monitor A (Driver side).
3. Directional pad
Press these buttons to increase/
decrease the volume or navigate up/
down when displaying a menu or file list.
4. Home
Press this button to return to the home
screen.
5. Back
Press this button to go back to the pre-
vious screen.
6. Monitor B
Press this button to transmit the remote
control codes and functions to operate
monitor B (Passenger side).
7. Select
Press this button to make a selection
when displaying a menu or file list.
8. Menu
Press this button to open the context
menu (when available).
NOTE:
You must first select the desired
monitor (press A or B) to control it.
Example - Press A, then press Power
to turn monitor A on/off.
LHA4879
4-52Monitor, climate, audio, phone and voice recognition systems
Page 298 of 638

CAUTION
•
Always ensure that the batteries are
inserted with the positive and nega-
tive terminals in the correct direction
as shown in the battery compartment.
• Different types of batteries have dif-
ferent characteristics. Do not mix dif-
ferent types.
• Do not mix old and new batteries.
Mixing old and new batteries will
shorten battery life and/or cause
chemical leaks from the old
batteries.
• When batteries fail to function, re-
place them immediately.
• Keep the batteries out of the reach of
children. In case the batteries are ac-
cidentally swallowed, immediately
consult a doctor. Also, when dispos-
ing of used batteries, please comply
with governmental regulations or
environmental public institution
rules that apply in your country/area.
• Remove the batteries if the head-
phones are not used for a month or
longer.
GENERAL OPERATION
Navigating menus
When fully powered on, the Home screen
can be accessed at any time by pressing
the
button on the remote control, or
thebutton on the monitor.
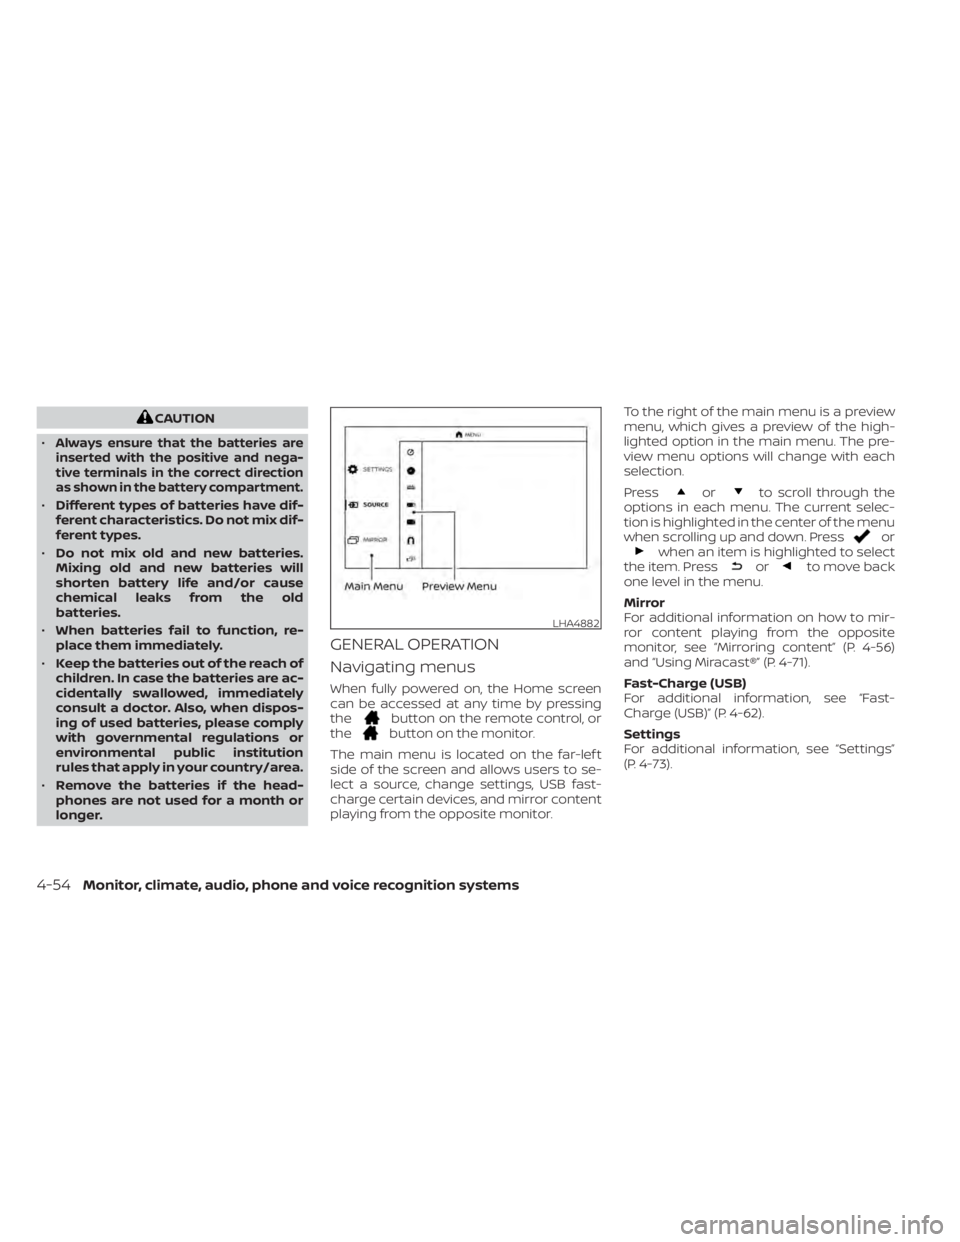
The main menu is located on the far-lef t
side of the screen and allows users to se-
lect a source, change settings, USB fast-
charge certain devices, and mirror content
playing from the opposite monitor. To the right of the main menu is a preview
menu, which gives a preview of the high-
lighted option in the main menu. The pre-
view menu options will change with each
selection.
Press
orto scroll through the
options in each menu. The current selec-
tion is highlighted in the center of the menu
when scrolling up and down. Press
orwhen an item is highlighted to select
the item. Pressorto move back
one level in the menu.
Mirror
For additional information on how to mir-
ror content playing from the opposite
monitor, see “Mirroring content” (P. 4-56)
and “Using Miracast®” (P. 4-71).
Fast-Charge (USB)
For additional information, see “Fast-
Charge (USB)” (P. 4-62).
Settings
For additional information, see “Settings”
(P. 4-73).
LHA4882
4-54Monitor, climate, audio, phone and voice recognition systems
Page 300 of 638

NOTE:
For hearing protection, there is a
maximum volume setting to limit the
audio output of the front panel 3.5mm
headphone output. Using the direc-
tional pad on the remote navigate to
“SETTINGS” then “AUDIO” then “HEAD-
PHONES” to adjust the maximum vol-
ume. Once set, the maximum volume
is limited to this setting.
Playing a disc
Insert a disc into the top slot of monitor A
with the label facing the rear of the vehicle.
If the disc is supported and there is no
content already playing, the disc will auto-
matically begin playing.
When a disc is inserted, playback will auto-
matically begin on both monitors A and B
(if there is no content already playing). If a
disc was previously inserted, using the
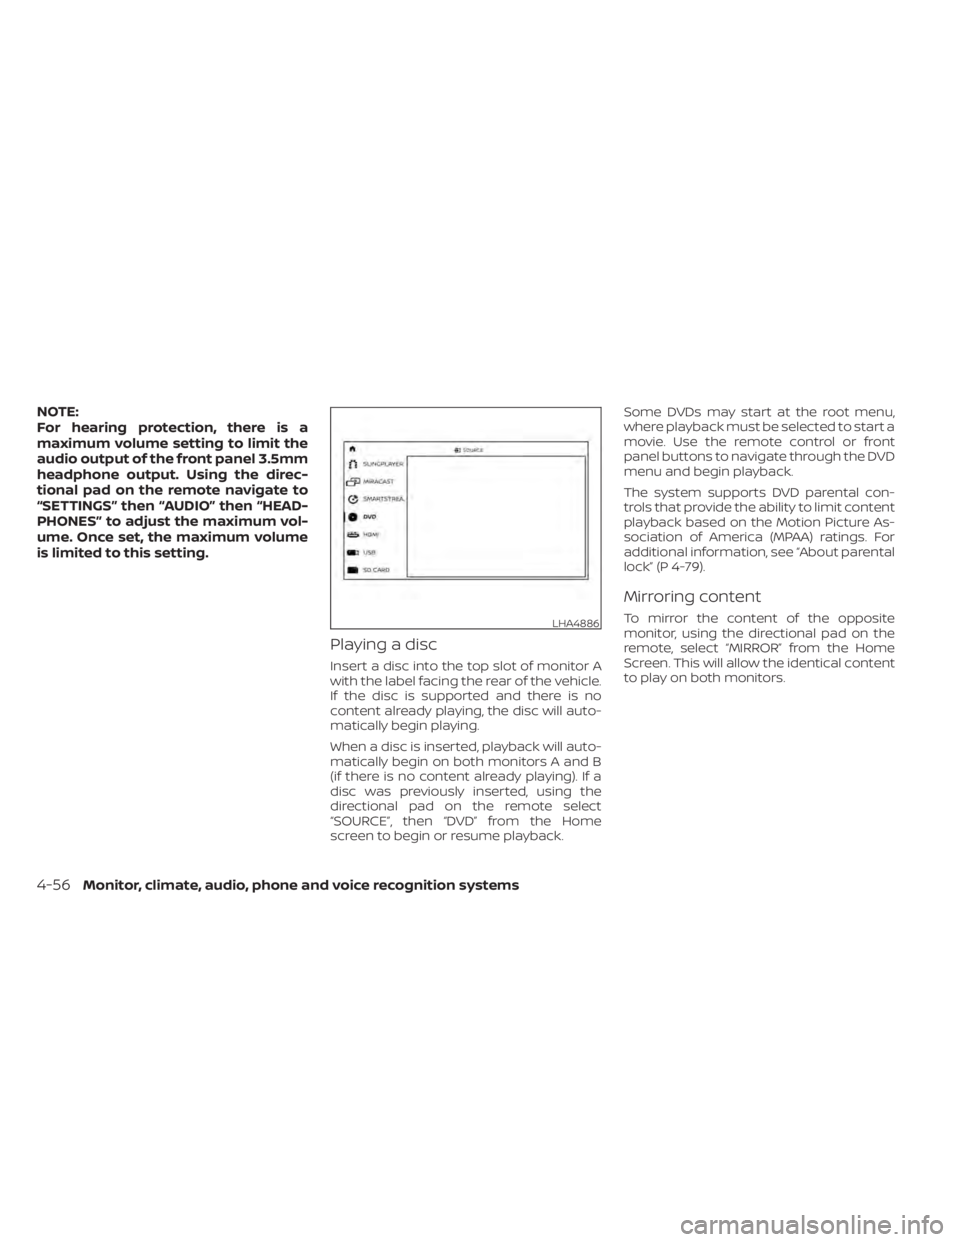
directional pad on the remote select
“SOURCE”, then “DVD” from the Home
screen to begin or resume playback.Some DVDs may start at the root menu,
where playback must be selected to start a
movie. Use the remote control or front
panel buttons to navigate through the DVD
menu and begin playback.
The system supports DVD parental con-
trols that provide the ability to limit content
playback based on the Motion Picture As-
sociation of America (MPAA) ratings. For
additional information, see “About parental
lock” (P 4-79).
Mirroring content
To mirror the content of the opposite
monitor, using the directional pad on the
remote, select “MIRROR” from the Home
Screen. This will allow the identical content
to play on both monitors.LHA4886
4-56Monitor, climate, audio, phone and voice recognition systems