2021 NISSAN TITAN fuel
[x] Cancel search: fuelPage 138 of 638

Loose Fuel Cap
This warning appears when the fuel-filler
cap is not tightened correctly af ter the ve-
hicle has been refueled. For additional in-
formation, see “Fuel-filler door” (P. 3-25).
Low Fuel
This warning appears when the fuel level in
the fuel tank is getting low. Refuel as soon
as it is convenient, preferably before the
fuel gauge reaches 0 (Empty).There will be
a small reserve of fuel in the tank when
the fuel gauge needle reaches 0 (Empty).
Low Tire Pressure Error —
Info
This warning appears when the low tire
pressure warning light in the meter illumi-
nates and low tire pressure is detected.
Press the ENTER button for information
about the low tire pressure. For additional
information, see “Low tire pressure warning
light” (P. 2-18) and “Tire Pressure Monitoring
System (TPMS)” (P. 5-5).
Low Washer Fluid
This warning appears when the
windshield-washer fluid is at a low level.
Add windshield-washer fluid as necessary.
For additional information, see
“Windshield-washer fluid” (P. 8-15).
Maintenance indicators
When engine oil service is due, one or more
of these icons will appear automatically to
remind you. For additional information, see
“Engine oil” (P. 8-7).
These will also appear when the user-set
reminders are met. For additional informa-
tion, see “Vehicle information display”
(P. 2-22).
Power turned off to save the battery
This warning appears af ter the ignition
switch is automatically turned off to save
the battery.
Power will turn off to save the battery
This message appears in the vehicle infor-
mation display af ter a period of time if the
ignition switch is in the ACC or the ON po-
sition and if the vehicle is in P (Park). For
additional information, see “Push-button
ignition switch positions” (P. 5-14).
Push brake and start
button to drive
This indicator appears when the shif t lever
is in the P (Park) position.
This indicator means that the engine will
start by pushing the ignition switch with
the brake pedal depressed. You can start
the engine from any position of the ignition
switch.
Push Ignition to OFF
Af ter the Push ignition to OFF warning ap-
pears, the warning will appear if the ignition
switch is placed in the ACC position when
the shif t lever is moved to the P (Park) po-
sition.
To turn off the Push warning, place the ig-
nition switch in the ON position and then in
the LOCK position.
Range XX miles
This warning appears to indicate the ap-
proximate distance remaining before the
fuel reaches 0 (Empty).
2-32Instruments and controls
Page 168 of 638

If the indicator light flashes when the Front
and rear sonar system, MOD, RAB, or RCTA
systems are not turned off, it may indicate
a malfunction in one or more of these sys-
tems (if so equipped).
The Front and rear sonar system, MOD,
RAB, or RCTA systems will be turned on
automatically under the following condi-
tions:
• When the ignition switch is switched fromthe OFF position to the ON position.
• When the shif t lever is shif ted into the R (Reverse) position.
The automatic turning on function can be
turned on and off for these systems in the
vehicle information display. For additional
information, see “Settings” (P. 2-23).
For additional information, see “Front and
rear sonar system” (P. 5-122), ”Rear Auto-
matic Braking (RAB)” (P. 5-75), “Rear Cross
Traffic Alert (RCTA)” (P. 5-41), or “Moving Ob-
ject Detection (MOD)” (P. 4-23). Tow mode should be used when pulling a
heavy trailer or hauling a heavy load. Driv-
ing the vehicle in the tow mode with no
trailer/load or light trailer/light load will
not cause any damage. However, fuel
economy may be reduced, and the
transmission/engine driving characteris-
tics may feel unusual.
Push the tow mode switch to activate tow
mode. The TOW indicator light illuminates
when tow mode is selected. Push the tow
mode switch again to turn tow mode off.Tow mode is automatically canceled when
the ignition switch is placed in the OFF po-
sition.
For additional information, see “Tow mode”
(P. 10-54).
LIC3381
TOW MODE SWITCH
2-62Instruments and controls
Page 201 of 638

3 Pre-driving checks and adjustments
Keys.............................................3-2NISSAN Intelligent Key® .......................3-2
NISSAN Vehicle Immobilizer System
keys..........................................3-4
Doors ...........................................3-4
Locking with key .............................3-5
Locking with inside lock knob ................3-6
Locking with power door lock switch .........3-6
Rear doors (King Cab® models) ............... 3-7
Automatic door locks (if so equipped) ........3-8
Child safety rear door lock
(if so equipped) ...............................3-9
NISSAN Intelligent Key® system ..................3-9
Operating range ............................. 3-11
Door locks/unlocks precaution ...............3-11
NISSAN Intelligent Key® Operation ...........3-12
How to use the remote keyless entry
function ..................................... 3-15
Warning signals ............................. 3-19
Troubleshooting guide ......................3-20
Remote Engine Start (if so equipped) ...........3-22
Remote Engine Start operating range .......3-22
Remote starting the vehicle .................3-23
Extending engine run time ..................3-23
Canceling a Remote Engine Start ...........3-23
Conditions the Remote Engine Start will
notwork .................................... 3-24Hood
........................................... 3-25
Fuel-filler door .................................. 3-25
Gasoline fuel engines .......................3-26
Steering wheel ................................. 3-28
Manual operation (if so equipped) ...........3-28
Automatic operation (if so equipped) ........3-29
Sun visors ...................................... 3-30
Vanity mirrors (if so equipped) ...............3-30
Card holder (driver’s side only) ...............3-31
Mirrors ......................................... 3-31
Manual anti-glare rearview mirror
(if so equipped) .............................. 3-31
Automatic anti-glare rearview mirror
(if so equipped) .............................. 3-31
Outside mirrors ............................. 3-32
Truck box ...................................... 3-36
Tailgate ..................................... 3-36
Tie down hooks ............................. 3-40
Memor
y Seat (if so equipped) ..................3-40
Memory storage function ...................3-41
Linking a key fob to a stored memory
position ..................................... 3-41
Entry/exit function .......................... 3-42
System operation ........................... 3-42
Page 208 of 638

CAUTION
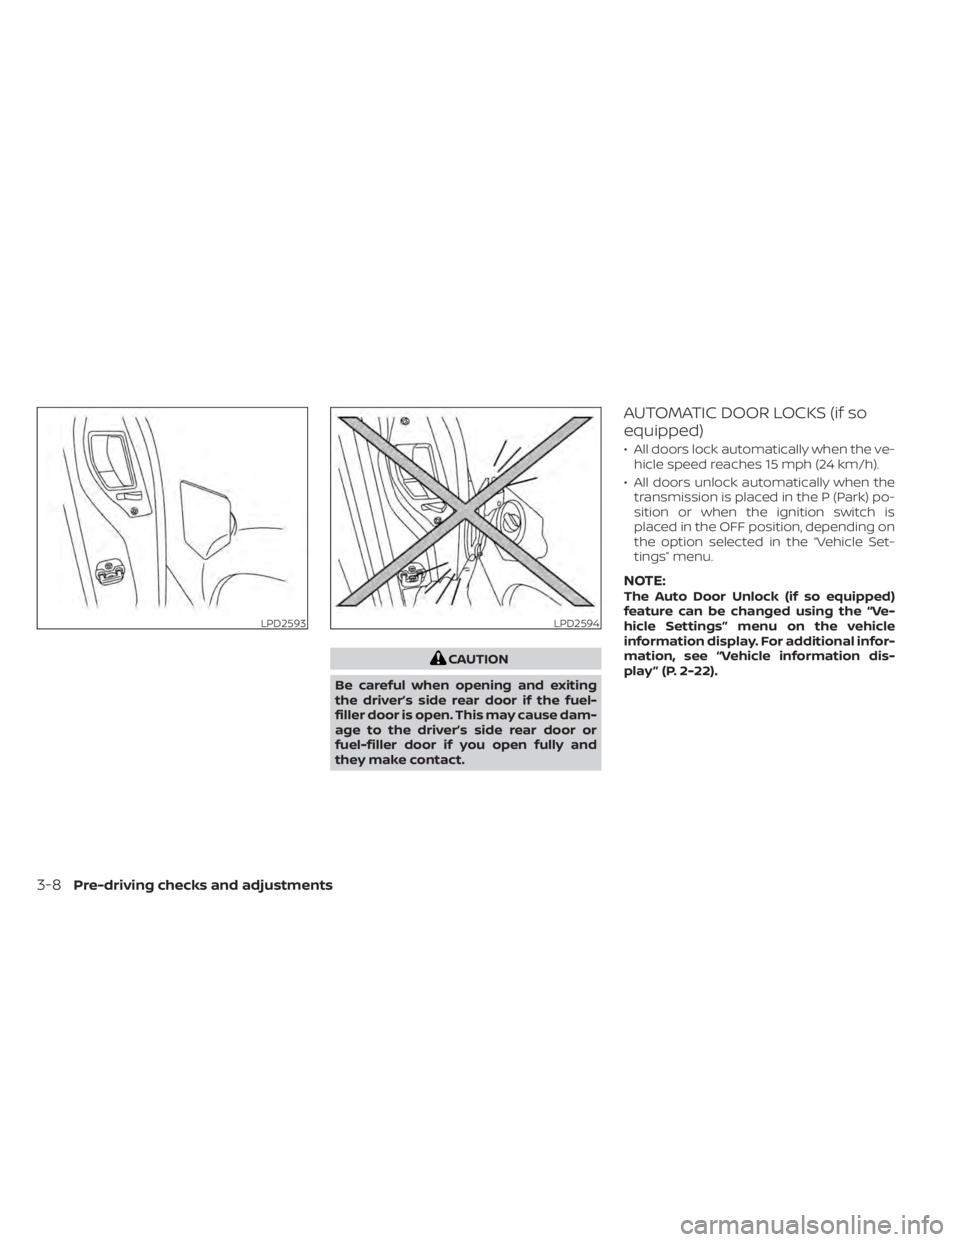
Be careful when opening and exiting
the driver’s side rear door if the fuel-
filler door is open. This may cause dam-
age to the driver’s side rear door or
fuel-filler door if you open fully and
they make contact.
AUTOMATIC DOOR LOCKS (if so
equipped)
• All doors lock automatically when the ve- hicle speed reaches 15 mph (24 km/h).
• All doors unlock automatically when the transmission is placed in the P (Park) po-
sition or when the ignition switch is
placed in the OFF position, depending on
the option selected in the “Vehicle Set-
tings” menu.
NOTE:The Auto Door Unlock (if so equipped)
feature can be changed using the “Ve-
hicle Settings” menu on the vehicle
information display. For additional infor-
mation, see “Vehicle information dis-
play ” (P. 2-22).
LPD2593LPD2594
3-8Pre-driving checks and adjustments
Page 225 of 638

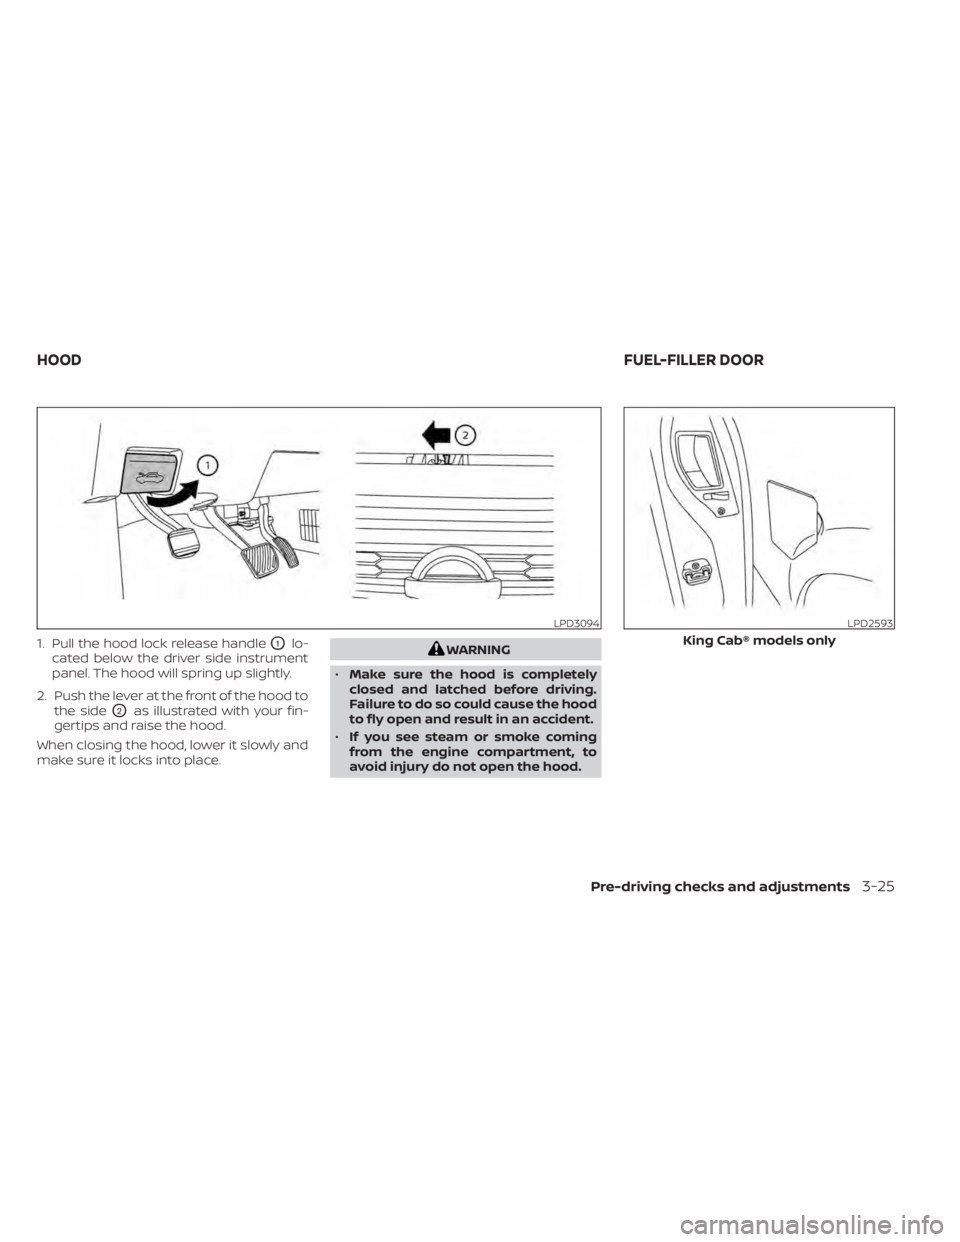
1. Pull the hood lock release handleO1lo-
cated below the driver side instrument
panel. The hood will spring up slightly.
2. Push the lever at the front of the hood to the side
O2as illustrated with your fin-
gertips and raise the hood.
When closing the hood, lower it slowly and
make sure it locks into place.
WARNING
• Make sure the hood is completely
closed and latched before driving.
Failure to do so could cause the hood
to fly open and result in an accident.
• If you see steam or smoke coming
from the engine compartment, to
avoid injury do not open the hood.
LPD3094LPD2593
King Cab® models only
HOOD FUEL-FILLER DOOR
Pre-driving checks and adjustments3-25
Page 226 of 638

CAUTION
Be careful when opening and exiting
the driver’s side rear door if the fuel-
filler door is open. This may cause dam-
age to the driver’s side rear door or
fuel-filler door if you open fully and
they make contact.
GASOLINE FUEL ENGINES
WARNING
• Gasoline is extremely flammable and
highly explosive under certain condi-
tions. You could be burned or seri-
ously injured if it is misused or mis-
handled. Always stop the engine and
do not smoke or allow open flames
or sparks near the vehicle when
refueling. •
Do not attempt to top off the fuel
tank af ter the fuel pump nozzle
shuts off automatically. Continued
refueling may cause fuel overflow,
resulting in fuel spray and possibly a
fire.
• Use only an original equipment type
fuel-filler cap as a replacement. It has
a built-in safety valve needed for
proper operation of the fuel system
and emission control system. An in-
correct cap can result in a serious
malfunction and possible injury. It
could also cause the
Malfunc-
tion Indicator Light (MIL) to come on.
• Never pour fuel into the throttle body
to attempt to start your vehicle.
• Do not fill a portable fuel container
on a truck bed liner, rubber truck bed
mat or other insulating material.
Static electricity can cause an explo-
sion of flammable liquid, vapor or
gas in any vehicle or trailer. To reduce
the risk of serious injury or death
when filling portable fuel containers:
– Always place the container on the
ground when filling.
– Do not use electronic devices
when filling.LPD2594
King Cab® models only
LPD3100
3-26Pre-driving checks and adjustments
Page 227 of 638

–Keep the pump nozzle in contact
with the container while you are
filling it.
– Use only approved portable fuel
containers for flammable liquid.
CAUTION
• Do not use E-15 or E-85 fuel in your
vehicle. For additional information,
see “Fuel recommendation” (P. 10-4).
• The Loose Fuel Cap warning mes-
sage will appear if the fuel-filler cap
is not properly tightened. It may take
a few driving trips for the message to
be displayed. Failure to tighten the
fuel-filler cap properly af ter the
Loose Fuel Cap warning message ap-
pears may cause the
Malfunc-
tion Indicator Light (MIL) to
illuminate. •
Failure to tighten the fuel-filler cap
properly may cause the
Mal-
function Indicator Light (MIL) to illu-
minate. If the
light illuminates
because the fuel-filler cap is loose or
missing, tighten or install the cap and
continue to drive the vehicle. The
light should turn off af ter a few
driving trips. If thelight does not
turn off af ter a few driving trips, have
the vehicle inspected. It is recom-
mended that you visit a NISSAN
dealer for this service.
• For additional information, see “Mal-
function Indicator Light (MIL)”
(P. 2-15).
• If fuel is spilled on the vehicle body,
flush it away with water to avoid
paint damage. To remove the fuel-filler cap:
1. Turn the fuel-filler cap counterclockwise
to remove.
2. Loop the tether strap around the hook
O1while refueling.
To install the fuel-filler cap:
1. Insert the fuel-filler cap straight into the fuel-filler tube.
2. Turn the fuel-filler cap clockwise until it clicks. The fuel-filler cap is a ratcheting
type.
LPD3101
Pre-driving checks and adjustments3-27
Page 228 of 638

Loose Fuel Cap warning
The Loose Fuel Cap warning appears in the
vehicle information display when the fuel-
filler cap is not tightened correctly af ter the
vehicle has been refueled. It may take a few
driving trips for the message to be dis-
played. To turn off the warning, perform the
following:
1.
Remove and install the fuel-filler cap as
previously described as soon as possible.
2. Tighten the fuel-filler cap until a single click is heard.
WARNING
• Do not adjust the steering wheel
while driving. You could lose control
of your vehicle and cause an
accident.
• Do not adjust the steering wheel any
closer to you than is necessary for
proper steering operation and com-
fort. The driver's air bag inflates with
great force. If you are unrestrained,
leaning forward, sitting sideways or
out of position in any way, you are at
greater risk of injury or death in a
crash. You may also receive serious
or fatal injuries from the air bag if you
are up against it when it inflates. Al-
ways sit back against the seatback
and as far away as practical from the
steering wheel. Always use the seat
belts.
MANUAL OPERATION (if so
equipped)
Tilt and telescopic operation
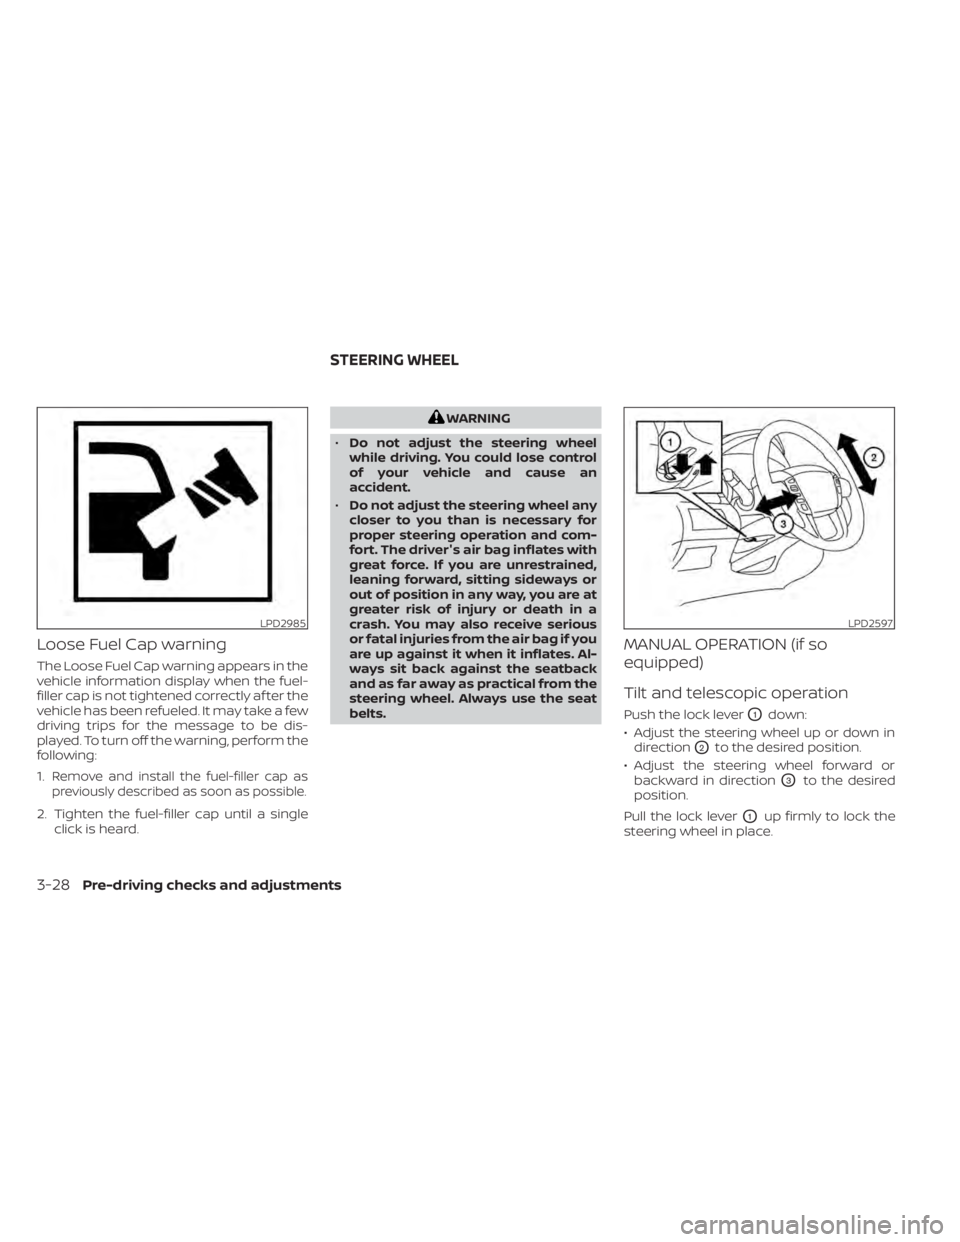
Push the lock leverO1down:
• Adjust the steering wheel up or down in direction
O2to the desired position.
• Adjust the steering wheel forward or backward in direction
O3to the desired
position.
Pull the lock lever
O1up firmly to lock the
steering wheel in place.
LPD2985LPD2597
STEERING WHEEL
3-28Pre-driving checks and adjustments