2021 NISSAN ROGUE light
[x] Cancel search: lightPage 110 of 556

2-22Instruments and controls
AUDIBLE REMINDERS
Light reminder chime
The light reminder chime will sound when
the headlight switch is placed in the
orposition after the engine was
turned off, and the driver’s door is opened
with the light is on.
Turn the light switch to the OFF (if so
equipped) or AUTO position when you
leave the vehicle.
Driving Aid chimes (if so equipped)
An audible alert/chime may be heard if
any of the following systems (if so
equipped) are active:
. Lane Departure Warning (LDW)
. Intelligent Lane Intervention (I-LI)
. Blind Spot Warning (BSW)
. Intelligent Blind Spot Intervention (I-
BSI)
. Rear Cross Traffic Alert (RCTA)
. ProPILOT Assist
. Automatic Emergency Braking (AEB)
with pedestrian detection
. Intelligent Forward Collision Warning
(I-FCW)
. Rear Automatic Braking (RAB)
. Sonar system .
Rear Sonar System (RSS)
For additional information, refer to the “5.
Starting and driving” section of this man-
ual.
Door lock warning chime
When the chime sounds, be sure to check
both the vehicle and the Intelligent Key.
See “Troubleshooting guide” (P.3-13).
Brake pad wear warning
The disc brake pads have audible wear
warnings. When a brake pad requires
replacement, it will make a high pitched
scraping sound when the vehicle is in
motion. This scraping sound will first
occur only when the brake pedal is
depressed. After more wear of the brake
pad, the sound will always be heard even
if the brake pedal is not depressed. Have
the brakes checked as soon as possible if
the warning sound is heard.
JVI1272XExample
The vehicle information displayis
located as shown above, and it displays
the warnings and information. The fol-
lowing items are also displayed if the
vehicle is equipped with them:
. Tachometer
. Speedometer
. Vehicle settings
. Trip computer information
. Driver Assistance
. Cruise control system information
. ProPILOT Assist
. Intelligent Key operation information
VEHICLE INFORMATION DISPLAY
Page 112 of 556

2-24Instruments and controls
SETTINGS
The setting mode allows user to change
the information displayed in the vehicle
information display and some settings:
.VDC Setting
. Driver Assistance
. Personal Display (if so equipped)
. Head-Up Display (if so equipped)
. ECO Mode Setting
. TPMS Setting
. Clock
. Vehicle Settings
. Maintenance
. Customize Display
. Unit/Language
. Key-Linked Settings (if so equipped)
. Factory Reset
VDC Setting
To change the setting, use the scroll dialto select and push it.
. System
Allows user to turn the Vehicle Dy-
namic Control (VDC) system ON or
OFF. By default the VDC system will be
turned ON. If the VDC system is turned
off, the VDC OFF indicator light will
illuminate. NOTE:
The vehicle should be driven with the
Vehicle Dynamic Control (VDC) system
ON for most driving conditions. (See
“Vehicle Dynamic Control (VDC) system”
(P.5-157).)
Driver Assistance
To change the status, warnings or turn on
or off any of the systems/warnings dis-
played in the “Driver Assistance” menu,
use the scroll dial
to select and change
a menu item:
. Steering Assist (if so equipped)
. Lane
. Blind Spot
. Emergency Brake
. Speed Limit Sign (if so equipped)
. Speed Adjust by Route (if so equipped)
. Spd. Limit Assist (if so equipped)
. Parking Aids
. Cross Traffic Alert
. Driver Attention Alert
. Timer Alert
. Low Temp. Alert
Steering Assist (if so equipped):
. Allows user to turn the Steering Assist
ON/OFF.
(See “ProPILOT Assist” (P.5-84).) Lane:
. Warning(LDW)
Allows user to turn the Lane Depar-
ture Warning (LDW) system ON/OFF.
. Prevention(LDP)
Allows user to turn the Intelligent Lane
Intervention (I-LI) system ON/OFF.
(See “Lane Departure Warning (LDW)” (P.5-
46) and “Intelligent Lane Intervention (I-
LI)” (P.5-115).)
Blind Spot:
. Warning(BSW)
Allows user to turn the Blind Spot
Warning (BSW) system ON/OFF.
. Intervention(BSI) (if so equipped)
Allows user to turn the Intelligent
Blind Spot Intervention (I-BSI) system
ON/OFF.
(See “Blind Spot Warning (BSW)” (P.5-57)
and “Intelligent Blind Spot Intervention (I-
BSI)” (P.5-65).)
Emergency Brake:
. Front
Allows user to turn the Automatic
Emergency Braking (AEB) with pedes-
trian detection system and Intelligent
Forward Collision Warning (I-FCW) sys-
tem ON/OFF.
Page 115 of 556
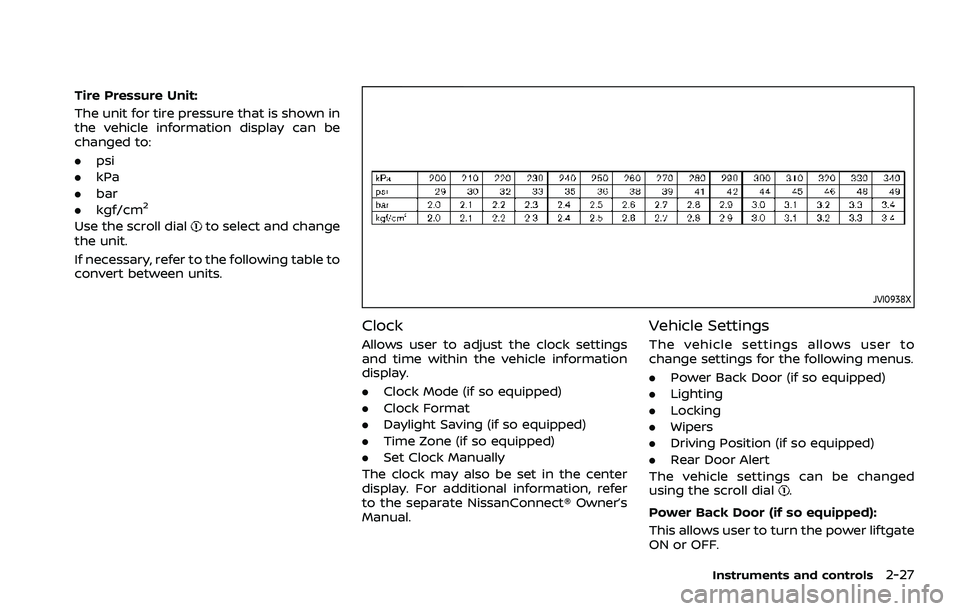
Tire Pressure Unit:
The unit for tire pressure that is shown in
the vehicle information display can be
changed to:
.psi
. kPa
. bar
. kgf/cm
2
Use the scroll dialto select and change
the unit.
If necessary, refer to the following table to
convert between units.
JVI0938X
Clock
Allows user to adjust the clock settings
and time within the vehicle information
display.
. Clock Mode (if so equipped)
. Clock Format
. Daylight Saving (if so equipped)
. Time Zone (if so equipped)
. Set Clock Manually
The clock may also be set in the center
display. For additional information, refer
to the separate NissanConnect® Owner’s
Manual.
Vehicle Settings
The vehicle settings allows user to
change settings for the following menus.
. Power Back Door (if so equipped)
. Lighting
. Locking
. Wipers
. Driving Position (if so equipped)
. Rear Door Alert
The vehicle settings can be changed
using the scroll dial
.
Power Back Door (if so equipped):
This allows user to turn the power liftgate
ON or OFF.
Instruments and controls2-27
Page 116 of 556

2-28Instruments and controls
Lighting:
The “Lighting” menu has the following
options:
.Welcome Headlight
The welcome lighting can be set to be
ON or OFF. Use the scroll dial
to turn
this feature ON or OFF.
. Auto Room Lamp
The interior light can be set to be ON
or OFF. Use the scroll dial
to turn
this feature ON or OFF.
. Accent Lighting (if so equipped)
The brightness of the Accent Lighting
can be adjusted. Use the scroll dial
to select the brightness.
. Auto Headlight
The sensitivity of the Intelligent Auto
Headlight can be adjusted. Use the
scroll dial
to select the required
sensitivity. The following options are
available:
— Turn on earliest
— Turn on earlier
— Turn on standard
— Turn on later
. Light Off Delay
The duration of the automatic head-
lights can be changed from 0 to 180
seconds. Use the scroll dial
to
change the duration. Locking:
The “Locking” menu has the following
options:
.
Ext. Door Switch (if so equipped)
When this item is turned on, the
request switch on the door is acti-
vated. Use the scroll dial
to activate
or deactivate this function.
. Selective Unlock (if so equipped)
When this item is turned on, and the
door handle request switch is pushed,
only the corresponding door is un-
locked. All the doors can be unlocked
if the door handle request switch is
pushed again within 1 minute. When
this item is turned to off, all the doors
will be unlocked when the door han-
dle request switch is pushed once. Use
the scroll dial
to activate or deacti-
vate this function.
. Auto Door Unlock
The “Auto Door Unlock” feature allows
user to customize the auto door
unlock options. Use the scroll dial
to change the mode.
— Shift to P
— IGN OFF
— OFF
. Horn beeps on lock (if so equipped)
When this item is turned on, the horn
will chirp and the hazard indicators will flash twice when locking the
vehicle with the Intelligent Key. Use
the scroll dial
to activate or deacti-
vate this function.
Wipers:
The “Wipers” menu has the following
options:
. Speed Dependent
The “Speed Dependent” feature can be
activated or deactivated. Use the
scroll dial
to turn this feature ON
or OFF.
. Reverse Link
The “Reverse Link” wiper feature can
be set to be ON or OFF. Use the scroll
dial
to turn this feature ON or OFF.
Driving Position (if so equipped):
. Exit Seat Slide
This allows user to turn the entry/exit
function ON or OFF. Use the scroll dial
to turn this function ON or OFF. (See
“Memory seat” (P.3-36).)
Rear Door Alert:
The “Rear Door Alert” feature allows user
to customize the Rear Door Alert options.
Use the scroll dial
to change the mode.
. Horn & Alert
When selected, the alert is displayed
and the horn sounds.
Page 118 of 556

2-30Instruments and controls
and intervals, refer to the “9. Maintenance
and schedules” section.
Tire:
This indicator appears when the user set
distance comes for replacing tires. You
can set or reset the distance for replacing
tires.
WARNING
The tire replacement indicator is not
a substitute for regular tire checks,
including tire pressure checks. (See
“Changing wheels and tires” (P.8-
33).) Many factors including tire in-
flation, alignment, driving habits and
road conditions affect tire wear and
when tires should be replaced.
Setting the tire replacement indica-
tor for a certain driving distance
does not mean your tires will last
that long. Use the tire replacement
indicator as a guide only and always
perform regular tire checks. Failure
to perform regular tire checks, in-
cluding tire pressure checks could
result in tire failure. Serious vehicle
damage could occur and may lead to
a collision, which could result in
serious personal injury or death.Other:
This indicator appears when the user set
distance comes for checking or replacing
maintenance items other than the engine
oil, oil filter and tires. Other maintenance
items can include such things as air filter
or tire rotation. You can set or reset the
distance for checking or replacing the
items.
Customize Display
The display settings allows user to
choose from the various meter selections.
The display settings can be changed
using the scroll dial
.
Main Menu Selection:
Displays available screens that can be
shown in the vehicle information display.
Route Guidance (if so equipped):
To change the setting, use the scroll dial
to select and push it.
. Alerts
The “Alerts” allows user to turn the
Navigation Settings alerts on or off.
Transition (Cruise) (if so equipped):
The ”Transition (Cruise)” allows user to
turn the cruise screen transition on or off. Welcome Effect:
The “Welcome Effect” displays the avail-
able welcome effect settings.
. Gauges (if so equipped)
. Animation
Operation guidance:
The “Operation guidance” displays the
available operation guidance settings.
. Lights
. Wiper
. Seat Memory (if so equipped)
. Cruise Control (if so equipped)
Unit/Language
The units that are shown in the vehicle
information display can be changed:
.Mileage/Fuel
. Tire Pressure
. Temperature
. Language
Use the scroll dial
to select and change
the units of the vehicle information dis-
play.
Mileage/Fuel:
The unit for the mileage that is shown in
the vehicle information display can be
changed.
Page 123 of 556

11. Rear seat belt warning
This warning appears for 35 seconds
after the ignition switch is placed in the
ON position.
This warning shows the status of the
three rear seat belts. When one of the rear
seat belts is buckled, the corresponding
rear seat belt indicator will appear gray.
When one of the rear seat belts is
unbuckled, the corresponding rear seat
belt indicator will appear red.
For precautions on seat belt usage, see
“Seat belts” (P.1-13).
12. Tire Pressure Low — Add Air
warning
This warning appears when the low tire
pressure warning light in the meter
illuminates and low tire pressure is de-
tected. The warning appears each time
the ignition switch is placed in the ON
position as long as the low tire pressure
warning light remains illuminated. If this
warning appears, stop the vehicle and
adjust the pressure to the recommended
COLD tire pressure shown on the Tire and
Loading Information label. (See “Low tire
pressure warning light” (P.2-18) and “Tire
Pressure Monitoring System (TPMS)” (P.5-
6).)
13. Shift to P range warning
This warning appears when the driver’s
door is opened while the shift lever is in
any position other than P (Park).
If this warning appears, push the park
button to engage the P (Park) position.
An inside warning chime will also sound.
(See “Intelligent Key system” (P.3-7).)
14. CVT Malfunction Service now
warning
This warning appears when there is a
malfunction with the CVT system. If this
warning appears, have the system
checked. It is recommended that you visit
a NISSAN dealer for this service.
15. CVT hot Power reduced warning
The CVT has a high fluid temperature
protection mode. If the fluid temperature
becomes too high (for example, climbing
steep grades in high temperatures with
heavy loads, such as when towing a
trailer), engine power and, under some
conditions, vehicle speed will be de-
creased automatically to reduce the
chance of transmission damage. Vehicle
speed can be controlled with the accel-
erator pedal, but the engine and vehicle
speed may be reduced.
16. CVT Malfunction Stop safely
warning
This warning appears when there is a
malfunction with the CVT system. If this
warning appears, stop the vehicle in a
safe place. Have the system checked. It is
recommended you visit a NISSAN dealer
for this service.
17. Check position of shift lever
warning
This warning appears if the system can-
not detect the shift position. Make sure
the vehicle is placed in a position properly.
Have the system checked. It is recom-
mended you contact a NISSAN dealer for
this service.
18. When parked apply parking
brake warning
This warning appears if a malfunction
occurs in the electric shift control system.
Contact a NISSAN dealer as soon as
possible. When parking the vehicle, make
sure that the parking brake is applied. If
the parking brake is not applied, the
ignition switch may not be turned off.
Instruments and controls2-35
Page 125 of 556

26. Power turned off to save the
battery warning
Under the specific conditions, this warn-
ing may appear after the ignition switch is
automatically turned OFF to save the
battery.
27. Reminder Turn OFF Headlights
warning
This warning appears when the driver
side door is opened with the headlight
switch is left ON and the ignition switch is
placed in the OFF position. Place the
headlight switch in OFF (if so equipped)
or AUTO position. For additional informa-
tion, (See “Headlight and turn signal
switch” (P.2-55).)
28. Headlight System Error: See
Owner’s Manual warning
This warning appears if the LED head-
lights are malfunctioning. Have the sys-
tem checked. It is recommended that you
visit a NISSAN dealer for this service.
29. Time for a break? indicator
This indicator appears when the set
Timer Alert activates. You can set the
time for up to 6 hours.
30. Chassis Control System Error:
See Owner’s Manual warning
This warning appears if the chassis con-
trol module detects a malfunction in the
chassis control system. Have the system
checked. It is recommended that you visit
a NISSAN dealer for this service. (See
“Chassis control” (P.5-160).)
31. Rear Door Alert is activated
indicator
When the system is enabled, this message
appears when the Rear Door Alert system
is active and can remind the driver to
check the rear seat.
.Using the steering switch, the driver
can select “Dismiss Message” to clear
the display for a period of time.
. Using the steering switch, the driver
can select “Disable Alert” to disable the
horn alert for the remainder of the
current trip.
For additional information, see “Rear Door
Alert” (P.2-65).
WARNING
Selecting “Dismiss Message” during a
stop within a trip temporarily dis-
misses the message for that stop
without turning the system off. Alerts can be provided for other
stops during the trip. Selecting “Dis-
able Alert” turns off the Rear Door
Alert system for the remainder of a
trip and no audible alert will be
provided.
NOTE:
This system is disabled until the driver
enables it using the settings menu. See
“Vehicle Settings” (P.2-27).
32. Check Rear Seat For all articles
indicator
When the system is enabled, this message
appears when the vehicle comes to a
complete stop, the shift position is placed
from the D (Drive) to P (Park), and the
driver exits the vehicle. This message
alerts the driver, after a period of time,
to check for items in the rear seat after
the audible alert has been provided.
NOTE:
This system is disabled until the driver
enables it using the settings menu. See
“Vehicle Settings” (P.2-27).
Instruments and controls2-37
Page 129 of 556

51. Not Available Bad Weather in-
dicator (if so equipped)
This message may appear when the
Steering Assist system is engaged.
Under the following conditions, the Steer-
ing Assist system is automatically can-
celed:
.When the wiper (HI) operates.
. When lane markers in the traveling
lane cannot be correctly detected for
a period of time due to such items as a
snow rut, reflection of light on a rainy
day or several unclear lane markers
are present.
If you want to use the Steering Assist
system again, cancel the ProPILOT Assist
system and set it again when lane
markers are clearly visible.
52. Not Available Front Camera
Obstructed indicator (if so
equipped)
This message may appear when the
Steering Assist system is engaged.
Under the following conditions, the Steer-
ing Assist system is automatically can-
celed:
. The camera area of the windshield is
fogged up or covered with dirt, water,
drops, ice, snow, etc. .
Strong light, such as sunlight or high
beams from oncoming vehicles, enter
the front camera
53. Steering Assist Not Available
Cannot Detect Lane indicator (if so
equipped)
This indicator may appear when the
Steering Assist system is engaged. The
Steering Assist system is automatically
canceled when the lane markers in the
traveling lane cannot be correctly de-
tected for a period of time due to such
items as a snow rut, reflection of light on
a rainy day or several unclear lane mar-
kers are present.
If you want to use the Steering Assist
system again, cancel the ProPILOT sys-
tem and set it again when lane markers
are clearly visible.
54. Not Available Parking Brake On
indicator (if so equipped)
This message may appear when the
Intelligent Cruise Control (ICC) system is
engaged.
Under the following condition, the ICC
system is automatically canceled:
.The electronic parking brake is ap-
plied.
The above system cannot be used when the electronic parking brake is activated.
55. Automatic Emergency Braking
(AEB) emergency warning indicator
This warning indicator appears along
with an audible warning, when the Auto-
matic Emergency Braking (AEB) with pe-
destrian detection system detects the
possibility of a forward collision.
See “Automatic Emergency Braking (AEB)
with pedestrian detection system” (P.5-
122).
56. Rear Automatic Braking (RAB)
system warning indicator
This warning indicator appears to indi-
cate the status of the Rear Automatic
Braking (RAB) system.
See “Rear Automatic Braking (RAB)” (P.5-
143).
57. Sonar system/Rear Sonar Sys-
tem (RSS) indicator
This indicator appears to indicate the
status of the sonar system (if so
equipped) or the Rear Sonar System
(RSS) (if so equipped).
See “Sonar system” (P.5-162) or “Rear
Sonar System (RSS)” (P.5-168).
Instruments and controls2-41