2021 NISSAN NV200 warning
[x] Cancel search: warningPage 158 of 300
Accelerator downshif t
— in D (Drive) position —
For passing or hill climbing, depress the
accelerator pedal to the floor. This shif ts
the transmission down into a lower gear,
depending on the vehicle speed.
High fluid temperature protection
mode
This transmission has a high fluid tem-
perature protection mode. If the fluid tem-
perature becomes too high (for example,
when climbing steep grades in high tem-
peratures with heavy loads, such as when
towing a trailer), engine power and, under
some conditions, vehicle speed will be de-
creased automatically to reduce the
chance of transmission damage. Vehicle
speed can be controlled with the accelera-
tor pedal, but the engine and vehicle speed
may be limited.
Fail-safe
When the fail-safe operation occurs, the
Continuously Variable Transmission will
not be shif ted into the selected driving
position.If the vehicle is driven under extreme
conditions, such as excessive wheel
spinning and subsequent hard braking,
the fail-safe system may be activated.
The Malfunction Indicator Light (MIL)
may come on to indicate the fail-safe
mode is activated. For additional infor-
mation, see “Malfunction Indicator Light
(MIL)” (P. 2-14). This will occur even if all
electrical circuits are functioning prop-
erly. In this case, place the ignition switch
in the OFF position and wait for 10 sec-
onds. Then place the ignition switch
back in the ON position. The vehicle
should return to its normal operating
condition. If it does not return to its nor-
mal operating condition, have the trans-
mission checked and repaired, if neces-
sary. It is recommended that you visit a
NISSAN dealer for this service.
WARNING
When the high fluid temperature pro-
tection mode or fail-safe operation oc-
curs, vehicle speed may be gradually
reduced. The reduced speed may be
lower than other traffic, which could in-
crease the chance of a collision. Be es-
pecially careful when driving. If neces-
sary, pull to the side of the road at a safe
place and allow the transmission to re-
turn to normal operation, or have it re-
paired if necessary.
5-16Starting and driving
Page 159 of 300
WARNING
• Be sure the parking brake is fully re-
leased before driving. Failure to do so
can cause brake failure and lead to
an accident.
• Do not release the parking brake
from outside the vehicle.
• Do not use the shif t lever in place of
the parking brake. When parking, be
sure the parking brake is fully
engaged.
• To help avoid risk of injury or death
through unintended operation of the
vehicle and/or its systems, do not
leave children, people who require
the assistance of others or pets unat-
tended in your vehicle. Additionally,
the temperature inside a closed ve-
hicle on a warm day can quickly be-
come high enough to cause a signifi-
cant risk of injury or death to people
and pets. To engage:
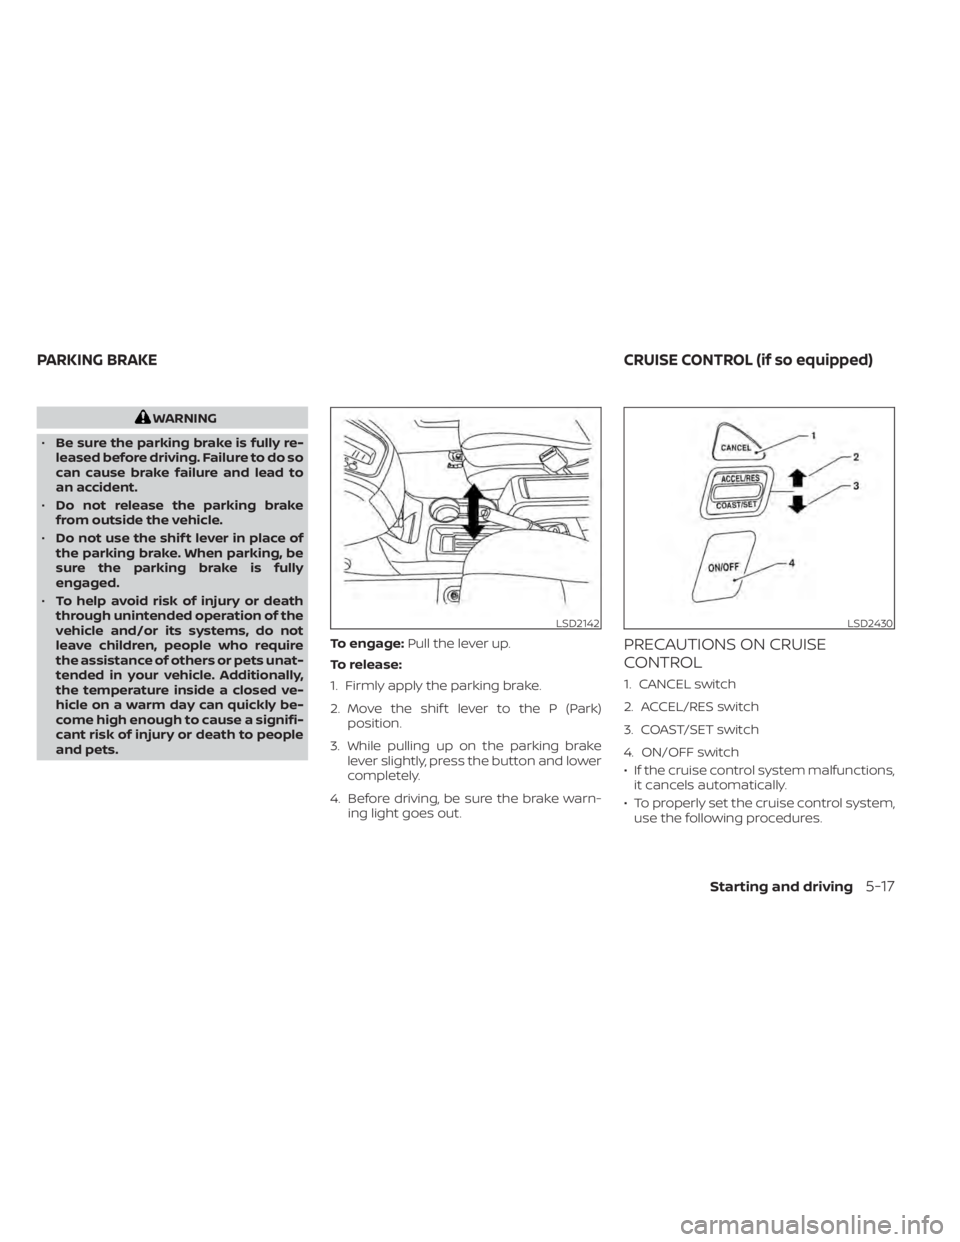
Pull the lever up.
To release:
1. Firmly apply the parking brake.
2. Move the shif t lever to the P (Park) position.
3. While pulling up on the parking brake lever slightly, press the button and lower
completely.
4. Before driving, be sure the brake warn- ing light goes out.
PRECAUTIONS ON CRUISE
CONTROL
1. CANCEL switch
2. ACCEL/RES switch
3. COAST/SET switch
4. ON/OFF switch
• If the cruise control system malfunctions,it cancels automatically.
• To properly set the cruise control system, use the following procedures.
LSD2142LSD2430
PARKING BRAKE CRUISE CONTROL (if so equipped)
Starting and driving5-17
Page 160 of 300
WARNING
Do not use the cruise control when driv-
ing under the following conditions:
• When it is not possible to keep the
vehicle at a set speed.
• In heavy traffic or in traffic that varies
in speed.
• On winding or hilly roads.
• On slippery roads (rain, snow, ice,
etc.).
• In very windy areas.
Doing so could cause a loss of vehicle
control and result in an accident.
CRUISE CONTROL OPERATIONS
The cruise control allows driving at a speed
between 30 - 89 mph (48 - 144 km/h) with-
out keeping your foot on the accelerator
pedal.
To turn on the cruise control, push the
ON/OFF switch. The CRUISE indicator light
in the instrument panel comes on.
To set cruising speed, accelerate the ve-
hicle to the desired speed, push the
COAST/SET switch and release it. Take your
foot off the accelerator pedal. Your vehicle
maintains the set speed. •
To pass another vehicle, depress the ac-
celerator pedal. When you release the
pedal, the vehicle returns to the previ-
ously set speed.
• The vehicle may not maintain the set speed when going up or down steep hills.
If this happens, drive without the cruise
control.
To cancel the preset speed, use one of the
following three methods:
• Push the CANCEL switch.
• Tap the brake pedal.
• Push the ON/OFF switch. The CRUISE in- dicator light in the instrument panel will
go out.
The cruise control is automatically can-
celed if:
• You depress the brake pedal while push- ing the ACCEL/RES or COAST/SET switch.
The preset speed is deleted from
memory.
• The vehicle slows down more than 8 mph (13 km/h) below the set speed.
• You move the shif t lever to N (Neutral). To reset at a faster cruising speed,
use
one of the following three methods:
• Depress the accelerator pedal. When the vehicle attains the desired speed, push
and release the COAST/SET switch.
• Push and hold the ACCEL/RES switch. When the vehicle attains the speed you
desire, release the switch.
• Push and release the ACCEL/RES switch. Each time you do this, the set speed in-
creases by about 1 mph (1.6 km/h).
To reset at a slower cruising speed, use
one of the following three methods:
• Lightly tap the brake pedal. When the ve- hicle attains the desired speed, push the
COAST/SET switch and release it.
• Push and hold the COAST/SET switch. Re- lease the switch when the vehicle slows
to the desired speed.
• Push and release the COAST/SET switch. Each time you do this, the set speed de-
creases by about 1 mph (1.6 km/h).
To resume the preset speed, push and
release the ACCEL/RES switch. The vehicle
returns to the last set cruising speed when
the vehicle speed is over 30 mph (48 km/h).
5-18Starting and driving
Page 163 of 300
WARNING
• Do not stop or park the vehicle over
flammable materials such as dry
grass, waste paper or rags. They may
ignite and cause a fire. •
Safe parking procedures require that
both the parking brake be set and the
transmission placed into P (Park).
Failure to do so could cause the ve-
hicle to move unexpectedly or roll
away and result in an accident. Make
sure the shif t lever has been pushed
as far forward as it can go and cannot
be moved without depressing the
foot brake pedal.
• Never leave the engine running while
the vehicle is unattended. •
Do not leave children unattended in-
side the vehicle. They could unknow-
ingly activate switches or controls or
make the vehicle move. Unattended
children could become involved in
serious accidents.
•
To help avoid risk of injury or death
through unintended operation of the
vehicle and/or its systems, do not
leave children, people who require the
assistance of others or pets unat-
tended in your vehicle. Additionally, the
temperature inside a closed vehicle on
a warm day can quickly become high
enough to cause a significant risk of
injury or death to people and pets.
1. Firmly apply the parking brake.
2. Move the shif t lever to the P (Park) position.
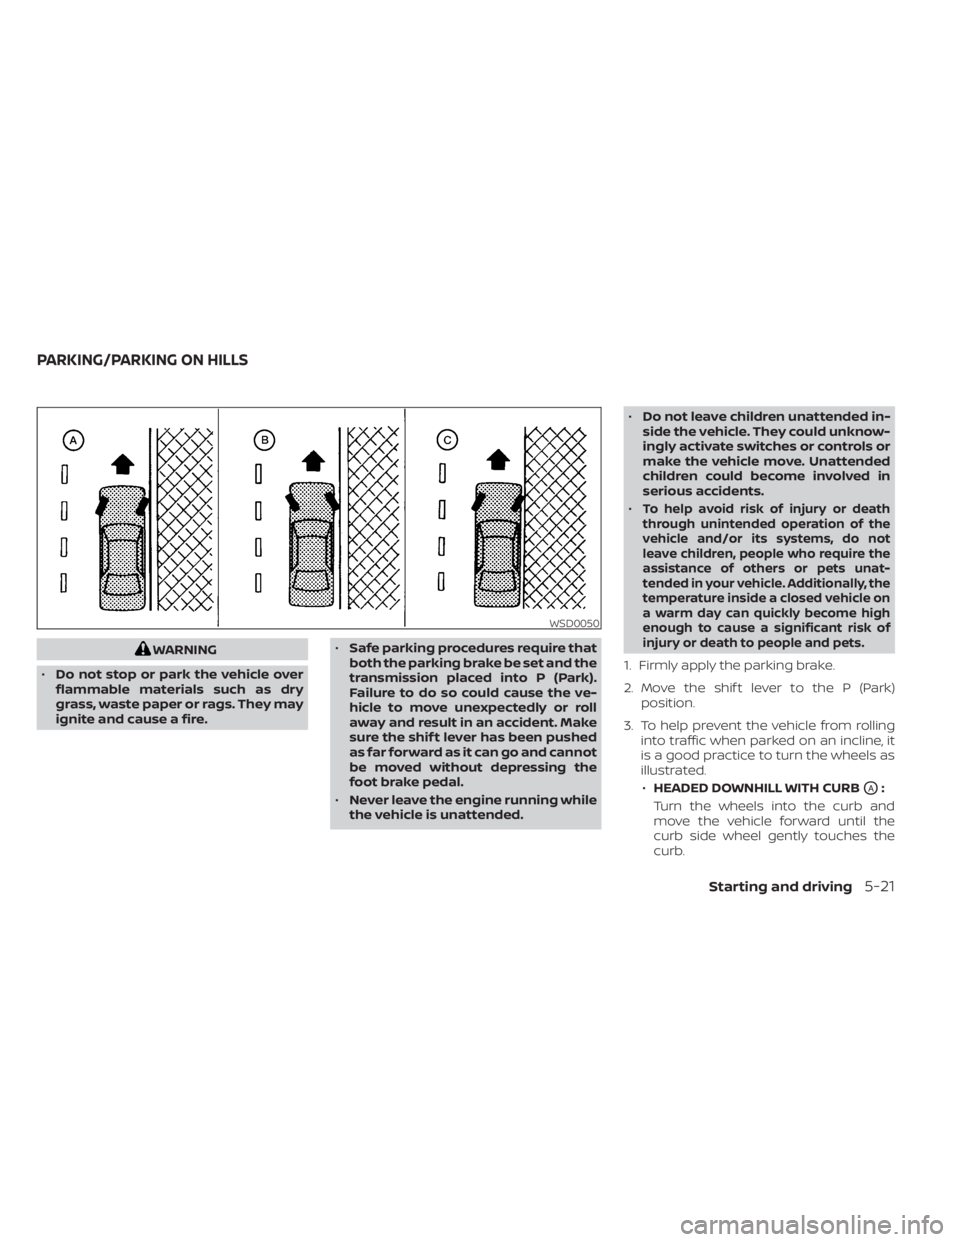
3. To help prevent the vehicle from rolling into traffic when parked on an incline, it
is a good practice to turn the wheels as
illustrated.
• HEADED DOWNHILL WITH CURB
OA:
Turn the wheels into the curb and
move the vehicle forward until the
curb side wheel gently touches the
curb.
WSD0050
PARKING/PARKING ON HILLS
Starting and driving5-21
Page 170 of 300
WARNING
• Never rely solely on the hill start as-
sist system to prevent the vehicle
from moving backward on a hill. Al-
ways drive carefully and attentively.
Depress the brake pedal when the
vehicle is stopped on a steep hill. Be
especially careful when stopped on a
hill on frozen or muddy roads. Failure
to prevent the vehicle from rolling
backwards may result in a loss of
control of the vehicle and possible
serious injury or death.
• The hill start assist system is not de-
signed to hold the vehicle at a stand-
still on a hill. Depress the brake pedal
when the vehicle is stopped on a
steep hill. Failure to do so may cause
the vehicle to roll backwards and
may result in a collision or serious
personal injury.
• The hill start assist system may not
prevent the vehicle from rolling
backwards on a hill under all load or
road conditions. Always be prepared
to depress the brake pedal to prevent
the vehicle from rolling backwards.
Failure to do so may result in a colli-
sion or serious personal injury. When the vehicle is stopped on a hill, the hill
start assist system automatically keeps
the brakes applied to help prevent the ve-
hicle from rolling backward in the time it
takes the driver to release the brake pedal
and apply the accelerator.
The hill start assist system will operate au-
tomatically under the following conditions:
• The transmission is shif ted to a forward
or reverse gear.
• The vehicle is stopped completely on a hill by applying the brake. The maximum
holding time is 2 seconds. Af ter 2 sec-
onds the vehicle will begin to roll back and
the hill start assist system will stop oper-
ating completely.
The hill start assist system will not operate
when the shif t lever is placed in the N (Neu-
tral) or P (Park) position or on a flat and level
road.
Page 171 of 300
•If your vehicle sustains damage to
the rear bumper fascia, leaving it
misaligned or bent, the sensing zone
may be altered causing inaccurate
measurement of obstacles or false
alarms.
The RSS sounds a tone to warn the driver of
obstacles near the rear bumper when the
ignition is in the ON position and the shif t
lever is in the R (Reverse) position.
RSS SYSTEM OPERATION
The RSS is automatically activated when
the ignition is in the ON position and the
shif t lever is in the R (Reverse) position. The
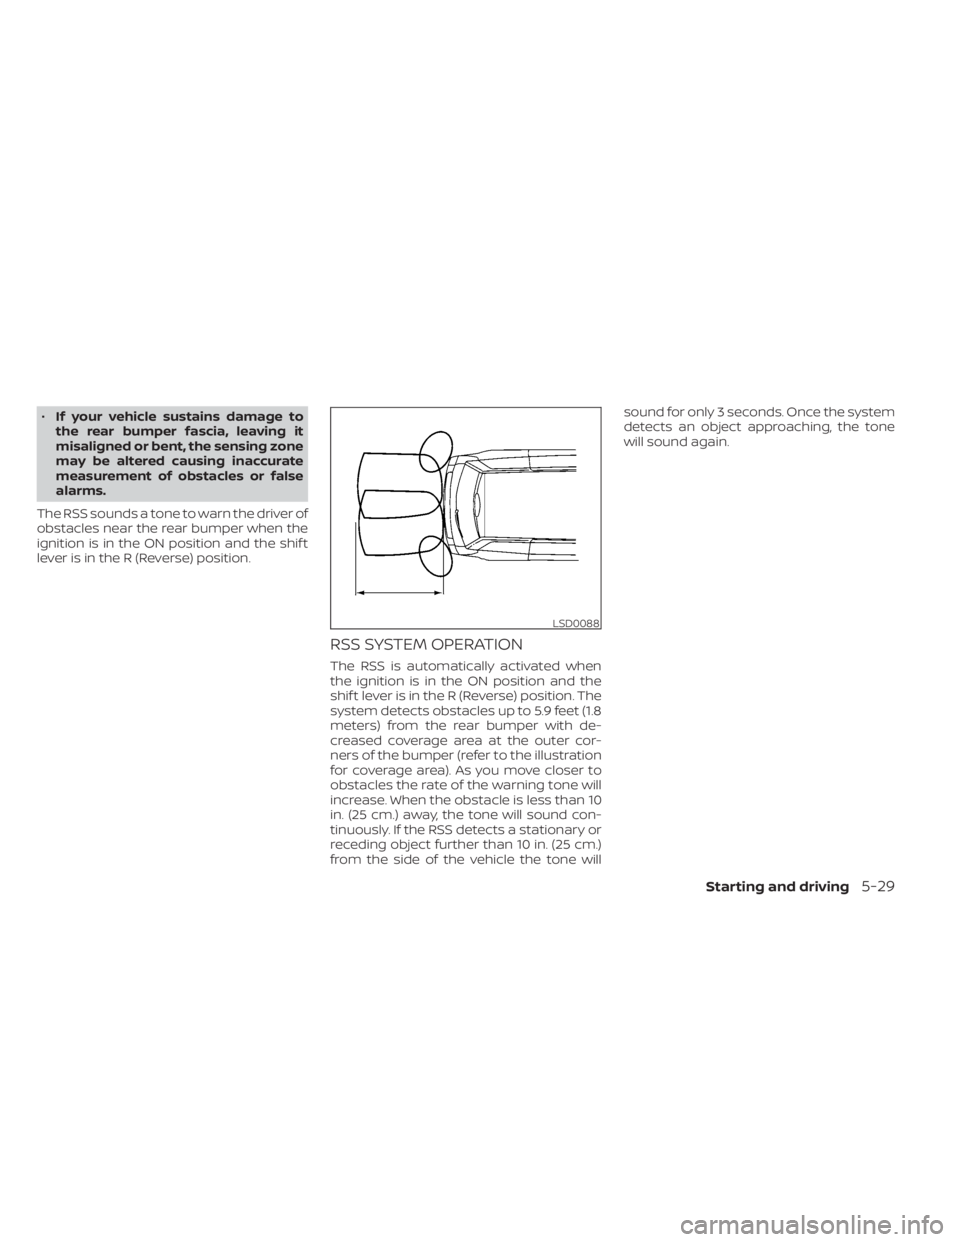
system detects obstacles up to 5.9 feet (1.8
meters) from the rear bumper with de-
creased coverage area at the outer cor-
ners of the bumper (refer to the illustration
for coverage area). As you move closer to
obstacles the rate of the warning tone will
increase. When the obstacle is less than 10
in. (25 cm.) away, the tone will sound con-
tinuously. If the RSS detects a stationary or
receding object further than 10 in. (25 cm.)
from the side of the vehicle the tone will sound for only 3 seconds. Once the system
detects an object approaching, the tone
will sound again.
LSD0088
Page 179 of 300

•If the low tire pressure warning light
illuminates while driving, avoid sud-
den steering maneuvers or abrupt
braking, reduce vehicle speed, pull
off the road to a safe location and
stop the vehicle as soon as possible.
Driving with under-inflated tires may
permanently damage the tires and
increase the likelihood of tire failure.
Serious vehicle damage could occur
and may lead to an accident and
could result in serious personal in-
jury. Check the tire pressure for all
four tires. Adjust the tire pressure to
the recommended COLD tire pres-
sure shown on the Tire and Loading
Information label to turn the low tire
pressure warning light OFF. If the
light still illuminates while driving af-
ter adjusting the tire pressure, a tire
may be flat or the TPMS may be mal-
functioning. If you have a flat tire, re-
place it with a spare tire as soon as
possible. If no tire is flat and all tires
are properly inflated, have the ve-
hicle checked. It is recommended
that you visit a NISSAN dealer for this
service. •
When using a wheel without the
TPMS such as the spare tire, the TPMS
will not function and the low tire
pressure warning light will flash for
approximately 1 minute. The light will
remain on af ter 1 minute. Have your
tires replaced and/or TPMS system
reset as soon as possible. It is recom-
mended that you visit a NISSAN
dealer for these services.
• Do not inject any tire liquid or aerosol
tire sealant into the tires, as this may
cause a malfunction of the tire pres-
sure sensors.
• Replacing tires with those not origi-
nally specified by NISSAN could af-
fect the proper operation of the
TPMS.
CHANGING A FLAT TIRE
If you have a flat tire, follow the instructions
below:
Stopping the vehicle
1. Safely move the vehicle off the road and away from traffic.
2. Turn on the hazard warning flashers. 3. Park on a level surface and apply the
parking brake. Move the shif t lever to P
(Park).
4. Turn off the engine.
5. Raise the hood to warn other traffic and to signal professional road assistance
personnel that you need assistance.
6. Have all passengers get out of the ve- hicle and stand in a safe place, away
from traffic and clear of the vehicle.
Page 187 of 300
WARNING
Always follow the instructions below.
Failure to do so could result in damage
to the charging system and cause per-
sonal injury.
1. If the booster battery is in another ve- hicle, position the two vehicles to bring
their batteries near each other.
Do not allow the two vehicles to touch.
2. Apply the parking brake. Move the shif t lever to P (Park). Switch off all unneces-
sary electrical systems (lights, heater, air
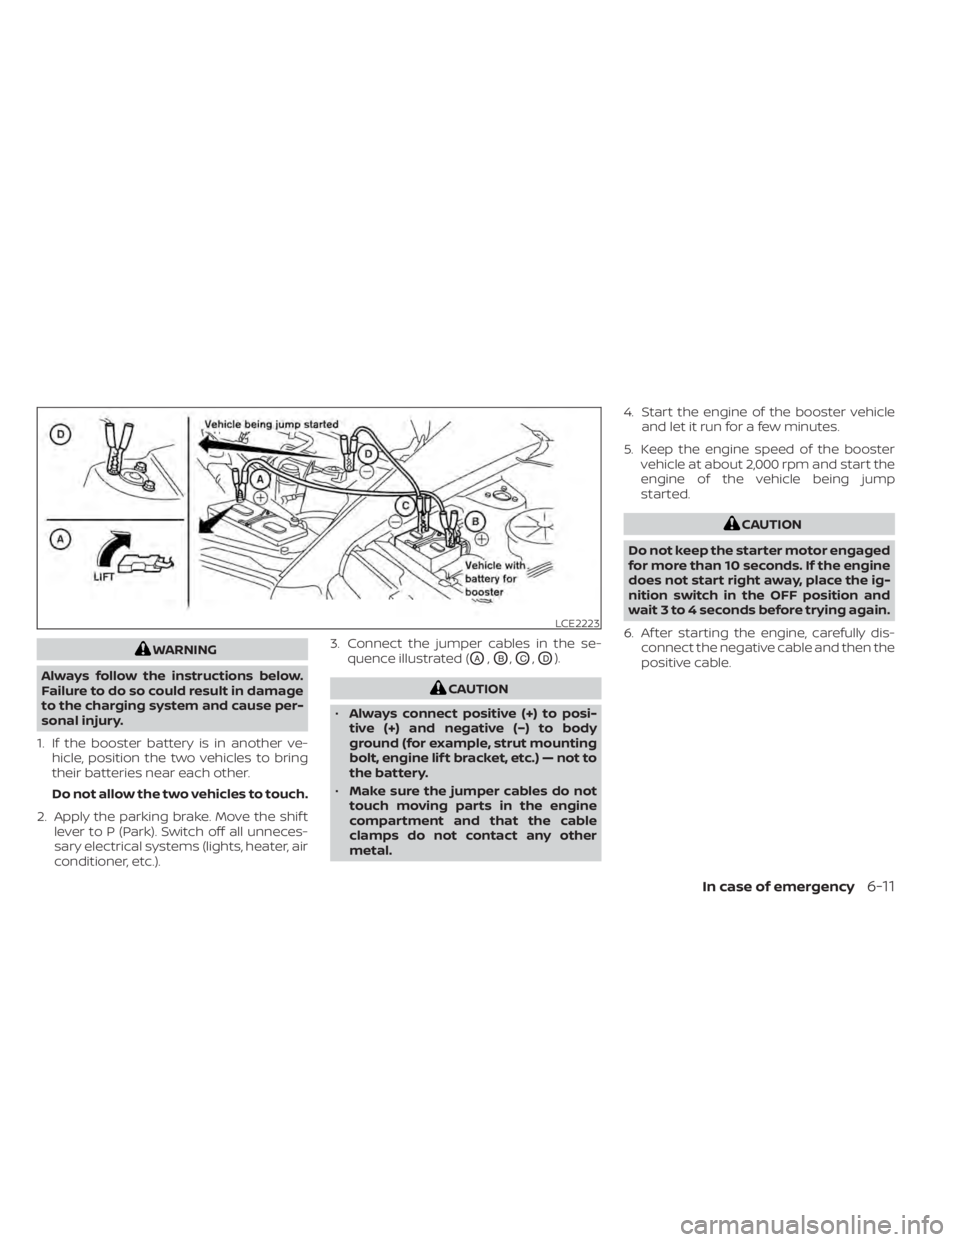
conditioner, etc.). 3. Connect the jumper cables in the se-
quence illustrated (OA,OB,OC,OD).
LCE2223