2021 NISSAN NV200 brake
[x] Cancel search: brakePage 179 of 300

•If the low tire pressure warning light
illuminates while driving, avoid sud-
den steering maneuvers or abrupt
braking, reduce vehicle speed, pull
off the road to a safe location and
stop the vehicle as soon as possible.
Driving with under-inflated tires may
permanently damage the tires and
increase the likelihood of tire failure.
Serious vehicle damage could occur
and may lead to an accident and
could result in serious personal in-
jury. Check the tire pressure for all
four tires. Adjust the tire pressure to
the recommended COLD tire pres-
sure shown on the Tire and Loading
Information label to turn the low tire
pressure warning light OFF. If the
light still illuminates while driving af-
ter adjusting the tire pressure, a tire
may be flat or the TPMS may be mal-
functioning. If you have a flat tire, re-
place it with a spare tire as soon as
possible. If no tire is flat and all tires
are properly inflated, have the ve-
hicle checked. It is recommended
that you visit a NISSAN dealer for this
service. •
When using a wheel without the
TPMS such as the spare tire, the TPMS
will not function and the low tire
pressure warning light will flash for
approximately 1 minute. The light will
remain on af ter 1 minute. Have your
tires replaced and/or TPMS system
reset as soon as possible. It is recom-
mended that you visit a NISSAN
dealer for these services.
• Do not inject any tire liquid or aerosol
tire sealant into the tires, as this may
cause a malfunction of the tire pres-
sure sensors.
• Replacing tires with those not origi-
nally specified by NISSAN could af-
fect the proper operation of the
TPMS.
CHANGING A FLAT TIRE
If you have a flat tire, follow the instructions
below:
Stopping the vehicle
1. Safely move the vehicle off the road and away from traffic.
2. Turn on the hazard warning flashers. 3. Park on a level surface and apply the
parking brake. Move the shif t lever to P
(Park).
4. Turn off the engine.
5. Raise the hood to warn other traffic and to signal professional road assistance
personnel that you need assistance.
6. Have all passengers get out of the ve- hicle and stand in a safe place, away
from traffic and clear of the vehicle.
Page 187 of 300
WARNING
Always follow the instructions below.
Failure to do so could result in damage
to the charging system and cause per-
sonal injury.
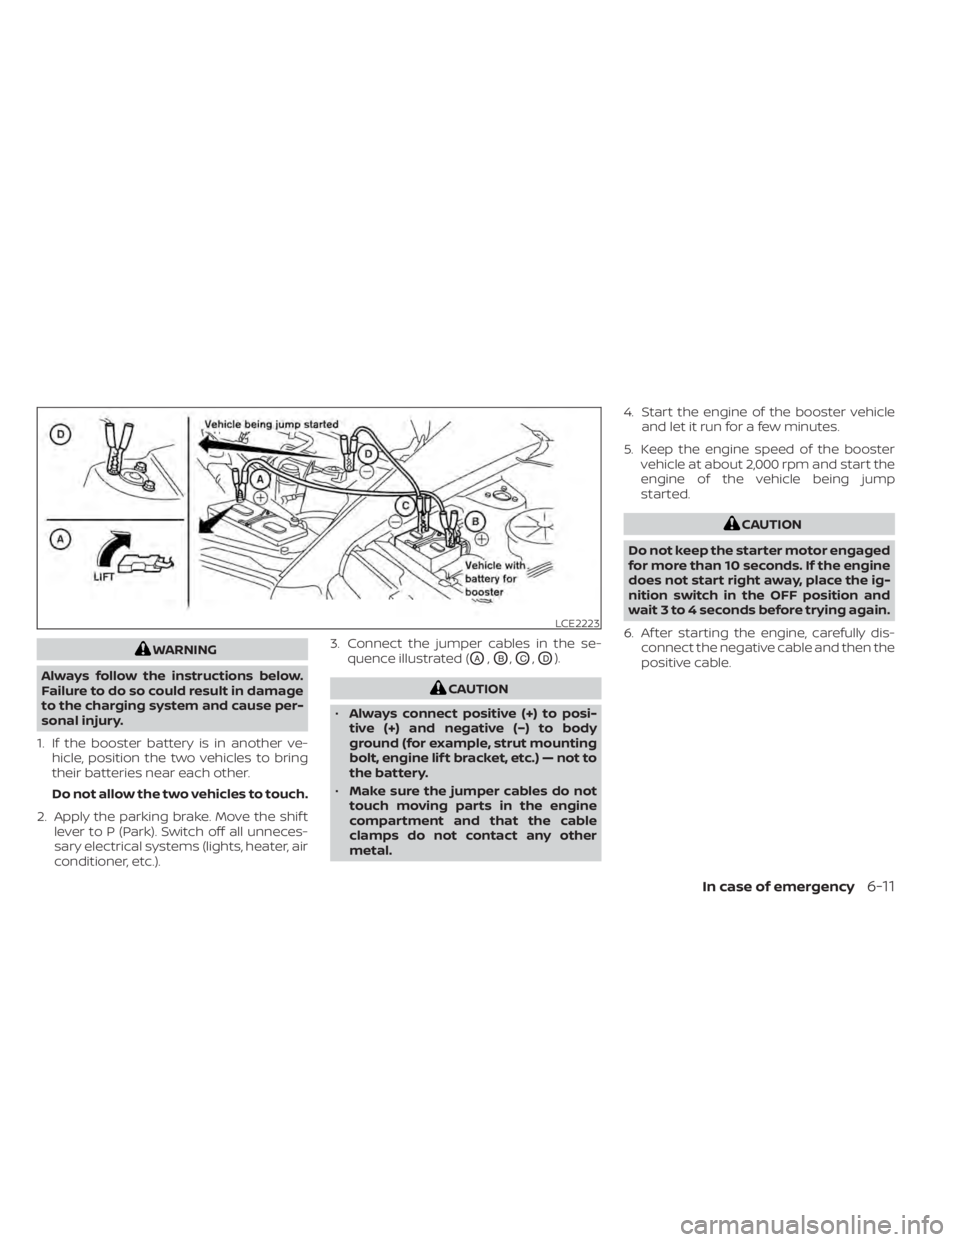
1. If the booster battery is in another ve- hicle, position the two vehicles to bring
their batteries near each other.
Do not allow the two vehicles to touch.
2. Apply the parking brake. Move the shif t lever to P (Park). Switch off all unneces-
sary electrical systems (lights, heater, air
conditioner, etc.). 3. Connect the jumper cables in the se-
quence illustrated (OA,OB,OC,OD).
LCE2223
Page 188 of 300
CAUTION
• Do not push start this vehicle. The
three-way catalyst may be
damaged.
• Continuously Variable Transmission
(CVT) models cannot be push-
started or tow-started. Attempting
to do so may cause transmission
damage.WARNING
• Do not continue to drive if your ve-
hicle overheats. Doing so could cause
engine damage or a vehicle fire.
• To avoid the danger of being scalded,
never remove the radiator or coolant
reservoir cap while the engine is still
hot. When the radiator or coolant res-
ervoir cap is removed, pressurized
hot water will spurt out, possibly
causing serious injury.
• Do not open the hood if steam is
coming out.
• Overheating can result in reduced
engine power and vehicle speed. The
reduced speed may be lower than
other traffic, which could increase
the chance of a collision. Be espe-
cially careful when driving. If the ve-
hicle cannot maintain a safe driving
speed, pull to the side of the road in a
safe area. Allow the engine to cool
and return to normal operation.
If your vehicle is overheating (indicated by a
red high temperature warning light
),
or if you feel a lack of engine power, detect
abnormal noise, etc., take the following
steps. 1. Move the vehicle safely off the road, ap-
ply the parking brake and move the shif t
lever to P (Park).
Do not stop the engine.
2. Turn off the air conditioner. Open all the windows, move the heater or air condi-
tioner temperature control to maximum
hot and fan control to high speed.
3. Get out of the vehicle. Look and listen for steam or coolant escaping from the ra-
diator before opening the hood. If steam
or coolant is escaping, turn off the en-
gine. Do not open the hood further until
no steam or coolant can be seen.
4. Open the engine hood.
Page 197 of 300
•Properly position the mats in the
floorwell using the floor mat posi-
tioning hook. For additional informa-
tion, see "Floor mat installation"
(P. 7-5).
• Make sure the floor mat does not in-
terfere with pedal operation.
• Periodically check the floor mats to
make sure they are properly
installed.
• Af ter cleaning the vehicle interior,
check the floor mats to make sure
they are properly installed.
The use of Genuine NISSAN floor mats can
extend the life of your vehicle carpet and
make it easier to clean the interior. Mats
should be maintained with regular clean-
ing and replaced if they become exces-
sively worn.
Floor mat installation
Your vehicle is equipped with floor mat po-
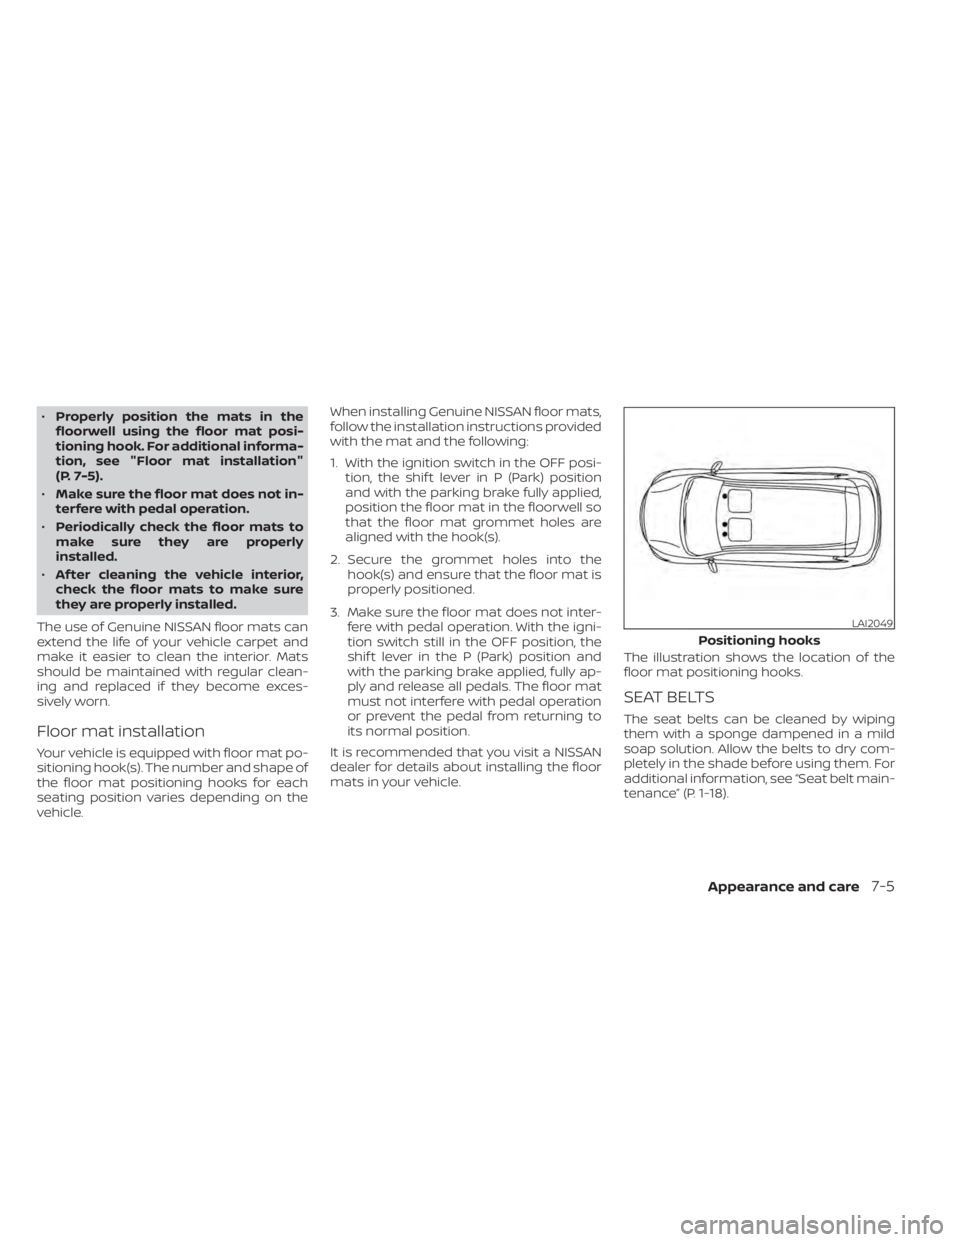
sitioning hook(s). The number and shape of
the floor mat positioning hooks for each
seating position varies depending on the
vehicle. When installing Genuine NISSAN floor mats,
follow the installation instructions provided
with the mat and the following:
1. With the ignition switch in the OFF posi-
tion, the shif t lever in P (Park) position
and with the parking brake fully applied,
position the floor mat in the floorwell so
that the floor mat grommet holes are
aligned with the hook(s).
2. Secure the grommet holes into the hook(s) and ensure that the floor mat is
properly positioned.
3. Make sure the floor mat does not inter- fere with pedal operation. With the igni-
tion switch still in the OFF position, the
shif t lever in the P (Park) position and
with the parking brake applied, fully ap-
ply and release all pedals. The floor mat
must not interfere with pedal operation
or prevent the pedal from returning to
its normal position.
It is recommended that you visit a NISSAN
dealer for details about installing the floor
mats in your vehicle. The illustration shows the location of the
floor mat positioning hooks.
SEAT BELTS
The seat belts can be cleaned by wiping
them with a sponge dampened in a mild
soap solution. Allow the belts to dry com-
pletely in the shade before using them. For
additional information, see “Seat belt main-
tenance” (P. 1-18).
LAI2049
Positioning hooks
Appearance and care7-5
Page 199 of 300
CAUTION
• NEVER remove dirt, sand or other de-
bris from the passenger compart-
ment by washing it out with a hose.
Remove dirt with a vacuum cleaner
or broom.
• Never allow water or other liquids to
come in contact with electronic com-
ponents inside the vehicle as this
may damage them.
Chemicals used for road surface de-icing
are extremely corrosive. They accelerate
corrosion and deterioration of underbody
components such as the exhaust system,
fuel and brake lines, brake cables, floor pan
and fenders.
In winter, the underbody must be
cleaned periodically.
For additional protection against rust and
corrosion, which may be required in some
areas, it is recommended that you visit a
NISSAN dealer.
Appearance and care7-7
Page 207 of 300
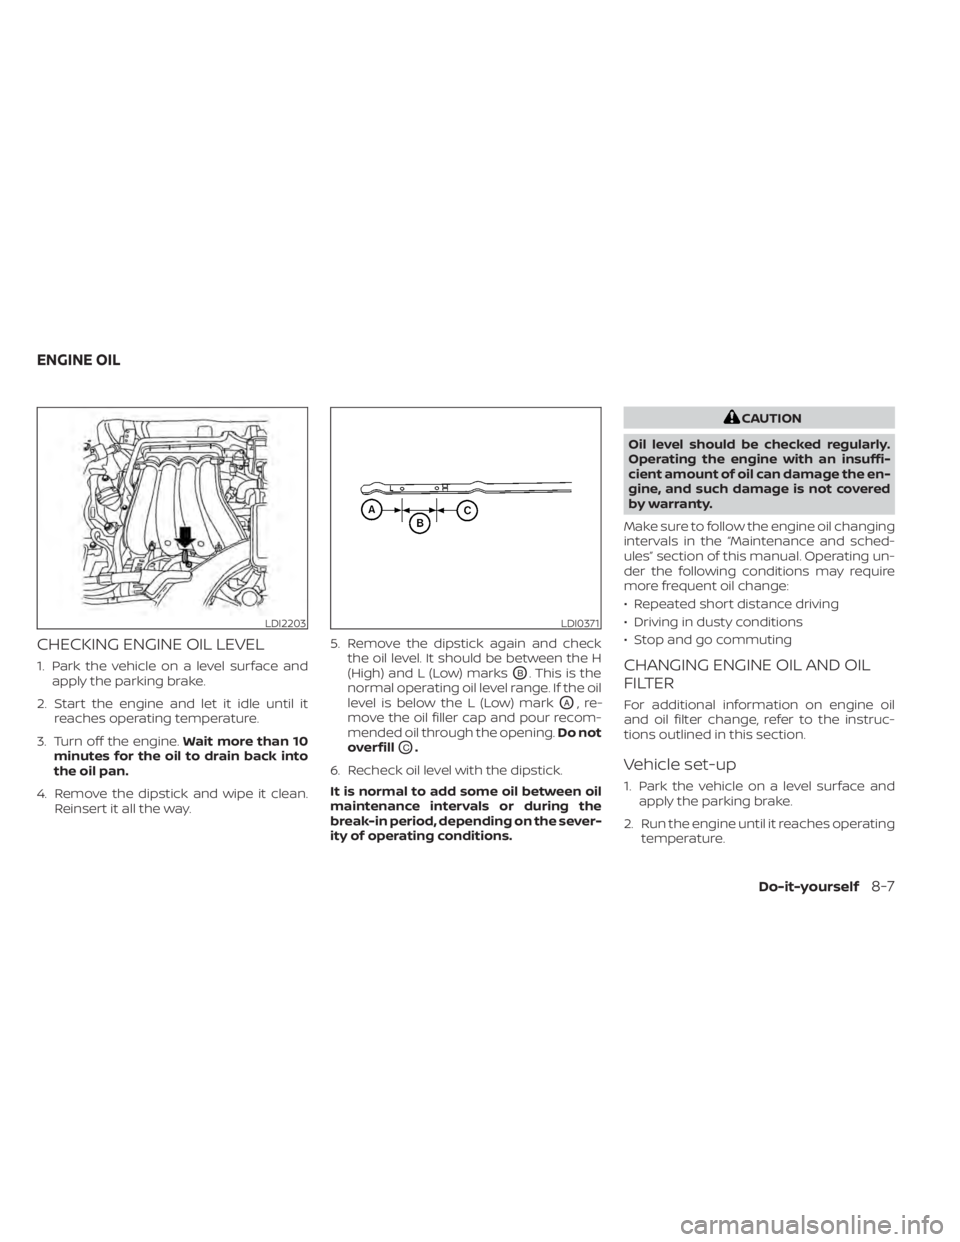
CHECKING ENGINE OIL LEVEL
1. Park the vehicle on a level surface andapply the parking brake.
2. Start the engine and let it idle until it reaches operating temperature.
3. Turn off the engine. Wait more than 10
minutes for the oil to drain back into
the oil pan.
4. Remove the dipstick and wipe it clean. Reinsert it all the way. 5. Remove the dipstick again and check
the oil level. It should be between the H
(High) and L (Low) marksOB. This is the
normal operating oil level range. If the oil
level is below the L (Low) mark
OA,re-
move the oil filler cap and pour recom-
mended oil through the opening. Do not
overfill
OC.
6. Recheck oil level with the dipstick.
It is normal to add some oil between oil
maintenance intervals or during the
break-in period, depending on the sever-
ity of operating conditions.
CAUTION
Oil level should be checked regularly.
Operating the engine with an insuffi-
cient amount of oil can damage the en-
gine, and such damage is not covered
by warranty.
Make sure to follow the engine oil changing
intervals in the “Maintenance and sched-
ules” section of this manual. Operating un-
der the following conditions may require
more frequent oil change:
• Repeated short distance driving
• Driving in dusty conditions
• Stop and go commuting
CHANGING ENGINE OIL AND OIL
FILTER
For additional information on engine oil
and oil filter change, refer to the instruc-
tions outlined in this section.
Vehicle set-up
1. Park the vehicle on a level surface and apply the parking brake.
2. Run the engine until it reaches operating temperature.
LDI2203LDI0371
ENGINE OIL
Do-it-yourself8-7
Page 210 of 300
CAUTION
• NISSAN recommends using Genuine
NISSAN CVT Fluid NS-3 (or equiva-
lent) ONLY in NISSAN CVTs. Do not mix
with other fluids.
• Do not use Automatic Transmission
Fluid (ATF) or manual transmission
fluid in a NISSAN CVT, as it may dam-
age the CVT. Damage caused by the
use of fluids other than as recom-
mended is not covered under
NISSAN's New Vehicle Limited
Warranty.
• Using fluids that are not equivalent
to Genuine NISSAN CVT Fluid NS-3
may also damage the CVT. Damage
caused by the use of fluids other than
as recommended is not covered un-
der NISSAN's New Vehicle Limited
Warranty.
When checking or replacement of CVT fluid
is required, it is recommended that you visit
a NISSAN dealer for servicing.
CAUTION
Do not spill the fluid on any painted sur-
faces. This will damage the paint. If fluid
is spilled, immediately wash the sur-
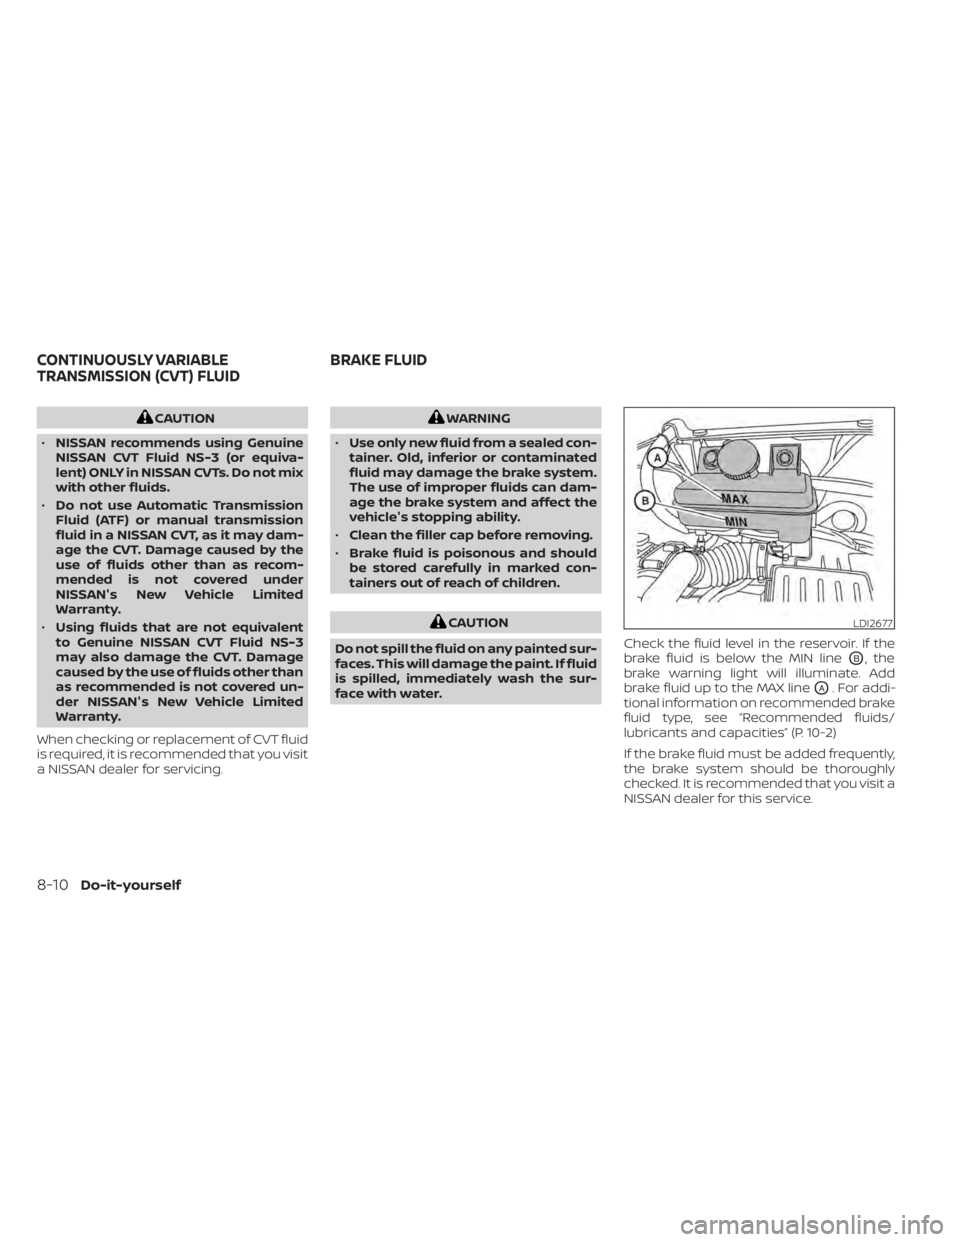
face with water. Check the fluid level in the reservoir. If the
brake fluid is below the MIN line
OB, the
brake warning light will illuminate. Add
brake fluid up to the MAX line
OA. For addi-
tional information on recommended brake
fluid type, see “Recommended fluids/
lubricants and capacities” (P. 10-2)
If the brake fluid must be added frequently,
the brake system should be thoroughly
checked. It is recommended that you visit a
NISSAN dealer for this service.
LDI2677
CONTINUOUSLY VARIABLE
TRANSMISSION (CVT) FLUID BRAKE FLUID
Page 215 of 300
WARNING
Be sure the engine and ignition switch
are off and that the parking brake is
engaged securely.
CAUTION
Be sure to use the correct socket to re-
move the spark plugs. An incorrect
socket can damage the spark plugs.
If replacement is required, it is recom-
mended that you visit a NISSAN dealer for
this service. The air cleaner filter should not be cleaned
and reused. Replace it according to the
maintenance log shown in the “Mainte-
nance and schedules” section of this
manual.
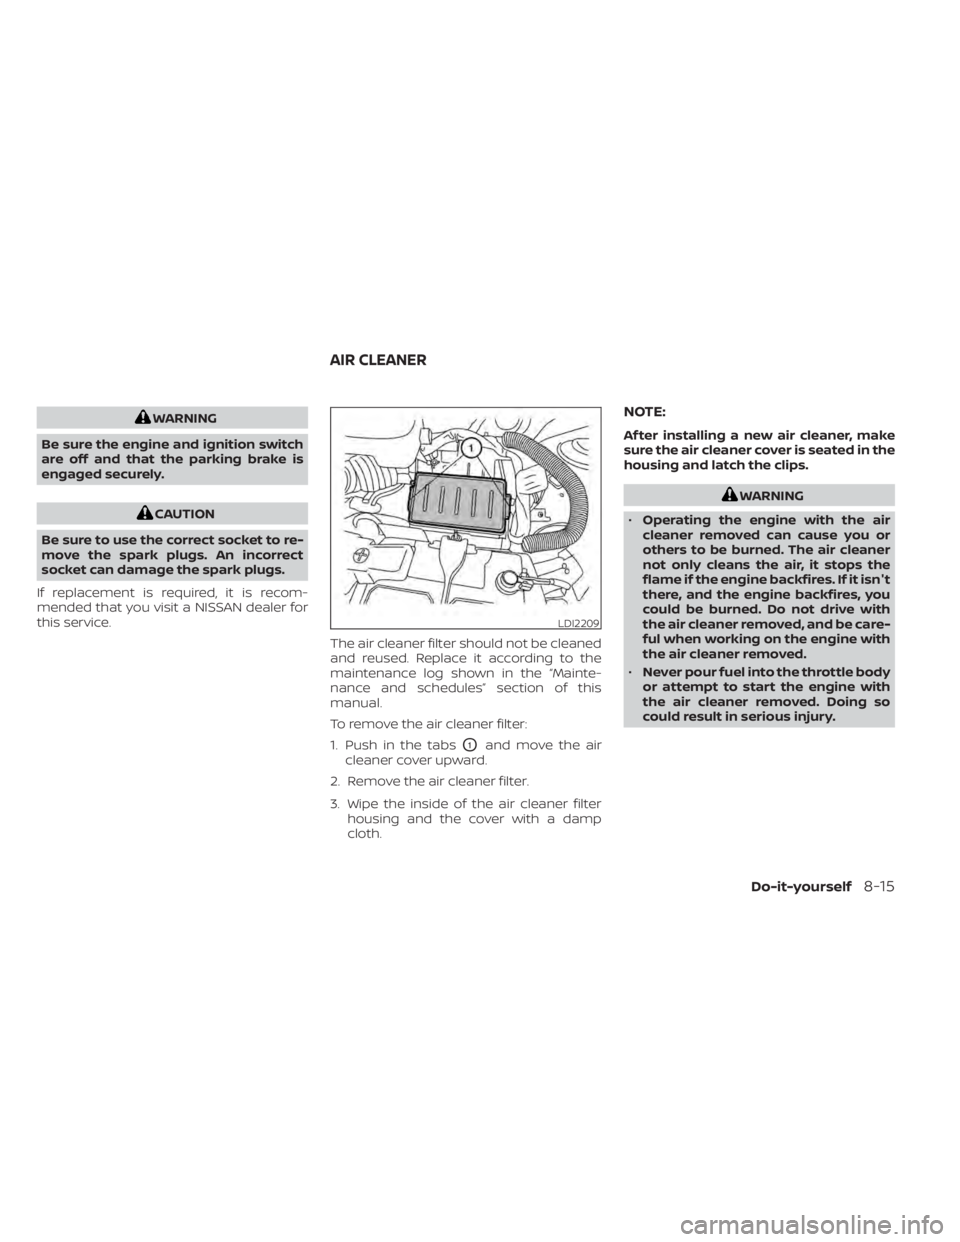
To remove the air cleaner filter:
1. Push in the tabs
O1and move the air
cleaner cover upward.
2. Remove the air cleaner filter.
3. Wipe the inside of the air cleaner filter housing and the cover with a damp
cloth.
NOTE:
Af ter installing a new air cleaner, make
sure the air cleaner cover is seated in the
housing and latch the clips.
WARNING
• Operating the engine with the air
cleaner removed can cause you or
others to be burned. The air cleaner
not only cleans the air, it stops the
flame if the engine backfires. If it isn't
there, and the engine backfires, you
could be burned. Do not drive with
the air cleaner removed, and be care-
ful when working on the engine with
the air cleaner removed.
• Never pour fuel into the throttle body
or attempt to start the engine with
the air cleaner removed. Doing so
could result in serious injury.
Do-it-yourself8-15