2021 NISSAN MURANO height
[x] Cancel search: heightPage 324 of 508
•Once the automatic brake control
operates, it does not operate again if
the vehicle approaches the same
obstacle.
• The automatic brake control can only
operate for a short period of time.
Therefore, the driver must depress
the brake pedal.
• In the following situations, the RAB
system may not operate properly or
may not function sufficiently:
– The vehicle is driven in bad
weather (rain, fog, snow, etc.).
– The vehicle is driven on a steep
hill.
– The vehicle’s posture is changed
(e.g., when driving over a bump).
– The vehicle is driven on a slippery
road.
– The vehicle is turned sharply by
turning the steering wheel fully.
– Snow chains are used.
– Wheels or tires other than NISSAN
recommended are used.
– The brakes are cold at low ambi-
ent temperatures or immediately
af ter driving has started. –
The braking force becomes poor
due to wet brakes af ter driving
through a puddle or washing the
vehicle.
• Turn the RAB system off in the follow-
ing conditions to prevent the occur-
rence of an unexpected accident re-
sulting from sudden system
operation:
– The vehicle is towed.
– The vehicle is carried on a flatbed
truck.
– The vehicle is on the chassis
dynamometer.
– The vehicle drives on an uneven
road surface.
– The vehicle is towing an object (if
so equipped).
– Suspension parts other than
those designated as Genuine
NISSAN parts are used. (If the ve-
hicle height or the vehicle body in-
clination is changed, the system
may not detect an obstacle
correctly.)
• Excessive noise (e.g., audio system
volume, an open vehicle window) will
interfere with the chime sound, and it
may not be heard.SYSTEM MALFUNCTION
If the RAB system malfunctions, it will be
turned off automatically, and the RAB sys-
tem warning light will illuminate in the ve-
hicle information display.
Action to take
If the warning light illuminates, park the ve-
hicle in a safe location, turn the engine off,
and restart the engine. If the warning light
continues to illuminate, have the RAB sys-
tem checked. It is recommended that you
visit a NISSAN dealer for this service.
NOTE:
If the RAB system cannot be operated
temporarily, the RAB system warning
light blinks.
5-86Starting and driving
Page 409 of 508
If the brakes do not operate properly, have
the brakes checked. It is recommended
that you visit a NISSAN dealer for this
service.
Self-adjusting brakes
Your vehicle is equipped with self-adjusting
brakes.
The front and rear disc-type brakes self-
adjust every time the brake pedal is
applied.
WARNING
Have your brake system checked if the
brake pedal height does not return to
normal. It is recommended that you
visit a NISSAN dealer for this service.
Brake pad wear indicators
The disc brake pads on your vehicle have
audible wear indicators. When a brake pad
requires replacement, a high pitched
scraping or screeching sound will be heard
when the vehicle is in motion. The noise will
be heard whether or not the brake pedal is
depressed. Have the brakes checked as
soon as possible if the wear indicator
sound is heard. Under some driving or climate conditions,
occasional brake squeak, squeal or other
noise may be heard. Occasional brake
noise during light to moderate stops is nor-
mal and does not affect the function or
performance of the brake system.
Proper brake inspection intervals should
be followed.
For additional information re-
garding brake inspections, refer to the ap-
propriate maintenance schedule informa-
tion in the "Maintenance and schedules"
section of this manual.
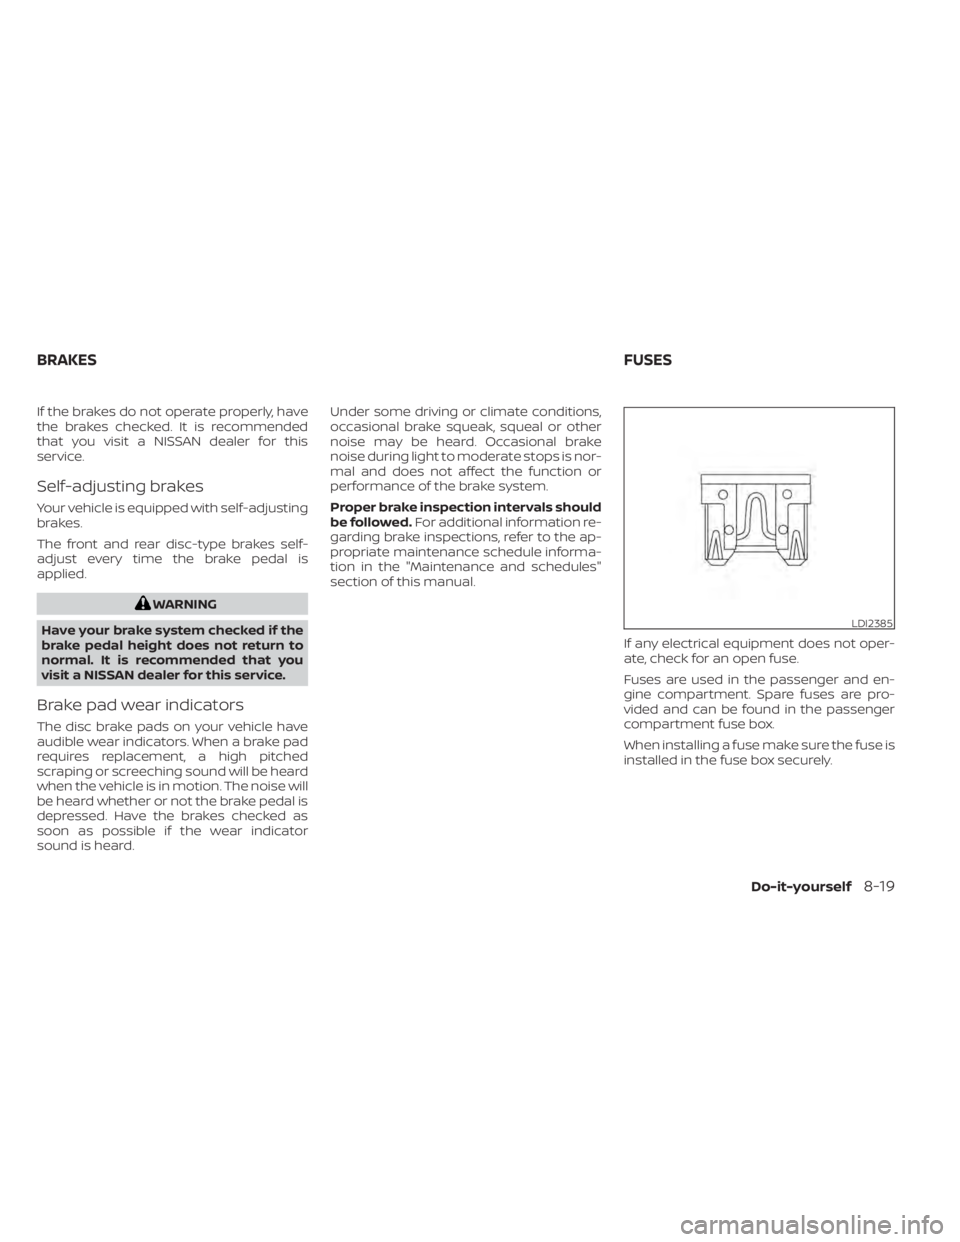
If any electrical equipment does not oper-
ate, check for an open fuse.
Fuses are used in the passenger and en-
gine compartment. Spare fuses are pro-
vided and can be found in the passenger
compartment fuse box.
When installing a fuse make sure the fuse is
installed in the fuse box securely.
LDI2385
BRAKES FUSES
Do-it-yourself8-19
Page 421 of 508
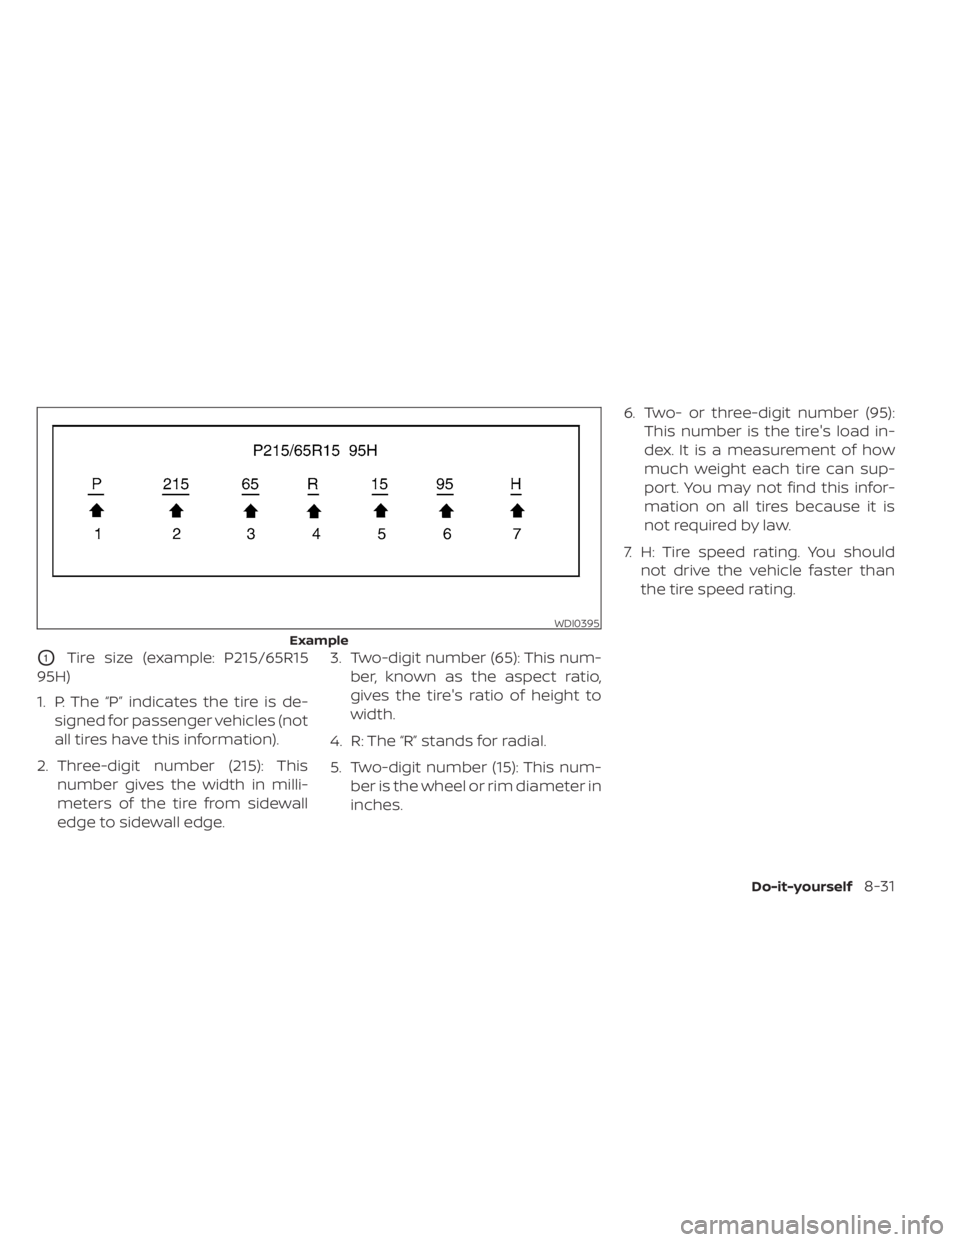
O1Tire size (example: P215/65R15
95H)
1. P: The “P” indicates the tire is de- signed for passenger vehicles (not
all tires have this information).
2. Three-digit number (215): This number gives the width in milli-
meters of the tire from sidewall
edge to sidewall edge. 3. Two-digit number (65): This num-
ber, known as the aspect ratio,
gives the tire's ratio of height to
width.
4. R: The “R” stands for radial.
5. Two-digit number (15): This num- ber is the wheel or rim diameter in
inches. 6. Two- or three-digit number (95):
This number is the tire's load in-
dex. It is a measurement of how
much weight each tire can sup-
port. You may not find this infor-
mation on all tires because it is
not required by law.
7. H: Tire speed rating. You should not drive the vehicle faster than
the tire speed rating.
WDI0395
Example
Do-it-yourself8-31
Page 426 of 508
WARNING
• Tires should be periodically in-
spected for wear, cracking,
bulging or objects caught in
the tread. If excessive wear,
cracks, bulging or deep cuts
are found, the tire(s) should be
replaced.
• The original tires have built-in
tread wear indicators. When
the wear indicators are visible,
the tire(s) should be replaced.
• Tires degrade with age and
use. Have tires, including the
spare, over 6 years old checked
by a qualified technician be-
cause some tire damage may
not be obvious. Replace the
tires as necessary to prevent
tire failure and possible per-
sonal injury. •
Improper service of the spare
tire may result in serious per-
sonal injury. If it is necessary to
repair the spare tire, it is rec-
ommended that you visit a
NISSAN dealer for this service.
• For additional information re-
garding tires, refer to “Impor-
tant Tire Safety Information”
(US) or “Tire Safety Informa-
tion” (Canada) in the Warranty
Information Booklet.
Replacing wheels and tires
When replacing a tire, use the same size,
tread design, speed rating and load carry-
ing capacity as originally equipped. For ad-
ditional information, see “Wheels and tires”
(P. 8-27).
WARNING
• The use of tires other than those rec-
ommended or the mixed use of tires
of different brands, construction
(bias, bias-belted or radial), or tread
patterns can adversely affect the
ride, braking, handling, VDC system,
ground clearance, body-to-tire clear-
ance, tire chain clearance, speedom-
eter calibration, headlight aim and
bumper height. Some of these ef-
fects may lead to accidents and
could result in serious personal
injury.
• For 2WD models, if your vehicle was
originally equipped with four tires
that were the same size and you are
only replacing two of the four tires,
install the new tires on the rear axle.
Placing new tires on the front axle
may cause loss of vehicle control in
some driving conditions and cause
an accident and personal injury.
8-36Do-it-yourself
Page 470 of 508
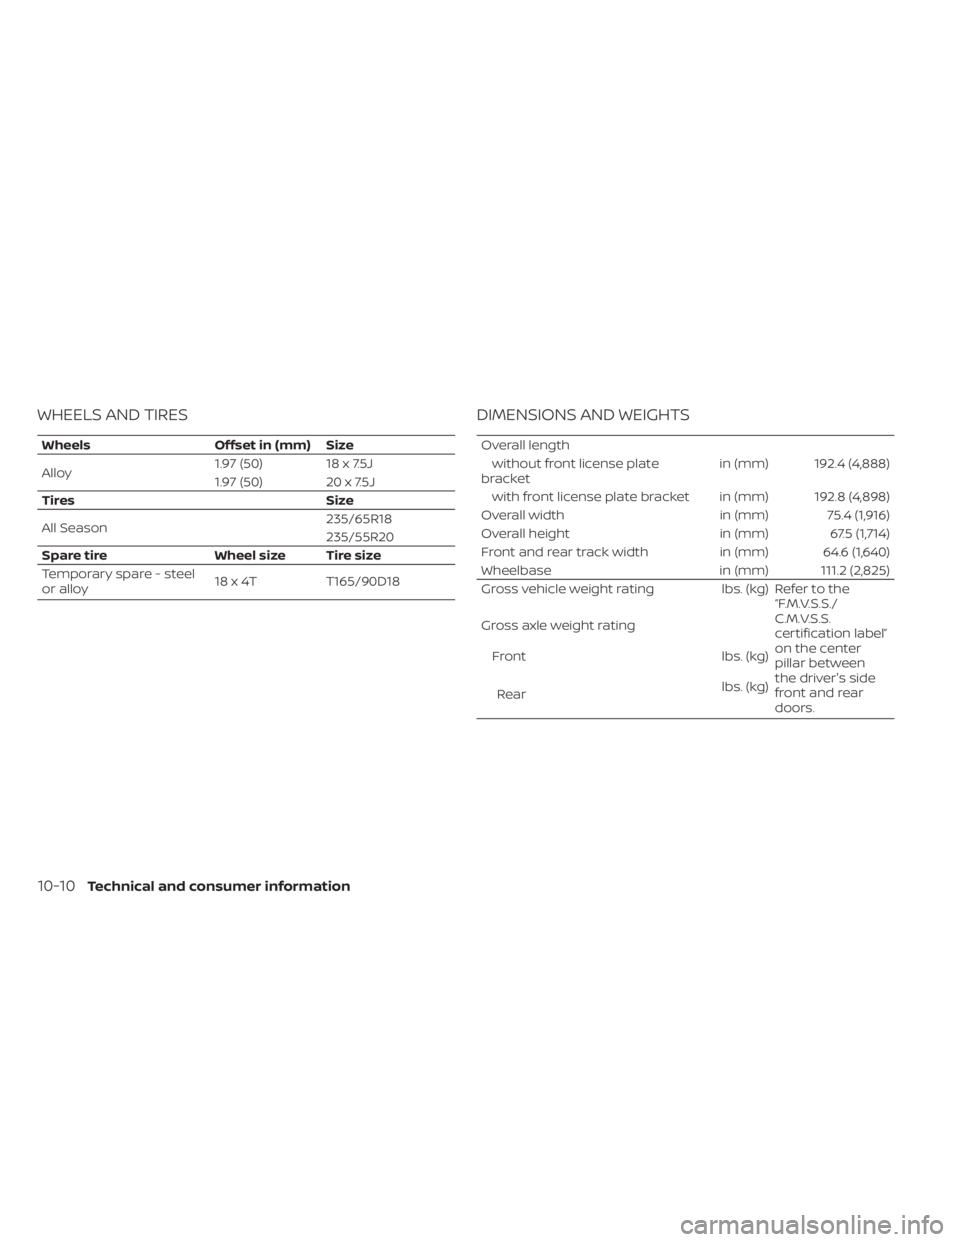
WHEELS AND TIRES
WheelsOffset in (mm) Size
Alloy 1.97 (50) 18 x 7.5J
1.97 (50) 20 x 7.5J
Tires Size
All Season 235/65R18
235/55R20
Spare tire Wheel size Tire size
Temporary spare - steel
or alloy 18 x 4T
T165/90D18
DIMENSIONS AND WEIGHTS
Overall length
without front license plate
bracket in (mm) 192.4 (4,888)
with front license plate bracket in (mm) 192.8 (4,898)
Overall width in (mm) 75.4 (1,916)
Overall height in (mm) 67.5 (1,714)
Front and rear track width in (mm) 64.6 (1,640)
Wheelbase in (mm) 111.2 (2,825)
Gross vehicle weight rating lbs. (kg) Refer to the
“F.M.V.S.S./
C.M.V.S.S.
certification label”
on the center
pillar between
the driver's side
front and rear
doors.
Gross axle weight rating
Front lbs. (kg)
Rear lbs. (kg)
10-10Technical and consumer information
Page 482 of 508
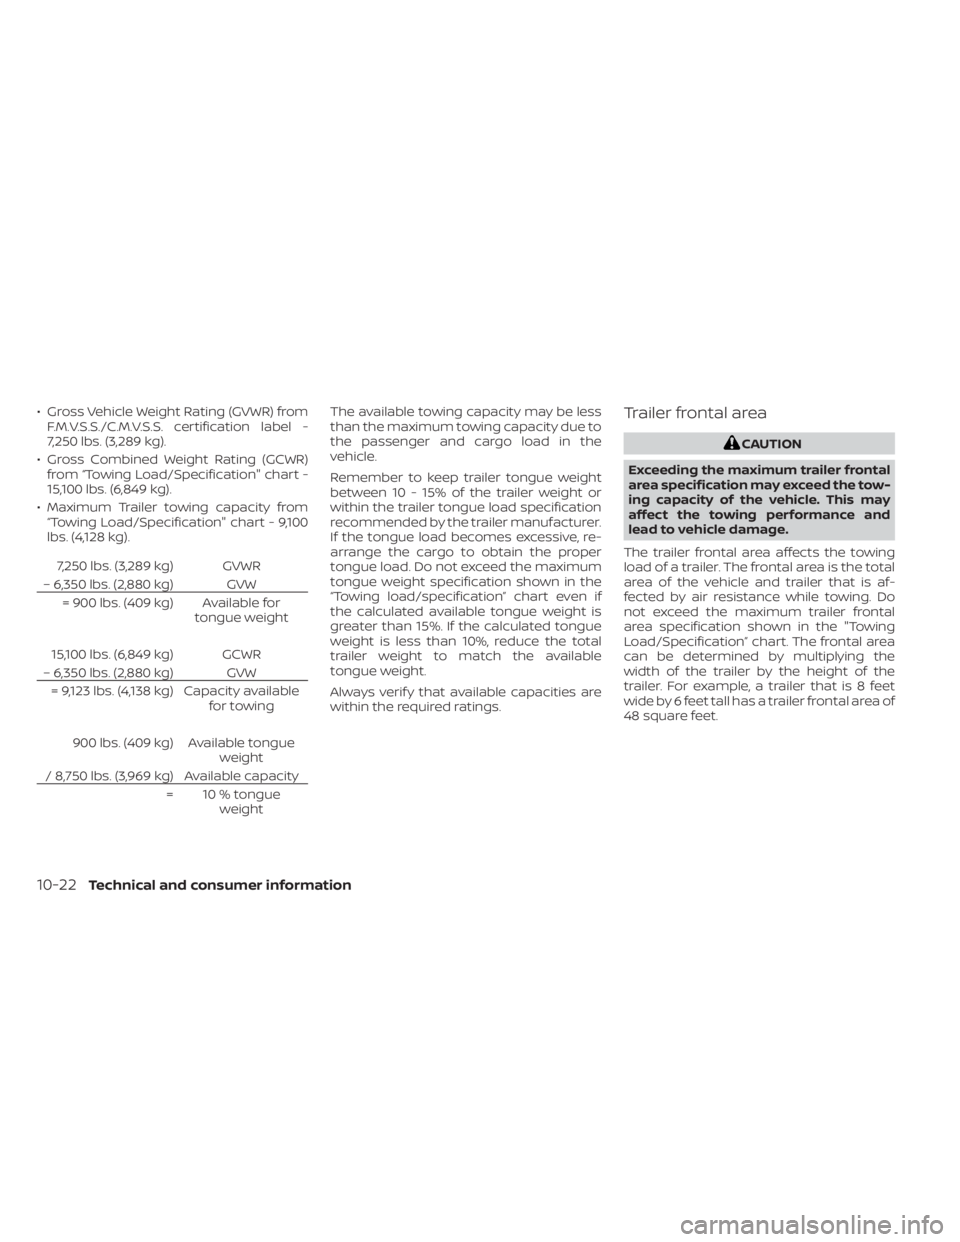
• Gross Vehicle Weight Rating (GVWR) fromF.M.V.S.S./C.M.V.S.S. certification label -
7,250 lbs. (3,289 kg).
• Gross Combined Weight Rating (GCWR) from “Towing Load/Specification" chart -
15,100 lbs. (6,849 kg).
• Maximum Trailer towing capacity from “Towing Load/Specification" chart - 9,100
lbs. (4,128 kg).
7,250 lbs. (3,289 kg) GVWR
– 6,350 lbs. (2,880 kg) GVW = 900 lbs. (409 kg) Available for tongue weight
15,100 lbs. (6,849 kg) GCWR
– 6,350 lbs. (2,880 kg) GVW = 9,123 lbs. (4,138 kg) Capacity available for towing
900 lbs. (409 kg) Available tongue weight
/ 8,750 lbs. (3,969 kg) Available capacity = 10 % tongueweight The available towing capacity may be less
than the maximum towing capacity due to
the passenger and cargo load in the
vehicle.
Remember to keep trailer tongue weight
between 10 - 15% of the trailer weight or
within the trailer tongue load specification
recommended by the trailer manufacturer.
If the tongue load becomes excessive, re-
arrange the cargo to obtain the proper
tongue load. Do not exceed the maximum
tongue weight specification shown in the
“Towing load/specification” chart even if
the calculated available tongue weight is
greater than 15%. If the calculated tongue
weight is less than 10%, reduce the total
trailer weight to match the available
tongue weight.
Always verif y that available capacities are
within the required ratings.
Trailer frontal area
CAUTION
Exceeding the maximum trailer frontal
area specification may exceed the tow-
ing capacity of the vehicle. This may
affect the towing performance and
lead to vehicle damage.
The trailer frontal area affects the towing
load of a trailer. The frontal area is the total
area of the vehicle and trailer that is af-
fected by air resistance while towing. Do
not exceed the maximum trailer frontal
area specification shown in the "Towing
Load/Specification” chart. The frontal area
can be determined by multiplying the
width of the trailer by the height of the
trailer. For example, a trailer that is 8 feet
wide by 6 feet tall has a trailer frontal area of
48 square feet.
10-22Technical and consumer information
Page 485 of 508

A weight-distributing hitch system (Class
IV) is recommended if you plan to tow trail-
ers with a maximum weight over 5,000 lbs.
(2,268 kg). Check with the trailer and towing
equipment manufacturers to determine if
they recommend the use of a weight-
distributing hitch system.
NOTE:
A weight-distributing hitch system may
affect the operation of trailer surge
brakes. If you are considering use of a
weight-distributing hitch system with a
surge brake-equipped trailer, check with
the surge brake, hitch or trailer manufac-
turer to determine if and how this can be
done.
Follow the instructions provided by the
manufacturer for installing and using the
weight-distributing hitch system.
General set-up instructions are as follows:
1. Park unloaded vehicle on a level surface.With the ignition switch in the ON posi-
tion and the doors closed, allow the ve-
hicle to stand for several minutes so that
it can level.
2. Measure the height of a reference point on the front and rear bumpers at the
center of the vehicle. 3. Attach the trailer to the vehicle and ad-
just the hitch equalizers so that the front
bumper height is within0-.5inches (0 –
13 mm) of the reference height mea-
sured in step 2. The rear bumper should
be no higher than the reference height
measured in step 2.
WARNING
Properly adjust the weight distributing
hitch so the rear of the bumper is no
higher than the measured reference
height when the trailer is attached. If
the rear bumper is higher than the
measured reference height when
loaded, the vehicle may handle unpre-
dictably which could cause a loss of ve-
hicle control and cause serious per-
sonal injury or property damage.
Sway control device
Sudden maneuvers, wind gusts, and buf-
feting caused by other vehicles can affect
trailer handling. Sway control devices may
be used to help control these affects. If you
choose to use one, contact a reputable
trailer hitch supplier to make sure the sway
control device will work with the vehicle,
hitch, trailer and the trailer's brake system.
Follow the instructions provided by the manufacturer for installing and using the
sway control device.
Class I hitch
Class I trailer hitch equipment (receiver, ball
mount and hitch ball) can be used to tow
trailers of a maximum weight of 2,000 lbs.
(907 kg).
Tire pressures
• When towing a trailer, inflate the
vehicle tires to the recommended
cold tire pressure indicated on the
Tire and Loading Information label.
• Trailer tire condition, size, load rat- ing and proper inflation pressure
should be in accordance with the
trailer and tire manufacturer's
specifications.
Safety chains
Always use suitable safety chains between
your vehicle and the trailer. The safety
chains should be crossed and should be
attached to the hitch, not to the vehicle
bumper or axle. The safety chains can be
attached to the bumper if the hitch ball is
Technical and consumer information10-25
Page 486 of 508
mounted to the bumper. Be sure to leave
enough slack in the chains to permit turn-
ing corners.
Trailer lights
CAUTION
When splicing into the vehicle electrical
system, a commercially available
power-type module/converter must
be used to provide power for all trailer
lighting. This unit uses the vehicle bat-
tery as a direct power source for all
trailer lights while using the vehicle tail
light, stop light and turn signal circuits
as a signal source. The module/
converter must draw no more than 15
milliamps from the stop and tail lamp
circuits. Using a module/converter that
exceeds these power requirements
may damage the vehicle's electrical
system. It is recommended that you
visit a reputable trailer retailer to ob-
tain the proper equipment and to have
it installed.
Trailer lights should comply with federal
and/or local regulations. For assistance in
hooking up trailer lights, it is recommended
that you contact a NISSAN dealer or repu-
table trailer retailer. Vehicles equipped with the optional trailer tow package are
equipped with a flat 4-pin connector, an
adapter will be needed to connect the
trailer lights to the vehicle. Adapters are
available at auto parts stores and hitch
retailers.Pre-towing tips
• Be certain your vehicle maintains a level
position when a loaded and/or unloaded
trailer is hitched. Do not drive the vehicle if
it has an abnormal nose-up or nose-
down condition; check for improper
tongue load, overload, worn suspension
or other possible causes of either
condition.
• Always secure items in the trailer to pre- vent load shif t while driving.
• Keep the cargo load as low as possible in the trailer to keep the trailer center of
gravity low.
• Load the trailer so approximately 60% of the trailer load is in the front half and 40%
is in the back half. Also make sure the load
is balanced side to side.
• Check your hitch, trailer tire pressure, ve- hicle tire pressure, trailer light operation,
and trailer wheel lug nuts every time you
attach a trailer to the vehicle. • Be certain your rearview mirrors conform
to all federal, state or local regulations. If
not, install any mirrors required for towing
before driving the vehicle.
• Determine the overall height of the ve- hicle and trailer so the required clearance
is known.Trailer towing tips
In order to gain skill and an understanding
of the vehicle's behavior, you should prac-
tice turning, stopping and backing up in an
area which is free from traffic. Steering sta-
bility and braking performance will be
somewhat different than under normal
driving conditions.
• Always secure items in the trailer to pre-vent load shif t while driving.
• Lock the trailer hitch coupler with a pin or lock to prevent the coupler from inadver-
tently becoming unlatched.
• Avoid abrupt starts, acceleration or stops.
• Avoid sharp turns or lane changes.
• Always drive your vehicle at a moderate speed.
10-26Technical and consumer information