2021 NISSAN MAXIMA battery
[x] Cancel search: batteryPage 172 of 476
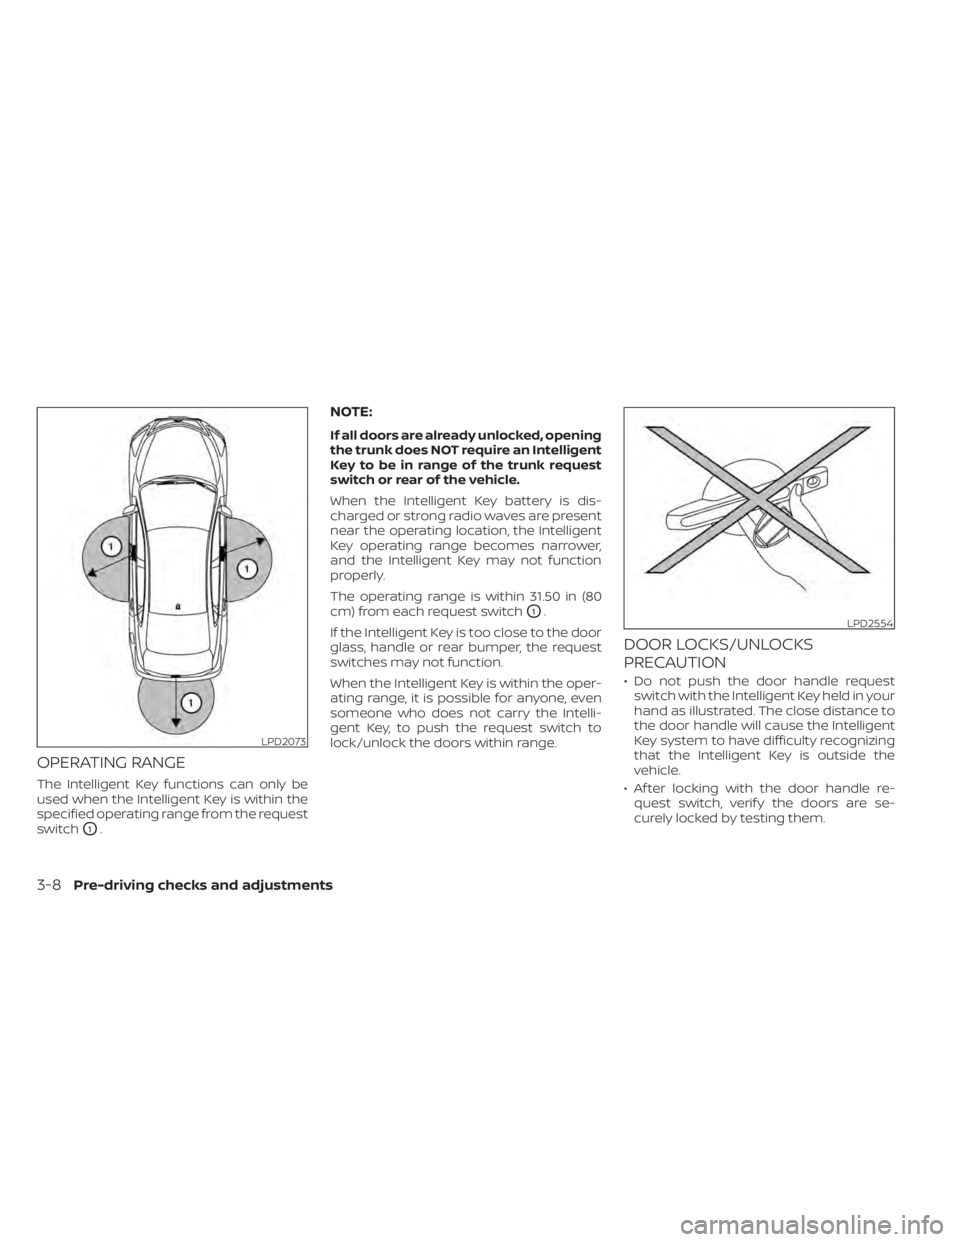
OPERATING RANGE
The Intelligent Key functions can only be
used when the Intelligent Key is within the
specified operating range from the request
switch
O1.
NOTE:
If all doors are already unlocked, opening
the trunk does NOT require an Intelligent
Key to be in range of the trunk request
switch or rear of the vehicle.
When the Intelligent Key battery is dis-
charged or strong radio waves are present
near the operating location, the Intelligent
Key operating range becomes narrower,
and the Intelligent Key may not function
properly.
The operating range is within 31.50 in (80
cm) from each request switch
O1.
If the Intelligent Key is too close to the door
glass, handle or rear bumper, the request
switches may not function.
When the Intelligent Key is within the oper-
ating range, it is possible for anyone, even
someone who does not carry the Intelli-
gent Key, to push the request switch to
lock/unlock the doors within range.
DOOR LOCKS/UNLOCKS
PRECAUTION
• Do not push the door handle request switch with the Intelligent Key held in your
hand as illustrated. The close distance to
the door handle will cause the Intelligent
Key system to have difficulty recognizing
that the Intelligent Key is outside the
vehicle.
• Af ter locking with the door handle re- quest switch, verif y the doors are se-
curely locked by testing them.
LPD2073
LPD2554
3-8Pre-driving checks and adjustments
Page 177 of 476

HOW TO USE THE REMOTE
KEYLESS ENTRY FUNCTION
The remote keyless entry function can op-
erate all door locks using the remote key-
less function of the Intelligent Key. The re-
mote keyless function can operate at a
distance of 33 f t (10 m) away from the ve-hicle. The operating distance depends
upon the conditions around the vehicle.
The remote keyless entry function will not
function under the following conditions:
• When the Intelligent Key is not within the
operational range.
• When the Intelligent Key battery is discharged.
CAUTION
When locking the doors using the Intel-
ligent Key, be sure not to leave the key
in the vehicle.
Locking doors
1. Place the ignition switch in the LOCK position.
2. Close all doors.
3. Press the
button on the Intelli-
gent Key.
4. The hazard indicator lights flash twice and the horn beeps once.
5. All doors and the trunk will be locked.
WARNING
Af ter locking the doors using the Intel-
ligent Key, be sure that the doors have
been securely locked by operating the
door handles. Failure to follow these in-
structions may result in inadvertently
unlocking the doors, which may de-
crease the safety and security of your
vehicle.
Unlocking doors
1. Press thebutton on the Intelligent
Key.
2. The hazard indicator lights flash once and the driver’s door will unlock.
3. Press the
button again within 1
minute to unlock all doors and trunk.
NOTE:
The Selective Unlock feature can be
changed using the “Vehicle Settings”
menu on the vehicle information display.
For additional information, see “Vehicle
information display ” (P. 2-17).
LPD3603
1.(remote engine start) button
2.
(lock) button
3.
(unlock) button
4.
(trunk) button
5.
(panic) button
Pre-driving checks and adjustments3-13
Page 179 of 476

To deactivate:
Press and hold theandbut-
tons for at least 2 seconds. The hazard
indicator lights will flash three times to con-
firm that the answer back horn feature has
been deactivated.
To activate:
Press and hold the
andbut-
tons for at least 2 seconds once more.
The hazard indicator lights will flash once
and the horn will sound once to confirm
that the horn beep feature has been
reactivated.
Deactivating the horn beep feature does
not silence the horn if the alarm is
triggered.
Intelligent Key button operation
light
The light blinks only when you press any
button on the Intelligent Key. The light illu-
mination only signifies that the key fob has
transmitted a signal. You may look and/or
listen to verif y that the vehicle has per-
formed the intended operation. The num-
ber of blinks identifies each registered key
(i.e. 1 blink = 1st key,...,4 blinks = 4th key) for
your own identification purposes. If the light does not blink, your battery may
be too weak to communicate to the ve-
hicle. If this occurs, the battery may need to
be replaced. For additional information re-
garding the replacement of a battery, see
“Battery replacement” (P. 8-21).
WARNING SIGNALS
To help prevent the vehicle from moving
unexpectedly by erroneous operation of
the Intelligent Key or to help prevent the
vehicle from being stolen, a chime or
buzzer sounds from inside and outside the
vehicle and a warning is displayed in the
instrument panel.
When a chime or beep sounds or a warning
is displayed, be sure to check the vehicle
and the Intelligent Key.
For additional information, see “Trouble-
shooting guide” (P. 3-16) and “Vehicle infor-
mation display” (P. 2-17).
LPD2836
Pre-driving checks and adjustments3-15
Page 181 of 476

SymptomPossible CauseRemedy
When pushing the door handle re-
quest switch to lock the door The outside chime sounds for approxi-
mately three seconds.
The Intelligent Key is inside the vehicle. Carry the Intelligent Key with you.
When pushing the ignition switch to
start the engine The Key Battery Low indicator appears
on the display.
The battery charge is low.Replace the battery with a new one.
For additional information, see “Battery
replacement” (P. 8-21).
The Key ID Incorrect warning appears
on the vehicle information display. The Intelligent Key is not detected in-
side of the vehicle.Carry the registered Intelligent Key
with you.
When closing the trunk lid The outside chime sounds for approxi-
mately 10 seconds and the trunk lid
opens. The Intelligent Key is inside the trunk. Carry the Intelligent Key with you.
Pre-driving checks and adjustments3-17
Page 182 of 476
Thebutton will be on the NISSAN
Intelligent Key® if the vehicle has Remote
Engine Start. This feature allows the engine
to start from outside the vehicle.
Vehicles with an automatic climate control
system will default to either heating or
cooling mode. For additional information,
see “Remote Engine Start with Intelligent
Climate Control” (P. 4-29).
Laws in some local communities may re-
strict the use of remote starters. For ex-
ample, some laws require a person using
Remote Engine Start to have the vehicle in
view. Check local regulations for any
requirements. Other conditions may affect the function of
the Remote Engine Start feature. For addi-
tional information, see “Conditions the Re-
mote Engine Start will not work” (P. 3-19).
Other conditions can affect the perfor-
mance of the Intelligent Key transmitter.
For additional information, see “NISSAN In-
telligent Key®” (P. 3-2).
REMOTE ENGINE START
OPERATING RANGE
WARNING
To help avoid risk of injury or death
through unintended operation of the
vehicle and/or its systems, including
entrapment in windows or inadvertent
door lock activation, do not leave chil-
dren, people who require the assis-
tance of others or pets unattended in
your vehicle. Additionally, the tempera-
ture inside a closed vehicle on a warm
day can quickly become high enough
to cause a significant risk of injury or
death to people and pets.
CAUTION
When the Intelligent Key battery is dis-
charged or other strong radio wave
sources are present near the operating
location, the Intelligent Key operating
range becomes narrower, and the Intel-
ligent Key may not function properly.
The Remote Engine Start function can only
be used when the Intelligent Key is within
the specified operating range from the
vehicle.
The Remote Engine Start operating range
is approximately 197 f t (60 m) from the
vehicle.
REMOTE STARTING THE VEHICLE
To use the Remote Engine Start feature
perform the following:
1. Aim the Intelligent Key at the vehicle.
2. Press the
button to lock all doors.
3. Within 5 seconds press and hold the
button until the turn signal lights
flash and the tail lamps turn on. If the
vehicle is not within view press and hold
the
button for at least 2 seconds.
LPD2995
REMOTE ENGINE START
3-18Pre-driving checks and adjustments
Page 189 of 476

MANUAL OPERATION (if so
equipped)
Tilt and telescopic operation
Push the lock leverO1down:
• Adjust the steering wheel up or down in direction
O2to the desired position.
• Adjust the steering wheel forward or backward in direction
O3to the desired
position.
Pull the lock lever
O1up firmly to lock the
steering wheel in place.
AUTOMATIC OPERATION (if so
equipped)
Tilt and telescopic operation
To adjust the steering wheel move the
switch
O1in the following directions:
• Adjust the steering wheel up or down in direction
O2to the desired tilt position.
• Adjust the steering wheel forward or backward in direction
O3to the desired
telescopic position.
CAUTION
For vehicles with memory seat: Failure
to reset the tilt and telescoping func-
tions of the steering wheel, af ter the
vehicle’s battery has been discharged,
may prevent the steering wheel posi-
tion from being adjusted.
Both the tilt and telescopic steering opera-
tion must be reset af ter the vehicle’s bat-
tery has been discharged in order to pre-
vent the tilt and telescopic operation from
locking in one position. When the battery
has been recharged or replaced, perform
the following:
• For tilt operation: Adjust the switch
O1so
the steering wheel moves to the highest
position
O2that can be reached.
• For telescopic operation: Adjust the switch
O1so the steering wheel moves to
the most forward and backward position
O3that can be reached.
Performing these operations resets the
range of the steering wheel’s tilt and tele-
scopic function.
LPD2359LPD2439
Pre-driving checks and adjustments3-25
Page 202 of 476
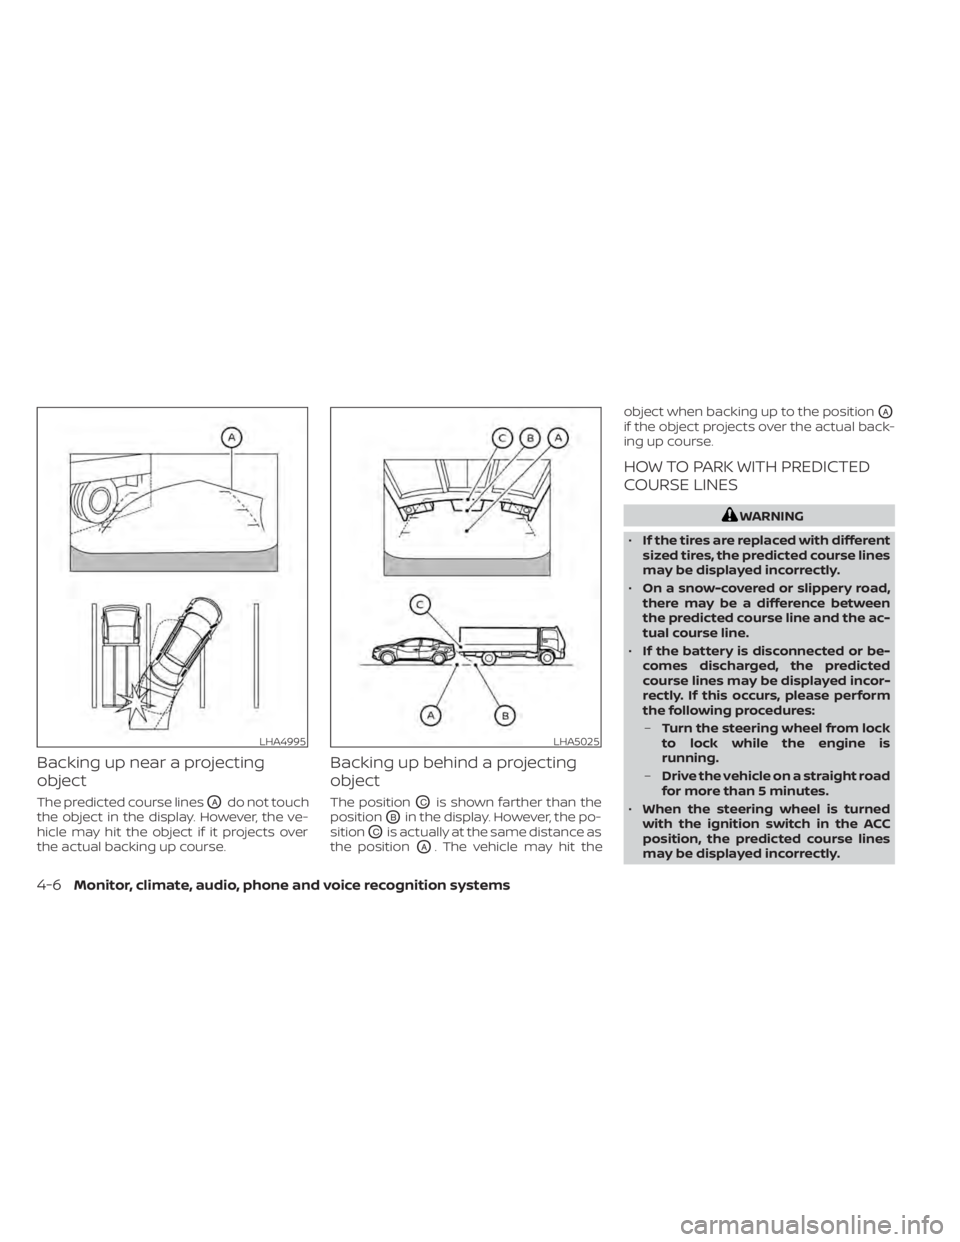
Backing up near a projecting
object
The predicted course linesOAdo not touch
the object in the display. However, the ve-
hicle may hit the object if it projects over
the actual backing up course.
Backing up behind a projecting
object
The positionOCis shown farther than the
position
OBin the display. However, the po-
sition
OCis actually at the same distance as
the position
OA. The vehicle may hit the object when backing up to the position
OA
if the object projects over the actual back-
ing up course.
HOW TO PARK WITH PREDICTED
COURSE LINES
WARNING
• If the tires are replaced with different
sized tires, the predicted course lines
may be displayed incorrectly.
• On a snow-covered or slippery road,
there may be a difference between
the predicted course line and the ac-
tual course line.
• If the battery is disconnected or be-
comes discharged, the predicted
course lines may be displayed incor-
rectly. If this occurs, please perform
the following procedures:
– Turn the steering wheel from lock
to lock while the engine is
running.
– Drive the vehicle on a straight road
for more than 5 minutes.
• When the steering wheel is turned
with the ignition switch in the ACC
position, the predicted course lines
may be displayed incorrectly.
LHA4995LHA5025
4-6Monitor, climate, audio, phone and voice recognition systems
Page 213 of 476
object when backing up to the positionOA
if the object projects over the actual back-
ing up course.
HOW TO PARK WITH PREDICTED
COURSE LINES
WARNING
• If the tires are replaced with different
sized tires, the predicted course lines
may be displayed incorrectly.
• On a snow-covered or slippery road,
there may be a difference between
the predicted course line and the ac-
tual course line.
• If the battery is disconnected or be-
comes discharged, the predicted
course lines may be displayed incor-
rectly. If this occurs, please perform
the following procedures:
– Turn the steering wheel from lock
to lock while the engine is
running.
– Drive the vehicle on a straight road
for more than 5 minutes.
• When the steering wheel is turned
with the ignition switch in the ACC
position, the predicted course lines
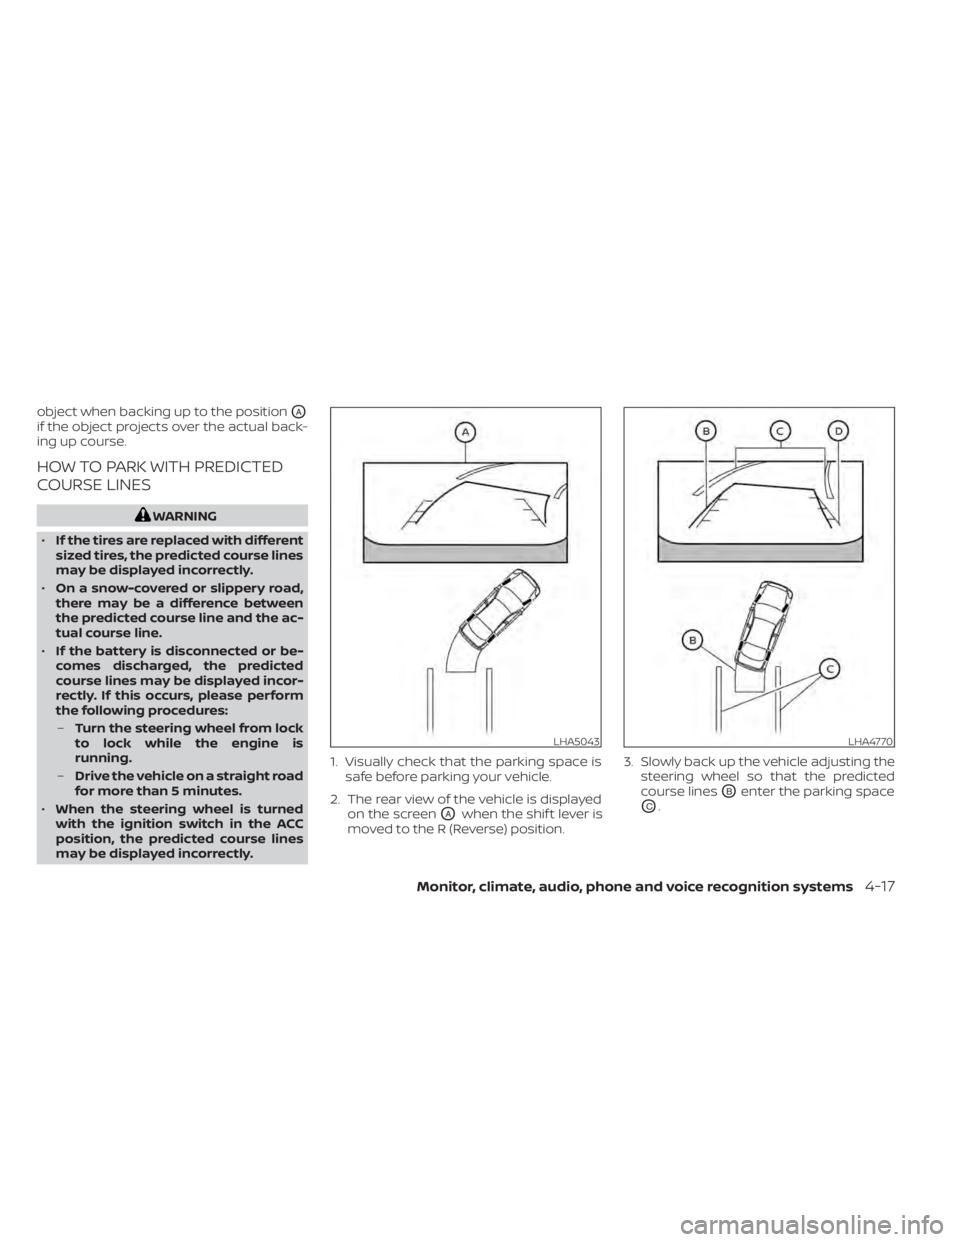
may be displayed incorrectly. 1. Visually check that the parking space is
safe before parking your vehicle.
2. The rear view of the vehicle is displayed on the screen
OAwhen the shif t lever is
moved to the R (Reverse) position. 3. Slowly back up the vehicle adjusting the
steering wheel so that the predicted
course lines
OBenter the parking space
OC.
LHA5043LHA4770
Monitor, climate, audio, phone and voice recognition systems4-17